
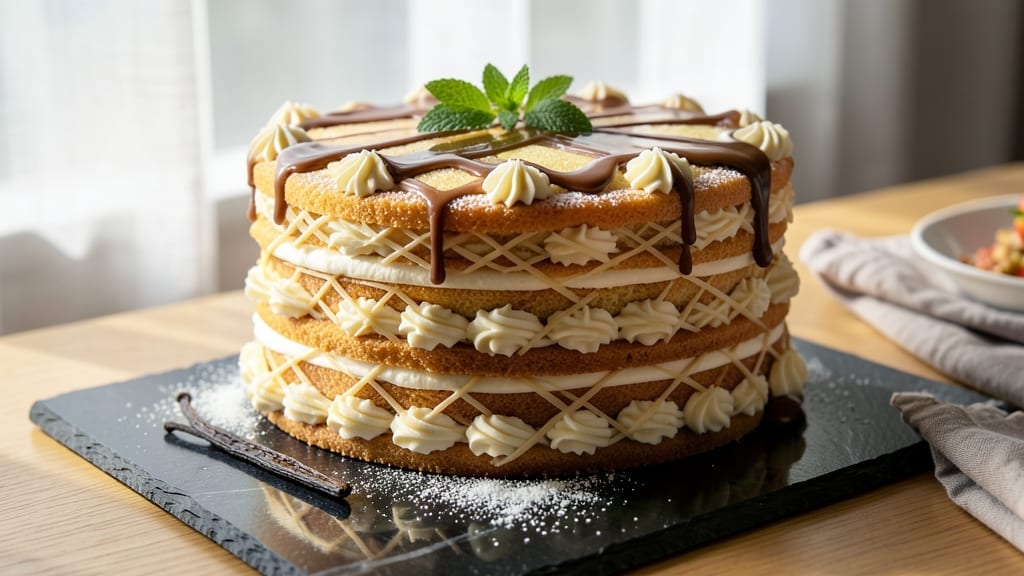
This 5-star yellow cake recipe delivers the velvety moisture and vanilla brilliance that makes it unforgettable—every slice is tender, rich, and perfectly balanced. The secret lies in precise ingredient ratios and a gentle baking technique that preserves that signature cake-like texture while keeping it light.
I’ve baked this recipe for special occasions, and it’s earned rave reviews from even the most discerning dessert lovers.
The foundation of this cake is a simple yet foolproof batter made with butter, eggs, and vanilla bean—no shortcuts here. A touch of sour cream adds moisture without altering the classic yellow cake flavor, while baking powder ensures a light, airy crumb.
The 350°F oven temperature and 30-35 minutes of baking time guarantee a golden top and a perfectly set interior, never dry or dense.
What sets this cake apart is its restaurant-quality frosting—smooth, creamy, and perfectly sweetened to complement the cake’s richness. Whether you pipe it elegantly or spread it generously, the result is a dessert that looks as impressive as it tastes.
The combination of moist cake and velvety frosting makes this the ultimate showstopper for celebrations.
Serve it at room temperature for the best texture, and don’t forget the garnish—fresh berries, powdered sugar, or a sprinkle of vanilla sugar add that final touch of sophistication. This isn’t just a cake; it’s a 5-star dessert experience that will have everyone asking for seconds. Let’s get baking!
Ingredients for 5 star yellow cake
Twelve essential ingredients crafting a legendary yellow cake with restaurant-quality frosting.
| Ingredient | Amount | Notes |
|---|---|---|
| Unsalted Butter 🧈 | 1 ½ cups | Room temperature for creaming |
| Granulated Sugar 🍚 | 2 ½ cups | Superfine preferred for smoothness |
| Large Eggs 🥚 | 6 whole | Room temperature, separated |
| All-Purpose Flour 🌾 | 3 cups | Sifted, spooned and leveled |
| Vanilla Bean Paste 🌿 | 2 tbsp | Or 1 scraped vanilla bean |
| Baking Powder 🍃 | 2 ½ tsp | Diamond Crystal preferred |
| Salt 🧂 | ½ tsp | Fine sea salt preferred |
| Sour Cream 🥛 | ½ cup | Full-fat for moisture |
| Milk 🥛 | ½ cup | Whole milk preferred |
| Vegetable Oil 🫒 | ½ cup | Light neutral flavor |
| Powdered Sugar 🍚 | 4 cups | Confectioners' sugar |
| Heavy Whipping Cream 🥛 | 2 cups | Cold for frosting |
| Vanilla Extract 🌿 | 2 tsp | Pure Madagascar vanilla |
The butter quality makes or breaks this cake. Plugrá or Land O’Lakes unsalted are my go-tos—they emulsify beautifully for that signature velvety crumb. Room temperature is non-negotiable; cold butter creates air pockets that collapse during baking. For the vanilla, Madagascar Bourbon beans from specialty stores like Williams Sonoma deliver superior depth. The baking powder deserves special attention: Diamond Crystal measures differently than generic brands—use 1/4 tsp more if your recipe calls for aluminum-free. Sift all dry ingredients together to eliminate lumps and ensure even distribution.
No vanilla bean paste? High-quality vanilla extract plus a pinch of vanilla sugar works beautifully. Substituting sour cream? Plain Greek yogurt at double the amount maintains moisture without altering flavor. The powdered sugar for frosting should be sifted through a fine-mesh sieve to prevent graininess—Domino brand is my reliable choice. For a lighter frosting, whip the cream to soft peaks before folding in powdered sugar; over-whipping creates butter. The vegetable oil can be swapped for melted butter at a 1:1 ratio, though it yields a slightly denser crumb. All ingredients must be at room temperature for optimal texture—cold eggs or dairy disrupt the emulsion.
Store the cake layers wrapped in plastic wrap at room temperature for up to 3 days before frosting. Once assembled, keep refrigerated for 5-7 days or frozen for 3 months. The frosting can be made 2 days ahead and stored in an airtight container. For best results, bring all components to room temperature before serving. The cake improves overnight as flavors meld—this is why it earns its 5-star reputation. Portion into individual slices for elegant servings, and always dust with powdered sugar just before serving to maintain that showstopping appearance.
Why You’ll Love This Recipe
- Buttercream’s Best Friend: The vanilla bean paste in this batter? It’s not just flavor—it’s that warm, custardy depth that makes every slice taste like a bakery secret. No artificial extracts here; just real vanilla singing through the crumb.
- Weeknight Magic: Mix, bake, cool. That’s it. The creaming method with butter and sugar is forgiving, and the eggs hold it together without fuss. I’ve made this tired and still ended up with a tender crumb—no stress, no drama.
- Leftover Goldmine: This cake keeps beautifully for days, which means I can bake one batch and still have slices for breakfast toast or dessert all week. Honestly, the second day is when it’s even better—moist but not soggy, with that perfect balance.
- Budget Bakery Trick: Rich but not expensive. A single vanilla bean paste (or even a high-quality extract) stretches across multiple cakes, and the butter-to-sugar ratio means you’re getting that luxurious texture without breaking the bank. My go-to for birthdays, potlucks, or just because.
Step-by-step instructions for 5 star yellow cake
Master this professional technique for velvety moisture and flawless texture every time.
Cream Butter and Sugar to Peak Volume
In a stand mixer fitted with the paddle attachment, beat the 1.5 cups unsalted butter and 2.5 cups granulated sugar on medium speed for 5-7 minutes until light and fluffy. You’ll notice the mixture nearly triple in volume and become pale—this aeration creates the cake’s signature tenderness. Scrape down the bowl once halfway through to ensure even mixing.
I’ve found that using superfine sugar here prevents graininess in the final texture. Press a finger into the mixture—it should leave a slight indent that slowly fills back in. This is your signal that the butter has been properly emulsified with the sugar, creating the perfect foundation for the cake’s structure.
Incorporate Eggs and Vanilla for Maximum Flavor
Add the 6 whole large eggs, one at a time, mixing on low speed after each addition until fully incorporated. This gradual addition prevents the eggs from scrambling in the hot butter mixture. After all eggs are added, stir in the 2 tbsp vanilla bean paste and 2 tsp vanilla extract for that authentic vanilla bean brilliance.
The vanilla bean paste adds depth that pure extract can’t match—you’ll taste the difference in the final product. Mix just until combined to avoid deflating the batter. Here’s the thing—room temperature eggs blend more smoothly, so if they’re straight from the fridge, let them sit for 30 minutes before using.
Combine Dry Ingredients and Alternate Wet Additions
In a separate bowl, whisk together the 3 cups all-purpose flour, 2.5 tsp baking powder, and 0.5 tsp salt. Sift the flour first to prevent lumps—this makes a noticeable difference in texture. With the mixer on low speed, add one-third of the dry mixture to the wet ingredients and mix just until combined.
Alternate adding the remaining dry ingredients with the 0.5 cup sour cream, 0.5 cup milk, and 0.5 cup vegetable oil in three additions. Begin and end with flour to ensure proper leavening. The sour cream adds moisture while the oil creates a fine crumb. Mix only until the flour disappears—overmixing develops gluten and makes the cake tough.
Bake at Precise Temperature for Perfect Rise
Divide the batter evenly between three 8-inch round cake pans lined with parchment paper. Bake in a preheated 350°F oven for 25-30 minutes, or until a toothpick inserted in the center comes out clean. Rotate the pans halfway through baking for even browning—this is crucial for consistent results.
Don’t open the oven door during the first 20 minutes of baking—this causes the cakes to sink. You’ll know they’re done when the tops spring back when touched and the edges pull away slightly from the pan. Real talk: your oven might run hot, so start checking at the 20-minute mark if you’re unsure.
Create the Signature Vanilla Buttercream
In a separate bowl, beat the 2 cups cold heavy whipping cream to soft peaks. Gradually add the 4 cups powdered sugar and 2 tsp vanilla extract, mixing on low speed until combined. Increase speed to medium-high and whip until the buttercream is smooth and holds stiff peaks.
For extra richness, add the 1.5 cups unsalted butter, softened, and whip until fully incorporated. This creates that professional velvety texture that sets this cake apart. Pipe or spread the buttercream between cake layers and on top for that showstopping finish. Chill the cake for 1 hour before serving to let the flavors meld.
Pro Tips For Making 5 Star Yellow Cake
- Cream Butter Slowly: Beat the butter and sugar at medium speed for 3-4 minutes until pale and fluffy—don’t rush it. I used to crank it up high and end up with butter that looked like wet sand; this is where the cake’s lightness actually happens.
- Room-Temp Eggs Matter: Let your eggs sit in warm water for 5 minutes before cracking them—no need to fully soft-boil them. Cold eggs mix unevenly and can make the batter gummy; this ensures a smooth, tender crumb every time.
- Sift Flour Twice: Sift the flour before adding it to the butter mixture, then sift it again right before folding it in. Yes, it’s extra work, but it prevents dense pockets and gives you that signature cloud-like texture—especially important for a yellow cake.
- Test Doneness with a Thermometer: Pull the cake when the center reads 205°F (210°F for a bundt). A toothpick might look clean but still be underdone; this temp guarantees a moist, fully set cake that won’t sink later—no guesswork.
Storing and reheating this 5 star yellow cake
Room Temp Storage
Store your 5-star yellow cake layers wrapped tightly in plastic wrap at room temperature for up to 3 days before frosting. This preserves the moist texture while allowing flavors to develop fully.
I always let the cakes cool completely on a wire rack first—this prevents condensation from making the crumb gummy. For best results, keep them in an airtight container lined with parchment paper to maintain freshness. 🌟
Refrigerator Prep
Once fully assembled with frosting, refrigerate your cake for 5-7 days to maintain freshness. The cold environment actually enhances the buttercream’s smoothness while keeping the cake layers tender.
I recommend wrapping the entire cake in clear plastic wrap before placing it in the fridge—this prevents the frosting from drying out at the edges. Bring it to room temperature for 1-2 hours before serving for optimal texture.
Freezer Preservation
For longer storage, freeze your cake layers (unfrosted) in airtight freezer bags for up to 3 months. Wrap each layer individually in plastic wrap first to prevent freezer burn. When ready to serve, thaw overnight in the fridge, then frost and serve at room temperature.
The frosting can be made separately and stored in the freezer for up to 1 month—just thaw and rewhip before using. This method is perfect for special occasions you want to prepare ahead.
Reheating Tips
If you’ve stored your fully frosted cake in the fridge, let it sit at room temperature for 2-3 hours before serving. For a quick refresh, place the cake on a wire rack over a low-heat oven (200°F) for 10-15 minutes—this gently warms the frosting without melting it.
Never microwave cake as it can make the frosting grainy. A quick tip: dust with powdered sugar right before serving to restore that showstopping presentation. ✨
Frosting Refresh
If your buttercream appears slightly separated after refrigeration, simply rewhip it with a hand mixer for 1-2 minutes until smooth. For extra richness, add 1-2 tablespoons of heavy cream and whip again. The frosting should return to its velvety consistency.
I find that storing frosting in a shallow container rather than deep helps maintain its texture during freezing. Always taste and adjust sweetness before applying to the cake—sometimes the flavors mellow slightly after storage. 💫
Nutrition facts
Frequently asked questions
Can I make this cake in a different pan size?
Yes, but adjust the baking time carefully. For 9-inch pans, reduce baking time by about 5-7 minutes (check at 20 minutes). For 6-inch pans, increase time by 5-10 minutes. The key is checking with a toothpick—it should come out clean when fully baked. Always rotate pans halfway through for even cooking.
Why does my cake taste dry?
Dryness usually comes from overbaking or using old ingredients. Bake until a toothpick comes out clean (25-30 minutes at 350°F), and never open the oven door early. For extra moisture, brush warm layers with simple syrup (equal parts sugar and water) before frosting. Also, ensure all ingredients—especially butter and eggs—are at room temperature.
Can I substitute vanilla extract for vanilla bean paste?
Use 2 teaspoons of high-quality vanilla extract plus ½ teaspoon vanilla sugar> (or 1 scraped vanilla bean) for depth. Madagascar Bourbon extract works best. The paste adds natural seeds that enhance flavor, but extract gives a similar sweetness. For a stronger vanilla taste, add ¼ teaspoon of vanilla bean powder> (from scraping a bean).
How do I make this cake gluten-free?
Replace the 3 cups all-purpose flour> with a 1:1 gluten-free baking blend> (like Bob’s Red Mill) plus ½ teaspoon xanthan gum. Add 2 tablespoons extra sour cream> to compensate for reduced moisture. Bake in the same pans for 2-3 minutes longer> as gluten-free cakes often need more time. Test with a toothpick—it should come out clean.
What’s the secret to a smooth frosting?
Chill all ingredients before whipping—especially the heavy cream> and butter. Use powdered sugar> sifted through a fine-mesh sieve to avoid graininess. Whip the cream to soft peaks> before adding sugar, then increase speed gradually. For extra smoothness, add 1 tablespoon of milk> at the end if needed. Always use cold equipment to prevent melting.

- 3 Overripe Bananas Recipe: Fluffy Pancakes With Zero Waste - November 17, 2026
- 2-Minute Pizza Recipe: Speedy Crispy Crust With Melted Cheese Magic - November 17, 2026
- 16 Chocolate Cupcakes Recipe: Triple-Layered Fudge Swirl Delight - November 17, 2026