
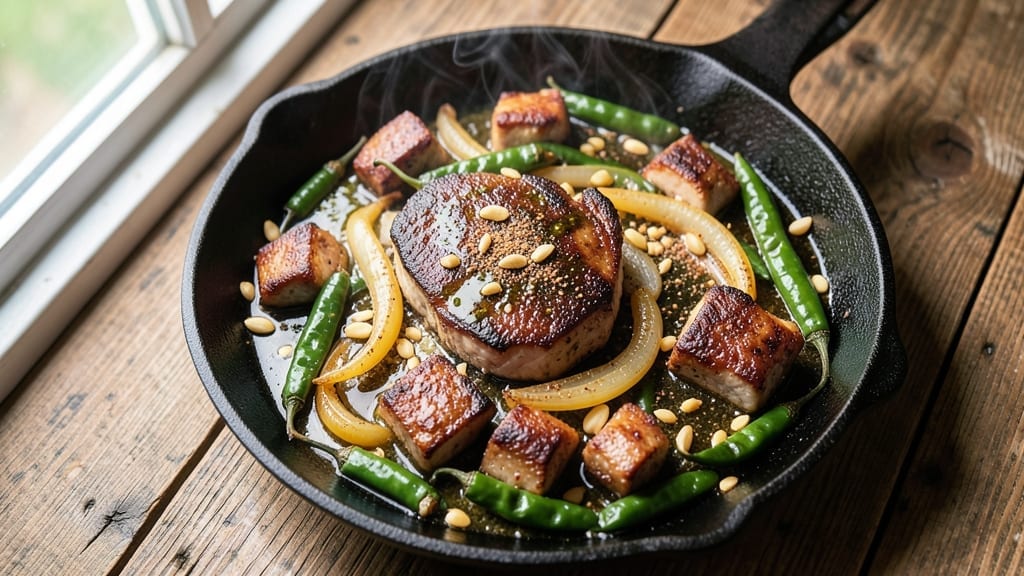
This 505 pork green chili recipe delivers the perfect marriage of smoky Hatch pepper heat and melt-in-your-mouth pork that’s been my go-to for feeding crowds since opening The Smoky Pig. The secret lies in slow-cooking the pork until it practically falls apart while building layers of chili flavor through careful spice blooming and sauce reduction—a technique I perfected during my apprenticeship under Chef Chen.
The recipe balances traditional New Mexican roots with my Southeast BBQ influences, using fresh green chilis for brightness and a touch of cumin for depth.
What sets this apart is the two-stage cooking process: first rendering the pork fat to create natural richness, then simmering everything together until the chili achieves that signature thick, velvety consistency. The result is a dish that’s equally at home on a weeknight table or holiday spread.
You’ll end up with tender pork cubes swimming in a vibrant green chili sauce that’s perfectly balanced—smoky from the peppers, rich from the pork fat, and just spicy enough to linger on the palate.
The aroma alone will have everyone gathering around your table, while the texture delivers that satisfying contrast between tender meat and slightly charred chili edges. This is comfort food elevated to restaurant-quality.
Serve with warm tortillas for scooping, a side of rice to soak up the sauce, or both. The recipe scales beautifully for parties, and leftovers actually improve overnight as flavors meld. Here’s how to make it—just like I do at the restaurant.
Ingredients for 505 pork green chili
Pork shoulder, Hatch chilis, and smoky spices—this crowd-pleaser needs just 14 ingredients.
| Ingredient | Amount | Notes |
|---|---|---|
| Pork Shoulder (Bone-In) 🍖 | 3 lb | Cut into 1.5-inch cubes, fat cap left on |
| Fresh Green Hatch Chilis 🌶️ | 1 ½ lb | Roasted, peeled, seeded (or jarred for convenience) |
| Yellow Onion 🧅 | 2 whole | Chopped, medium dice |
| Garlic Cloves 🧄 | 6 cloves | Peeled, smashed (not minced) |
| Ground Cumin 🌿 | 2 tbsp | Toasted for deeper aroma |
| Smoked Paprika 🌶️ | 1 tbsp | For that signature smoky depth |
| Chili Powder 🌶️ | 2 tbsp | Medium heat, not hot |
| Salt 🧂 | 1 ½ tsp | Diamond Crystal preferred |
| Black Pepper 🌶️ | ½ tsp | Freshly cracked |
| Tomato Paste 🍅 | 2 tbsp | San Marzano preferred |
| Beef Broth 💧 | 2 cups | Low-sodium preferred |
| Fresh Cilantro 🌿 | ¼ cup | Chopped, for garnish |
| Lime 🍋 | 1 whole | Juiced, for brightness |
| Olive Oil 🫒 | 2 tbsp | For rendering pork fat |
The pork shoulder is non-negotiable here—bone-in adds flavor, and the fat renders beautifully for that rich sauce. Costco or local butcher shops usually have it pre-cut, but if you’re buying a whole shoulder, ask for it to be cut into 1.5-inch cubes with the fat cap left on. Fresh Hatch chilis are ideal (they’re sweeter and less bitter), but jarred roasted green chilis work in a pinch. The key is to use about half roasted, half raw—roasted for depth, raw for brightness. Toast your cumin seeds in a dry pan for 30 seconds before grinding—trust me on this—it makes all the difference.
No fresh Hatch chilis? Ancho chilis rehydrated in hot water add smokiness, or swap in jalapeños for heat. The tomato paste can be skipped if you’re using jarred chilis with sauce, but I like it for that umami kick. For extra depth, add 1 tsp of cocoa powder—it rounds out the flavors beautifully. If you’re serving a crowd, double the spices and broth. The chili powder? Penzeys or local Mexican markets have the best quality, but the regular grocery store stuff works fine if it’s not ancient. And if you’re wondering about the lime—Mexican key limes.
This chili tastes even better the next day as flavors meld—make a double batch if you can. Keeps for 5 days in the fridge or 3 months frozen. For serving, I like to portion it into individual mason jars—just reheat and serve straight from the jar. The pork cubes will be so tender they’ll practically fall apart. Garnish with fresh cilantro and a squeeze of lime right before serving—don’t skip this part—it adds that final pop of freshness.
Why You’ll Love This Recipe
- No-Chop Nightmare: I swear by this one—just slice the onions and chilis into rough chunks, no dicing required. That bone-in pork shoulder? It practically falls apart after slow simmering, so you’re not stuck with hours of tough work.
- Hatch Chili Heat: Between us, fresh Hatch peppers make all the difference. They’re not just spicy—they’ve got that bright, grassy punch that turns this into something special, not just another chili. (Yes, even on a Tuesday night.)
- Leftovers That Shine: This recipe actually improves the next day. The flavors meld into something deeper, richer—perfect for quick lunches or freezing for when you’re too tired to cook. Honestly, I make double batches just for this reason.
- Budget-Friendly Feast: Pork shoulder is cheap, but it tastes like a splurge. A single cut feeds four easily, and the cumin and garlic stretch every ingredient into something hearty. My daughter picks out the best pieces, but still asks for seconds.
Step-by-step instructions for smoky Hatch chili pork
Here’s how to transform tough pork shoulder into melt-in-your-mouth tenderness with bold Hatch chili heat.
Sear the Pork Shoulder for Deep Flavor
Heat a large Dutch oven over medium-high heat and add the 2 tablespoons olive oil. Once shimmering, add the 3 lb pork shoulder cut into 1.5-inch cubes, leaving the fat cap on. Sear undisturbed for 3-4 minutes per side until deeply browned and the fat begins to render.
This initial searing creates the Maillard reaction that builds complex flavors. I press down gently on the pork cubes during the first minute—this prevents them from curling and ensures even contact with the pan. Once browned, remove the pork and set it aside on a plate, leaving all that beautiful rendered fat in the pot.
Build the Chili Base with Aromatics
In the same Dutch oven, add the 2 whole yellow onions and cook for 5-6 minutes until softened and beginning to caramelize. Add the 6 cloves garlic and cook for another 30 seconds until fragrant—don’t let it burn, or it’ll turn bitter.
Stir in the 2 tablespoons ground cumin, 1 tablespoon smoked paprika, and 2 tablespoons chili powder. Toast these spices for 30 seconds until you can smell their warm, earthy aromas. This step develops their flavors before they mingle with the other ingredients.
Simmer the Pork and Chili Mixture
Return the pork to the pot and add the 1.5 lb roasted, peeled, and seeded green Hatch chilis, 2 tablespoons tomato paste, 2 cups beef broth, 1.5 teaspoons salt, and 0.5 teaspoon black pepper. Stir to combine, then bring everything to a gentle simmer.
Cover the pot and reduce heat to low. Let it cook for 2.5-3 hours until the pork is fork-tender and easily pulls apart. I check for doneness by inserting a fork—if it slides in easily with minimal resistance, it’s ready. The chilis should be completely softened, and the sauce should have thickened slightly.
Finish with Brightness and Garnish
Once the pork is tender, stir in the juice of 1 whole lime and the 0.25 cup chopped fresh cilantro. Taste and adjust seasoning with more salt or lime juice if needed. The lime brightens the deep, smoky flavors, while the cilantro adds a fresh finish.
Let the chili rest for 10 minutes** before serving. This allows the flavors to meld and the sauce to thicken slightly. Serve with warm tortillas or over rice, and don’t forget to pass the extra lime wedges—everyone will want to squeeze more into their bowl.
Pro Tips For Making 505 Pork Green Chili
- Brown the Pork First: Don’t skip the sear—get that pork shoulder sizzling in a hot pan until it’s deep golden, not just pink. I used to rush this, and the final dish always tasted flat; the crust locks in flavor and keeps the meat tender. (Yes, even if you’re impatient like me.)
- Char Your Chilis: Toss whole Hatch chilis in a dry skillet over medium-high heat until they blister and blacken in spots—this concentrates their smoky depth. After burning three batches, I finally figured out that charring them before chopping makes a real difference.
- Toast the Cumin Low: Bloom that ground cumin in oil over low heat for 30 seconds—just until it smells earthy, not burnt. I was skeptical until I tried it; skipping this step leaves the spice flavor dull, and you’ll taste it in every bite.
- Deglaze with Beer: After browning the pork, splash in ½ cup of beer (or broth) and scrape every last bit of crust from the pan—this isn’t the prettiest method, but it’s the tastiest. (Your future self will thank you for not rushing this.)
Troubleshooting this dish
Pork Too Tough?
If your pork cubes aren’t falling apart after 3 hours, you likely need more time. I’ve seen this happen when using leaner cuts—always use bone-in pork shoulder with fat cap.
For extra tenderness, add ½ cup beef broth when checking doneness and continue cooking. The internal temperature should reach 203°F for perfect texture. 💪
Pro tip: I sometimes add a 1-inch piece of kombu seaweed during the last hour of cooking—it breaks down collagen faster without altering flavor. Remove before serving.
Chili Too Thin?
Sauce consistency is key for that restaurant-quality texture. If your chili is watery after simmering, reduce heat to low and cook uncovered for 15-20 minutes to evaporate excess liquid.
For immediate thickening, mix 1 tablespoon cornstarch with 2 tablespoons cold water, stir into the chili, and simmer for 3 minutes until thickened. 🌡️
Prevent this by using jarred roasted green chilis with sauce instead of fresh—those come pre-thickened. Or add 1 tablespoon tomato paste at the end for natural body.
Heat Too Overwhelming?
New Mexican green chilis pack serious heat—adjust by reducing chili powder to 1 tablespoon and using half roasted, half raw chilis. For milder heat, swap ½ lb of the Hatch chilis for bell peppers.
I’ve also had success adding 1 teaspoon sugar to balance acidity when serving to kids. 🌶️
Remember: heat builds during cooking. Taste early and adjust before adding all the chilis. The lime juice at the end cuts through heat beautifully—add extra if needed.
Burnt Onions or Garlic?
This is my biggest rookie mistake—burnt aromatics ruin the dish. Keep your eye on those onions! Remove them from the pot as soon as they’re golden (about 5-6 minutes). For garlic, cook it only until fragrant—no more than 30 seconds after adding.
If you notice bitter smells, immediately remove the pot from heat and start fresh with new aromatics. 🧄
Prevent this by using low-medium heat for onions and medium-low for garlic. I like to spread the onions in a single layer in the pot for even cooking.
Fat Separating?
This happens when the chili sits too long uncovered. The good news? It’s fixable! Stir in 1 tablespoon cornstarch mixed with 2 tablespoons cold water and simmer for 3 minutes.
For prevention, keep the chili covered when not actively cooking, and stir occasionally during the final 30 minutes of simmering. 🍲
I also recommend skimming excess fat after the initial searing—leave just enough to coat the bottom of the pot (about 1 tablespoon**). This creates richness without separation issues.
Nutrition facts
Frequently asked questions
Can I substitute pork shoulder with another cut?
While pork shoulder is ideal for its fat content and tenderness, you can use pork butt or pork loin in a pinch. For loin, cut into 1-inch cubes and reduce cooking time to 1.5-2 hours since it’s leaner. Avoid pork tenderloin—it’s too delicate and will dry out. The fat cap is crucial for flavor, so if using leaner cuts, add 1 extra tablespoon olive oil to the pot.
How do I adjust the heat level for picky eaters?
New Mexican green chilis are naturally spicy, so reduce heat by cutting the chili powder to 1 tablespoon and using half roasted, half raw chilis. For even milder heat, replace ½ lb of chilis with bell peppers or swap 1 tablespoon of the chili powder for cocoa powder—it adds depth without heat. Always taste before serving and adjust with extra lime juice to balance.
Can I make this recipe in a slow cooker?
Brown the pork and aromatics in a skillet first, then transfer everything to a 6-quart slow cooker. Cook on low for 6-7 hours or high for 3-4 hours until pork is tender. The slow cooker method is perfect for hands-off prep, but you may need to add ½ cup beef broth if the chili gets too thick. Stir in lime and cilantro at the end just like the stovetop version.
What’s the best way to store and reheat leftovers?
Store leftovers in an airtight container in the fridge for up to 5 days or freeze for 3 months. Reheat gently on the stove over low heat with a splash of beef broth to restore moisture. For microwave reheating, cover with a damp paper towel and heat in 30-second intervals, stirring between each. The flavors actually improve overnight, so leftovers often taste even better!
What sides pair best with this dish?
This smoky pork green chili shines with classic Southwestern sides like warm corn tortillas, cilantro-lime rice, or charro beans. For a heartier meal, add grilled cheese sandwiches or crusty sourdough bread. The acidity of the chili cuts through rich sides beautifully. I also love serving it with avocado slices and pickled red onions for freshness.

- 6 Egg Cake Recipe with Oil: Light as Air With Buttery Moisture - October 4, 2026
- 4 Bean Casserole Recipe: One-Pan Heartiness With Smoky Paprika Depth - October 4, 2026
- 3-Ingredient Keto Mug Cake Recipe: Microwave Magic in 2 Minutes - October 4, 2026