
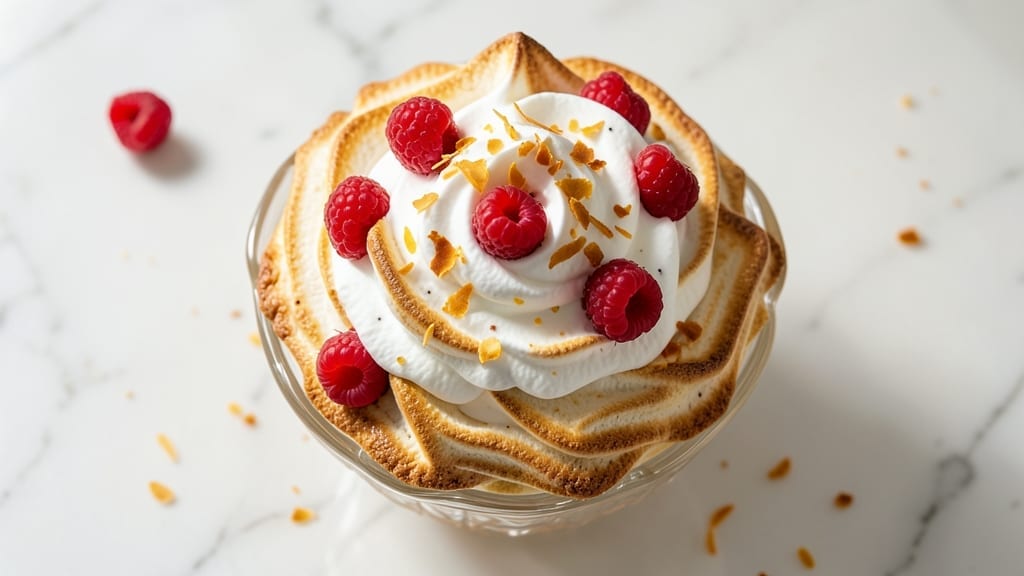
This 6 egg white pavlova recipe delivers the perfect balance of a crispy shell and a light, marshmallow-like center—an Australian classic that’s surprisingly simple to master.
The secret lies in carefully whipping the egg whites to stiff peaks while gradually incorporating sugar, then baking at a low temperature to prevent cracking. I’ve perfected this technique over years of trial and error, ensuring your pavlova stays airy and elegant.
What sets this recipe apart is its foolproof method for achieving that signature crispy exterior without compromising the delicate interior. Using 6 egg whites (not whole eggs) creates a lighter, more stable meringue that holds its shape beautifully.
The key is patience—letting the pavlova cool completely before adding toppings prevents the shell from softening.
Once cooled, your pavlova will be a stunning centerpiece with a crispy, crackly top and a soft, cloud-like core. Top it with whipped cream, fresh berries, and a sprinkle of toasted coconut for a dessert that looks as impressive as it tastes.
The contrast of textures and flavors makes every bite unforgettable.
Perfect for special occasions or a weekend treat, this pavlova is easier than it looks. Let’s get started—your guests won’t believe it’s homemade!
Ingredients for 6 egg white pavlova
Six egg whites and a few key ingredients transform into a stunning dessert with perfect texture contrast.
| Ingredient | Amount | Notes |
|---|---|---|
| Large Egg Whites 🥚 | 6 whole | Room temperature, pasteurized preferred |
| Granulated White Sugar 🍚 | 1 ½ cups | Superfine for smoother texture |
| Cornstarch 🌾 | ½ tsp | Lightly dusted on meringue |
| White Vinegar 🍶 | ½ tsp | Stabilizes egg whites |
| Vanilla Extract 🌸 | 1 tsp | Pure vanilla preferred |
| Unsalted Butter 🧈 | ¼ cup | Softened, for topping |
| Heavy Whipping Cream 🥛 | 2 cups | Chilled, for whipped topping |
| Powdered Sugar 🍚 | 1 cup | For whipped cream |
| Fresh Berries 🍓 | 2 cups | Mixed assortment |
| Toasted Coconut Flakes 🥥 | ¼ cup | Lightly toasted |
| Lemon Juice 🍋 | 1 tbsp | Freshly squeezed |
The egg whites are the foundation—room temperature ensures they whip to stiff, glossy peaks without weeping. Pasteurized egg whites from brands like Organic Valley or Eggland’s Best reduce risk while maintaining stability. For sugar, superfine (like Domino) dissolves faster, creating a smoother meringue. If you only have regular granulated, pulse it in a food processor for 30 seconds first. The cornstarch and vinegar work together to stabilize the structure—don’t skip either. For vanilla, pure Madagascar bourbon adds depth, though imitation works in a pinch.
No superfine sugar? Pulse regular granulated sugar in a food processor for 30 seconds to break it down. Short on egg whites? Aquafaba (chickpea brine) works at 1:1 ratio but may require extra stabilizers. The whipped cream can be made with coconut cream for a dairy-free option, though texture will differ slightly. For berries, frozen works perfectly—just thaw and drain excess liquid. The toasted coconut should be lightly browned (3-4 minutes in a dry pan) to enhance flavor without burning. Lemon juice adds brightness—freshly squeezed** is ideal, but bottled works if you’re in a hurry.
Prevent cracking by baking at low heat (250°F) and avoiding opening the oven door during the first 30 minutes. Once cooled, store the pavlova base airtight at room temperature for up to 2 days, though it’s best served fresh. The whipped cream keeps 1 day refrigerated—whip it fresh before serving. For make-ahead convenience, assemble the pavlova 1 day ahead and refrigerate uncovered to dry the meringue slightly before adding toppings. The coconut and berries can be prepped 2 hours ahead and stored separately.
Why You’ll Love This Recipe
- No Whisk Struggles: I swear by this method—just egg whites, sugar, and a splash of vinegar. No overmixing, no deflating disasters. The cornstarch keeps it stable, so even if I rush, it still holds its shape like magic.
- Vanilla Kiss Magic: That little bottle of extract makes all the difference. The meringue gets this subtle, warm sweetness that’s not overpowering—just enough to make it taste like a bakery treat, not a sad Sunday afternoon dessert.
- Dessert for Any Occasion: Too fancy for a weeknight but too simple for company? This nails it. Serve it with berries for brunch, whipped cream for a party, or just plain for when you’re too tired to care—it works every time.
- Budget-Friendly Luxury: Six egg whites and a cup of sugar? That’s it. No specialty ingredients, no wasted money on store-bought meringues. Honestly, it’s the kind of recipe that makes me feel like I’m cooking gourmet without breaking the bank.
Step-by-step instructions for 6 egg white pavlova recipe
Mastering pavlova’s signature crisp shell and marshmallow core requires precision—here’s how to achieve it every time.
Prepare the Meringue Base
Preheat your oven to 250°F and line a baking sheet with parchment paper. In a spotlessly clean, grease-free bowl, beat the 6 whole large egg whites on high speed until soft peaks form. This ensures no fat residue interferes with proper meringue formation.
Gradually add the 1.5 cups granulated white sugar in a slow, steady stream while continuing to beat. You’ll notice the mixture thicken dramatically—this is when you want to incorporate the 0.5 teaspoon cornstarch and 0.5 teaspoon white vinegar for stability. Beat until the meringue reaches stiff, glossy peaks that hold their shape when the beaters are lifted.
Transfer the meringue to a piping bag fitted with a large round tip. Pipe a 7-inch circle onto the prepared baking sheet, creating a slight well in the center for the marshmallow core. Immediately draw the edges slightly upward to form the signature ruffled crust. The key here is working quickly—egg whites begin to dry as soon as they’re exposed to air.
Bake the Crisp Shell
Place the meringue in the preheated oven and immediately reduce the temperature to 225°F. Bake for 1 hour and 15 minutes, then carefully open the oven door and increase the heat to 300°F. Continue baking for another 10 minutes until the meringue is completely dry and crisp to the touch.
Here’s where the magic happens: immediately after removing the pavlova from the oven, turn it upside down to release the air pocket. Let it cool completely on a wire rack—this prevents condensation from forming inside, which would make the base soggy. The shell should be crisp enough to snap but still light enough to hold its shape when inverted.
Create the Marshmallow Core
While the pavlova cools, whip the 2 cups heavy whipping cream with the 1 cup powdered sugar and 1 teaspoon vanilla extract until soft peaks form. In a separate bowl, combine the 1 tablespoon lemon juice with the 0.25 cup softened unsalted butter and mix until smooth. Gently fold this butter mixture into the whipped cream until fully incorporated.
Once the pavlova has cooled completely, carefully invert it back to its original position. Spoon the marshmallow mixture into the center well, creating a dome shape. The mixture should be thick enough to hold its form but still spread slightly when pressed. Use a small offset spatula to smooth the edges for a professional finish.
Assemble and Garnish
Arrange the 2 cups fresh berries around the base of the pavlova, creating a colorful border. Sprinkle the 0.25 cup toasted coconut flakes evenly over the marshmallow center, pressing them gently into the surface so they adhere. The coconut adds both texture contrast and visual appeal to the finished dessert.
Serve immediately while the marshmallow core remains soft and creamy. The contrast between the crisp outer shell and the light, airy interior is what makes pavlova truly special. Each slice should reveal that perfect balance of textures—crunchy exterior giving way to marshmallow softness topped with fresh berries.
Pro Tips For Making 6 Egg White Pavlova
- Chill the Whites First: Pop those egg whites straight from the fridge—room temperature makes them clingy and unpredictable. I learned this the hard way when my meringue collapsed mid-bake because the whites warmed up too fast. Give them 10 minutes in the fridge before whipping, and they’ll hold their shape like a champ.
- Sift That Sugar: Dump granulated sugar straight from the bag? Bad idea. Sift it first to break up clumps and dissolve evenly into the meringue. I used to skip this, and my pavlovas always had gritty pockets—now they’re silky smooth. A fine-mesh sieve takes 30 seconds and makes a real difference.
- Bake Low and Slow: Crank the oven to 250°F (120°C) and bake for 1.5 hours—no peeking! High heat makes the outside crisp too fast while the inside stays wet. After 1 hour, turn off the oven and let it cool inside with the door slightly ajar. This trick guarantees a crisp shell without a gummy center.
- Whip in the Vinegar Last: Add the white vinegar after the meringue peaks but before folding in sugar. It stabilizes the structure without over-acidifying—too early, and you’ll end up with flat, sad peaks. A splash (1/2 tsp) is enough; don’t go overboard unless you’re making a science experiment.
Pro cooking tips for this recipe
Egg White Prep
Start with room temperature egg whites—this prevents weeping and ensures proper volume. I recommend using pasteurized egg whites from brands like Organic Valley for safety without sacrificing stability.
Beat them in a grease-free bowl (even a trace of fat prevents stiff peaks) until they form soft peaks before adding sugar. This gradual process is key to avoiding deflation later.
Sugar Incorporation
Add superfine sugar (like Domino) slowly while beating on high speed—this creates a smoother meringue. If you only have granulated sugar, pulse it in a food processor for 30 seconds to break it down.
Stop beating briefly to scrape down the sides of the bowl, then resume until you achieve stiff, glossy peaks that hold their shape when the beaters are lifted. This step is where most pavlova failures happen!
Baking Technique
Bake at 250°F for 1 hour and 15 minutes to develop the crisp shell, then increase to 300°F for the final 10 minutes to dry it completely. The low initial heat prevents cracking, while the higher finish ensures full crispness.
Immediately after baking, invert the pavlova to release trapped air—this prevents condensation from forming inside and making the base soggy.
Cooling Strategy
Let the pavlova cool completely on a wire rack before adding toppings. This prevents the marshmallow center from melting the crisp shell. I’ve learned the hard way—rushing this step leads to a sad, soggy mess!
The cooling process also allows the meringue to set properly, giving you that perfect crispy snap when you cut into it. 💫
Topping Timing
Assemble the pavlova just before serving—the whipped cream should be added when the meringue is fully cooled but still at room temperature. For extra stability, chill the meringue base for 30 minutes before adding toppings.
This creates a clean break between the crisp shell and creamy center, making each slice look restaurant-worthy. The berries and coconut should go on last to maintain their freshness and texture.
Equipment Essentials
Use a stand mixer with the whisk attachment for best results—it achieves stiff peaks faster than hand beaters. A piping bag with a large round tip helps create the signature shape, and parchment paper prevents sticking during baking.
For serving, a sharp knife ensures clean slices that showcase the texture contrast. Trust me, these small tools make all the difference in your final presentation! ✨
Nutrition facts
Frequently asked questions
Why do you use only egg whites instead of whole eggs for pavlova?
Egg whites create a lighter, more stable meringue that holds its shape beautifully. Whole eggs would add fat, which prevents the meringue from reaching stiff peaks and can cause weeping or collapse during baking. The 6 egg whites in this recipe provide enough structure for a perfect 7-inch pavlova with that signature crispy shell and marshmallow core.
How do I prevent my pavlova from cracking?
Cracking usually happens from sudden temperature changes or humidity. Start by baking at 250°F for 1 hour and 15 minutes to develop the shell slowly, then increase to 300°F for the final 10 minutes. Avoid opening the oven door during the first 30 minutes of baking, and let the pavlova cool completely on a wire rack before adding toppings. Also, make sure your kitchen isn’t too humid on baking day!
Can I make this pavlova ahead of time?
Yes! The meringue base can be baked and cooled 1 day ahead, then stored in an airtight container at room temperature. Just be sure to add the whipped cream and toppings 1-2 hours before serving—this prevents the marshmallow center from melting the crisp shell. The berries and coconut should always go on fresh to maintain their texture and flavor.
What’s the best way to slice pavlova for serving?
Use a sharp knife and dip it in hot water between slices to create clean cuts that showcase the texture contrast. Start from the outside and work your way toward the center to maintain the pavlova’s shape. For a restaurant-style presentation, slice into 6-8 wedges—each should reveal the crispy shell, marshmallow center, and fresh toppings in perfect harmony!
Can I substitute aquafaba for egg whites?
Yes, but with adjustments! Use 6 tablespoons aquafaba (chickpea brine) at a 1:1 ratio, but you’ll need to add 0.25 teaspoon cream of tartar and 0.5 teaspoon xanthan gum for stability. The texture will be slightly different—aquafaba meringues tend to be less crispy but still delicious. For this recipe, I recommend sticking with egg whites for the best traditional texture.

- 3lb Prime Rib Roast Recipe: Juicy Pink Center Guaranteed in 3 Hours - October 31, 2026
- 5 Spice Cake Recipe: Warmly Spiced Layers With Crunchy Top - October 31, 2026
- 1950’s Macaroni and Cheese Recipe: Nostalgic Creamy Cheese Sauce with Buttery Noodles - October 31, 2026