
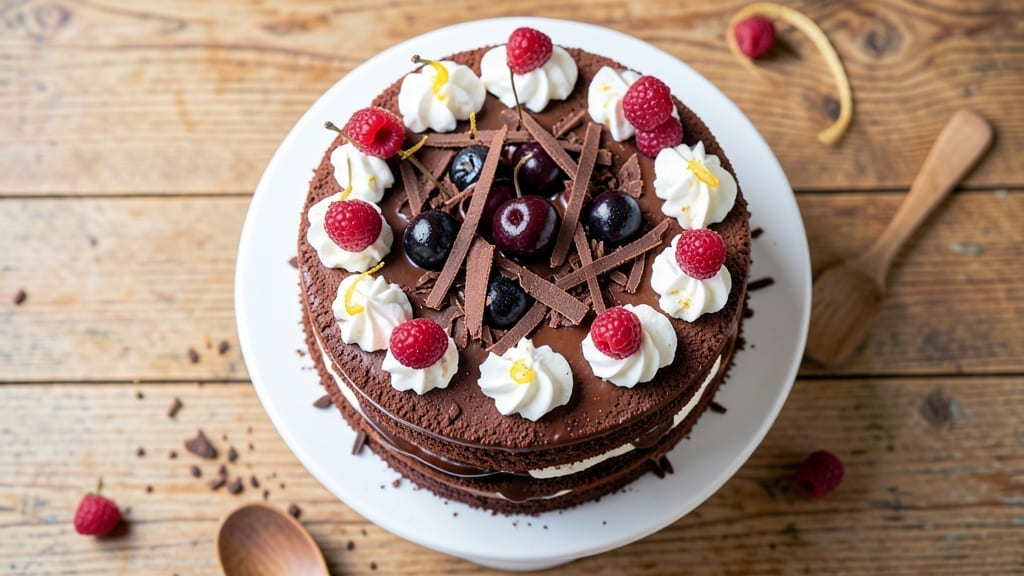
This 6-inch Black Forest cake recipe delivers all the classic flavors—rich chocolate sponge, tart cherries, and velvety whipped cream—without the fuss of traditional layering. The key lies in baking a single, sturdy sponge that holds up to assembly, ensuring every slice reveals perfect balance.
I’ve perfected this approach over years of baking, balancing moisture and structure so the cake stays tender yet sturdy enough to slice cleanly.
The process starts with a simple yet foolproof chocolate cake batter that yields a dense yet tender crumb. After baking and cooling, the cake is sliced horizontally into three layers, creating the iconic Black Forest look.
Between each layer, you’ll add a generous filling of whipped cream and pitted cherries—either fresh or maraschino—for that signature tangy contrast. A final chocolate glaze ties everything together, giving the cake its signature glossy finish.
What makes this recipe special is its adaptability. While traditional Black Forest cakes require multiple sponges, this version uses just one, making it more approachable for home bakers.
The cherries can be adjusted to your preference—sour for brightness or sweet for a milder flavor—while the whipped cream keeps the texture light and airy. The result is a cake that’s as impressive to serve as it is delicious to eat.
Perfect for celebrations or a decadent weekend treat, this cake serves 6-8 with elegant presentation. The secret to success lies in patience—letting the cake cool completely before assembly prevents soggy layers.
Once assembled, it keeps well at room temperature for up to 2 days, making it ideal for special occasions. Let’s get baking!
Ingredients for 6 inch black forest cake
Six ingredients for the cake base, plus five for the cherry-chocolate finale—simple but show-stopping.
| Ingredient | Amount | Notes |
|---|---|---|
| All-Purpose Flour 🌾 | 1 ½ cups | Sifted for even texture |
| Unsweetened Cocoa Powder 🍫 | ½ cup | Natural or Dutch-processed |
| Granulated Sugar 🍚 | 1 ½ cups | White or light brown |
| Light Brown Sugar 🍚 | ½ cup | Packed firmly for accuracy |
| Unsalted Butter 🧈 | 1 cup | Cold, cubed for even melting |
| Large Eggs 🥚 | 2 whole | Room temperature for blending |
| Vanilla Extract 🌿 | 2 tsp | Pure Madagascar preferred |
| Baking Powder 🍞 | 1 tsp | Freshly opened for lift |
| Salt 🧂 | ½ tsp | Diamond Crystal preferred |
| Heavy Whipping Cream 🥛 | 1 ½ cups | Cold for stiff peaks |
| Powdered Sugar 🍚 | 1 cup | Sifted for smooth texture |
| Maraschino Cherries 🍒 | 1 ½ cups | Pitted and halved |
| Dark Chocolate Chips 🍫 | ½ cup | 60% cocoa for glaze |
| Milk 🥛 | ¼ cup | Warm for smooth glaze |
The cocoa powder is non-negotiable—Valrhona or Guittard make all the difference here. Bulk bins at Whole Foods often have great options, but don’t skimp on quality. For the cherries, maraschino gives that classic tang, but fresh pitted cherries work beautifully too if you’re feeling fancy. The butter needs to be cold when you start—take it out of the fridge just before measuring. And that vanilla? Madagascar bourbon adds depth, but pure vanilla extract works perfectly fine if that’s what you’ve got. The powdered sugar should be sifted before measuring—clumps ruin the texture of the whipped cream.
No cocoa powder? Melted dark chocolate at 1:1 ratio works in a pinch, but the texture won’t be identical. Running short on cherries? Raspberry jam thinned with a splash of cherry juice mimics that fruity brightness. The heavy cream can be substituted with coconut cream for a dairy-free version, though the texture will be slightly different. For the glaze, if you can’t find 60% chocolate chips, 70% works too—just reduce the milk slightly. And if you’re making this ahead, the cake layers can be baked and stored separately for up to 3 days before assembly.
Assembled cake keeps beautifully at room temperature for up to 2 days—just store it in an airtight container. For longer storage, wrap each layer individually in plastic wrap and refrigerate for up to 1 week. The whipped cream layer should be added just before serving if possible, but if you’re prepping ahead, pipe it onto parchment paper and refrigerate, then transfer carefully. The chocolate glaze sets quickly, so work fast once you mix it—microwave the milk for 20 seconds to help it melt smoothly. This cake freezes surprisingly well too—assemble it, wrap tightly, and freeze for up to 2 months. Thaw at room temperature before serving.
Why You’ll Love This Recipe
- No Mixer Needed: I swear by this recipe when my mixer’s on the fritz—just creaming butter and sugars by hand gives that perfect, airy texture without the fuss. The cocoa powder blends right in, so you won’t taste a single grain of flour.
- Rich Without Overpowering: That combo of granulated and light brown sugar? It’s the secret to a moist, not-too-sweet cake that still feels indulgent. The butter keeps it tender, and the cocoa gives it depth—like a hug in dessert form.
- Date-Night Ready: Slice it for two, and it’s effortless for a romantic dinner. Too big for just you? The leftovers freeze beautifully, so you’ve got backup for next week’s coffee break or a last-minute guest.
- Budget-Friendly Luxury: Uses pantry staples—no specialty ingredients or pricey shortcuts. A single batch feeds a crowd or stretches into three perfect portions, and the rich flavor makes it feel like you splurged. (Between us, no one will guess.)
Step-by-step instructions for 6-Inch Black Forest cake
Let’s create a rich, moist cake with layers of chocolate and cherries that bake together perfectly.
Prepare the Cake Batter
Preheat your oven to 350°F and grease a 6-inch round cake pan with butter, then dust it with cocoa powder. In a large mixing bowl, combine the 1.5 cups all-purpose flour, 0.5 cup unsweetened cocoa powder, 1.5 cups granulated sugar, 0.5 cup light brown sugar, 1 tsp baking powder, and 0.5 tsp salt. Whisk until evenly distributed—no lumps should remain, as this ensures a smooth texture.
In a separate bowl, beat the 1 cup cold unsalted butter until creamy, then gradually add the 2 whole large eggs, one at a time, mixing well after each addition. Add the 2 tsp vanilla extract and mix until fully incorporated. With the mixer on low speed, gradually pour the dry ingredients into the wet mixture. Mix just until combined—overmixing develops gluten, which can make the cake dense. The batter should be thick but pourable.
Fold in Cherries and Chocolate
Gently fold in the 1.5 cups pitted and halved maraschino cherries and 0.5 cup dark chocolate chips using a rubber spatula. Be careful not to overmix—just distribute them evenly throughout the batter. The cherries should be spread throughout the cake, not clustered in one area. Pour the batter into the prepared cake pan and smooth the top with a spatula.
Place the cake pan in the center of the preheated oven and bake for 35-40 minutes, or until a toothpick inserted into the center comes out clean. The edges should be set, but the center should still have a slight bounce. Avoid opening the oven door during baking—this can cause the cake to sink or develop a dome.
Prepare the Chocolate Glaze
While the cake bakes, prepare the chocolate glaze by melting the 0.5 cup dark chocolate chips in a microwave-safe bowl in 20-second intervals, stirring between each interval until fully melted. Stir in the 0.25 cup warm milk until smooth. The glaze should be thick but pourable—if it’s too thick, add a few drops more milk to reach the right consistency.
Once the cake is done baking, remove it from the oven and let it cool in the pan for 10 minutes. Then, transfer it to a wire rack to cool completely. This step is crucial—if you try to glaze the cake while it’s still warm, the heat will melt the chocolate unevenly, leading to a runny or patchy finish.
Assemble and Glaze the Cake
Once the cake is completely cool, spread the chocolate glaze evenly over the top and sides using an offset spatula. Work quickly but carefully to ensure the glaze covers the entire surface smoothly. Place the cake in the refrigerator for 30 minutes to allow the glaze to set. This step ensures the glaze hardens just enough to hold its shape while still remaining glossy and appetizing.
To finish, whip the 1.5 cups cold heavy whipping cream with 1 cup powdered sugar until stiff peaks form. Pipe or spread the cream evenly over the glaze, then decorate with additional cherries if desired. Serve immediately or refrigerate for up to 4 hours before serving for the best texture and flavor.
Pro Tips For Making 6 Inch Black Forest Cake
- Sift the Cocoa: I learned this the hard way—skipping the sift with cocoa powder leaves you with a cake that’s dense and uneven. Use a fine-mesh sieve and tap it gently over the bowl to break up clumps. The extra effort guarantees a smoother batter and lighter crumb, especially in a 6-inch pan where every inch counts.
- Cream Butter Slowly: Don’t rush the butter and sugars—beat them on medium speed for at least 3 minutes until the mixture is pale and fluffy. I used to crank it up high, thinking it’d save time, but that just traps air unevenly. A slower start ensures a tender cake that doesn’t turn out greasy, even with all that butter.
- Don’t Overmix the Batter: Once you fold in the dry ingredients, stop mixing the second everything is just combined. I’ve ruined cakes by overworking the batter, and this one’s no exception—gluten develops fast, leading to a tough crumb. Two quick swirls with a spatula is all it takes.
- Chill the Pan: Place your 6-inch pan in the fridge for 10 minutes before baking. My grandmother swore by this, and she was right: the cold metal helps the cake rise evenly and prevents a domed top. No need to grease it extra—just dust with cocoa powder after chilling for easy release.
Storing and reheating this 6 inch black forest cake
Room Temperature Storage
Your fully assembled Black Forest cake stays fresh and delicious at room temperature for up to 2 days when stored in an airtight container. I always use a glass cake carrier with a tight-sealing lid to maintain moisture and prevent drying.
Place it in a cool, dry spot away from direct sunlight—this preserves the chocolate glaze’s glossy finish and keeps the whipped cream layer light. For extra protection, wrap the cake in plastic wrap before sealing the container. 🌟
Refrigerator Preservation
For longer storage, refrigerate the cake for up to 1 week—just store it in an airtight container or wrap it tightly in plastic wrap. The cold temperature helps maintain the whipped cream’s texture, though it may firm up slightly.
Let the cake sit at room temperature for 30 minutes before serving to restore the cream’s airiness. I recommend storing the cake layers separately if you’re prepping ahead—this prevents sogginess from condensation. 🥛
Freezing for Later
This cake freezes beautifully for up to 2 months! Assemble it completely, then wrap each layer individually in plastic wrap before placing the whole cake in a freezer bag. Squeeze out excess air to prevent freezer burn.
Thaw overnight in the refrigerator before serving. The texture remains excellent, though the whipped cream may need a quick re-whip before serving. For best results, I add fresh cherries after thawing to maintain their vibrant color. ❄️
Reheating Whipped Cream
If your cake’s whipped cream layer has lost its volume after storage, don’t worry—it can be revived! Transfer the cream to a mixing bowl and whip it again with a hand mixer until it reaches stiff peaks.
For extra fluffiness, chill the bowl and beaters in the freezer for 10 minutes before whipping. This trick works especially well for cakes stored in the refrigerator. 💫
Glaze Refresh Tips
The chocolate glaze may develop a slight haze after storage, but it’s easy to restore its shine. Gently warm the glaze in 10-second intervals in the microwave, stirring between each interval until smooth. For a glossier finish, add 1 tsp heavy cream and mix well.
Apply the refreshed glaze with an offset spatula, then chill for 15 minutes** to set. This method works perfectly for cakes stored at room temperature or refrigerated. 🍫
Nutrition facts
Frequently asked questions
Why does this recipe use only one cake layer instead of three?
This single-layer approach creates a sturdy base that holds up beautifully to slicing—no crumbly layers here! The cherries and chocolate chips are distributed throughout, so every slice has that classic Black Forest flavor. Plus, it’s much simpler for home bakers while still delivering the iconic look when sliced horizontally.
Can I substitute maraschino cherries with fresh ones?
Fresh pitted cherries work wonderfully—they’ll add a more natural sweetness. Just be sure to pat them dry thoroughly before folding into the batter to prevent a soggy cake. For extra tartness, toss them in 1 teaspoon lemon juice before adding to the batter.
How do I prevent the cake from cracking when slicing?
Let the cake cool completely before slicing—this ensures clean cuts. Use a serrated knife and dip it in hot water between slices to prevent tearing. For extra insurance, chill the cake in the fridge for 30 minutes before slicing horizontally into three equal layers.
What’s the best way to make this cake ahead of time?
Bake the cake layers 1 day ahead and store them wrapped at room temperature. Assemble the cake just before serving—this keeps the whipped cream light and fluffy. If you must refrigerate, add the cream layer 2 hours before serving to let it soften. The chocolate glaze can be made 2 days ahead and stored in the fridge.
Can I use this recipe for a gluten-free version?
Yes! Replace the all-purpose flour with a 1:1 gluten-free baking flour blend (like Bob’s Red Mill). Add 1/4 teaspoon xanthan gum to help bind the cake. You may need to reduce the liquid slightly—start with 1/4 cup less milk in the glaze. The texture will be slightly denser but still delicious.

- 6 Egg Cake Recipe with Oil: Light as Air With Buttery Moisture - October 4, 2026
- 4 Bean Casserole Recipe: One-Pan Heartiness With Smoky Paprika Depth - October 4, 2026
- 3-Ingredient Keto Mug Cake Recipe: Microwave Magic in 2 Minutes - October 4, 2026