
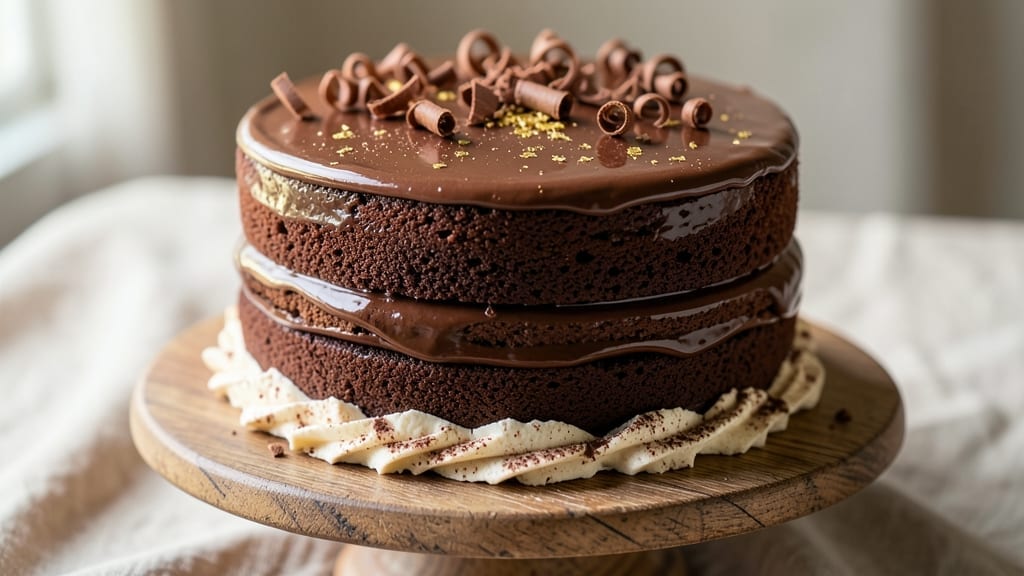
A 6-inch chocolate birthday cake is the perfect solution when you want to celebrate with just one person—rich, moist, and ready in 30 minutes without the fuss of a full-size cake. 💛 The secret lies in a simple yet foolproof recipe that delivers professional results with minimal effort, using a single 6-inch pan for portion control and easy handling.
This recipe balances tender crumb and deep chocolate flavor without needing fancy equipment or techniques—just a standard oven and basic mixing. The cake bakes in one layer, making it effortless to decorate with store-bought frosting or a quick homemade glaze for a restaurant-worthy finish.
By the time you pull it from the oven, you’ll have a perfectly golden cake with a moist interior that stays soft for days. The rich cocoa flavor shines through every slice, making it ideal for birthdays, anniversaries, or even a solo treat.
Serve warm with vanilla ice cream or dust with powdered sugar for an elegant touch.
Whether you’re baking for one or want a quick dessert, this single-serve chocolate cake delivers all the joy of a celebration without the leftovers. Ready to impress with minimal effort? Let’s get started.
Ingredients for 6 inch chocolate birthday cake
Rich cocoa, tender crumb, and just one serving—these ingredients create a perfect solo celebration.
| Ingredient | Amount | Notes |
|---|---|---|
| All-Purpose Flour 🌾 | ¾ cup | Sifted for light texture |
| Unsweetened Cocoa Powder 🍫 | ⅓ cup | Natural or Dutch-processed |
| Granulated Sugar 🍚 | ½ cup | White or light brown |
| Large Eggs 🥚 | 1 whole | Room temperature preferred |
| Melted Unsalted Butter 🧈 | ⅓ cup | Cooled slightly before mixing |
| Vanilla Extract 🌸 | 1 tsp | Pure extract preferred |
| Baking Powder 🧂 | ½ tsp | Aluminum-free preferred |
| Salt 🧂 | ¼ tsp | Fine sea salt |
| Milk 🥛 | ¼ cup | Whole milk for richness |
| Vegetable Oil 🫒 | 0.17 cup | Light or neutral oil |
| Powdered Sugar 🍚 | ½ cup | For simple glaze option |
| Heavy Cream 🥛 | ¼ cup | For optional whipped cream |
The cocoa powder makes all the difference here. Ghirardelli or Hershey’s Special Dark are my go-tos—they’re reliable and give that deep chocolate flavor. For the flour, King Arthur or Gold Medal brands are ideal—they’re sifted and consistent. The eggs should be at room temperature for even mixing, so take them out 30 minutes before baking. Butter matters too—use Land O’Lakes or Plugrá for reliable melting. If you’re in a hurry, microwave the butter for 40 seconds to just soften it before mixing.
No cocoa powder? Melted dark chocolate (70% or higher) at half the amount works in a pinch—just let it cool before mixing. Short on eggs? Flax eggs (1 tbsp ground flaxseed + 3 tbsp water) replace one egg. The milk can be swapped for vanilla almond milk if you prefer, but whole milk gives the best texture. For the glaze, powdered sugar + milk is classic, but melted white chocolate drizzle takes it to the next level. The oil keeps the cake moist—don’t skip it if your butter is salted.
This cake stays moist for 3 days at room temperature, wrapped tightly. For longer storage, freeze the whole cake (unfrosted) for up to 1 month. Reheat slices in the microwave for 10 seconds to revive the texture. I always make a double batch—one for today, one for next week’s solo treat. The glaze sets fast, so work quickly if you’re adding it right after baking. Serve warm with vanilla ice cream for maximum indulgence.
Why You’ll Love This Recipe
- No Mixer Needed: I swear by this recipe when my mixer’s on the fritz—just whisk eggs and sugar until fluffy, then fold in the cocoa and butter. The batter’s so light you’d never guess it’s that simple.
- Rich Without Overpowering: That balance of cocoa and sugar? Chef’s kiss. The melted butter keeps it moist but not greasy, and the eggs add just enough structure so it doesn’t crumble. Honestly, my kids ask for seconds before the candles even burn out.
- Single-Serve Perfection: Six inches is my go-to for one person’s celebration—birthday, promotion, or just because. It’s easy to frost, easy to eat, and no one feels guilty about cutting into a whole cake when it’s just them.
- Budget-Friendly Luxury: Flour, sugar, and cocoa are pantry staples, and eggs/butter stretch further than you’d think. I’ve made this for under $5 and still felt like I served something special—no boxed cake mix required.
Step-by-step instructions for single-serve chocolate birthday cake
Here’s how to bake a rich, moist 6-inch chocolate cake with perfect texture every time.
👨🍳 Step 1: Prep Ingredients and Preheat
Start by preheating your oven to 350°F. While it warms, sift together the 0.75 cup all-purpose flour and 0.33 cup unsweetened cocoa powder in a medium bowl. I like to use a fine-mesh sieve for this—it prevents lumps and ensures a smoother batter. In a separate bowl, whisk together the 0.5 cup granulated sugar, 1 whole large egg, 0.33 cup melted unsalted butter (cooled slightly), 1 tsp vanilla extract, 0.5 tsp baking powder, and 0.25 tsp salt.
Here’s the thing—room temperature egg and butter mix better. If your butter is still liquid, let it cool for 5 minutes before adding. The melted butter should be warm but not hot to the touch. I always give my eggs a quick spin in warm water for 5 minutes if they’re straight from the fridge. This small step makes a huge difference in texture.
🍳 Step 2: Combine Wet and Dry Ingredients
Gradually add the dry ingredients to the wet mixture, alternating with the 0.25 cup milk and 0.17 cup vegetable oil. Start and end with the dry ingredients to ensure even distribution. Use a spatula to gently fold everything together until just combined—you should still see some flour streaks. Overmixing develops gluten, which can make the cake dense.
I use a rubber spatula for this step because it’s more gentle than a whisk. You’re looking for a smooth, thick batter that coats the back of your spoon. If it’s too thick, add 1 more tablespoon of milk. The batter should be like thick pudding—this ensures a moist cake rather than a dry one. Give it a quick taste at this stage (yes, really!) to check the chocolate flavor balance.
🔥 Step 3: Bake the Perfect Single-Serve Cake
Grease a 6-inch round cake pan thoroughly with butter or nonstick spray, then dust with a light layer of flour. Pour the batter into the prepared pan and smooth the top with a spatula. Tap the pan gently on the counter 2-3 times to remove any air bubbles. Bake in the preheated oven for 25-30 minutes or until a toothpick inserted in the center comes out clean.
Don’t open the oven door during the first 20 minutes—this prevents the cake from sinking. You’ll know it’s done when the edges pull away slightly from the pan and the top springs back when gently pressed. The cake should be golden brown around the edges but still fudgy in the center. If you’re worried about overbaking, pull it out when the toothpick has just a few moist crumbs (they’ll clear up during cooling).
⏰ Step 4: Cool and Glaze for Decadence
Let the cake cool in the pan for 10 minutes before transferring it to a wire rack. While it cools, prepare your glaze by whisking together the 0.5 cup powdered sugar and 2 tablespoons milk (from your remaining ingredients) until smooth. For extra indulgence, whip the 0.25 cup heavy cream to soft peaks and spread it over the cooled cake before adding the glaze.
Here’s where it gets fun—drizzle the glaze over the top and sides of the cake while it’s still slightly warm. The heat helps the glaze set beautifully. I like to work quickly and use a fork to catch any drips. Let the glaze set for 5 minutes before serving. The contrast between the warm cake and cool glaze is pure magic. For an extra touch, sprinkle with cocoa powder or mini chocolate chips right after glazing.
Pro Tips For Making 6 Inch Chocolate Birthday Cake
- Sift the Cocoa: I learned this the hard way—skipping the sift with cocoa powder leaves tiny clumps that ruin the texture of your cake. Use a fine-mesh sieve and tap it firmly over the bowl to break up any lumps before mixing. It’s a 30-second step that makes a real difference in how smooth your batter turns out.
- Melt Butter Slowly: Pouring cold butter straight into a hot pan or microwave often leads to burnt bits that turn your cake greasy. Warm the butter in a bowl over barely simmering water (double boiler) until it’s just liquid—no bubbles, no brown spots. This keeps the flavor clean and the texture light.
- Don’t Overmix the Batter: I used to crank the mixer until the batter looked “perfectly smooth,” but that’s when gluten starts overdeveloping, leaving you with a dense, chewy cake instead of tender layers. Mix just until the dry ingredients disappear—about 30 seconds with a hand mixer. Stop when it’s almost combined.
- Test for Doneness Early: Chocolate cakes often look set on the outside while staying undercooked inside. Stick a toothpick in the center—if it comes out with moist crumbs (not wet batter or clean), pull it out. Let it cool 10 minutes in the pan, then transfer to a wire rack. This prevents a gummy middle that’ll make you want to stab it again.
Wine and beer pairings for this dish
Rich Chocolate & Dessert Wines
For this decadent chocolate cake, a bold red wine with chocolate notes is ideal. I love Cabernet Sauvignon from Napa Valley—its dark fruit and cocoa undertones mirror the cake’s flavors beautifully.
A Malbec from Argentina brings juicy blackberry and mocha notes that complement the richness. Serve slightly chilled (55-60°F) to enhance the dessert experience. 🍷
Sweet Sparkling Options
If you prefer something lighter, Moscato d’Asti from Italy is a fantastic choice. Its honeyed sweetness and delicate bubbles cut through the cake’s density while keeping the palate fresh.
For a non-alcoholic option, San Pellegrino Aranciata Rossa (blood orange soda) adds citrus brightness that contrasts the chocolate. Chill both options thoroughly for best results.
Creamy Liqueur Pairings
Add a sophisticated touch with Baileys Irish Cream or Godiva Chocolate Liqueur. Serve these in small 3-ounce glasses alongside the cake for dipping or sipping. The creamy texture and chocolate intensity create a luxurious pairing that feels like a celebration.
For a boozy twist, mix 1 oz Baileys with ½ cup cold milk—it becomes a delicious “chocolate milk” companion. 🥛
Coffee-Inspired Pairings
If you enjoy coffee, a dark roast espresso or cold brew concentrate elevates the chocolate experience. The bitterness in coffee enhances the cake’s cocoa depth. I recommend Starbucks Sumatra Dark Roast or Death Wish Coffee for a bold match.
For a dessert cocktail, blend 1 shot espresso with 1 oz chocolate syrup and a splash of cream—serve over ice.
Beer for Chocolate Lovers
Stout beers like Guinness or Samuel Smith’s Oatmeal Stout are classic chocolate cake companions. The roasted malt flavors and creamy texture create a perfect balance. For a lighter option, try a Belgian Dubbel like Westmalle Trappist 8—its caramel and spice notes add complexity.
Serve stouts at 45-50°F** to preserve their creamy texture and chocolate undertones. 🍺
Nutrition facts
Frequently asked questions
Can I make this cake without eggs?
Yes! For a vegan version, replace the 1 egg with 1 flax egg (1 tbsp ground flaxseed + 3 tbsp water), mixed and rested for 5 minutes before using. The texture stays moist, though it may be slightly denser. For another option, use ½ cup unsweetened applesauce—it keeps the cake tender while adding natural sweetness.
How do I adjust the recipe for a gluten-free version?
Swap the 0.75 cup all-purpose flour for 0.75 cup gluten-free 1:1 baking flour (like Bob’s Red Mill or King Arthur). Add 0.5 tsp xanthan gum to improve structure. Sift the flour mix thoroughly to prevent lumps—this ensures a light, airy crumb. The cake will still be rich and moist, just with a slightly different texture.
Can I bake this cake in a different pan size?
For a 7-inch pan, reduce baking time to 20-25 minutes—the cake will be thinner. For a 5-inch pan, increase time to 30-35 minutes and add 0.25 cup extra batter to fill it. Always check doneness with a toothpick. The key is adjusting time and batter volume to match the pan’s depth and surface area.
Why did my cake turn out dense?
Overmixing the batter develops gluten, making the cake dense. Mix just until combined—you should still see flour streaks. Another common issue is overbaking: pull the cake out when a toothpick comes out with a few moist crumbs (they’ll clear as it cools). Also, ensure your butter is melted but not hot—it should be warm to the touch, not liquid.
How can I make this cake extra fudgy?
Increase the cocoa powder to 0.4 cup and reduce flour to 0.6 cup. Replace 0.1 cup milk with 0.1 cup melted dark chocolate (70% cocoa) for deeper flavor. Bake for 22-25 minutes (check early!)—fudgy cakes pull away from the pan sooner. Let it cool completely before slicing for the perfect slice.

- 3lb Prime Rib Roast Recipe: Juicy Pink Center Guaranteed in 3 Hours - October 31, 2026
- 5 Spice Cake Recipe: Warmly Spiced Layers With Crunchy Top - October 31, 2026
- 1950’s Macaroni and Cheese Recipe: Nostalgic Creamy Cheese Sauce with Buttery Noodles - October 31, 2026