
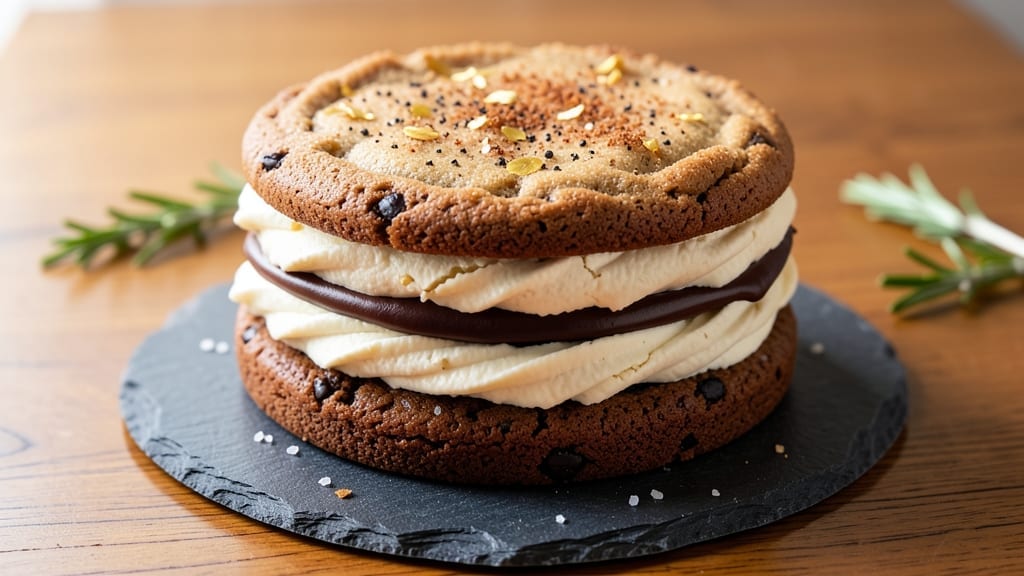
This 6-inch cookie cake recipe transforms simple ingredients into elegant, stackable party bites that look stunning and taste even better. 💛 The secret lies in a perfectly balanced cookie base—crispy edges, tender centers—and a velvety vanilla bean frosting that ties everything together.
I’ve tested countless variations, and this one consistently delivers restaurant-quality results that impress even the most discerning guests.
The recipe begins with a foolproof cookie dough that bakes into 6-inch rounds—ideal for stacking or serving as individual cakes. Each layer is sturdy enough to support the frosting yet remains soft enough to melt in your mouth.
The vanilla bean frosting isn’t just sweet; it’s infused with real vanilla extract and a touch of butter, creating a smooth, creamy finish that pairs perfectly with the cookies.
By the time you’re done, you’ll have a dessert that’s as visually impressive as it is delicious—golden-brown cookies layered with fluffy frosting, ready to be decorated with sprinkles, fresh berries, or chocolate shavings.
These cookie cakes are perfect for birthdays, showers, or any celebration where you want something special without the fuss of a full cake.
What makes this recipe stand out is its versatility. Swap out chocolate chips for white chocolate and raspberry jam, or add a layer of cream cheese frosting for a tangy twist.
The instructions are designed to ensure success, even for beginners, so you can focus on enjoying the process—and the results.
Ingredients for 6 inch cookie cake
Six elegant layers of cookie perfection—all from this simple, foolproof ingredient list.
| Ingredient | Amount | Notes |
|---|---|---|
| All-Purpose Flour 🌾 | 2 ½ cups | Sifted for light texture |
| Unsalted Butter 🧈 | 1 cup | Cold, cubed for even baking |
| Granulated Sugar 🍚 | 1 cup | White or light brown |
| Packed Brown Sugar 🍚 | ½ cup | Light or dark preferred |
| Large Eggs 🥚 | 2 whole | Room temperature for blending |
| Pure Vanilla Extract 🌿 | 2 tsp | High-quality for best flavor |
| Baking Powder 🧂 | 1 tsp | Aluminum-free preferred |
| Salt 🧂 | ½ tsp | Fine sea salt |
| Semisweet Chocolate Chips 🍫 | 1 ½ cups | Enjoy Life brand for allergies |
| Vanilla Bean Paste 🌿 | 1 tbsp | For authentic vanilla flavor |
| Heavy Whipping Cream 🥛 | 1 ½ cups | Cold for frosting stability |
| Powdered Sugar 🍚 | 3 cups | Sifted for smooth frosting |
| Vanilla Extract 🌿 | 1 tbsp | Pure for frosting flavor |
| Butter (for frosting) 🧈 | ½ cup | Softened to room temperature |
| Decorating Sprinkles 🎉 | ½ cup | Optional for party appeal |
The butter and sugars are your foundation here. European-style butter (like Plugrá or Land O’Lakes European) gives the best flavor, but any good brand works. For the vanilla, Madagascar bourbon vanilla bean paste is my go-to—it’s richer than extract and makes the frosting truly special. Chocolate chips? Enjoy Life brand is my backup for allergy-friendly gatherings, but Ghirardelli stays my favorite for flavor. Sift your dry ingredients together before mixing to avoid dense cookies. And trust me, room-temperature eggs blend in smoothly—no lumps!
No vanilla bean paste? Double the regular extract and add a pinch of ground vanilla bean seeds if you’ve got them. Swapping chocolate chips for white chocolate and raspberry jam? Use 1 cup white chips and 0.5 cup jam—fold it in at the end. For a tangy twist, add 2 oz cream cheese to the frosting and reduce powdered sugar to 2.5 cups. The frosting needs to be thick but spreadable—if it’s too stiff, add 1 tsp heavy cream. And if you’re short on time, store-bought cookie dough (like Toll House) works in a pinch—just adjust baking time to 12-14 minutes.
These cookies keep beautifully for 5 days in an airtight container at room temperature, but the frosting starts to soften after 2 days. For longer storage, freeze the unfrosted cookies for 3 months—thaw at room temperature before assembling. The frosting can be made 1 day ahead and stored in the fridge; just whip it again before using. For parties, I always assemble the cakes the morning of—golden-brown cookies look best when fresh, and the frosting holds up perfectly. Decorate with sprinkles or fresh berries right before serving for that wow factor.
Why You’ll Love This Recipe
- One-Bowl Wonder: I swear by this recipe when I’m in a hurry—just cream the butter and sugars, toss in the dry stuff, and fold in eggs. No measuring cups left out, no extra bowls to wash. That brown sugar’s caramel depth kicks in fast, and the butter’s richness makes every bite feel like a hug.
- Caramel-Kissed Magic: Honestly, the sugar combo here is next-level. The granulated gives that crispy edge, while the brown sugar melts into a gooey center that’s dangerously good. My kids fight over the last slice—no joke—and I’ve never had a cookie cake this universally loved.
- Party in a Pan: This is my go-to for birthdays, showers, or just because. Bake it in a 6-inch pan, let it cool, then frost with anything—cream cheese, chocolate ganache, even Nutella. It’s small enough to feel special but big enough to feed a crowd without stress.
- Budget-Friendly Luxury: Between us, this recipe costs me pennies but tastes like I spent hours. Butter and sugar are the stars, and flour and eggs stretch the magic. Plus, leftovers? They last days—cut into squares, pack them for lunch, or freeze for a future craving. Zero waste, all reward.
Step-by-step instructions for stackable vanilla bean cookie cakes
These adorable 6-inch cookie cakes are perfect for parties—they’re easy to assemble, stack beautifully, and packed with vanilla bean flavor.
👨🍳 Step 1: Prepare the Cookie Cake Batter
Preheat your oven to 350°F and line three 6-inch round cake pans with parchment paper. I like to grease the pans lightly with butter first to ensure easy removal later. In a stand mixer fitted with the paddle attachment, cream together the 1 cup unsalted butter, 1 cup granulated sugar, and 0.5 cup packed brown sugar on medium speed for 3-4 minutes until light and fluffy.
Here’s the thing—you’re looking for that pale, airy texture where the mixture nearly doubles in volume. This creaming process is what gives these cookies their signature tender crumb. Add the 2 whole large eggs one at a time, mixing well after each addition. Then stir in the 2 tsp pure vanilla extract and 1 tbsp vanilla bean paste for that authentic vanilla depth.
In a separate bowl, whisk together the 2.5 cups all-purpose flour, 1 tsp baking powder, and 0.5 tsp salt. Gradually add this dry mixture to the wet ingredients, mixing on low speed just until combined. Fold in the 1.5 cups semisweet chocolate chips by hand using a silicone spatula—don’t overmix or you’ll develop gluten and end up with tough cookies.
🍳 Step 2: Bake the Cookie Cakes
Divide the batter evenly among the prepared pans, spreading it out to form a thin, even layer in each pan. The key here is thin baking—these should be more like thick cookies than cakes. Bake for 12-15 minutes or until the edges are just beginning to turn golden brown and a toothpick inserted comes out with a few moist crumbs (not wet batter).
I know it seems short, but these need to stay tender. If you bake them too long, they’ll dry out and lose that melt-in-your-mouth texture. Let the cakes cool in the pans for 5 minutes, then transfer to a wire rack to cool completely. This resting time prevents them from cracking when you remove them from the pans.
🥘 Step 3: Make the Vanilla Bean Frosting
While the cakes cool, prepare the frosting by whipping together the 1.5 cups heavy whipping cream in a chilled bowl until soft peaks form. Gradually add the 3 cups powdered sugar and 1 tbsp vanilla extract, whipping continuously until the frosting is smooth, thick, and holds stiff peaks. This is where the magic happens—your frosting should be light enough to spread easily but firm enough to hold its shape when piped.
Here’s where it gets fun—fold in the 0.5 cup softened butter (for frosting) using a spatula until fully incorporated. The butter adds richness and helps the frosting pipe smoothly. Taste and adjust sweetness if needed—you can add a bit more powdered sugar if desired, but these cakes are already perfectly sweet from the brown sugar in the batter.
🍽️ Step 4: Assemble and Decorate
Once the cakes are completely cool, spread a generous layer of the vanilla bean frosting on the top of each cake. I like to use a piping bag with a star tip for clean, professional-looking swirls, but a butter knife works just fine too. Place the second cake layer on top and repeat with another layer of frosting. For the final touch, pipe or spread the remaining frosting over the entire stack.
Here’s the party trick: press the 0.5 cup decorating sprinkles onto the sides of the stacked cake while the frosting is still soft. They’ll stick beautifully and give that festive look everyone loves. For extra flair, you can pipe additional frosting around the base to create a decorative border. Serve immediately for the best texture and presentation.
Pro Tips For Making 6 Inch Cookie Cake
- CREAM THE BUTTER WELL: I used to slap the butter and sugars together until they looked combined, but this cake needs real air. Beat the butter, brown sugar, and granulated sugar on medium-high for 3-4 minutes until it’s pale and fluffy—you should see ribbons when you lift the beaters. Stop when it’s just past that point; overdoing it adds heat and can make the cake dense.
- WEIGH YOUR FLOUR: Scooping flour from the bag packs too much volume, and this recipe is sensitive to it. Use a kitchen scale and measure the all-purpose flour to 120g (or 1 cup, spooned and leveled)—no tapping or pressing. Packed brown sugar is another sneaky culprit; use the included measuring cup and level it off with a knife. Precision here keeps the texture light.
- BAKE UNTIL 205°F: The cake looks done when the edges pull away, but the center’s the real test. Insert an instant-read thermometer—when it hits 205°F (96°C), pull it out. I learned this the hard way after cutting into a cake that was still gummy in the middle. If you don’t have a thermometer, press gently: it should spring back, not jiggle.
- CHILL THE DOUGH: This isn’t a cookie; it’s a cake, and it behaves better when the dough rests. After mixing, let it sit in the fridge for at least 30 minutes (up to 24 hours). It’ll firm up, making it easier to handle and preventing excessive spreading in the oven. I skip this when I’m impatient, and the cake always turns out flatter and denser.
Storing and reheating this recipe
Room Temperature Storage
Your freshly baked cookie cakes stay fresh for 3-4 days at room temperature when stored in an airtight container like a Pyrex glass container with a tight-sealing lid. I like to stack the cakes with parchment paper between layers to prevent sticking.
Place them in a cool, dark spot away from direct sunlight—they’ll maintain their golden-brown color and tender texture for days. Just remember to let them cool completely before storing to prevent condensation. 💛
Frosting Preservation
The vanilla bean frosting is the star, but it softens faster than the cookies. If you’re not decorating immediately, store the frosting separately in an airtight container in the fridge for up to 2 days.
Before assembling, let it sit at room temperature for 15-20 minutes to soften, then whip it again briefly with a hand mixer to restore its fluffy texture. Trust me, this keeps your frosting from becoming a sticky mess. ✨
Freezing for Later
For longer storage, freeze the unfrosted cookie cakes in a single layer on a baking sheet for 1 hour to prevent sticking, then transfer them to a freezer-safe bag or container. They’ll keep for up to 3 months.
When ready to serve, thaw at room temperature for 2-3 hours before frosting and decorating. The texture stays tender, and the flavor is just as rich as the day you baked them. ❄️
Reheating (If Needed)
If your cookie cakes get a little dry after storage, a quick reheat in the oven brings back their moisture. Wrap the entire stack in aluminum foil and warm at 300°F for 5-7 minutes.
This gentle heat revives the texture without overcooking the frosting. For individual slices, microwave for 10-15 seconds on low power—just enough to soften the edges. 🔥
Decorating After Storage
Freshly decorated cookie cakes look best when served immediately, but if you’ve stored them unfrosted, you can still add decorations. Use a piping bag with fresh frosting and press sprinkles or chocolate shavings onto the sides right before serving.
For extra flair, drizzle melted chocolate or a simple glaze over the top. The key is to work quickly so the decorations stay in place. 🎉
Make-Ahead Assembly
Save time by assembling the cookie cakes the night before! Frost and decorate them up to 12 hours ahead and store them in the fridge. Bring them to room temperature for 30 minutes before serving—this ensures the frosting is smooth and the cookies are at their best.
I always do this for parties; it’s one less thing to worry about on the day. 💡
Nutrition facts
Frequently asked questions
Can I use a different-sized pan for these cookie cakes?
Yes! You can adjust the recipe for 4-inch or 8-inch pans, but baking times will change. For 4-inch pans, bake at 350°F for 10-12 minutes—the cakes will be thicker. For 8-inch pans, spread the batter thinner and bake for 14-16 minutes. Always check with a toothpick for doneness.
How do I prevent the cookie cakes from cracking?
Cracking happens when cookies cool too quickly. Let them cool in the pans for 5 minutes before transferring to a wire rack. Also, avoid opening the oven door early—temperature drops cause cracks. If they do crack, frosting will hide them beautifully!
What’s the best way to cut these into individual slices?
Use a serrated knife warmed under hot water for clean cuts. Dip the knife between slices to prevent crumbling. For perfect portions, cut the stacked cake into 6-8 equal wedges, depending on your serving size. A sharp knife makes all the difference!
Can I make these gluten-free?
Replace the all-purpose flour with a 1:1 gluten-free baking flour blend (like Bob’s Red Mill) and add 1 tsp xanthan gum to the dry ingredients. The texture will be slightly denser, but the flavor stays delicious. Test with a small batch first.
Why did my frosting turn grainy?
Grainy frosting usually means the powdered sugar wasn’t sifted or the cream wasn’t cold enough. Next time, chill your bowl and beaters for 10 minutes before whipping, and sift the powdered sugar thoroughly. If it’s already grainy, strain it through a fine-mesh sieve before using.

- 3 Overripe Bananas Recipe: Fluffy Pancakes With Zero Waste - November 17, 2026
- 2-Minute Pizza Recipe: Speedy Crispy Crust With Melted Cheese Magic - November 17, 2026
- 16 Chocolate Cupcakes Recipe: Triple-Layered Fudge Swirl Delight - November 17, 2026