
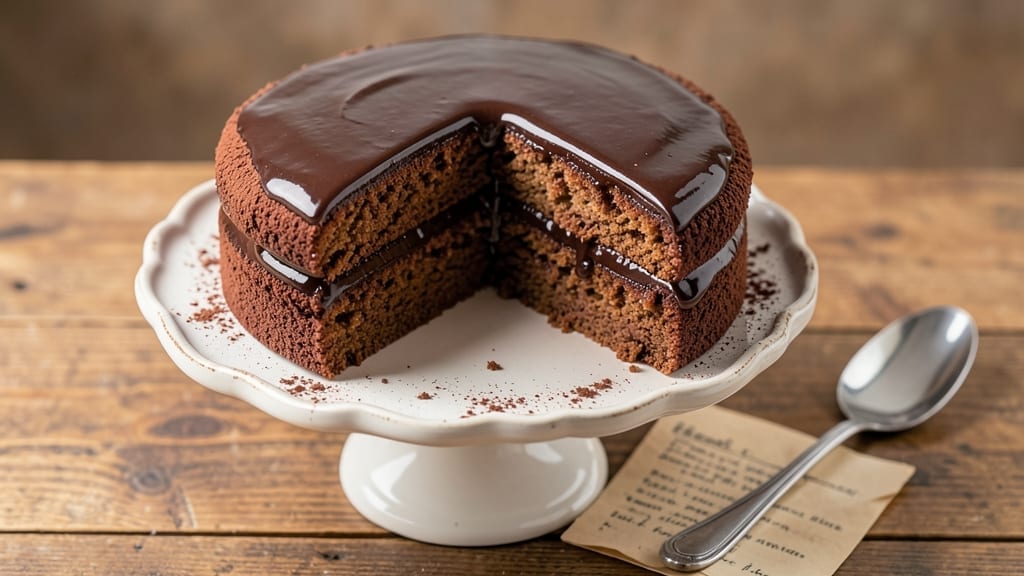
This 6-inch eggless chocolate cake delivers restaurant-quality layers with a fudgy crumb and perfect moisture—no eggs required. The secret lies in a simple yet precise technique that replaces eggs with pantry staples while maintaining that signature chocolate density.
I’ve perfected this recipe after years of testing, ensuring every slice stays tender without drying out, even the next day.
The magic happens with a two-stage mixing method: first combining dry ingredients, then gently folding in melted butter and coffee (yes, coffee!) for depth. This approach creates air pockets for a light yet rich texture, while a short baking time at the right temperature locks in moisture.
No special equipment needed—just a standard 6-inch pan and patience for the layers to set.
What you’ll end up with is a decadent yet balanced cake that’s perfect for celebrations or impromptu desserts. The layers stay ultra-moist for days, making it ideal for meal prep, and the fudgy crumb melts in your mouth without being overly sweet.
Serve it warm with vanilla ice cream or dusted with powdered sugar for a showstopping finish.
This recipe is vegetarian-friendly and works beautifully for dietary restrictions, yet it doesn’t compromise on flavor. Whether you’re baking for a crowd or treating yourself, the result is a foolproof chocolate cake that rivals the best bakery versions. Let’s get started!
Ingredients for 6 inch eggless chocolate cake
Twelve ingredients transform into a decadent, ultra-moist cake—no eggs needed.
| Ingredient | Amount | Notes |
|---|---|---|
| All-Purpose Flour 🌾 | 1 ½ cups | Sifted for lightness |
| Unsalted Butter 🧈 | 1 cup | Cold, cubed for even melting |
| Granulated Sugar 🍚 | 1 ¼ cups | Superfine preferred for smoothness |
| Cocoa Powder 🍫 | ¾ cup | Dutch-processed for rich flavor |
| Instant Espresso Powder ☕ | 2 tbsp | Enhances chocolate depth |
| Baking Powder 🧪 | 1 ½ tsp | Ensures proper rise |
| Salt 🧂 | ½ tsp | Diamond Crystal preferred |
| Vanilla Extract 🌸 | 1 tbsp | Pure Madagascar preferred |
| Non-Dairy Milk 🥛 | ½ cup | Almond or oat for neutral flavor |
| Applesauce 🍎 | ½ cup | Unsweetened for egg replacement |
| Powdered Sugar 🍚 | ½ cup | For dusting top layers |
| Dark Chocolate Chips 🍫 | ½ cup | 70% cocoa for fudgy texture |
The cocoa powder and instant espresso are non-negotiable for that signature depth. Valrhona or Guittard cocoa powder delivers the richest flavor, but Hershey’s Special Dark works in a pinch. Grab the espresso powder from the coffee aisle—Starbucks or Folgers both have solid options. For the butter, I always recommend Plugrá or Land O’Lakes for reliable quality. The applesauce acts as our egg substitute, so use unsweetened—Mott’s or Whole Foods brand are my go-tos. Pro tip: Toast your cocoa powder in a dry pan for 30 seconds to deepen the flavor (trust me on this).
No espresso powder? Instant coffee granules at double the amount work just fine. Running low on vanilla? Vanilla bean paste adds specks for visual appeal. The non-dairy milk can be swapped for water or brewed tea if needed, but almond or oat milk keeps it moist. For the chocolate chips, Enjoy Life brand is the safest bet if you’re avoiding dairy. The powdered sugar? Domino or Confectioners Sugar from the baking aisle is perfect. If you’re short on applesauce, mashed banana at half the amount works too—just don’t overdo it or the cake will taste fruity.
This cake stays ultra-moist for 4-5 days when stored in an airtight container at room temperature. For longer storage, wrap tightly and keep in the fridge for up to 1 week. The layers can be baked a day ahead—they actually improve overnight! To reheat, cover with a damp towel and warm in the oven at 300°F for 10 minutes. Freeze between layers of parchment for up to 3 months. The powdered sugar topping? Add it right before serving to keep it crisp.
Why You’ll Love This Recipe
- No Fuss Mixing: I swear by this batter—just creaming butter and sugar, then folding in dry ingredients. No whisking, no waiting, no stress. That espresso powder does the heavy lifting for depth, so you’re basically a cake scientist with minimal effort.
- Rich Without Eggs: The cocoa and butter combo gives it that melt-in-your-mouth texture, but here’s the magic: the espresso powder cuts through the sweetness like a sharp knife. Honestly, it’s the kind of cake that makes you forget it’s eggless.
- Portion Perfection: Six-inch rounds are the ultimate single-serve size—great for lunchboxes, coffee breaks, or when you just want one slice without guilt. They’re also perfect for parties if you’re lazy about slicing a whole cake.
- Budget-Friendly Luxury: You’re using pantry staples (butter, flour, sugar) with cocoa and espresso to elevate it. I’ve made this for under $5 a batch, and it still tastes like a bakery treat. Leftovers? They’ll disappear faster than you can say “second cup of coffee.”
Step-by-step instructions for ultra-moist eggless chocolate cake
Here’s how to craft layers that stay wonderfully moist with a fudgy crumb—no eggs required!
Cream Butter and Sugar for Maximum Moisture
In a stand mixer fitted with the paddle attachment, combine the 1 cup unsalted butter (cold, cubed) and 1.25 cups granulated sugar. Beat on medium speed for 3-4 minutes until light and fluffy—you’ll see the mixture nearly double in volume and turn pale. This aeration creates the perfect foundation for tender layers.
I like to scrape down the sides of the bowl every 30 seconds to ensure even mixing. The butter should be completely incorporated but still hold its shape when pressed. This step is absolutely critical for that ultra-moist texture—don’t rush it. If the mixture feels too warm, chill it in the fridge for 10 minutes before proceeding.
Fold in Dry Ingredients for Perfect Texture
In a separate bowl, whisk together the 1.5 cups all-purpose flour, 0.75 cup cocoa powder, 2 tbsp instant espresso powder, 1.5 tsp baking powder, and 0.5 tsp salt. Sift the dry ingredients directly into the wet mixture in three additions, mixing on low speed for 20 seconds after each addition. This prevents overmixing and maintains that delicate crumb structure.
Add the 1 tbsp vanilla extract and mix for 10 seconds until just combined. The batter will look shaggy and thick—this is perfect. For the egg replacement, stir in the 0.5 cup applesauce and 0.5 cup non-dairy milk until fully incorporated. The applesauce adds moisture while the non-dairy milk helps create lift. Fold in the 0.5 cup dark chocolate chips by hand using a spatula to distribute them evenly.
Prepare the Cake Pans for Even Baking
Preheat your oven to 350°F. Generously grease two 6-inch round cake pans with butter (using the leftover 1 cup unsalted butter if needed) and line the bottoms with parchment paper circles. Dust the pans lightly with flour, tapping out any excess. This ensures easy release and even baking.
Divide the batter evenly between the two prepared pans, spreading it out to create smooth, level tops. Tap each pan gently on the counter 3-4 times to remove any air bubbles. The batter should reach about ¾ of the way up the sides of the pans. Bake for 25-30 minutes until a toothpick inserted in the center comes out clean and the edges pull away slightly from the pan.
Cool and Layer with Powdered Sugar Glaze
Remove the cakes from the oven and let them cool in the pans for 10 minutes. Then invert them onto a wire rack to cool completely. While they’re cooling, make the glaze by whisking together the 0.5 cup powdered sugar with 1-2 tablespoons of non-dairy milk until smooth. You want a consistency that’s thick enough to coat but thin enough to drizzle.
Place the first cake layer on a serving plate and spread a thin layer of glaze over the top. This isn’t just decoration—it helps create that signature moist barrier between layers. Add the second layer on top and spread the remaining glaze over the entire cake, letting it drip slightly over the edges for that professional finish. The powdered sugar glaze keeps the cake moist while adding a delicate sweetness.
Slice and Serve for Maximum Fudgy Joy
Let the cake sit at room temperature for at least 1 hour before slicing—this allows the layers to fully set and the flavors to meld. Use a serrated knife and dip it in hot water between slices for clean cuts. Each slice should reveal a fudgy crumb with pockets of melted chocolate chips throughout.
The cake will stay moist for 3-4 days when stored in an airtight container at room temperature. For best results, serve within 24 hours when the flavors are at their peak. The combination of applesauce, non-dairy milk, and proper layering ensures that first bite stays wonderfully tender—not dry, not crumbly, but perfectly moist with that rich chocolate depth.
Pro Tips For Making 6 Inch Eggless Chocolate Cake
- MEASURE COCOA PRECISELY: Use a kitchen scale for the cocoa powder—1 tablespoon by volume is deceiving. Dutch-process cocoa is denser; scoop it straight from the bag, level it off, and don’t pack it down. I learned this the hard way when my cake turned bitter because I eyeballed it.
- CREAM BUTTER AND SUGAR LOW: Beat the butter and sugar on medium speed until just combined—no need for fluffy peaks. Overmixing traps air, which can make the cake dense. I used to go full speed and wondered why my 6-inch cake always felt heavy.
- DON’T OVERMIX THE BATTER: Stop folding in the dry ingredients as soon as they’re just incorporated. Stirring too much develops gluten, which turns your cake into a chewy brick. Think “damp flour,” not “smooth dough”—your future self will thank you.
- LET THE BUTTER COOL SLIGHTLY: Take the butter out of the fridge 10 minutes before creaming, but don’t let it get soft. Cold butter creates air pockets, but room-temp butter melts into a greasy mess. Aim for “yielding but not greasy”—press a finger in; it should leave a slight dent.
Essential equipment for 6 inch eggless chocolate cake
Stand Mixer Essentials
Your stand mixer is the MVP for this recipe—no eggs mean we need extra aeration to create that light, fluffy texture. I recommend the KitchenAid Artisan Series for its powerful motor and durable construction, but budget-friendly options like the Cuisinart SM-50 work too.
The paddle attachment is critical for creaming butter and sugar properly, while the wire whisk (if you have it) helps incorporate dry ingredients gently. Avoid hand-mixing here—the extra power ensures even distribution of ingredients without overworking the batter. 💪
6-Inch Cake Pans
Invest in two 6-inch round cake pans with removable bottoms—I swear by Wilton Perfect Results pans for their even heat distribution. If you don’t have removable bottoms, line the pans with parchment circles cut to fit snugly.
Avoid dark-colored pans (they can over-bake the edges) and always grease them thoroughly with unsalted butter and dust with flour. Pro tip: Chill your pans in the freezer for 10 minutes before baking to prevent sticking. ❄️
Mixing Bowls
Use two medium-sized mixing bowls—one for your dry ingredients and one for wet. I prefer stainless steel bowls (like OXO Good Grips) for their durability, but glass bowls work too.
Avoid plastic—they can retain odors and aren’t heat-safe. For sifting dry ingredients, a fine-mesh sifter (like Microplane) ensures no lumps, which keeps your cake layers smooth. 🧪
Measuring Tools
Precision matters here! Use a liquid measuring cup for the non-dairy milk and applesauce, and a dry measuring cup with a level edge for the flour and cocoa powder. For accuracy, spoon flour into the cup instead of scooping—this prevents packing.
A digital kitchen scale (like Escali Primo) is ideal for weighing ingredients like butter and sugar, but if you’re measuring by volume, use the spoon-and-level method. 📏
Wire Rack and Cooling
Never skip the wire cooling rack—it’s non-negotiable for even cooling. I love the OXO Good Grips design with non-slip feet. After baking, let the cakes cool in the pans for 10 minutes, then invert them onto the rack to cool completely.
This prevents soggy bottoms and helps the layers set properly. For extra insurance, place a silicon mat under the rack to catch any crumbs. 🍫
Optional Pro Tools
For the ultimate results, consider these upgrades: A thermometer (like Thermoworks Thermapen) ensures your oven is at the correct 350°F—home ovens often run hot or cold. A serrated knife (like Mercer Culinary) makes clean slices, and a pastry brush helps apply butter to pans evenly.
If you’re feeling fancy, a cake turntable makes layering and decorating effortless. But honestly? This cake tastes amazing with just the basics. 💡
Nutrition facts
Frequently asked questions
Can I substitute the applesauce with another egg replacement?
Yes! You can use ½ cup mashed banana or ½ cup unsweetened applesauce (same amount), but for best results, stick with applesauce. If you prefer a neutral flavor, ¼ cup ground flaxseed mixed with ¼ cup water (let it sit for 5 minutes to gel) works too. Avoid yogurt—it can make the cake too dense.
Why does my eggless cake turn out dry?
Most likely, you overbaked it or didn’t cool it properly. Remove the cake from the oven when a toothpick comes out with moist crumbs (not completely clean). Let it cool in the pan for 10 minutes before inverting, and always store it in an airtight container. For extra moisture, brush warm layers with simple syrup (equal parts sugar and water).
How do I make this cake gluten-free?
Replace the 1.5 cups all-purpose flour with a 1:1 gluten-free baking flour blend (like Bob’s Red Mill). Add ½ tsp xanthan gum if your blend doesn’t include it. For best texture, chill the batter for 30 minutes before baking. The cake will be slightly denser but still delicious!
Can I bake this in a different-sized pan?
For a single 8-inch layer, reduce baking time to 20-25 minutes and use ¾ of the batter. For a 9-inch pan, bake for 25-30 minutes but expect a thicker slice. Adjust oven temp to 340°F for larger pans to prevent over-browning. Always use parchment paper for easy release!
How can I make this cake vegan?
Swap the vanilla extract for vegan vanilla and use vegan butter** (like Earth Balance). For the non-dairy milk, choose almond or oat milk. The applesauce is already vegan! Test your butter first—some brands contain dairy. The cake will still be rich and moist with these adjustments.

- 3lb Prime Rib Roast Recipe: Juicy Pink Center Guaranteed in 3 Hours - October 31, 2026
- 5 Spice Cake Recipe: Warmly Spiced Layers With Crunchy Top - October 31, 2026
- 1950’s Macaroni and Cheese Recipe: Nostalgic Creamy Cheese Sauce with Buttery Noodles - October 31, 2026