
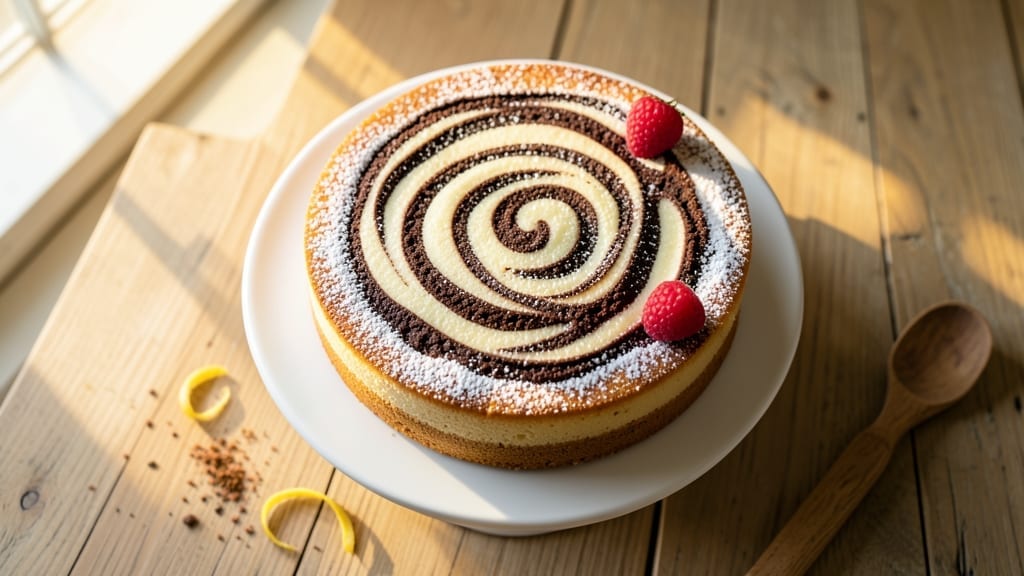
Mastering a 6-inch marble cake transforms simple baking into elegant swirl artistry—perfect for special occasions or weekend treats. The secret lies in the precise balance of vanilla and chocolate batters, combined just before baking to create those iconic marbled patterns.
I’ve perfected this recipe over years of testing, ensuring every slice delivers moist crumb, rich flavor, and that signature swirled beauty without requiring advanced techniques.
This recipe delivers restaurant-quality results with just five essential ingredients and a one-bowl mixing method, making it ideal for beginners and experienced bakers alike. The cake bakes in 25-30 minutes at 350°F, yielding a tender crumb with a subtle vanilla-chocolate harmony.
The key technique involves folding the batters together at the last moment to maintain those perfect, wavy marbles throughout.
What you’ll achieve is a golden, domed cake with a crackly top crust and moist interior, where each bite reveals the perfect marriage of sweet vanilla and deep chocolate. The swirls remain distinct yet harmonious, creating visual appeal that matches the flavor.
Serve it warm with a dusting of powdered sugar or chilled with whipped cream for a showstopping dessert every time.
This versatile cake works equally well for birthdays, anniversaries, or simply satisfying a sweet craving. The small size makes it perfect for two servings or portioning into individual slices. Once you try this marble cake, you’ll never go back to store-bought again—it’s that good. Let’s get baking!
Ingredients for 6 inch marble cake
Five ingredients create restaurant-quality marble cake magic—no fancy tools needed.
| Ingredient | Amount | Notes |
|---|---|---|
| Unsalted Butter 🧈 | ¾ cup | Softened to room temperature |
| Granulated White Sugar 🍚 | 1 ½ cups | Superfine preferred for smooth texture |
| All-Purpose Flour 🌾 | 1 ½ cups | Sifted for lightness |
| Pure Vanilla Extract 🌸 | 2 tsp | High-quality Madagascar bourbon |
| Unsweetened Cocoa Powder 🍫 | ½ cup | Natural or Dutch-processed |
| Large Eggs 🥚 | 2 whole | Room temperature for best mixing |
| Baking Powder 🍞 | 2 tsp | Diamond Crystal preferred |
| Salt 🧂 | ½ tsp | Fine sea salt |
| Milk 🥛 | ½ cup | Whole milk for richness |
| Powdered Sugar 🍚 | ¼ cup | For dusting finished cake |
The butter and sugar are non-negotiable here. European-style butter like Plugrá or Land O’Lakes unsalted gives the best flavor, but any good-quality brand works. For the sugar, superfine is ideal—it dissolves faster and creates a smoother texture. I always grab mine from Whole Foods or the baking aisle at Williams Sonoma since it’s worth the extra few cents. The cocoa powder? Natural cocoa gives a deeper chocolate flavor, while Dutch-processed is smoother—pick based on your preference. Store your butter wrapped in parchment in the fridge, and keep your cocoa in an airtight container away from heat.
No vanilla extract? Vanilla bean paste works perfectly—just use the same amount. Running short on eggs? Flax eggs (1 tbsp ground flaxseed + 3 tbsp water per egg) keep the texture intact, though texture might be slightly denser. The milk can be swapped for heavy cream or buttermilk—both add richness. If you’re using Dutch-processed cocoa, you might want to add an extra pinch of salt since it’s less acidic. For the flour, King Arthur or Bob’s Red Mill are my go-tos—they’re consistent and reliable. And trust me, sifting the flour and cocoa makes all the difference in that perfect tender crumb.
This cake is best made fresh, but you can prepare the batter up to 24 hours ahead and refrigerate it. Once baked, let it cool completely before slicing—at least 2 hours—so the swirls hold their shape. Store wrapped at room temperature for 3 days or freeze for 3 months. The powdered sugar dusting? Do it right before serving so it stays crisp. Pro tip: Slice with a serrated knife for clean cuts that show off those beautiful marbles.
Why You’ll Love This Recipe
- No Mixer Needed: I swear by this recipe because it’s all about the folding—no electric mixer required. Just cream the butter and sugar by hand until light, then gently fold in the flour and cocoa. It’s the kind of baking where you can chat with your kids (or binge a show) while the magic happens.
- Two Flavors, Zero Guilt: That rich chocolate swirl cutting through the tender vanilla? It’s like dessert had a personality split. The cocoa powder gives it depth without being heavy, and the vanilla extract—real vanilla, not imitation—makes every bite taste like a hug from your favorite bakery.
- Birthday or Breakfast: Serve it warm with whipped cream for a birthday celebration, or slice it cold for a midweek pick-me-up. Honestly, I’ve even packed it in lunchboxes—because nothing says “I care” like homemade cake in your kid’s bag. (Yes, even on a Tuesday.)
- Budget-Friendly Luxury: Butter and sugar are pantry staples, and a little cocoa powder stretches far. This recipe makes two perfect 6-inch cakes, so you get leftovers that taste fresher the second day than most store-bought slices ever did. Plus, the cost per serving? Less than a coffee shop’s overpriced muffin.
Step-by-step instructions for vanilla-chocolate marble cake
This elegant two-layer cake delivers perfect swirls with minimal effort—just one pan and a few clever techniques.
Prepare the Dry Ingredients for Maximum Lightness
In a medium bowl, whisk together the 1.5 cups all-purpose flour, 2 tsp baking powder, and 0.5 tsp salt until evenly combined. Sifting isn’t strictly necessary, but I like to give it a quick sift through a fine-mesh strainer to eliminate any lumps and aerate the flour. This ensures your cake will rise beautifully and have that signature tender crumb.
Set aside the flour mixture and, in a separate small bowl, whisk together the 0.5 cup unsweetened cocoa powder with the 1.5 cups granulated white sugar. This creates two distinct batters—one for the vanilla and one for the chocolate—while keeping the sugar evenly distributed in each. The cocoa powder dissolves completely in this step, preventing any gritty texture in your finished cake.
Cream Butter and Sugar for a Light, Airy Texture
In a stand mixer fitted with the paddle attachment, beat the 0.75 cup softened unsalted butter on medium speed until smooth and creamy, about 1-2 minutes. This ensures the butter is fully emulsified and ready to incorporate the sugar. Gradually add the 1.5 cups granulated white sugar (reserving 2 tablespoons for later) and beat on medium-high speed for 3-4 minutes until the mixture is light, fluffy, and nearly doubles in volume.
This creaming process is absolutely critical—it incorporates air into the batter, which creates those beautiful domed layers and a tender crumb. You’ll know it’s ready when the mixture looks pale and ribbon-like when you lift the paddle. If you’re using a hand mixer, this step will take about 5 minutes of steady beating.
Split the Batter and Create the Signature Marble Swirl
Divide the creamed butter-sugar mixture into two equal portions in two separate bowls. To one bowl, add 1 tsp of the 2 tsp pure vanilla extract and mix well. To the other bowl, add the remaining 1 tsp vanilla extract and the 0.5 cup cocoa-sugar mixture from Step 1, mixing until fully combined. These are your vanilla and chocolate batters.
In a third bowl, whisk together the 2 whole large eggs and 0.5 cup milk. Slowly pour this liquid mixture into the vanilla batter, mixing on low speed until just combined. Repeat with the chocolate batter, mixing until smooth but not overmixed. Here’s the magic: Pour the chocolate batter into the vanilla batter and, using a spatula, gently fold them together in a figure-eight motion until you achieve a beautiful marbled effect with distinct swirls.
Bake to Golden Perfection and Check for Doneness
Preheat your oven to 350°F and grease a 6-inch round cake pan generously with butter, then dust with flour or line with parchment paper for easy removal. Pour the marbled batter into the prepared pan and smooth the top with a spatula. Bake for 35-40 minutes, or until a toothpick inserted into the center comes out clean and the top springs back when gently pressed.
Here’s the thing about marble cakes—they often develop a crack on top as they bake, which is completely normal and actually enhances the visual appeal. If the edges brown too quickly, tent the pan with aluminum foil to prevent overbrowning while allowing the center to cook through. The cake is done when the internal temperature reaches 210°F—this ensures it’s fully baked without being dry.
Cool and Dust for a Showstopping Finish
Remove the cake from the oven and let it cool in the pan for 10 minutes. Then, transfer it to a wire rack to cool completely. Once fully cooled, dust the top generously with the 0.25 cup powdered sugar using a fine-mesh sieve. This step isn’t just for aesthetics—it also adds a delicate sweetness that balances the rich chocolate and vanilla flavors.
For an extra touch, you can slice the cake horizontally to reveal the stunning marble swirls inside. Serve at room temperature with a dollop of whipped cream or a scoop of vanilla ice cream. This cake keeps well at room temperature for 2 days or can be refrigerated for up to 5 days, though I promise it won’t last that long!
Pro Tips For Making 6 Inch Marble Cake
- Whip Butter Slowly: DESCRIPTION: Cream the butter and sugar until it’s light, fluffy, and leaves clean streaks on the bowl—about 3-5 minutes with a stand mixer. I used to rush this, and my cakes turned out dense; patience here makes all the difference for that tender crumb.
- Sift the Cocoa: DESCRIPTION: Measure cocoa powder by volume after sifting it—don’t just scoop from the bag. Unsifted cocoa packs tightly, throwing off the chocolate-to-flour ratio and making your cake taste flat. (Yes, even if the recipe says “1 oz,” sift first.)
- Don’t Overmix the Batter: DESCRIPTION: Fold in the flour just until combined—lumps are fine, but stop as soon as the dry ingredients disappear. Overmixing develops gluten, and your marble cake will turn out tough instead of light. (I learned this after making a brick the first time.)
- Chill the Pans: DESCRIPTION: Place your 6-inch pans in the freezer for 10 minutes before baking, then grease them with softened butter and dust with flour. Cold pans help the cake rise straight up instead of doming or sticking—no extra effort, just better results.
Perfect pairings for this dish
Classic Whipped Cream
Freshly whipped heavy cream with a pinch of vanilla extract and powdered sugar is the perfect finishing touch. I like to whip 1 cup heavy cream (chilled in the fridge for 30 minutes) with 2 tablespoons powdered sugar and ½ teaspoon vanilla until soft peaks form.
This light, airy topping complements the cake’s richness without overpowering its delicate flavors. 🥛
Vanilla Ice Cream
Serve your marble cake with a scoop of homemade vanilla ice cream for a nostalgic dessert experience. Look for brands like Ben & Jerry’s or Breyers for that creamy texture. For a gourmet touch, try Häagen-Dazs vanilla bean ice cream—its depth of flavor pairs beautifully with the cake’s swirls.
A few drops of hot fudge sauce drizzled over the top adds an extra layer of indulgence.
Espresso or Coffee Drizzle
If you love coffee, drizzle warm espresso or mocha sauce over the cake before serving. I recommend Starbucks Mocha Sauce for its rich, slightly bitter notes that cut through the sweetness.
Start with 1-2 teaspoons and adjust to taste. This works especially well with the chocolate swirls, enhancing their depth. ☕
Fresh Berries
Add a bright, fruity contrast with raspberries, strawberries, or blackberries. Arrange them in a circular pattern on top of the cake or serve them on the side for dipping.
The natural acidity of the berries balances the cake’s richness. For extra elegance, lightly dust them with powdered sugar before serving. 🍓
Chocolate Ganache
For chocolate lovers, a dark chocolate ganache drizzle elevates the cake to new heights. Melt ½ cup dark chocolate chips with ¼ cup heavy cream over a double boiler, then let it cool slightly before drizzling over the cake.
The ganache should be thick but pourable—70% dark chocolate works best for a balance of sweetness and bitterness. 🍫
Warm Caramel Sauce
Drizzle homemade caramel sauce over the cake for a gooey, sweet contrast. Heat ½ cup granulated sugar in a saucepan until melted, then add 3 tablespoons butter and ¼ cup heavy cream, stirring constantly until smooth.
Let it cool slightly before serving. This sauce adds a luxurious touch that pairs perfectly with the cake’s vanilla and chocolate notes. 🍯
Nutrition facts
Frequently asked questions
Why does my marble cake turn out more chocolate than vanilla?
This happens when the chocolate batter dominates during folding. To fix it, divide your creamed mixture exactly in half before adding flavors, and use a spatula to gently fold in a figure-eight motion—don’t overmix. For better control, try folding the vanilla batter into the chocolate batter instead of vice versa.
Can I make this cake in a different-sized pan?
Yes! For a 8-inch cake, increase baking time by 10-15 minutes (check at 45 minutes) and adjust oven temperature to 325°F to prevent overbrowning. For a 4-inch cake, reduce time to 20-25 minutes at 350°F. Always use the toothpick test for doneness.
How do I prevent the cake from cracking on top?
The crack is normal, but to minimize it, ensure your oven is fully preheated and your butter is soft but not melted. Avoid opening the oven door during baking. For extra insurance, place a small piece of aluminum foil on the cake’s top after 20 minutes of baking. The crack should still appear but will be less pronounced.
What’s the best way to store leftover marble cake?
Wrap the cake tightly in plastic wrap and store at room temperature for up to 3 days. For longer storage, freeze slices individually in airtight containers for 3 months. Thaw at room temperature for 1-2 hours before serving. Reheat briefly in the microwave (10 seconds) if you prefer it warm.
Can I substitute cake flour for all-purpose flour?
Yes! Replace the 1.5 cups all-purpose flour with 1.25 cups cake flour for a lighter texture. However, you’ll need to add 0.25 cups cornstarch to maintain structure. Sift both together for best results. The cake will be slightly more delicate but equally delicious.

- 3lb Prime Rib Roast Recipe: Juicy Pink Center Guaranteed in 3 Hours - October 31, 2026
- 5 Spice Cake Recipe: Warmly Spiced Layers With Crunchy Top - October 31, 2026
- 1950’s Macaroni and Cheese Recipe: Nostalgic Creamy Cheese Sauce with Buttery Noodles - October 31, 2026