
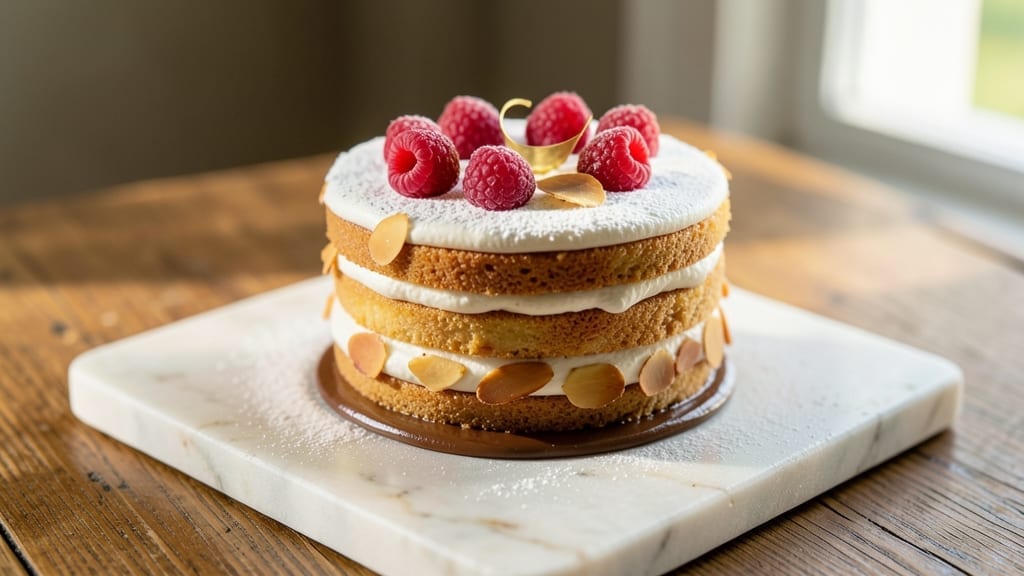
Mastering a 6-inch mini cake recipe transforms baking from overwhelming to delightfully manageable—each layer packed with flavor, precision, and that perfect balance of texture. These bite-sized cakes are ideal for parties, gifts, or satisfying a single craving without the commitment of a full-sized dessert.
The secret lies in a foolproof batter that bakes evenly in a 350°F oven for just 20-25 minutes, ensuring a tender crumb and golden top every time.
What sets these mini cakes apart is their versatility—whether you’re whipping up classic vanilla, rich chocolate, or fruity citrus flavors, the technique remains the same. The recipe yields three perfect layers, each with a moist interior and a crisp exterior, ready for filling and frosting.
No special equipment is needed beyond a standard 6-inch cake pan, making this a beginner-friendly project that still feels impressive.
The result is a stack of decadent, portable desserts that disappear faster than you can say “second slice.” Each layer holds its shape beautifully, making them perfect for decorating with buttercream, ganache, or fresh fruit.
Whether you’re prepping for a celebration or treating yourself, these mini cakes deliver restaurant-quality indulgence in a fraction of the time.
For those eager to customize, experiment with fillings like raspberry jam or salted caramel, or add sprinkles and edible flowers for a festive touch. The recipe scales effortlessly—double the batter for six cakes or halve it for a single serving. Let’s bake these crowd-pleasers with confidence.
Ingredients for 6 inch mini cake
Three layers of precision, packed with flavor—these ingredients transform simple baking into restaurant-worthy mini cakes.
| Ingredient | Amount | Notes |
|---|---|---|
| All-Purpose Flour 🌾 | 1 ½ cups | Sifted for light texture |
| Granulated Sugar 🍚 | 1 ¼ cups | Superfine preferred for smoothness |
| Unsalted Butter 🧈 | 1 cup | Room temperature, cubed |
| Large Eggs 🥚 | 3 whole | Room temperature, separated |
| Vanilla Extract 🌿 | 2 tsp | Pure Madagascar preferred |
| Baking Powder 🍞 | 1 ½ tsp | Aluminum-free for stability |
| Diamond Crystal Kosher Salt 🧂 | ½ tsp | Fine grain for even distribution |
| Whole Milk 🥛 | ½ cup | Room temperature for blending |
| Cocoa Powder 🍫 | ⅓ cup | Dutch-processed for richness (optional for chocolate flavor) |
| Lemon Zest 🍋 | 1 tbsp | Freshly grated for brightness (optional for citrus flavor) |
| Vanilla Bean Paste 🌿 | 1 tsp | For intense vanilla flavor (optional upgrade) |
| Buttercream Frosting 🧁 | 1 ½ cups | Homemade or quality store-bought |
| Raspberry Jam 🍓 | ¼ cup | For filling between layers (optional) |
| Edible Gold Leaf 🌟 | 1 sheet | For decorative touch (optional) |
| Fresh Berries 🍓 | ½ cup | For garnish (strawberries, raspberries, or blueberries) |
The butter and eggs are the foundation—room temperature is non-negotiable for a tender crumb. I always grab European-style butter from Whole Foods or Trader Joe’s for that extra richness, but any good-quality unsalted butter works. The vanilla extract makes a difference—Madagascar bourbon has a deeper, smoother flavor than imitation. For the flour, King Arthur or Gold Medal are my go-tos; they’re sifted for you, which saves time. If you’re making chocolate mini cakes, Dutch-processed cocoa powder is a game-changer—it’s smoother and richer than natural cocoa. And that lemon zest? It brightens the flavor without overpowering, especially in vanilla-based cakes. Trust me on this: fresh is always better than bottled zest.
No vanilla bean paste? Pure vanilla extract still works—just double the amount. Running short on buttercream? Cream cheese frosting is a delicious swap, though it’s heavier. The raspberry jam can be substituted with salted caramel or citrus curd for a different twist. For the edible gold leaf, Amazon or specialty baking stores carry it in sheets—it’s worth the splurge for that wow factor. If you’re feeling adventurous, matcha powder can replace cocoa for a vibrant green tea flavor. And if you’re baking for a crowd, pre-made fillings from Trader Joe’s save time without sacrificing quality. The key is balancing sweetness—jam can be tart, so taste as you go.
Store the dry ingredients (flour, cocoa, baking powder) in airtight containers in a cool, dark place for up to 6 months. The butter and eggs should be used within 2 weeks of opening, and the vanilla extract lasts 1 year unopened. Once baked, the mini cakes keep well in an airtight container at room temperature for 3 days, or in the fridge for 5 days. For longer storage, freeze the unfrosted layers for up to 3 months—just thaw at room temperature before assembling. The frosting and fillings should be refrigerated and used within 3 days of opening. Pro tip: Assemble the cakes the morning you plan to serve them so the frosting stays fresh and the layers hold their shape.
Why You’ll Love This Recipe
- I’ll be real: this uses stuff you already have. Flour, sugar, butter, eggs—no specialty ingredients, no extra shopping. The butter-to-sugar ratio means it’s rich but not heavy, and the eggs add structure without drying it out. Budget-friendly? Absolutely. Worth every penny? Even more so.
- No Mixer Needed: I swear by this—just cream butter and sugar by hand until it’s light and fluffy. No electric mixer, no fuss, and the eggs blend right in without overworking the batter. That vanilla? It’s the secret to that buttery-sweet aroma that fills the kitchen before the oven even beeps.
- Crowd-Pleasing Simplicity: Between us, this recipe is foolproof. Kids love the size—perfect for little hands—and adults adore the texture. The sugar-butter ratio gives it that classic cake crumb, but the vanilla keeps it from being too sweet. Honestly, it’s the kind of dessert that disappears faster than you can say “second slice.”
- Party in a Pan: Six-inch cakes are my go-to for gatherings. Make a batch ahead, wrap them in parchment, and pop them in the fridge. No last-minute stress—just pull them out, dust with powdered sugar, and boom, you’ve got a showstopper. (Yes, even on a Tuesday night.)
Step-by-step instructions for bite-sized decadence in 3 layers
Here’s how to craft these delicate mini cakes with professional precision and showstopping presentation.
Prepare the Cake Layers with Perfect Texture
Preheat your oven to 350°F and grease three 6-inch round cake pans thoroughly with butter, then line the bottoms with parchment circles. In a stand mixer fitted with the paddle attachment, cream the 1 cup unsalted butter and 1.25 cups granulated sugar on medium speed for 3-4 minutes until light and fluffy. This step is crucial—you’re incorporating air that will create that signature tender crumb.
Add the 3 whole large eggs one at a time, mixing just until each is incorporated before adding the next. Scrape down the sides of the bowl to ensure even distribution. In a separate bowl, whisk together the 1.5 cups all-purpose flour, 1.5 teaspoons baking powder, and 0.5 teaspoon kosher salt. With the mixer on low speed, alternately add the dry ingredients and 0.5 cup whole milk, beginning and ending with the flour mixture. Mix just until combined—overmixing develops gluten and creates tough cakes.
Divide the batter evenly among the prepared pans. For the chocolate layer, add 0.33 cup cocoa powder to the batter in one pan and mix gently. Bake for 25-30 minutes or until a toothpick inserted into the center comes out clean. Let the cakes cool in the pans for 10 minutes before transferring to a wire rack to cool completely. The chocolate layer should have a rich, velvety texture with no dryness at the center.
Assemble with Precision and Elegance
Once completely cool, level the tops of the cakes if needed using a serrated knife. Place the first layer on a cake stand or plate. Spread 2 tablespoons raspberry jam evenly over the top, leaving a ½-inch border to prevent sogginess. This layer of jam adds a delicate fruity contrast that brightens the rich chocolate and vanilla flavors.
Add the second layer on top, then spread another 2 tablespoons raspberry jam over it. For the final layer, place the third cake on top and gently press down to create a stable structure. The key here is patience—don’t rush the assembly, as this ensures clean, even layers that will hold up beautifully when sliced.
Create the Signature Buttercream Finish
Using an offset spatula, apply a thin crumb coat of 1 cup buttercream frosting over the entire cake. Chill in the refrigerator for 15 minutes to set. This step prevents crumbs from mixing into your final frosting layer, giving you that silky, professional finish. After chilling, apply the remaining 0.5 cup buttercream frosting in smooth, even strokes to create a flawless dome shape.
For the decorative touch, carefully apply the sheet edible gold leaf to the top of the cake using a small brush or your fingertip. The gold leaf should adhere smoothly, catching the light beautifully. Arrange the 0.5 cup fresh berries around the base of the cake for a pop of color and freshness that complements the rich flavors.
Final Touches for Showstopping Presentation
Use a sharp knife to create clean, precise cuts when serving these mini cakes. The layers should reveal the beautiful contrast between the vanilla sponge, chocolate layer, and jam filling. For an extra touch of elegance, dust the top and sides with a light layer of powdered sugar using a fine-mesh sieve. This not only adds to the visual appeal but also enhances the flavors by balancing the richness with a subtle sweetness.
Serve immediately to enjoy the perfect balance of textures and flavors. The cakes should be moist yet tender, with each bite offering a harmonious blend of vanilla, chocolate, and fruity jam. The edible gold leaf adds a luxurious finish that makes these mini cakes feel like a special occasion dessert, even when enjoyed in small portions.
Pro Tips For Making 6 Inch Mini Cake
- Cream Butter Until Pale: Whip that butter and sugar until it’s the color of vanilla ice cream—not just off-white. I used to stop at “lightened,” but this extra minute ensures your mini cakes stay moist and tender, not dense. The butter needs to dissolve properly into the sugar for that perfect crumb.
- Sift Flour Like a Pro: Skip the measuring cups—sift that all-purpose flour directly into your bowl. Packed flour adds bulk, and these tiny cakes won’t rise right. A quick shake of the sifter also aerates the flour, giving you a lighter texture without extra effort.
- Room-Temp Eggs Matter: Cold eggs? Don’t even think about it. Let those eggs sit in warm water for 10 minutes first—they’ll blend smoother and incorporate better into the batter. I learned this after struggling with lumpy mini cakes that looked like they’d been mixed with a fork.
- Bake Until Springy: Press the center of your mini cake—it should bounce back, not stay indented. Overbaking turns them dry, and underbaking leaves them gummy. A toothpick test is fine, but trust your finger more for these small batches. They cool fast, so pull them just before they’re “done.”
Wine and beer pairings for this recipe
Wine Pairings
A crisp Moscato d’Asti from Italy is my go-to wine for these delicate mini cakes—its light sweetness and effervescence complement the vanilla and berry flavors without overpowering. The bubbles cleanse your palate between bites, making each layer taste fresh.
Look for a 2022 vintage from Saracco or G.D. Vajra for quality under $20. 🍷
For chocolate lovers, a Pinot Noir with bright acidity and red fruit notes balances the richness beautifully. I recommend a Willamette Valley Pinot from Domaine Serene—its $35-$45 price point delivers restaurant-quality depth.
The earthy undertones in the wine mirror the cocoa powder’s intensity while keeping the dessert’s sweetness in harmony.
Beer Pairings
A Belgian witbier like Stella Artois or Hoegaarden brings a citrusy, floral brightness that cuts through the buttercream’s richness. The slight tartness in the beer enhances the raspberry jam filling, creating a refreshing contrast. Serve chilled at 45°F for the best balance. 🍺
For a richer pairing, try a honey ale like Allagash Honey Farmer—its malty sweetness mirrors the caramel notes in the vanilla cake while the honey’s floral aroma complements the edible gold leaf’s luxurious touch. The $8-$10 price point makes it a crowd-pleaser without breaking the bank.
Non-Alcoholic Options
Sparkling apple cider from Martinelli’s adds a festive touch with its crisp acidity and subtle sweetness. The $4-$6 price point makes it a budget-friendly choice that still feels special. Serve it chilled in small glasses to enhance the dessert’s elegant presentation.
A vanilla chai latte from Starbucks (the Iced Vanilla Sweet Cream Chai) offers a creamy, aromatic pairing that echoes the cake’s flavors. The warm spices in the drink complement the vanilla and cinnamon notes in the batter, creating a cohesive experience. 💛
Nutrition facts
Frequently asked questions
Can I make these mini cakes in a different size pan?
Yes, but adjust baking times carefully. For a 4-inch pan, bake 15-18 minutes at 350°F, while an 8-inch pan needs 30-35 minutes. The key is checking with a toothpick—when it comes out clean, your cake is done. Just remember smaller pans bake faster, so watch closely to avoid overbrowning.
How do I prevent my mini cakes from cracking?
Cracking usually happens from overmixing or sudden temperature changes. Mix just until combined, avoid opening the oven door early, and let cakes cool gradually in their pans for 10 minutes before removing. For extra insurance, chill the assembled cake for 30 minutes before frosting to stabilize the layers.
Can I substitute the buttercream frosting?
Try cream cheese frosting for a tangy twist or ganache for a richer finish. For a lighter option, whipped cream with powdered sugar works beautifully. Just adjust consistency—it should be thick enough to hold its shape but still spreadable. The chocolate layer pairs especially well with dark chocolate ganache.
How long can I store the unfrosted layers?
Unfrosted layers keep well in an airtight container at room temperature for 3 days or in the fridge for 5 days. For longer storage, wrap each layer tightly in plastic wrap and freeze for up to 3 months. Thaw overnight in the fridge before assembling—never at room temperature to prevent condensation.
What’s the best way to transport these mini cakes?
Assemble the cakes without frosting, then wrap each layer individually in plastic wrap. Place them in a sturdy box with dividers or separate them with parchment paper. Frost just before serving to maintain freshness. For extra protection, secure the top with a cake board and transport upright. The 6-inch size makes them perfect for gifting—just add a decorative ribbon!

- 3lb Prime Rib Roast Recipe: Juicy Pink Center Guaranteed in 3 Hours - October 31, 2026
- 5 Spice Cake Recipe: Warmly Spiced Layers With Crunchy Top - October 31, 2026
- 1950’s Macaroni and Cheese Recipe: Nostalgic Creamy Cheese Sauce with Buttery Noodles - October 31, 2026