
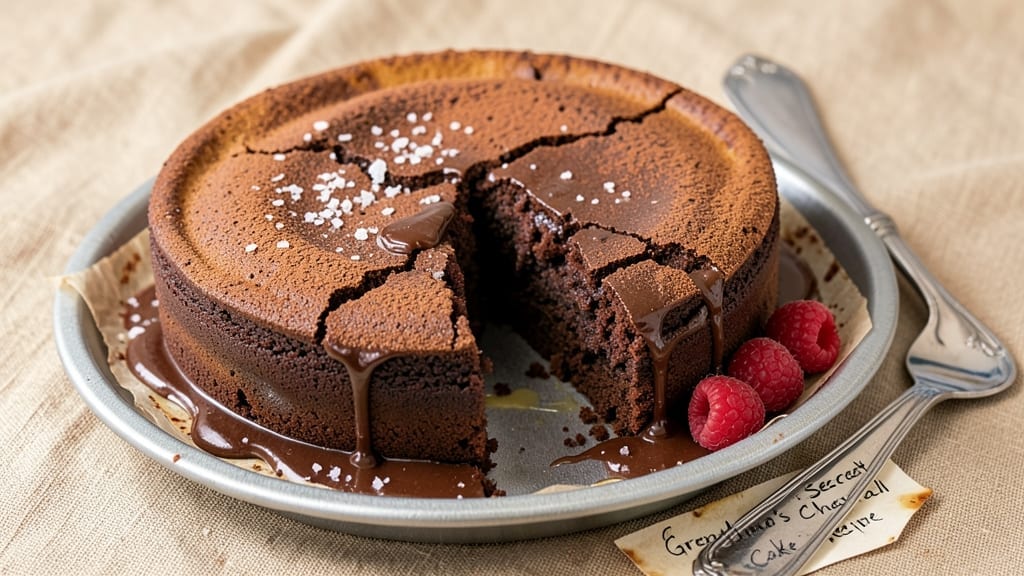
A 6-inch round chocolate cake baked in one bowl means no pans to wash, no layers to fuss with—just rich, moist chocolate perfection in minutes. This recipe delivers a fudgy yet tender center with a crackly top, all from a single 6-inch springform pan.
The secret? A precise mix of cocoa powder and buttermilk that keeps it ultra-moist without being dense, and a simple glaze that adds that restaurant-quality finish.
What makes this recipe stand out is its foolproof technique—no fancy equipment, no tricky steps. You’ll use standard pantry ingredients (flour, sugar, eggs, and cocoa) mixed in one bowl, then baked at 350°F for 25-30 minutes. The result?
A cake that’s perfectly portioned for one—ideal for a late-night craving, a single-serving dessert, or a small gathering where everyone wants their own slice. No one will guess it took just 15 minutes of active prep.
The cake itself is deep chocolate with a subtle bittersweet note, while the glaze adds a glossy sheen and just enough sweetness to balance the richness. It’s the kind of dessert that feels indulgent but comes together effortlessly.
Whether you’re serving it warm with ice cream or letting it cool for a clean slice, this cake delivers every time. Ready to bake?
This recipe also works beautifully for dietary adaptations—swap regular flour for almond flour for a gluten-free version, or use Greek yogurt instead of buttermilk for a lighter texture. The possibilities are endless, but the base recipe stays simple and reliable. Let’s get started with the ingredients.
Ingredients for 6 inch round chocolate cake
Pantry staples plus a few specialty touches—this 6-inch cake delivers restaurant-quality richness in one bowl.
| Ingredient | Amount | Notes |
|---|---|---|
| All-Purpose Flour 🌾 | ¾ cup | Sifted for light texture |
| Unsalted Butter 🧈 | ½ cup | Cold, cubed for even baking |
| Granulated Sugar 🍚 | ½ cup | Superfine preferred for smoothness |
| Cocoa Powder 🍫 | ⅓ cup | Dutch-processed for richness |
| Buttermilk 🥛 | ½ cup | Room temperature for best mixing |
| Large Eggs 🥚 | 1 whole | Room temperature for even baking |
| Baking Powder 🧂 | ½ tsp | Aluminum-free for tender crumb |
| Salt 🧂 | ¼ tsp | Fine sea salt preferred |
| Vanilla Extract 🌿 | 1 tsp | Pure Madagascar preferred |
| Powdered Sugar 🍚 | ¼ cup | For glaze, sifted |
| Heavy Cream 🥛 | ⅛ cup | Cold for glaze stability |
| Dark Chocolate Chips 🍫 | ¼ cup | 70% cocoa for intense flavor |
The cocoa powder is where the magic happens. Dutch-processed (like Droste or Valrhona) creates that deep, velvety chocolate flavor without bitterness. If you only have natural cocoa, reduce the amount by 1 tbsp and add 1 tbsp extra sugar. Butter quality matters too—Plugrá or Land O’Lakes unsalted work well, but avoid anything with additives. The buttermilk should be room temperature when measuring—cold buttermilk can make the batter too thick. For a gluten-free adaptation, swap the flour for Bob’s Red Mill 1:1 baking flour.
No buttermilk? Substitute with 0.5 cup milk plus 0.5 tsp vinegar or lemon juice, let sit 5 minutes. Vanilla extract can be omitted if you prefer a purer chocolate flavor, but the Madagascar bourbon variety adds subtle depth. Chocolate chips are optional but recommended—they melt beautifully into the cake’s tender crumb. For a vegan version, replace the butter with Earth Balance vegan butter and use flax eggs (1 tbsp ground flaxseed + 3 tbsp water). The powdered sugar glaze should be thin enough to drizzle but thick enough to coat—2-3 minutes of whisking achieves the perfect consistency.
Store the cake in an airtight container at room temperature for up to 3 days, or refrigerate for 5 days if you prefer a firmer texture. The glaze sets best after 1 hour of cooling, so plan ahead if serving immediately. For make-ahead convenience, bake the cake, let it cool completely, then wrap tightly in plastic wrap. It reheats beautifully in the microwave for 10-15 seconds—perfect for a quick single serving. The glaze can be made 1 day ahead and stored separately until ready to assemble.
Why You’ll Love This Recipe
- No Mixer Needed: I swear by this recipe because it only calls for a bowl and a whisk—no stand mixer, no food processor, just elbow grease for about five minutes. That buttermilk does the heavy lifting of tenderizing the crumb while you’re still deciding what to watch on TV.
- Rich Without Bitterness: The cocoa powder here isn’t the cheap stuff—it’s the kind that melts into your mouth instead of making you gag. That butter-to-sugar ratio? It keeps the cake moist but never cloying, with just enough depth to make it feel like a treat, not a chore.
- Portion Control Perfected: Six-inch rounds are my secret weapon for feeding two without leftovers (or guilt). Bake one for dessert, another for breakfast the next morning—it’s the same cake, just different vibes. Honestly, I’ve even microwaved a slice for a 3 a.m. sugar craving.
- Pantry Staple Magic: Between us, this recipe costs me about $3 for two cakes. Flour, sugar, butter—stuff I already have. The buttermilk? I make my own with milk and vinegar when I forget to buy it. It’s the kind of recipe that turns grocery runs into wins, not stress.
Step-by-step instructions for 6-Inch round chocolate cake
This one-bowl method delivers a perfectly moist, rich chocolate cake with crisp edges every time.
Prepare Your Mixing Bowl and Preheat the Oven
First, position a rack in the middle of your oven and preheat to 350°F. Grease a 6-inch round cake pan generously with unsalted butter (using the 0.5 cup you have measured), then line the bottom with parchment paper for easy removal. I like to use a small offset spatula to spread the butter evenly—this prevents sticking and ensures clean release later.
While the oven heats, sift together the 0.75 cup all-purpose flour, 0.33 cup cocoa powder, 0.5 tsp baking powder, and 0.25 tsp salt in a medium mixing bowl. Using a whisk, combine these dry ingredients until fully aerated—you should see no remaining lumps. This step creates the perfect foundation for a tender crumb. Set the bowl aside while you prepare the wet ingredients.
Cream Butter and Sugar for Maximum Fluffiness
In the same bowl (no need to wash it—this one-bowl method saves time), add the 0.5 cup unsalted butter (still cold) and 0.5 cup granulated sugar. Using an electric mixer on medium speed, beat these ingredients together for 2-3 minutes until light and fluffy. You’ll see the mixture nearly double in volume and become pale in color—this incorporates air that creates that signature tender texture.
Here’s the thing—don’t rush this step. If you skip it or beat too quickly, your cake will be dense. I’ve found that using a stand mixer with the paddle attachment gives the best results. Once properly creamed, the mixture should look like a thick, pale ribbon when you lift the beaters.
Combine Wet Ingredients for Perfect Moisture Balance
Add the 1 whole large egg to the butter-sugar mixture, mixing on low speed for 30 seconds until just combined. Then add the 0.5 cup buttermilk and 1 tsp vanilla extract, mixing on low speed for another 30 seconds until smooth. The buttermilk adds moisture and acidity that enhances the chocolate flavor while keeping the cake tender.
Now fold in the dry ingredients you prepared earlier using a spatula, mixing just until combined—you should still see some flour streaks. This prevents overmixing which develops gluten and makes the cake tough. Finally, gently fold in the 0.25 cup dark chocolate chips using a rubber spatula, being careful not to break them up too much. The chocolate should be evenly distributed throughout the batter.
Bake to Golden Perfection with Even Heat Distribution
Pour the batter into your prepared 6-inch round cake pan and smooth the top with a spatula. Tap the pan gently on the counter a few times to remove any air bubbles. Bake in the preheated 350°F oven for 25-30 minutes, or until a toothpick inserted in the center comes out clean. The edges should be set but the top should still look slightly soft—this indicates proper doneness.
I know it’s tempting to open the oven door early, but resist! The cake needs that full baking time to develop its structure. If you’re unsure, check at the 25-minute mark. The cake is done when it springs back slowly when touched in the center, and the edges pull away slightly from the pan.
Cool and Glaze for Ultimate Decadence
Remove the cake from the oven and let it cool in the pan for 10 minutes. Then carefully invert it onto a wire rack to cool completely. While the cake cools, prepare the glaze by whisking together the 0.25 cup powdered sugar and 0.125 cup cold heavy cream in a small bowl until smooth. The glaze should be thick but pourable—if it’s too thick, add 1-2 teaspoons of milk to achieve the right consistency.
Once the cake is completely cool, drizzle the glaze evenly over the top. For a professional finish, use a small offset spatula to spread the glaze smoothly. Let the glaze set for 10 minutes before serving. This cake is best enjoyed at room temperature when the glaze has fully set, creating that perfect balance of moist cake and sweet, creamy finish.
Pro Tips For Making 6 Inch Round Chocolate Cake
- MEASURE COCOA ACCURATELY: Use a kitchen scale for the cocoa powder—spoons pack it differently, and even a tablespoon too much can make your cake dense or bitter. I learned this the hard way when my first batch turned out like a brick.
- CREAM BUTTER AND SUGAR LONG: Beat the butter and sugar until it’s light and fluffy—about 3-4 minutes with a stand mixer. Stopping early means a tougher cake, and no one wants that. (Yes, even if you’re impatient like me.)
- DON’T OVERMIX THE BATTER: Once you add the flour and buttermilk, mix just until combined—overmixing develops gluten and turns your cake into a sad, chewy mess. Think “lumps still visible,” not “smooth perfection.”
- CHILL THE BATTER 10 MINUTES: Let the batter sit before baking—it helps the cocoa dissolve fully and prevents a sunken center. I skip this when I’m rushed, but the difference in texture is noticeable. (Your future self will thank you.)
Storing and reheating your 6 inch round chocolate cake
Room Temperature Storage
Store your cake in an airtight container at room temperature for up to 3 days—this keeps it perfectly moist without drying out. I like using a glass container with a silicone lid (like Pyrex) because it maintains humidity better than plastic.
Place the cake on a wire rack inside the container to prevent sogginess from condensation. 💫
Refrigerator Storage
If you need to store it longer, refrigerate for up to 5 days in the same airtight container. The cold temperature actually preserves the cake’s texture better than room storage, though the glaze may set slightly firmer.
Let it sit at room temperature for 10-15 minutes before serving to restore the perfect balance of soft cake and glossy glaze.
Freezing for Later
For maximum shelf life, freeze the cake (without glaze) for up to 3 months. Wrap it tightly in plastic wrap first, then place in a freezer bag with all air squeezed out.
When ready to serve, thaw at room temperature for 2 hours, then add fresh glaze. The texture remains moist, though slightly denser after freezing. This is perfect for make-ahead desserts! ❄️
Reheating Warm Slices
For a warm serving, microwave individual slices on medium power (70%) for 10-15 seconds. Cover with a damp paper towel to prevent drying. Alternatively, warm in a 200°F oven for 5-7 minutes for even heating. The glaze will soften beautifully, making it feel like fresh-baked perfection every time.
Glaze Refresh Tips
If the glaze looks dry after storage, simply rewarm it by whisking with 1 tsp warm water or heavy cream. For a restaurant-style finish, dust with powdered sugar or add chocolate shavings before serving.
The glaze can also be made 1 day ahead and stored separately—just whisk before using for a smooth application. 🍫
Nutrition facts
Frequently asked questions
Can I use this recipe for a larger cake?
This recipe is specifically designed for a 6-inch round cake to ensure perfect texture and portion control. For a larger cake, you’d need to adjust the recipe significantly—typically 1.5x to 2x the ingredients for an 8-inch pan, but you’ll also need to increase baking time by about 10-15 minutes and potentially add another layer. The one-bowl method works best for single servings!
Why does my cake turn out dense?
Dense cake usually happens from overmixing the batter or using the wrong cocoa powder. Make sure to fold the dry ingredients just until combined (you should still see flour streaks), and always use Dutch-processed cocoa powder. If you’re in a hurry, skip the creaming step—but your cake will be less tender. Also, don’t overfill the pan (this batter should fill about 2/3 of a 6-inch pan).
Can I make this cake without buttermilk?
The easiest substitute is 0.5 cup milk plus 0.5 tsp vinegar or lemon juice, let sit for 5 minutes. For a dairy-free option, use 0.5 cup coconut milk (full-fat) or unsweetened almond milk with 1 tsp vinegar. The acidity helps activate the baking powder for proper rise. Just be sure all liquids are room temperature for best results.
How do I make this gluten-free?
Swap the all-purpose flour for a 1:1 gluten-free baking flour blend like Bob’s Red Mill or King Arthur. You may need to add 0.25 tsp xanthan gum if your blend doesn’t contain it already. For best results, measure carefully—gluten-free flours absorb moisture differently. Also, don’t overmix, as gluten-free batters can become gummy. The cake will still be moist but may have a slightly denser texture.
Can I add other mix-ins like nuts or fruit?
Yes, but keep it simple! Fold in 0.25 cup chopped walnuts or pecans or 0.5 cup dried cranberries with the chocolate chips. Avoid adding too much liquid (like fresh fruit) as it can make the cake too wet. For a boozy twist, add 1 tsp rum or espresso powder to the batter. Just remember to reduce the chocolate chips by 2 tbsp if adding extra mix-ins to maintain balance.

- 5 Lb Eye Round Roast Recipe: Slow-Braised to Melt-in-Mouth Tenderness - November 3, 2026
- 3-Hour Ciabatta Bread Recipe: Crusty Chews and Airy Holes Mastered - November 3, 2026
- 5 Fruit Salad Recipe: Vibrant Rainbow Layers With No Brown Spots - November 3, 2026