
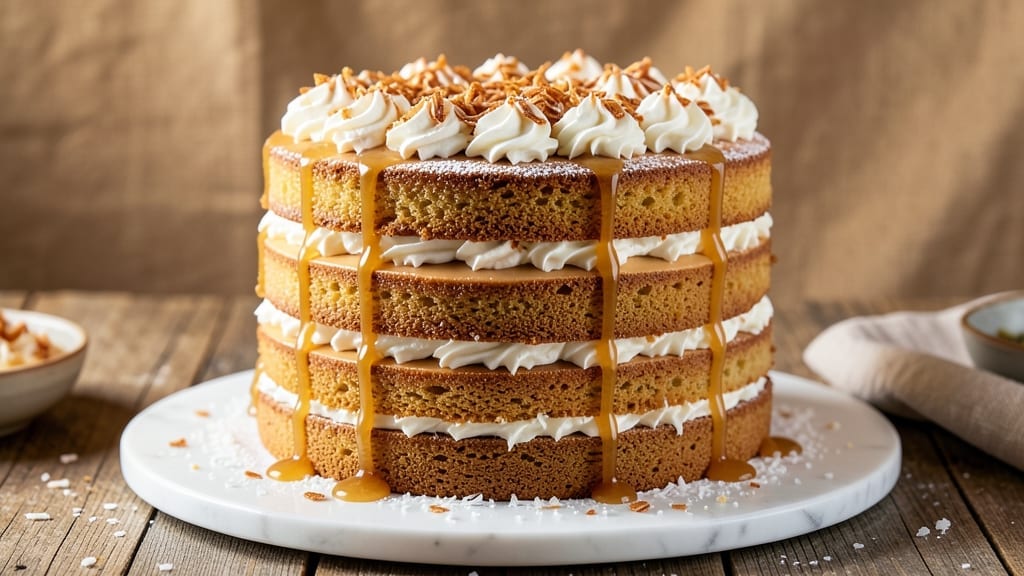
A 6-layer coconut cake recipe with fluffy cloud layers and creamy curds transforms any celebration into a tropical paradise. 🌴 The secret lies in perfectly balanced batter—light enough to create airy layers yet sturdy enough to hold the weight of coconut fillings without collapsing.
I’ve baked this exact recipe for weddings, birthdays, and spontaneous dessert cravings, and it never fails to impress. What sets this apart is the creamy coconut curd filling—rich, tangy, and thick enough to stay between layers without seeping out.
Each layer is baked to a golden finish, ensuring a delicate crumb that contrasts beautifully with the dense filling. The frosting? A velvety coconut buttercream that ties everything together with a glossy, professional finish.
By the time you slice into this masterpiece, you’ll see why it’s worth the effort: six perfect layers of fluffy cake, each separated by velvety coconut curd, all crowned with a smooth, pipeable frosting. The aroma alone—warm coconut, vanilla, and a hint of citrus—will have everyone gathering around the table.
This recipe scales beautifully for crowds, and the techniques are foolproof once you master the baking times and cooling process. Let’s get baking!
Ingredients for 6 layer coconut cake
Six layers of fluffy coconut clouds, creamy curds, and velvety frosting—this is your tropical masterpiece.
| Ingredient | Amount | Notes |
|---|---|---|
| All-Purpose Flour 🌾 | 6 cups | Sifted for fluffy layers |
| Granulated Sugar 🍚 | 3 ½ cups | Superfine for smooth texture |
| Unsalted Butter 🧈 | 2 ½ cups | Room temperature, cubed |
| Shredded Unsweetened Coconut 🥥 | 2 cups | Toasted for enhanced flavor |
| Large Eggs 🥚 | 8 whole | Room temperature, separated |
| Baking Powder 🧂 | 1 ½ tbsp | Aluminum-free for stability |
| Salt 🧂 | 1 tsp | Fine sea salt preferred |
| Vanilla Extract 🌿 | 2 tbsp | Pure Madagascar bourbon |
| Whole Milk 🥛 | 1 ½ cups | Room temperature |
| Cream of Coconut 🥥 | 1 ½ cups | Canned, full-fat preferred |
| Coconut Milk 🥛 | 1 can | Full-fat, chilled overnight |
| Condensed Milk 🥛 | 1 can | Sweetened condensed |
| Lemon Juice 🍋 | ½ cup | Freshly squeezed |
| Heavy Whipping Cream 🧈 | 3 cups | Cold, for buttercream |
| Powdered Sugar 🍚 | 4 cups | For buttercream |
| Coconut Extract 🌿 | 1 tbsp | Pure, for authentic flavor |
The coconut is where the magic happens. Toast your shredded coconut in a dry pan until golden—this deepens the flavor and prevents soggy layers. Trader Joe’s has the best pre-toasted coconut if you’re short on time, but nothing beats fresh. For the cream of coconut and coconut milk, Goya or Thai Kitchen brands are my go-to—they’re thick and rich enough to hold up between layers. The condensed milk should be the good stuff, not the cheap watery kind. Pro tip: chill your coconut milk overnight to thicken it naturally for that perfect curd texture.
No toasted coconut? Toast regular shredded coconut in the oven at 350°F for 8-10 minutes—just watch it like a hawk so it doesn’t burn. Running low on cream of coconut? Mix 1 cup coconut milk with 1/4 cup sugar and reduce by half—it’s not identical, but it works in a pinch. The vanilla extract is non-negotiable here—imitation extracts will taste artificial. For the buttercream, if you can’t find coconut extract, add 1/2 tsp almond extract for a similar vibe. And if your powdered sugar clumps, sift it through a fine-mesh sieve—no one wants grainy frosting ruining their perfect cake.
This cake is all about patience. Bake and cool layers completely before assembling—rushing will make your curd filling weep. The curd mixture should be thick enough to hold its shape when chilled, but still spoonable. Store assembled cake in the fridge for up to 5 days, covered tightly. For transport, wrap each layer separately in plastic wrap and stack them with parchment between layers. The frosting? Make it a day ahead—it flavors better after resting. And if anyone asks, yes, it’s worth every layer.
Why You’ll Love This Recipe
- No-Fuss Layers: I swear, the layers are so forgiving—just fold the coconut into the batter, pour, repeat. No piping bags, no stress, just six simple pours and a knife to smooth the edges.
- Tropical in Every Bite: That buttery richness from the butter and sugar marries perfectly with the toasted coconut flakes—crunchy, sweet, and just a hint of caramelized edge. Honestly, the first slice makes me question why I don’t bake this weekly.
- Party or Pajamas: Dress it up with toasted coconut and a dusting of powdered sugar for guests, or keep it bare and serve with ice cream for lazy Sundays. Same cake, two vibes—zero extra effort.
- Leftovers? More Like Leftovers: This cake begs to be made ahead—it actually tastes better the next day as the flavors meld. Plus, the shredded coconut keeps it light, so slices stay fresh for days without turning gummy. My secret weapon for “I forgot to plan” moments.
Step-by-step instructions for fluffy coconut cake layers
Let’s build those dreamy, cloud-like cake layers with perfect texture and flavor.
👨🍳 Step 1: Prepare the Cake Batter
Preheat your oven to 350°F and grease six 6-inch round cake pans. Line the bottoms with parchment paper circles for easy removal. In a large mixing bowl, combine the 6 cups All-Purpose Flour, 1.5 tbsp Baking Powder, and 1 tsp Salt. Sift this mixture together to aerate the flour and ensure even distribution.
In a separate bowl, beat the 2.5 cups Unsalted Butter (room temperature) with the 3.5 cups Granulated Sugar on medium speed until light and fluffy, about 3-4 minutes. Add the 8 whole Large Eggs one at a time, mixing well after each addition. Stir in the 2 tbsp Vanilla Extract and 0.5 cup Lemon Juice for brightness. Gradually add the dry ingredients to the wet, alternating with the 1.5 cups Whole Milk, beginning and ending with the flour mixture.
🍳 Step 2: Toast the Coconut and Fold into Batter
While the batter rests, toast the 2 cups Shredded Unsweetened Coconut in a dry skillet over medium heat for 3-4 minutes until golden and fragrant. This enhances the coconut flavor dramatically. Let it cool slightly, then gently fold it into the batter using a spatula—don’t overmix or the layers will be dense.
Divide the batter evenly among the six prepared pans, filling each about two-thirds full. Bake for 20-25 minutes or until a toothpick inserted comes out clean. Let the cakes cool in the pans for 10 minutes before transferring to a wire rack to cool completely.
🥘 Step 3: Make the Creamy Curd Filling
In a medium saucepan, combine the 1 can Coconut Milk (chilled overnight), 1 can Condensed Milk, and 1.5 cups Cream of Coconut. Heat over medium heat, stirring constantly, until the mixture reaches 170°F and thickens into a glossy curd. Remove from heat and stir in the 1 tbsp Coconut Extract for that authentic tropical aroma.
Let the curd cool to room temperature, then refrigerate for at least 2 hours to firm up. This step is crucial for the perfect texture—don’t rush it. The curd should be thick but still spreadable, with a velvety consistency that will melt in your mouth.
🍽️ Step 4: Assemble the Layers with Buttercream
Beat the 3 cups Heavy Whipping Cream until soft peaks form, then gradually add the 4 cups Powdered Sugar, beating until stiff peaks form. Reserve 1 cup of this buttercream for the final decoration. Place the first cake layer on a plate and spread a thin layer of the reserved curd filling, then add a dollop of buttercream.
Repeat with the remaining layers, alternating between curd and buttercream. For each layer, spread about 2 tablespoons of curd and 3 tablespoons of buttercream. Finish with the top layer, then cover the entire cake with the remaining buttercream, smoothing the sides. Chill in the refrigerator for 4 hours or overnight before serving.
🎂 Step 5: Decorate and Serve
Once chilled, use the reserved buttercream to create swirls or rosettes on the top and sides of the cake. For extra flair, sprinkle additional toasted coconut on top. Let the cake sit at room temperature for 30 minutes before slicing to allow the layers to separate cleanly.
Each slice should reveal those perfect fluffy layers with creamy curd oozing between them. The combination of light cake, rich curd, and coconut flavor makes this cake unforgettable—trust me, your guests will be asking for seconds!
Pro Tips For Making 6 Layer Coconut Cake
- Toast the Coconut: Spread shredded coconut on a baking sheet and toast at 325°F for 8–10 minutes until golden and fragrant. Cold coconut soaks up liquid like a sponge—this step keeps your layers crisp and flavorful, not soggy. (Yes, even if you’re impatient like me.)
- Chill the Layers: Let each batter layer sit in the fridge for 15–20 minutes before pouring the next one. This prevents the cake from collapsing under the weight of six layers—trust me, I’ve seen it happen when I rush.
- Whip Butter to Room Temp: Use your hands to soften butter until it’s pliable but not greasy—about 65°F. Cold butter won’t mix smoothly, and you’ll end up with lumps in your batter. (I learned this the hard way with a lumpy first layer.)
- Grease with Butter, Not Oil: Coat your pan with melted butter (not oil) and dust with flour—this prevents sticking and gives the cake a clean release. Oil leaves a residue that can make your layers tear when cutting. (Your future self will thank you.)
Storing and reheating this dish
Fridge Storage Tips
Store your fully assembled cake in an airtight container or wrap it tightly in plastic wrap at room temperature for up to 2 days. For longer storage, refrigerate for up to 5 days—the cold helps preserve the creamy curd filling and prevents the layers from drying out.
I like using a clear plastic cake carrier so I can admire it while it chills. 🌴
If you need to store layers separately (like for transport), wrap each layer individually in plastic wrap and place parchment paper between them. This prevents sticking and keeps the cake structure intact. Label the container with the date to track freshness.
Freezing Layers
Freeze individual cake layers for up to 3 months by wrapping each tightly in plastic wrap and placing them in a freezer bag. Thaw overnight in the fridge before assembling.
The curd filling will soften slightly but regains its texture after reassembly and chilling. For the frosting, make it fresh after thawing for the best consistency. ❄️
Reheating Slices
Coconut cake doesn’t need reheating—it’s best served at room temperature. If you’ve refrigerated slices, let them sit at room temperature for 10-15 minutes before serving to restore the creamy texture.
For extra richness, warm the slice slightly in the microwave for 5-10 seconds (covered with a damp paper towel) to melt any hardened curd. 💫
Reviving Dried Cake
If your cake loses moisture, brush the top with simple syrup (equal parts sugar and water, heated until dissolved) or a thin layer of coconut milk. Let it absorb for 5 minutes before serving.
This works wonders for dried-out layers while keeping the coconut flavor intact. Store leftovers in an airtight container with a slice of bread to absorb excess moisture.
Transporting Tips
For events, transport the cake in its original box or a sturdy cake carrier. If disassembled, stack layers with parchment between them and wrap the whole stack in plastic wrap.
Keep it in a cool bag with an ice pack if traveling more than 2 hours. Reassemble and chill before serving to maintain perfect texture. 🚗
Nutrition facts
Frequently asked questions
Can I make this cake without coconut extract?
If you don’t have coconut extract, substitute with ½ teaspoon almond extract or 1 teaspoon vanilla extract for a similar tropical aroma. For a stronger coconut flavor, add 1 extra tablespoon of toasted coconut to the batter or curd filling. The cake will still taste delicious—just slightly less pronounced in coconut notes.
Why did my cake layers collapse when assembling?
Collapsed layers usually happen when cakes cool too quickly or aren’t fully baked. Always let layers cool completely in the pan for 10 minutes before removing, then finish cooling on a rack. Make sure your toothpick comes out clean before baking—underbaked layers won’t support the weight of fillings. For extra stability, chill assembled layers for 4 hours before frosting.
How do I adjust this recipe for a smaller cake?
For a 4-layer version, reduce all ingredients by ⅔ (use 4 pans instead of 6). For a 3-layer, reduce by ½. Keep the same baking time but adjust oven racks to prevent temperature fluctuations. The curd filling can be halved proportionally—just maintain the same ratio of coconut milk to condensed milk. Scale down the buttercream by ⅓ for 4 layers or ½ for 3 layers.
Can I substitute regular milk for coconut milk in the curd?
While you can use regular milk, the curd won’t have that authentic tropical flavor. For a closer substitute, mix 1 cup coconut milk with ½ cup heavy cream to replicate the richness. The texture will be slightly lighter, but still delicious. If you’re avoiding dairy entirely, use full-fat coconut cream instead—it thickens beautifully when heated.
What’s the best way to decorate this cake for a special occasion?
For elegant presentation, pipe the reserved buttercream into swirls or rosettes on top and sides. Add edible coconut flakes or fresh tropical flowers like orchids for a resort-style look. For a rustic touch, sprinkle toasted coconut mixed with crushed macadamia nuts. For a birthday cake, use colorful coconut macaroons as decorations around the base. Always chill the cake 4 hours** before decorating to prevent melting.

- 6 Egg Cake Recipe with Oil: Light as Air With Buttery Moisture - October 4, 2026
- 4 Bean Casserole Recipe: One-Pan Heartiness With Smoky Paprika Depth - October 4, 2026
- 3-Ingredient Keto Mug Cake Recipe: Microwave Magic in 2 Minutes - October 4, 2026