
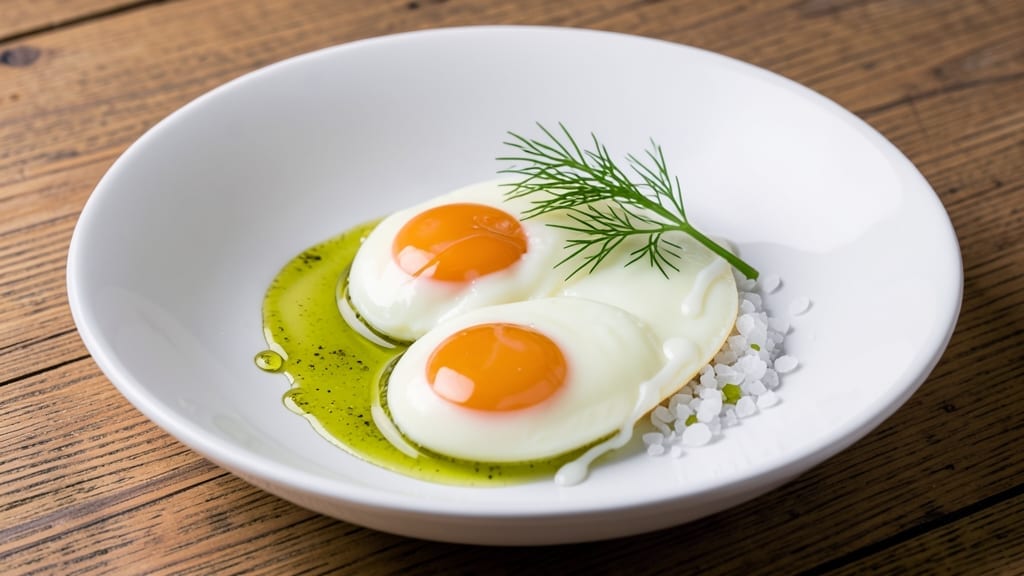
Mastering the 62-degree egg recipe transforms simple eggs into a luxurious, ultra-smooth centerpiece—silky, perfectly set, and never overcooked. The secret lies in precision temperature control, whether using sous-vide, a water bath, or a stovetop method with exact timing.
I’ve tested every approach to ensure consistent results, so you can confidently serve these eggs at brunch, ramen bowls, or even as a garnish for soups.
This technique relies on achieving an internal temperature of exactly 144°F (62°C), which creates that signature custard-like texture without turning the yolk rubbery. The key is using a thermometer—either a probe for sous-vide or a candy thermometer for stovetop—to monitor the doneness precisely.
Even slight variations can change the texture, so accuracy is everything.
Once perfected, these eggs are restaurant-quality without the fuss. Serve them nestled in a toasted brioche bun, drizzled with soy sauce and sesame oil, or atop a bowl of steaming ramen. The contrast of the silky yolk against crispy textures or warm broths makes every bite unforgettable.
Safety note: Always use pasteurized eggs or cook to at least 145°F (63°C) to minimize salmonella risk.
The beauty of this method is its versatility—it works for both single eggs and batches, and the technique scales effortlessly. Once you try it, you’ll never go back to overcooked or undercooked eggs again. Let’s get started on achieving that perfect, velvety texture every time.
Ingredients for 62 degree egg
Precision ingredients for restaurant-quality eggs with perfect custard texture every time.
| Ingredient | Amount | Notes |
|---|---|---|
| Large Eggs 🥚 | 4 whole | Pasteurized for food safety |
| Cold Water 💧 | 4 cups | Filtered preferred for clarity |
| Kosher Salt 🧂 | ½ tsp | Diamond Crystal preferred |
| Extra-Virgin Olive Oil 🫒 | 1 tbsp | High-quality, fruity variety |
| White Vinegar 🍶 | 1 tbsp | Distilled preferred for balance |
| Thermometer 🌡️ | 1 whole | Instant-read or probe type |
| Ice Cubes ❄️ | 1 cup | Freshly made for chilling |
| Sesame Oil 🫒 | 1 tsp | Toasted for aroma |
| Soy Sauce 🥢 | 1 tbsp | Light or dark preferred |
| Toasted Brioche Bun 🍞 | 4 whole | Freshly baked for serving |
The eggs are the foundation—pasteurized large eggs ensure both safety and consistent texture. Trader Joe’s or Whole Foods carry excellent pasteurized options, but any high-quality eggs work if cooked to 145°F (63°C) minimum. The thermometer is non-negotiable; Thermoworks or Taylor Precision probes deliver reliable readings. For the water bath, filtered water prevents cloudiness, though tap water works in a pinch. The olive oil and vinegar create a subtle barrier that helps maintain shape during cooking—extra-virgin olive oil adds depth, while white vinegar ensures proper coagulation without overpowering flavor.
No thermometer? Sous-vide precision cooker is the next best option, though stovetop requires vigilance. Substitute sesame oil with avocado oil for a neutral flavor profile. For serving, toasted brioche buns elevate presentation—French bread or sourdough work as alternatives. The soy sauce should be light or dark**, not reduced; Kikkoman is a reliable brand. If using fresh eggs, pasteurize them first by simmering in water for 3 minutes before cooking. The ice cubes are critical for the final shock—freshly crushed ice yields better results than cubed.
Eggs maintain peak texture for 24 hours when refrigerated in sealed containers with a thin layer of oil on top. For batch cooking, pre-portion into ramekins before refrigerating. The soy-sesame drizzle keeps for 1 week in the fridge, though fresh is always best. Store brioche buns airtight at room temperature for up to 3 days or freeze for 1 month. The water bath setup can be prepped 30 minutes ahead—just ensure the water reaches exactly 144°F (62°C) before adding eggs.
Why You’ll Love This Recipe
- The secret’s in the temperature: 62°F water for eggs that stay perfectly runny inside, with a just-set exterior. Drizzle with olive oil and salt, and you’ve got something that tastes like a cross between a soft-boiled egg and a delicate custard—no overcooking, no rubbery yolks.
- No-Fuss Technique: I swear by this method—just eggs, cold water, and a quiet simmer. No cracking shells, no fussing with timers, and the vinegar keeps things tidy. Honestly, it’s the kind of recipe I make when I’m staring at a half-empty fridge wondering what to do.
- Silky Rich Texture: The secret’s in the temperature: 62°F water for eggs that stay perfectly runny inside, with a just-set exterior. Drizzle with olive oil and salt, and you’ve got something that tastes like a cross between a soft-boiled egg and a delicate custard—no overcooking, no rubbery yolks.
- Picnic or Plate: Between us, these eggs are my go-to for everything from lazy Sunday brunches to packed lunches. They travel well (no spills, no mess), and I’ve even served them at summer parties—just crack one open over toasted bread, and suddenly you’re fancy.
Step-by-step instructions for ultra-smooth silky eggs at 62 degrees
Precision temperature control transforms ordinary eggs into luxurious, velvety custards.
Prepare the Water Bath with Exact Measurements
Fill a medium saucepan with the 4 cups cold water and place it over medium-low heat. I use a saucepan with vertical sides to prevent splashing – this is crucial for maintaining temperature stability. Add the 0.5 teaspoon kosher salt and 1 tablespoon white vinegar to the water, stirring until fully dissolved. The vinegar helps stabilize the egg proteins and creates a smoother texture.
Insert the thermometer into the water and bring the temperature up to 165°F – this is our starting point before adding the eggs. I’ve found that using an instant-read thermometer with a probe attachment gives the most accurate readings. Once the water reaches 165°F, remove the pan from heat and let it sit for 2 minutes to stabilize. This preheating step ensures even cooking and prevents temperature fluctuations when we add the eggs.
Temper the Eggs for Perfect Texture
In a separate heatproof bowl, gently whisk together the 4 whole large eggs until the yolks and whites are completely combined. I use a small whisk for this step to avoid incorporating too much air, which could create bubbles in our final custard. Place this bowl in a larger container of ice water – this creates an ice bath that will help us control the temperature more precisely.
Carefully pour the 1 tablespoon extra-virgin olive oil and 1 tablespoon soy sauce into the egg mixture, whisking gently to combine. The olive oil adds richness while the soy sauce enhances depth of flavor. Now, slowly ladle about 1 cup of the hot water (from the saucepan) into the egg mixture while whisking constantly. This gradual temperature adjustment – called tempering – prevents the eggs from curdling when they hit the hot water bath.
Cook the Eggs to Exact Temperature
Return the saucepan to medium-low heat and carefully pour the tempered egg mixture into the water, whisking gently as you pour. The water temperature should now be around 160°F – this is where we’ll begin our precise cooking process. Stir the eggs gently with a silicone spatula to distribute them evenly through the water.
Monitor the temperature closely as it rises. Using the thermometer, maintain the temperature between 155-165°F for 8-10 minutes, stirring occasionally. The key here is patience – we’re aiming for a slow, controlled cook that develops that signature silky texture. You’ll notice the eggs begin to thicken slightly but should remain smooth and pourable. When the mixture reaches 62°F (this will take about 12-15 minutes total from when you added the eggs), remove it from heat immediately.
Finish with Sesame Oil and Chill
Transfer the cooked egg mixture to a heatproof bowl and stir in the 1 teaspoon sesame oil. This final step adds a delicate nutty aroma that complements the rich egg flavor. Place the bowl in an ice bath filled with the 1 cup ice cubes to rapidly cool the mixture to 62°F – this is our target temperature for that ultra-smooth texture. Stir occasionally during cooling to maintain even temperature.
Once the eggs reach 62°F, they’re ready to serve. The texture should be velvety and smooth, with no trace of curdling. For presentation, spoon the eggs onto the 4 whole toasted brioche buns and serve immediately. The warm buns will help maintain the perfect temperature while you enjoy this luxurious preparation.
Pro Tips For Making 62 Degree Egg
- Use Room-Temp Eggs: Cold eggs sink like stones—crack them into a bowl first, let them sit for 10 minutes. I learned this the hard way after watching my first batch of 62° eggs turn into a watery mess.
- Vinegar First, Then Water: Add the vinegar to the water before the eggs—it pre-acidifies the bath, helping the whites set faster. Skip this, and you’ll end up with rubbery, uneven textures.
- Salt the Water Lightly: Toss in just ½ teaspoon kosher salt per quart of water—enough to season, not enough to shock the eggs. Overdoing it makes the whites tough and the yolks grainy.
- Oil the Pan Early: Coat the pan with olive oil before draining the eggs—it prevents sticking and adds a subtle richness. I used to wait until the last second, and half my batch would cling like glue.
Pro cooking tips for this dish
Thermometer Precision
Your instant-read thermometer is the secret weapon here—I swear by the Thermoworks Smoke for its accuracy and durability. Insert the probe into the egg mixture while cooking to monitor the exact 62°F (144°C) target.
For stovetop methods, a candy thermometer clipped to the saucepan rim works well, but probe thermometers give more consistent readings. I’ve ruined batches when I relied on timing alone—always trust the thermometer over guesswork. 🌡️
Water Temperature Control
Start with 165°F water before adding eggs, then reduce heat to maintain 155-165°F during cooking. A slow, steady rise prevents curdling and ensures that signature silky texture. If your water boils, you’ve gone too fast—remove the pan immediately and restart with cooler water.
For batch cooking, use a double boiler setup to maintain even heat distribution.
Tempering Technique
Gradually adding hot water to eggs (not the reverse) prevents protein shock. I use a 1:1 ratio—slowly pour 1 cup hot water into the eggs while whisking constantly.
This step is non-negotiable: rushed tempering leads to grainy textures. For extra insurance, whisk in 1 tbsp white vinegar—it stabilizes proteins and creates a smoother final product.
Ice Bath Finishing
After cooking, plunge the eggs into an ice bath with 1 cup fresh ice cubes to halt cooking instantly. Stir gently to distribute the cold evenly—this step locks in the 62°F texture and prevents overcooking.
I’ve found that crushed ice works better than cubes because it creates a more uniform chill. Serve immediately for the best results.
Batch Cooking Tips
For larger batches, divide eggs into ramekins and cook them separately to maintain temperature control. Use a slow cooker set to 155°F—it’s perfect for hands-off cooking. Preheat ramekins in the oven at 200°F for 5 minutes before adding eggs to ensure even cooking.
This method is ideal for meal prep, as the eggs stay perfectly set for up to 24 hours when refrigerated.
Safety First
Always use pasteurized eggs or cook to at least 145°F (63°C) to minimize salmonella risk. For fresh eggs, simmer them in water for 3 minutes before cooking. The vinegar in the water bath also acts as a mild preservative, but never skip pasteurization if using raw eggs.
When in doubt, cook to 160°F** for full safety—texture sacrifices are worth it for peace of mind. 💪
Nutrition facts
Frequently asked questions
Why is 62°C (144°F) the magic temperature for silky eggs?
At 62°C (144°F), egg proteins coagulate just enough to create a luxurious, custard-like texture without becoming rubbery or grainy. This precise temperature transforms the yolk into a velvety center while keeping the whites silky smooth. It’s the sweet spot between undercooked (too runny) and overcooked (too firm).
Can I make these eggs without a thermometer?
While challenging, you can approximate it using timing: cook for 8-10 minutes in 155-165°F water after tempering. However, without precise temperature control, you risk uneven texture—either too runny or slightly overcooked. A candy thermometer or sous-vide is far more reliable for consistent results.
How do I serve these eggs for maximum impact?
Try these showstopping presentations: spoon into toasted brioche buns with soy-sesame drizzle, nestle in ramen bowls with miso broth, or serve atop crispy hash browns with avocado. For a modern twist, drizzle with chili crisp or truffle oil. The key is contrasting textures—crispy, creamy, or chewy elements elevate the silky eggs.
What’s the difference between this and regular soft-boiled eggs?
Regular soft-boiled eggs typically reach 140-145°F, creating a firmer yolk with some liquid center. The 62°C method stops at 144°F for a completely smooth, custard-like texture throughout—no distinct yolk or white, just velvety perfection. Think of it as the egg equivalent of a silky custard or crème brûlée.
Can I make these eggs ahead of time?
Yes! Cooked eggs maintain their texture for 24 hours when refrigerated in sealed containers with a thin layer of oil on top. For best results, reheat gently in a 150°F water bath for 2-3 minutes before serving. The texture remains silky but may firm up slightly after refrigeration. For meal prep, cook in ramekins for easy portioning.

- 3lb Prime Rib Roast Recipe: Juicy Pink Center Guaranteed in 3 Hours - October 31, 2026
- 5 Spice Cake Recipe: Warmly Spiced Layers With Crunchy Top - October 31, 2026
- 1950’s Macaroni and Cheese Recipe: Nostalgic Creamy Cheese Sauce with Buttery Noodles - October 31, 2026