
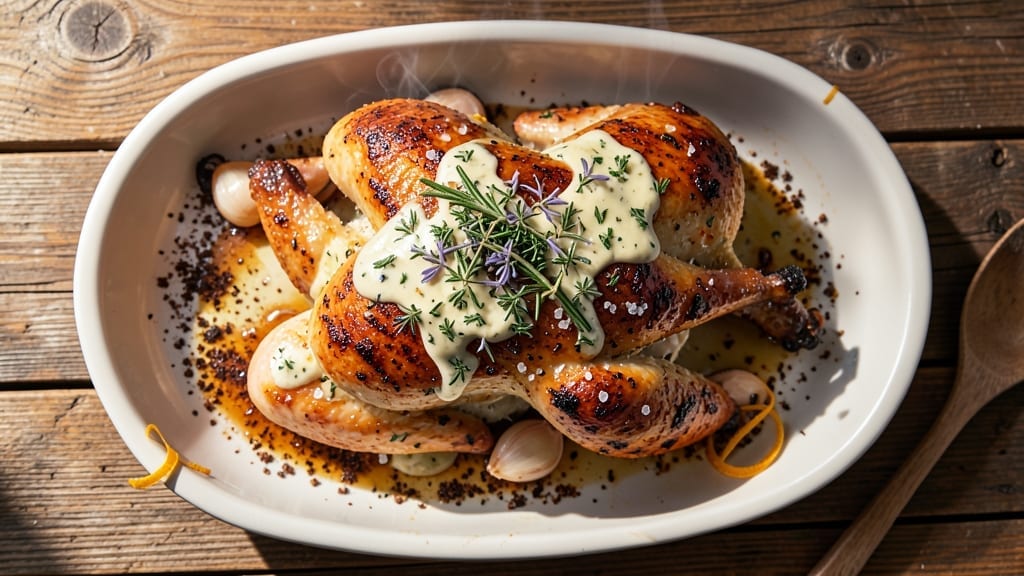
A 6-lb roasted chicken recipe that delivers perfectly golden skin and impossibly juicy meat is the foundation of any great dinner. After years of perfecting this technique—from brining to resting—I’ve cracked the code for a bird that’s crispy outside, tender inside, and packed with flavor.
The secret? A simple herbed butter injection and precise roasting times that guarantee restaurant-quality results every time.
This method transforms a basic whole chicken into a showstopper with minimal effort. You’ll start with a dry brine overnight, then use a flavorful butter injection to keep the meat moist while building that coveted golden crust.
The key is patience—letting the chicken rest after roasting ensures every slice stays juicy, not dry. No fancy equipment needed, just a standard roasting pan and a meat thermometer.
What you’ll end up with is a chicken so tender it falls apart at the bone, with skin that’s crisp enough to shatter between your teeth. The herbed butter adds layers of savory depth, while the slow roast develops rich, caramelized flavors.
Serve with roasted vegetables or a classic gravy for a meal that feels like a Sunday supper, no matter the day.
Whether you’re feeding a family or hosting a dinner party, this recipe scales beautifully and delivers consistent results. The technique works for any size chicken, but the 6-lb bird is perfect for sharing. Let’s get started on a dish that’s equal parts impressive and foolproof.
Ingredients for 6lb roasted chicken
Six ingredients transform a simple chicken into a restaurant-worthy centerpiece. Focus on quality and technique for golden skin and juicy meat.
| Ingredient | Amount | Notes |
|---|---|---|
| Whole Chicken 🍗 | 6 lb | Fresh, preferably organic, skin-on |
| Unsalted Butter 🧈 | ½ cup | Cold, cut into small cubes |
| Fresh Rosemary 🌿 | ¼ cup | Chopped, finely minced |
| Fresh Thyme 🌿 | ¼ cup | Leaves only, finely minced |
| Garlic Cloves 🧄 | 6 cloves | Minced, for butter injection |
| Kosher Salt 🧂 | 2 tbsp | Diamond Crystal preferred |
| Black Peppercorns 🌶️ | 1 tsp | Freshly ground, coarse |
| Olive Oil 🫒 | 2 tbsp | Extra-virgin, for basting |
| Lemon Juice 🍋 | 1 tbsp | Freshly squeezed |
| Dried Sage 🍃 | 1 tsp | Crumbled, for dry brine |
| Vegetable Oil 🫒 | 1 tbsp | For roasting pan |
The chicken is the star, so source a high-quality 6-lb bird—look for organic or free-range at Whole Foods or your local butcher. The skin-on variety is essential for that crispy texture. If your grocery store doesn’t carry whole chickens, Costco or Trader Joe’s usually have them. For the herbed butter, cold butter is key—it melts slowly during roasting, keeping the meat moist. European-style butter (like Plugrá) has higher fat content, which is ideal. The herbs should be fresh—rosemary and thyme from the grocery store’s produce section will work, but if they smell stale, skip them. For the garlic, fresh is non-negotiable—jarred minced garlic lacks the depth.
No fresh rosemary? Dried works at one-third the amount, but the flavor won’t be as vibrant. Short on butter? Olive oil or avocado oil can substitute, though the texture won’t be as rich. The kosher salt matters here—Diamond Crystal dissolves more easily than table salt, so you’ll need slightly less. For the lemon juice, bottled is fine in a pinch, but fresh adds a brightness that bottled can’t match. If you’re prepping ahead, make the herbed butter up to 2 days early—just keep it cold until ready to use. The dry brine can also be done the night before, which is ideal for a stress-free cooking day.
The chicken will rest best in the fridge uncovered on a wire rack for 1-2 hours before roasting—this helps the skin crisp up faster. Store any leftover herbed butter in an airtight container in the fridge for up to 1 week, or freeze for 3 months. The roasted chicken reheats beautifully—350°F for 20-30 minutes covered with foil—though it’s best served fresh. If you’re not using the whole bird at once, portion the leftovers into containers and freeze for up to 3 months. The skin stays crispy if reheated gently, but expect it to soften slightly.
Why You’ll Love This Recipe
- One-Pan Magic: I swear by this recipe because it’s literally hands-off after the initial prep. Toss the chicken with softened butter, herbs, and garlic, slap it on a sheet pan, and let the oven do the work. My counter stays clear—no messy drips, no extra pots.
- Herb-Packed Crisp: That golden crust? It’s all in the butter and herbs. The rosemary and thyme seep into the skin while the garlic infuses the meat—juicy, aromatic, and way more flavorful than takeout. Honestly, the first time I made it, my roommate stole half before I even carved it.
- Leftovers That Shine: This recipe feeds a crowd but also gives you days of effortless meals. Shred it for wraps, toss it into salads, or reheat slices straight from the fridge—it’s always better than store-bought rotisserie. Between us, I’ve lived off these leftovers for three lunches without getting tired of it.
- Budget Feast: A 6lb chicken is a steal, and this method stretches every bite. You’re not just feeding your family—you’re saving money on takeout and groceries. Plus, the butter and herbs are pantry staples, so no last-minute shopping runs. My wallet’s been happier since I started making this weekly.
Step-by-step instructions for juicy roasted chicken
Transform a simple whole chicken into a showstopping centerpiece with crispy skin and tender meat.
Prepare the Herbed Butter Injection
In a small bowl, combine the 0.5 cup unsalted butter, 0.25 cup finely minced fresh rosemary, 0.25 cup finely minced fresh thyme, 6 minced garlic cloves, 1 tablespoon lemon juice, and 1 teaspoon dried sage. Mix thoroughly until fully incorporated. The butter should be cold but soft enough to blend smoothly.
This herbed butter injection works magic by infusing flavor deep into the meat while keeping it juicy. The acidity from the lemon juice helps tenderize the chicken slightly, and the fresh herbs create an aromatic base that permeates every bite. Roll the mixture into a log shape for easy injection.
Dry Brine and Inject the Chicken
Remove the 6 lb whole chicken from its packaging and place it breast-side up on a wire rack set over a baking sheet. Pat it completely dry with paper towels—this is critical for crispy skin. Sprinkle 2 tablespoons kosher salt and 1 teaspoon freshly ground black peppercorns evenly over the entire surface, including inside the cavity.
Using a meat injector or a clean, sharp syringe, inject the herbed butter mixture into the thickest parts of the chicken—focus on the breast and thighs. You’ll want to make about 10-12 injection points total, distributing the butter evenly. Let the chicken sit uncovered in the refrigerator for at least 2 hours (or up to 12 hours for maximum flavor penetration).
Preheat and Prepare for Roasting
Preheat your oven to 425°F. Remove the chicken from the fridge and let it sit at room temperature for 30 minutes before roasting. Place a wire rack in a roasting pan and rub it lightly with 1 tablespoon vegetable oil to prevent sticking. Position the chicken breast-side up on the rack.
Brush the skin generously with 2 tablespoons olive oil, focusing on the exposed areas. This creates a barrier that helps the skin crisp beautifully while keeping the meat moist. The oil also carries the herb flavors from the injection, enhancing the aromatic profile. Avoid getting oil on the cavity to prevent steam buildup that could soften the skin.
Roast with Precision Timing
Roast the chicken at 425°F for 45 minutes, then reduce the heat to 375°F. Continue roasting for an additional 1 hour to 1 hour 15 minutes, or until the internal temperature reaches 165°F in the thickest part of the thigh (not touching bone). The skin should be deep golden brown and crispy, with juices running clear when pierced.
Here’s the key: Don’t open the oven during cooking. Every time you peek, you lose heat and steam, which can lead to uneven cooking and less crispy skin. If you’re worried about doneness, use an instant-read thermometer—it’s the most accurate way to judge. The chicken will continue cooking slightly after removal due to carryover heat.
Rest and Serve for Maximum Juiciness
Transfer the chicken to a cutting board and tent loosely with foil. Let it rest for 20 minutes before carving. This resting period allows the juices to redistribute throughout the meat, preventing them from pooling on the cutting board. The skin will stay crispy while the meat becomes even more tender.
To serve, carve the chicken into 6 equal portions (about 1 pound each) and arrange on a platter. The herbed butter infusion will create a rich, golden sauce that coats each piece, and the crispy skin will contrast beautifully with the juicy meat. Serve immediately with pan drippings reduced into a sauce if desired—this captures all the herb-infused flavors for an extra touch of elegance.
Pro Tips For Making 6lb Roasted Chicken
- Start with 450°F: I used to creep up to temperature slowly, and my chicken always ended up dry by the time the core hit 165°F. Crank your oven to 450°F first—this sears the skin fast and locks in moisture. After 20 minutes, drop to 375°F and let it cook low and slow. (Yes, even if you’re impatient like me.)
- Stuff the cavity loose: Packing herbs and garlic too tightly means they’ll steam instead of infuse. Loosely tuck 2-3 garlic cloves, 2 sprigs of thyme, and 1 rosemary sprig under the skin and in the cavity—leave space for the chicken to expand. If it looks messy, that’s fine. Taste matters more than presentation.
- Don’t skip the butter bath: After browning the chicken, pull it out and spoon melted butter over the skin—everywhere. The butter pools in the oven and bastes the chicken as it cooks, making the skin crispy and the meat juicy. Skip this, and you’ll get dry, flavorless skin. (I learned this the hard way with my first batch.)
- Use a thermometer: Guessing is how you end up with overcooked chicken that falls apart when you cut it. Stick a meat thermometer in the thickest part of the thigh—it’s done at 165°F. If you’re nervous, pull it at 160°F and let it rest. The residual heat will carry it to perfection. (Your future self will thank you.)
Storing and reheating this recipe
Refrigerator Storage
Store your roasted chicken in an airtight container for up to 4 days in the fridge. I always portion it into individual containers—this makes reheating easier and keeps the skin from getting soggy.
Place the chicken on the middle shelf where the temperature stays most consistent. The herbed butter flavors actually deepen overnight, making leftovers taste even better the next day. 💫
Freezer Preservation
For longer storage, freeze the chicken in portions for up to 3 months. Wrap each serving tightly in plastic wrap, then place in a freezer bag with all air removed. I like to label them with the date—trust me, you’ll forget otherwise!
Thaw overnight in the fridge before reheating for best results. The skin stays crispy if reheated properly, though it won’t be as perfect as fresh.
Reheating Methods
My preferred method is oven reheating at 350°F for 20-30 minutes covered with foil. This maintains the juiciness and keeps the skin from drying out completely.
For microwave reheating, use 50% power for 2-3 minute intervals until reaching 165°F internally. Add a splash of water or chicken broth to prevent dryness.
Skin Rescue Tips
If your reheated chicken skin loses crispiness, don’t worry—it happens! Pop it under the broiler for 2-3 minutes at the end to restore that golden crunch. For extra flavor, brush with a little melted butter before reheating.
The skin will never be as perfect as day-one, but it’s still delicious. Honestly, I’d rather have slightly softer skin than dry meat any day. 🍗
Pan Sauce Revival
Save the pan drippings while the chicken rests—they’re packed with flavor! Strain them through a fine-mesh sieve to remove any debris, then reduce over medium heat until slightly thickened. Use this as a quick pan sauce for serving reheated chicken.
It’s like having restaurant-quality gravy with minimal effort. I keep a small jar of this sauce in the fridge for up to 1 week—it’s perfect for drizzling over chicken or mashed potatoes.
Make-Ahead Prep
Prep your chicken for storage while it’s still warm. This helps it cool faster and prevents bacteria growth. I always make extra herbed butter—store it in the fridge for up to 1 week or freeze for 3 months.
That way, you can quickly inject fresh butter into reheated chicken for a flavor boost. The butter stays fresh longer than you’d think, and it’s perfect for future roasts too. 💡
Nutrition facts
Frequently asked questions about roasting a 6-Lb chicken
Why do you recommend a 2-hour dry brine?
The 2-hour dry brine is essential for developing crispy skin and deep flavor penetration. Salt draws out moisture from the surface, which evaporates during roasting, creating that perfect golden crust. Plus, it helps tenderize the meat for juicier results. For maximum flavor, you can even brine overnight—just don’t exceed 12 hours to avoid over-salting.
What’s the best way to inject the herbed butter?
Use a meat injector or large syringe to inject the butter into the thickest parts of the chicken—focus on the breast and thighs. Make 10-12 small holes (about 1/2-inch deep) to ensure even distribution. If you don’t have an injector, use a clean, sharp knife to make small slits and spoon the butter inside. The goal is to keep the meat moist while building flavor from the inside out.
Can I roast the chicken at a lower temperature for more even cooking?
Yes, but you’ll need to adjust the time. Roast at 350°F for 1 hour 45 minutes to 2 hours until the internal temperature reaches 165°F. The skin may not be as crispy, but the meat will be more evenly cooked. For extra crispiness, finish under the broiler for 5-7 minutes at the end. The key is patience—low and slow ensures tender results.
What if my chicken skin isn’t crispy?
Overcrowding the pan or opening the oven too soon are the most common culprits. Ensure the chicken has space to breathe (at least 1-inch clearance from other pans) and resist the urge to peek! If the skin is still soft after roasting, broil for 2-3 minutes at the end. Also, make sure the chicken is completely dry before seasoning—moisture is the enemy of crispy skin.
How do I carve a whole chicken for serving?
First, remove the legs at the joint, then the wings. Use kitchen shears for clean cuts. For the breast, slice from the bottom of the ribcage to the top, cutting against the grain for tender pieces. Save the carcass for stock—simmer with veggies and herbs for a flavorful base. If serving a crowd, carve into 6 equal portions (about 1 lb each

- 3lb Prime Rib Roast Recipe: Juicy Pink Center Guaranteed in 3 Hours - October 31, 2026
- 5 Spice Cake Recipe: Warmly Spiced Layers With Crunchy Top - October 31, 2026
- 1950’s Macaroni and Cheese Recipe: Nostalgic Creamy Cheese Sauce with Buttery Noodles - October 31, 2026