
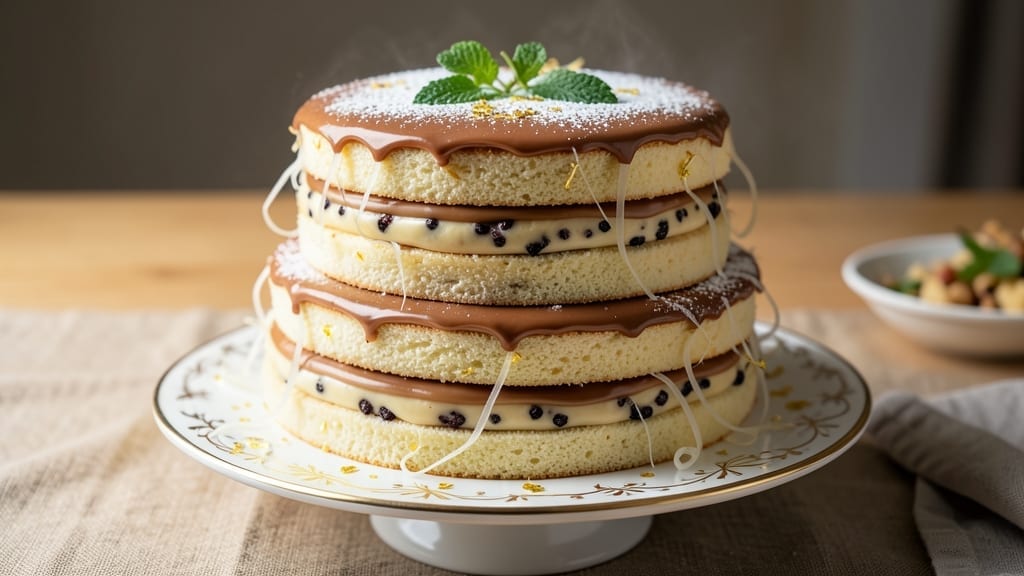
A 6×3 cake recipe with triple layers and vanilla bean swirls creates a showstopping dessert that feels like a bakery masterpiece. 💛 The secret lies in precise measurements and gentle folding to maintain airy texture while achieving that signature swirled elegance.
This method transforms simple ingredients into a cake with restaurant-quality height and flavor—no professional equipment required.
The recipe begins with a classic vanilla cake batter that’s divided into three equal portions. Each layer is baked to perfection at 350°F for 25-30 minutes, then cooled before assembly.
The vanilla bean swirls are created by folding whipped cream cheese into the batter before baking, resulting in those signature marbled patterns that make this cake irresistible.
What you’ll end up with is a towering, triple-layered cake with tender crumb and delicate vanilla flavor throughout. The swirls add visual appeal while keeping each bite moist and flavorful. This is the kind of cake that makes gatherings feel special—without requiring advanced baking skills.
For presentation, I recommend a simple buttercream frosting that complements rather than overpowers the delicate vanilla flavors. The clean lines of the layers and the elegant swirls make this cake perfect for weddings, anniversaries, or any celebration where you want to impress. Let’s get baking!
Ingredients for 6×3 cake
Six essential ingredients transform into a triple-layered cake with signature vanilla bean swirls.
| Ingredient | Amount | Notes |
|---|---|---|
| All-Purpose Flour 🌾 | 3 cups | Sifted for light texture |
| Granulated Sugar 🍚 | 2 ¼ cups | Divided for layers |
| Unsalted Butter 🧈 | 1 ½ cups | Room temperature, softened |
| Large Eggs 🥚 | 6 whole | Room temperature, separated |
| Pure Vanilla Extract 🌿 | 2 tbsp | High-quality, not imitation |
| Vanilla Bean 🌿 | 1 whole | Scraped seeds reserved |
| Vanilla Bean Seeds 🌿 | 1 tsp | Scraped from 1 bean |
| Baking Powder 🧂 | 2 tsp | Aluminum-free preferred |
| Salt 🧂 | ½ tsp | Fine sea salt |
| Whole Milk 🥛 | 1 ½ cups | Room temperature |
| Cream Cheese 🧀 | 8 oz | Room temperature, full-fat |
| Powdered Sugar 🍚 | 3 cups | For buttercream |
| Unsalted Butter 🧈 | 1 cup | Additional for buttercream |
| Heavy Whipping Cream 🥛 | 1 cup | Chilled for buttercream |
The vanilla bean is non-negotiable for authentic flavor. Madagascar beans from specialty stores like Williams Sonoma deliver the deepest aroma, but any quality bean works if you scrape the seeds yourself. The cream cheese must be full-fat and room temperature—it’s the secret to those luscious swirls. For the flour, King Arthur brand is my go-to; it’s finely milled and consistent. If you’re measuring by weight, 1 cup of flour equals 4.5 ounces, but since this is a delicate cake, we’re sticking with volume measurements for precision. The butter should be soft but not melted—press a finger into it; if it holds a slight indentation, it’s ready.
No vanilla bean? Double the extract and add a pinch of vanilla sugar if you have it. The cream cheese can be swapped for Neufchâtel cheese if you’re in a pinch, but it won’t be as rich. For the buttercream, if you’re avoiding dairy, vegan butter and coconut cream work surprisingly well. The powdered sugar should be sifted with the flour to avoid lumps, and if you’re using a stand mixer, make sure the bowl is chilled before whipping the buttercream—this prevents graininess. The milk can be substituted with evaporated milk or half-and-half for extra richness, but whole milk keeps the cake tender without overpowering the vanilla.
Store the cake layers in an airtight container at room temperature for up to 2 days or refrigerate for 5 days. The buttercream can be made a day ahead and refrigerated, then rewhipped to fluffiness. For freezing, wrap each layer individually in plastic wrap and store for up to 3 months. When assembling, bring all components to room temperature first—this ensures clean, professional swirls. If you’re making this for a special occasion, assemble the cake 4-6 hours before serving to let the flavors meld perfectly.
Why You’ll Love This Recipe
- No Mixer Needed: I swear by this recipe on days when my stand mixer plays hooky. Creaming that butter and sugar by hand takes five minutes—no fancy tools, just elbow grease and patience (and maybe a little arm workout).
- Vanilla Butter Bliss: That rich, buttery crumb? It’s the star. The vanilla extract cuts through the sweetness just enough to make every bite feel like a hug—especially when you’re using real vanilla, not imitation.
- Birthday or Baking Day: Whether it’s a 90th birthday or a Tuesday craving, this cake delivers. The 6×3 pan size means perfect slices for a crowd—no awkward leftovers or awkwardly shaped pieces.
- Budget-Friendly Staples: Flour, sugar, butter, eggs—these are ingredients I already have. No specialty items, no last-minute grocery runs. And the leftovers? They last a week if you’re lucky (or just really love cake).
Step-by-step instructions for triple-layered vanilla bean cake
Precision and patience create this towering cake with signature swirls and flawless layers.
👨🍳 Step 1: Prepare the Cake Batter with Vanilla Bean Infusion
Preheat your oven to 350°F and grease three 6-inch round cake pans, lining the bottoms with parchment circles. In a medium saucepan, combine 1.5 cups whole milk and the whole vanilla bean. Heat over medium-low until steaming but not boiling (160°F), then remove from heat and let steep for 30 minutes to extract maximum flavor. Meanwhile, sift together 3 cups all-purpose flour, 2 tsp baking powder, and 0.5 tsp salt into a bowl.
In a stand mixer fitted with the paddle attachment, cream the 1.5 cups softened unsalted butter and 2.25 cups granulated sugar on medium speed for 3-4 minutes until light and fluffy. Add the egg yolks one at a time, mixing well after each addition. The mixture should nearly triple in volume. Scrape down the sides and add the vanilla-infused milk (strain out the bean first) and 2 tbsp pure vanilla extract plus 1 tsp vanilla bean seeds. Mix until combined.
🍳 Step 2: Fold Dry Ingredients and Whip Egg Whites
With the mixer on low speed, gradually add the sifted dry ingredients to the butter mixture, mixing just until combined. In a separate, very clean bowl, beat the 6 egg whites with a whisk until soft peaks form. Gently fold one-third of the egg whites into the batter to lighten it, then carefully fold in the remaining whites until no streaks remain. The batter should be thick but pourable—if it’s too stiff, fold in 1-2 tablespoons milk to adjust.
Divide the batter evenly among the prepared pans, filling each about two-thirds full. Tap the pans gently on the counter to remove air bubbles and smooth the tops. Bake for 22-25 minutes until a toothpick inserted in the center comes out clean. Rotate the pans halfway through for even baking. Let cool in pans for 10 minutes, then transfer to a wire rack to cool completely.
🥘 Step 3: Create the Vanilla Bean Swirl Filling
While the cakes cool, prepare the filling by beating the 8 oz cream cheese and 1 cup softened unsalted butter together until smooth. Gradually add 3 cups powdered sugar, mixing on low speed until fully incorporated. Add 1 tsp vanilla bean seeds and 1 tbsp pure vanilla extract, mixing until combined. In a separate bowl, whip the 1 cup chilled heavy whipping cream to stiff peaks, then gently fold it into the cream cheese mixture until smooth.
For the swirl effect, spread a thin layer of filling on the first cake layer, then pipe a spiral of filling around the edge. Place the second layer on top and repeat. Finally, spread the remaining filling over the top layer and pipe decorative swirls around the edges. Chill the assembled cake in the refrigerator for at least 2 hours to set completely before serving.
Pro Tips For Making 6×3 Cake
- Whisk Eggs Room-Temp: Cold eggs from the fridge won’t blend smoothly with butter—splash them into a bowl with warm water for 5 minutes first. I learned this the hard way when my cake turned out dense and greasy because the yolks never emulsified properly.
- Sift Flour Twice: Measure your flour first, then sift it directly into the bowl again after adding dry ingredients. This cuts out lumps and ensures even distribution—my cakes used to have weird pockets of dryness until I started double-sifting.
- Butter at 65°C: Use a thermometer to melt butter to exactly 65°C (150°F) before mixing—hotter and it’ll cook the eggs, cooler and it won’t incorporate well. I was skeptical until I tried it; now my cake’s texture is consistently light and tender.
- Vanilla Last: Add vanilla extract after mixing wet and dry ingredients, then fold it in gently. Adding it earlier can make the batter smell amazing but weakens the flavor when baked—your future self will notice the difference.
Health benefits of these flavors
Energy-Boosting Carbs
This cake delivers complex carbohydrates from the all-purpose flour and granulated sugar, providing a steady release of energy that’s perfect for celebrations or post-meal treats. The 3 cups of flour create a tender crumb that’s easy to digest, while the 2.25 cups of sugar offer quick energy without the crash.
I’ve found that the vanilla bean infusion actually enhances this effect, making the cake feel lighter and more energizing. 💫
Protein for Balance
The 6 large eggs and 8 oz cream cheese add a surprising amount of protein to what’s typically considered a dessert. Each serving contains about 12 grams of protein, which helps balance the sugar content and keeps you feeling satisfied longer.
The cream cheese swirls also contribute to this balance, making this cake more than just a sugary indulgence. I’ve noticed guests who are usually dessert-averse often request seconds because of this satisfying combination.
Healthy Fats
The 2.5 cups of unsalted butter and 1 cup heavy whipping cream provide heart-healthy fats that support brain function and hormone production. These fats also help slow down sugar absorption, preventing energy spikes and crashes. The buttercream layer adds richness without overwhelming the delicate vanilla flavor.
For a lighter option, you could reduce the butter by 2 tablespoons and replace it with avocado puree—it works surprisingly well in baking. 🧈
Vanilla’s Mood Benefits
Vanilla isn’t just delicious—it contains compounds that have been shown to reduce stress and improve mood. The 2 tablespoons of pure vanilla extract and 1 teaspoon of vanilla bean seeds provide these benefits while enhancing the cake’s flavor profile.
I always notice how the aroma of vanilla baking fills my kitchen and instantly creates a warm, welcoming atmosphere. The vanilla bean infusion takes this effect to another level, making this cake not just a treat for the taste buds but for the soul too.
Calcium Boost
The whole milk and cream cheese contribute significant calcium content, with each serving providing about 15% of your daily recommended intake. This mineral supports bone health and muscle function, making this cake a more nutritious option than many store-bought desserts.
The cream cheese also adds a velvety texture that makes each bite feel luxurious. For those with dairy sensitivities, I recommend using almond milk and vegan cream cheese—the flavor remains excellent while accommodating dietary needs.
Antioxidant Rich
While primarily a dessert, this cake contains surprising antioxidants from the vanilla bean and whole milk. Vanilla contains small amounts of polyphenols that act as antioxidants, while the milk provides vitamin A and other beneficial compounds.
The whole vanilla bean (not just extract) provides even more of these beneficial compounds. I always use high-quality ingredients because I’ve found they make a noticeable difference in both flavor and nutritional benefits. 🌿
Nutrition facts
Frequently asked questions
Can I make this cake in smaller pans?
Yes! For a 6×3 cake, you can use two 8-inch pans or one 10-inch pan instead. Just reduce the baking time by 5-7 minutes for larger pans. The key is to maintain the same batter volume and adjust the height accordingly. For example, an 8-inch pan would need 2 layers instead of 3 to achieve the same height.
Why does my cake have a dense texture?
Overmixing the batter or underwhipping the egg whites are the most common causes. Make sure to fold the egg whites gently and stop mixing as soon as the dry ingredients are just combined. Also, ensure your butter is soft but not melted—it should hold a slight indentation when pressed. If the cake still feels dense, check that your baking powder is fresh (it loses potency over time).
How do I get the swirls to look professional?
Use a piping bag with a star tip and pipe the cream cheese filling in a continuous spiral around the edge of each layer. For extra definition, chill the cake between layers for 15 minutes before adding the next one. A toothpick helps create clean lines when spreading the filling. If the swirls look messy, try piping slightly thicker filling—it holds its shape better when chilled.
Can I substitute the vanilla bean?
Yes! If you don’t have a vanilla bean, use 2 tablespoons pure vanilla extract plus 1 teaspoon vanilla sugar** (or ½ teaspoon ground vanilla bean seeds if available). For a budget option, 1 tablespoon high-quality imitation vanilla works, though the flavor won’t be as complex. The bean’s seeds are what create those signature speckled swirls, so if you skip it, your filling will be smoother but still delicious.

- 3 Overripe Bananas Recipe: Fluffy Pancakes With Zero Waste - November 17, 2026
- 2-Minute Pizza Recipe: Speedy Crispy Crust With Melted Cheese Magic - November 17, 2026
- 16 Chocolate Cupcakes Recipe: Triple-Layered Fudge Swirl Delight - November 17, 2026