
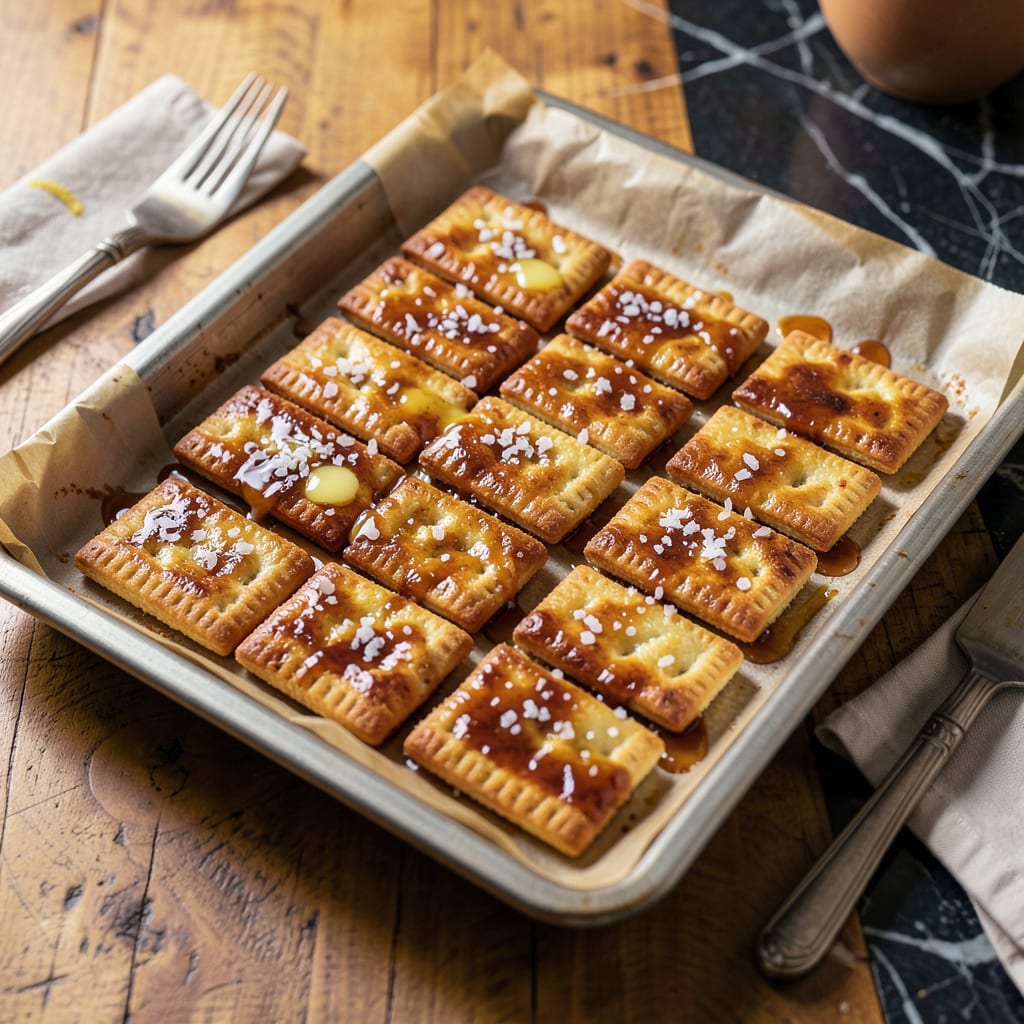
I’m gonna let you in on the easiest homemade snack secret ever—crispy, buttery club crackers that’ll make you forget the store-bought box. Honestly, I was shocked how simple this is: just 5 ingredients, one bowl, and 5 minutes of prep before baking.
What comes out of the oven is pure magic: golden, flaky crackers with that perfect salty-buttery crunch. The dough rolls out smooth, cuts clean, and bakes up crisp every time. No fancy equipment, no weird ingredients—just real, simple snacking that beats anything from a package.
Ingredients for Club Cracker Crack
Five pantry staples transform into your new favorite snack—crispy, buttery, irresistible.
| Ingredient | Amount | Notes |
|---|---|---|
| Saltine Crackers 🍪 | 40 pieces | Standard square crackers |
| Unsalted Butter 🧈 | 1 cup | Melted to golden brown |
| Light Brown Sugar 🧂 | 1 cup | Packed for sweetness |
| Pure Vanilla Extract 💧 | 2 tsp | High-quality for flavor |
| Flaky Sea Salt 🧂 | 1 tsp | For finishing sprinkle |
The butter is everything here. Land O’Lakes or Kerrygold give that rich, golden color when browned. Don’t skip browning it—that nutty depth makes these crackers next-level. Saltines matter too: Premium brand (like Keebler) holds up better than generic. The brown sugar? Light brown for caramel notes, but dark works if that’s what’s in your pantry (just slightly deeper flavor).
No vanilla extract? Maple syrup or almond extract at half the amount can pinch-hit. Out of brown sugar? White sugar plus 1 tbsp molasses gets you close. Want less sweetness? Cut sugar to 3/4 cup—still delicious. The sea salt is non-negotiable though (that flaky crunch is key). Maldon is my splurge, but Diamond Crystal works too.
Store crackers in an airtight container at room temp—they’ll stay crisp for about 1 week. Freezing? Layer between parchment in a bag for up to 3 months (thaw at room temp). The buttery coating means they can get sticky in humidity, so keep them cool and dry.
Why You’ll Love This Recipe
- 5-Minute Assembly: Honestly, this might be the laziest recipe I’ve ever loved. Melt butter, stir in brown sugar, pour over crackers—no bowls piled in the sink, no fancy techniques. Even my 10-year-old can handle it (and does, when she’s craving something sweet).
- Buttery Caramel Crunch: That first bite where the salty cracker meets the sticky, vanilla-kissed caramel? I’ve made three batches this week. The flaky salt on top cuts the sweetness just enough—like if toffee and a pretzel had the perfect baby.
- Snack Stash Hero: Between us, I keep a tin of this in my pantry for emergencies—book club nights, last-minute playdates, or when I need to bribe my husband to fold laundry. It’s sturdy enough to toss in a bag, and somehow fancier than store-bought cookies.
- Pantry Lifesaver: No eggs, no flour, no “special trip to the grocery store” ingredients. I’ve made this with generic saltines and whatever brown sugar was lurking in the back of my cabinet. It still disappears faster than the good chocolate.
Step-by-Step Instructions for Club Cracker Crack
This couldn’t be easier—just follow these simple steps for irresistible sweet and salty perfection.
Step 1: Prepare the Crackers and Preheat
Start by arranging the 40 pieces saltine crackers in a single layer on a parchment-lined baking sheet, salted side down. I like to use a standard half-sheet pan for this—it gives you just enough room to spread them out without crowding. Make sure they’re touching but not overlapping, so each one gets evenly coated with the caramel mixture.
Preheat your oven to 350°F while you work. This temperature is perfect for creating that golden caramel layer without burning the crackers. I’ve found that preheating at this stage gives the oven plenty of time to reach the right temperature while you prepare the topping.
Step 2: Make the Brown Butter Caramel
In a medium saucepan, melt the 1 cup unsalted butter over medium heat. Watch it closely as it begins to foam and then turns a beautiful golden brown—this should take about 5-7 minutes. The nutty aroma will tell you when it’s ready. Don’t walk away during this step, as butter can go from browned to burned quickly.
Once the butter reaches that perfect golden color, immediately add the 1 cup light brown sugar (packed tightly) and stir until completely dissolved. Let this mixture bubble for 2-3 minutes until it thickens slightly. You’ll notice it transforming from a liquid to a richer, more viscous caramel—this is exactly what you want.
Step 3: Add Vanilla and Assemble
Remove the caramel from heat and stir in the 2 tsp pure vanilla extract. The mixture will bubble up vigorously when you add the vanilla—that’s completely normal. Give it a good stir to incorporate everything evenly. The vanilla adds that warm, aromatic depth that makes this treat so addictive.
Pour the caramel mixture evenly over the arranged crackers, using a spatula to spread it to the edges. Work quickly but carefully—the caramel will start to set as it cools. You want every cracker to be completely covered, with just a thin layer peeking through the edges. This ensures maximum flavor in every bite.
Step 4: Bake to Golden Perfection
Bake in your preheated 350°F oven for 5-7 minutes. You’re looking for the caramel to bubble vigorously and turn a deeper amber color. Watch through the oven window—when the entire surface is bubbling uniformly and the edges start to darken slightly, it’s done. The crackers should still be intact but fully coated in glossy caramel.
Remove from the oven and immediately sprinkle the 1 tsp flaky sea salt evenly over the top. The heat from the caramel will help the salt adhere perfectly. Let it cool completely on the baking sheet—this usually takes about 30 minutes—before breaking into pieces. The caramel will harden as it cools, creating that signature crunch.
Step 5: Break and Serve
Once completely cooled, break the sheet into individual cracker pieces or larger clusters, depending on your preference. I like to go for a mix of both—some single crackers for easy snacking and some bigger pieces for those who want more of that caramel-saltine combination in one bite.
Store in an airtight container at room temperature for up to 5 days, though I doubt they’ll last that long. The flavor actually improves after a day as the caramel fully sets. For the best texture, keep them in a single layer if possible to prevent sticking. Serve at room temperature for the perfect balance of crunch and chew.
Serving Suggestions for This Recipe
Party Platter Perfection
These crackers shine on a snack board with contrasting textures. I love pairing them with sharp cheddar cubes and dried apricots for sweet-salty balance. Arrange in small clusters with toothpicks for easy grabbing—guests will devour them first! 💛
Dessert Pairings
Serve alongside vanilla bean ice cream for a crunchy topping that beats sprinkles. The caramel coating softens slightly when cold, creating the perfect contrast. I also love them with dark chocolate-dipped strawberries—the salt enhances both flavors beautifully.
Coffee Break Treat
These are my secret weapon for afternoon slumps. Pack a few in a small bag with espresso beans to absorb any moisture. The buttery crunch pairs perfectly with cold brew or chai latte—trust me, it’s a game-changer.
Giftable Goodies
Layer in cellophane bags with baker’s twine for homemade gifts. I add a handwritten tag: “Sweet & Salty Cracker Crack—Warning: Addictive!” For extra flair, include a mini sea salt sampler so recipients can customize their salt level.
Movie Night Must
Swap popcorn for these during your next film marathon. The caramel coating won’t leave sticky fingers like candy, and the saltiness keeps you reaching for more. I serve them in a wooden bowl with roasted almonds for variety.
Breakfast Twist
Crush a few over Greek yogurt with honey drizzle for a sweet-salty crunch. The vanilla notes in the caramel complement berries perfectly. My kids love them as a cereal topping—way better than store-bought granola! ✨
Nutrition Facts

- 6 Egg Cake Recipe with Oil: Light as Air With Buttery Moisture - October 4, 2026
- 4 Bean Casserole Recipe: One-Pan Heartiness With Smoky Paprika Depth - October 4, 2026
- 3-Ingredient Keto Mug Cake Recipe: Microwave Magic in 2 Minutes - October 4, 2026