
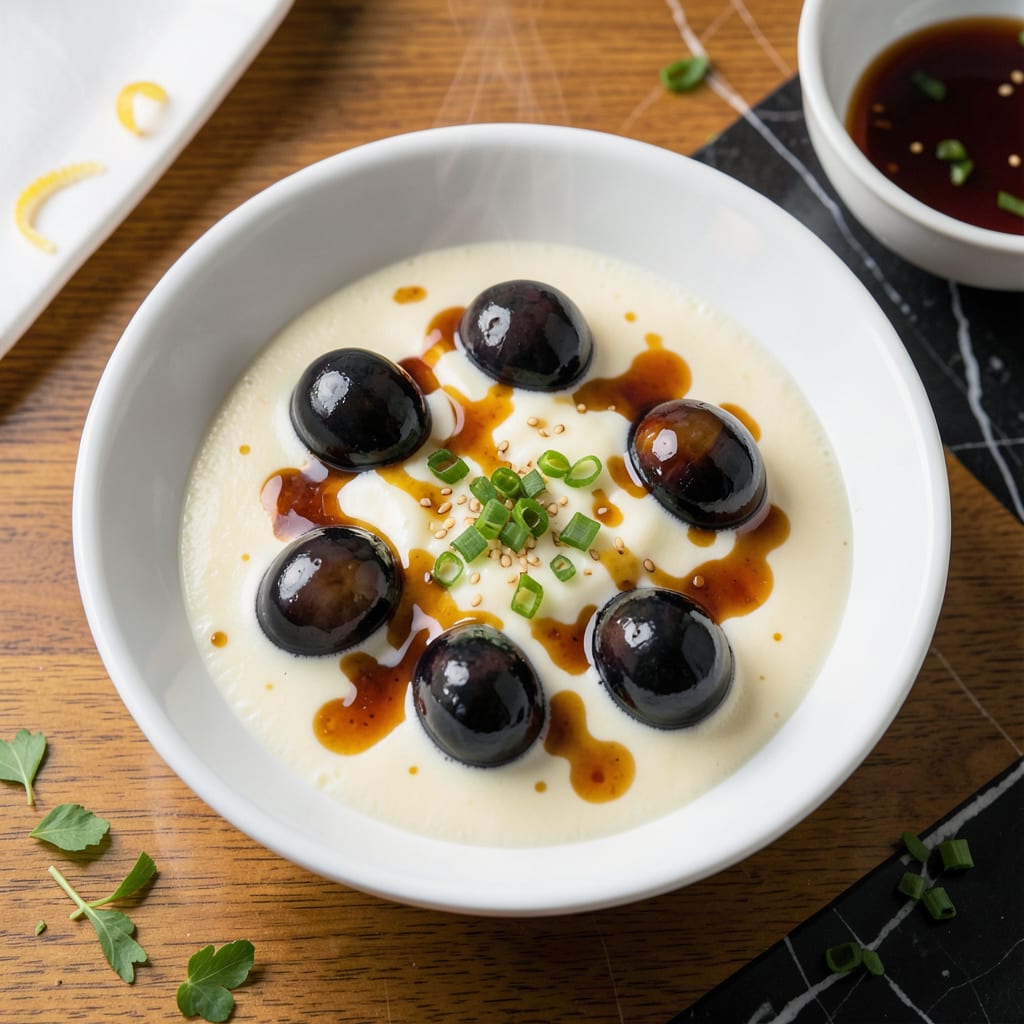
This Cantonese classic delivers a silky, delicate custard enhanced by the rich, earthy depth of century egg. The steaming method ensures a smooth texture that’s both comforting and elegant.
I’ve refined this technique to balance the custard’s lightness with the century egg’s bold flavor. The result is a dish that’s simple yet sophisticated, perfect for breakfast or a light meal.
Ingredients for Steam Egg with Century Egg
A few simple ingredients create this Cantonese-style silky custard with rich century egg depth.
| Ingredient | Amount | Notes |
|---|---|---|
| Large Eggs 🥚 | 6 whole | Room temperature preferred |
| Century Eggs 🥚 | 2 whole | Peeled and quartered |
| Water 💧 | 1 ½ cups | Filtered or distilled |
| Chicken Stock 🍲 | ½ cup | Low-sodium preferred |
| Soy Sauce 🫕 | 1 tsp | Light or all-purpose |
| Sesame Oil 🫒 | ½ tsp | Toasted for depth |
| Green Onions 🧅 | 2 whole | Thinly sliced for garnish |
| Ginger 🌿 | 1 tsp | Freshly grated |
| Shaoxing Wine 🍷 | 1 tsp | Optional for complexity |
| White Pepper 🌶️ | ¼ tsp | Ground for subtle heat |
| Salt 🧂 | ½ tsp | Fine sea salt |
| Neutral Oil 🫒 | 1 tsp | For greasing ramekins |
The century eggs are non-negotiable here—look for brands like Wing Hop Fung or Golden Star at Asian markets (the good stuff, not the pre-sliced kind). Fresh eggs should be room temperature for even steaming. Chicken stock adds depth, but water works if that’s what you’ve got. I always grab my century eggs from 99 Ranch Market since they have a solid turnover.
No Shaoxing wine? Dry sherry at half the amount gets you close. Vegetable stock can replace chicken stock for a lighter flavor. The soy sauce can be tamari for gluten-free. If you’re missing sesame oil, a dash of toasted peanut oil works in a pinch. Green onions can be scallions or chives (whatever’s on hand).
This keeps 2-3 days in the fridge—reheat gently by steaming again. Don’t freeze, as the texture suffers. Best served fresh, straight from the steamer (worth the extra minute).
Why You’ll Love This Recipe
- One Bowl Wonder: I just beat eggs, add chicken stock, and steam—no chopping, no fuss.
- Umami Bomb: The century egg’s salty richness with soy sauce is ridiculously good.
- Breakfast or Dinner: Honestly, I serve this silky dish for any meal, even midnight snacks.
- Budget Stretcher: Five eggs and a century egg feed my family for pennies.
Step-by-Step Instructions for Steamed Egg With Century Egg
This Cantonese classic requires precise technique for its signature silky texture and layered flavors.
Step 1: Prepare the Egg Mixture
Crack the 6 whole Large Eggs into a large bowl and whisk until the yolks and whites are fully combined but not frothy. I prefer using room temperature eggs as they blend more smoothly into the custard base.
Gradually whisk in the 1.5 cups Water and 0.5 cup Chicken Stock until fully incorporated. The liquid ratio is critical—too much and your custard will be watery; too little and it will turn out dense. Add the 1 tsp Soy Sauce, 0.5 tsp Sesame Oil, 1 tsp Ginger, 1 tsp Shaoxing Wine, 0.5 tsp Salt, and 0.25 tsp White Pepper, whisking after each addition.
Step 2: Strain and Portion the Mixture
Strain the egg mixture through a fine-mesh sieve into a large measuring cup or pitcher. This step removes any lumps or unincorporated egg whites, ensuring a perfectly smooth custard. Skipping this risks a textured, uneven final dish.
Lightly grease four ramekins or small heatproof bowls with the 1 tsp Neutral Oil. Divide the strained egg mixture evenly among them, filling each about three-quarters full. Gently place the 2 whole Century Eggs (peeled and quartered) into each ramekin, pressing them lightly into the mixture so they’re partially submerged.
Step 3: Steam to Silky Perfection
Bring a large pot or wok of water to a rolling boil. Place a steamer rack or bamboo steamer inside, ensuring the water doesn’t touch the bottom of the rack. Carefully arrange the ramekins on the rack, cover with a tight-fitting lid, and steam over medium-low heat for 12-15 minutes.
Check for doneness by inserting a toothpick into the center of a custard—it should come out clean with no liquid egg clinging to it. The surface should look set but still slightly jiggly, like a well-made flan. Avoid opening the lid during steaming, as temperature fluctuations can cause the custards to collapse or develop a rough texture.
Step 4: Finish and Serve
Once done, carefully remove the ramekins from the steamer using tongs or a dry towel to avoid burns. Let them rest for 2-3 minutes to set further. This brief rest helps the custard firm up slightly, making it easier to serve without breaking.
Garnish each ramekin with thinly sliced 2 whole Green Onions and a light drizzle of Sesame Oil if desired. Serve immediately while warm, as the texture is best enjoyed fresh from the steamer. The contrast between the silky egg custard and the bold, pungent century egg is what makes this dish exceptional.
Pro Tips For Making Steam Egg With Century Egg
- Steam Low and Slow: Use the lowest heat setting and steam for 12-15 minutes—any higher and the eggs turn rubbery. I learned this the hard way after my first three batches came out like bouncy balls.
- Filter the Stock: Strain your chicken stock through a fine mesh sieve before mixing with eggs. Sounds fussy, but it removes the bits that make your steamed eggs look speckled instead of silky.
- Skip the Boiling Water: Always start with room temperature water in your steamer. Pouring egg mixture into a hot steamer causes uneven cooking and a lumpy texture.
- Soak the Century Egg: Rinse and soak the century egg in water for 5 minutes before using to reduce its strong ammonia smell. My grandmother swore by this, and it actually changes the outcome.
Make-Ahead Tips for Leftovers
Prep Ahead Strategy
You can mix the egg custard base up to 12 hours in advance and store it covered in the fridge. I recommend whisking it briefly before using, as the ingredients may separate slightly overnight. This makes morning prep a breeze. 💡
Century Egg Prep
Peel and quarter the century eggs up to 24 hours ahead. Store them in an airtight container in the fridge to preserve their texture. The strong aroma is contained, and they’ll stay fresh until you’re ready to steam.
Ramekin Readiness
Grease your ramekins the night before and store them covered. This saves time and ensures you won’t forget this crucial step. I keep a stack of prepped ramekins in my pantry for spontaneous steaming sessions.
Steaming Setup
If using a bamboo steamer, soak it in warm water for 10 minutes before use to prevent cracking. Set up your steaming pot and rack in advance, so everything is ready when you begin cooking.
Reheating Leftovers
While best fresh, leftovers can be gently reheated by steaming for 5-7 minutes until warmed through. Avoid microwaving, as it can make the custard rubbery. Add a splash of water to the ramekin to prevent drying out. ❄️
Garnish Prep
Slice the green onions and measure out your sesame oil the night before. Store them separately in small containers. This way, you can garnish and serve immediately after steaming.
Nutrition Facts
Frequently Asked Questions
Why strain the egg mixture?
Straining removes lumps and unblended whites for a perfectly smooth custard. Skipping this can result in a textured, uneven dish.
Can I use a metal steamer?
Yes, but bamboo steamers retain heat better. Ensure the water doesn’t touch the ramekins to prevent uneven cooking.
How do I know when it’s done?
Insert a toothpick—it should come out clean with no liquid egg. The surface will look set but slightly jiggly.
What if my custard collapses?
This happens if the lid is opened too soon. Keep it closed until the full 12-15 minutes to maintain steady heat.

- 6 Egg Cake Recipe with Oil: Light as Air With Buttery Moisture - October 4, 2026
- 4 Bean Casserole Recipe: One-Pan Heartiness With Smoky Paprika Depth - October 4, 2026
- 3-Ingredient Keto Mug Cake Recipe: Microwave Magic in 2 Minutes - October 4, 2026