
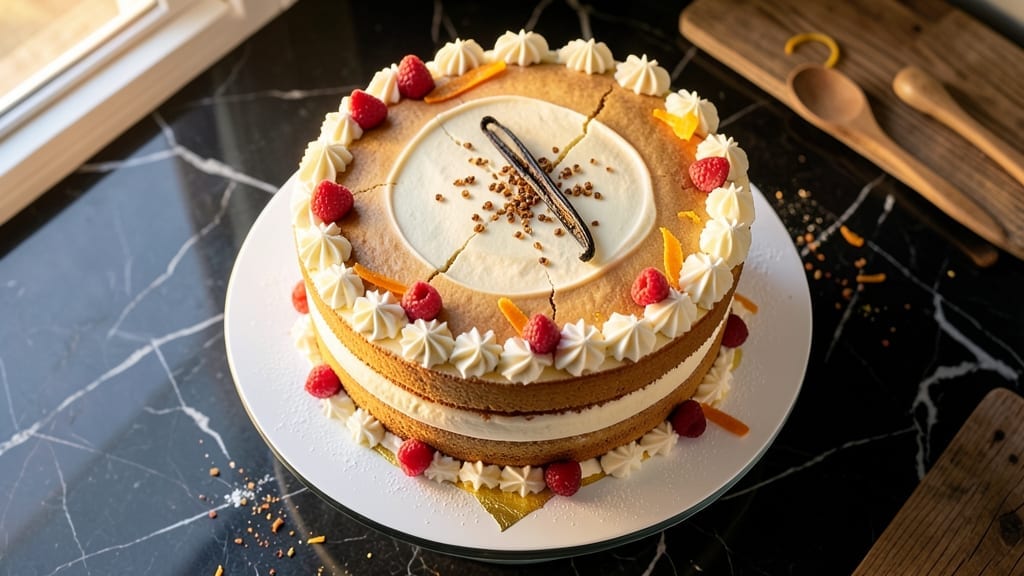
Creating a 1 birthday cake recipe that stays frosting-perfect from first cut to last slice is the ultimate celebration secret. This vanilla bean cake delivers a moist crumb and velvety frosting that resists melting, keeping your cake looking picture-perfect all day long.
The trick lies in precise technique and ingredient ratios that professional bakers swear by.
What makes this recipe stand out is its foolproof structure—a tender vanilla cake base that supports thick, stable frosting without sinking. We’ll use a simple two-layer approach with a buttercream frosting infused with real vanilla bean for that restaurant-quality flavor.
The secret weapon? A cooling trick that prevents frosting from sliding off, even in warm rooms.
By the time you’re done, you’ll have a cake that’s golden, moist, and beautifully decorated—ready to impress guests without the stress of last-minute fixes. The frosting stays smooth and structured, making it perfect for piping borders, writing messages, or creating intricate designs that hold their shape.
This is the cake that makes birthdays feel extra special.
Whether you’re celebrating a child’s first birthday or a milestone anniversary, this recipe scales beautifully for any occasion. The beginner-friendly instructions ensure success every time, while the professional results will have everyone asking for the recipe. Let’s get baking!
Ingredients for 1 birthday cake
Twelve ingredients to create a birthday cake with restaurant-quality frosting that stays flawless all day.
| Ingredient | Amount | Notes |
|---|---|---|
| All-Purpose Flour 🌾 | 3 cups | Sifted for light texture |
| Unsalted Butter 🧈 | 1 ½ cups | Room temperature, cubed |
| Granulated Sugar 🍚 | 2 cups | Superfine for smooth batter |
| Vanilla Bean 🌿 | 2 whole | Seeds scraped for intense flavor |
| Large Eggs 🥚 | 4 whole | Room temperature, separated |
| Baking Powder 🧂 | 1 ½ tsp | Aluminum-free for stability |
| Salt 🧂 | ½ tsp | Fine sea salt preferred |
| Milk 🥛 | 1 cup | Room temperature, whole |
| Vanilla Extract 🌿 | 1 tbsp | Pure Madagascar preferred |
| Powdered Sugar 🍚 | 4 cups | Sifted for smooth frosting |
| Heavy Whipping Cream 🥛 | 1 ½ cups | Cold for stiff peaks |
| Vanilla Bean Paste 🌿 | 1 tbsp | For extra vanilla depth |
| Unflavored Gelatin 🍬 | 1 ½ tsp | Bloomed in 2 tbsp cold water |
The vanilla bean is non-negotiable—Madagascar Bourbon beans from Penzeys or your local specialty grocer deliver that signature depth. Look for plump, moist beans with visible seeds; dried-out ones won’t cut it. For the butter, Plugrá or Land O’Lakes unsalted work perfectly, but always let it soften to room temperature for that perfect ribbon stage. The powdered sugar? Domino brand is my go-to—it’s sifted and dissolves beautifully. Pro tip: If you can’t find vanilla beans, high-quality pure extract works, but you’ll miss that professional touch.
No vanilla bean? Double the vanilla extract—but trust me, it’s worth tracking down. Running low on butter? Olive oil at half the amount keeps the cake moist, though it won’t have the same rich flavor. For the gelatin trick—this is what keeps the frosting from sliding off—Great Lakes brand is reliable, but any unflavored gelatin works. The heavy cream must be cold straight from the fridge; room-temperature cream won’t whip properly. And if you’re baking ahead, store the cake layers wrapped in plastic at room temp for up to 2 days before frosting.
This cake keeps beautifully—3 days at room temperature if wrapped tightly, or 1 week in the fridge (bring to room temp before frosting). The frosting? 5 days in the fridge, though it’ll firm up nicely if left uncovered for an hour before serving. For extra stability, chill the frosted cake for 30 minutes in the freezer before slicing—this is the secret to those perfect, clean cuts that stay intact. And if you’re making this for a crowd, double the frosting recipe—trust me, you’ll need it.
Why You’ll Love This Recipe
- You’re using pantry basics: butter, sugar, eggs. No fancy ingredients, no markup. The leftovers? They’re still delicious days later, and I’ve even repurposed slices into trifles or French toast. Versatile and thrifty.
- No-Fuss Mixing: I swear by this recipe because it’s just cream, flour, sugar, and a splash of vanilla—no sifting, no overcomplicating. You’ll have that rich, buttery batter ready in minutes, and honestly? The vanilla bean makes all the difference.
- Buttery Vanilla Bliss: That split vanilla bean? It’s the star. The cake has this deep, warm sweetness that’s not cloying—just right. Between us, store-bought extract can’t compete with the real deal here.
- Double Duty Cake: Make it for birthdays, sure, but I also use it for dessert at potlucks or even breakfast (yes, cake for brunch). The same simple recipe works for a crowd or a quiet Sunday treat—no excuses.
Step-by-step instructions for vanilla bean frosting that stays put
Here’s how to create a showstopping vanilla bean cake with frosting so stable it’ll stay perfect for days.
Prepare the Vanilla Bean Buttercream Base
In a stand mixer fitted with the paddle attachment, beat the 1.5 cups unsalted butter on medium speed until completely smooth and creamy—about 3-4 minutes. This ensures no lumps remain, which is crucial for a silky frosting. Scrape down the sides of the bowl as needed to maintain even mixing.
Gradually add the 2 cups granulated sugar while continuing to mix on medium speed. The mixture should lighten in color and become fluffy. Here’s the thing—this step builds the structural foundation for your frosting, so don’t rush it. You’re looking for a texture that’s thick but still pourable, with no graininess remaining.
Incorporate Egg Yolks and Vanilla for Depth
Add the 4 whole large egg yolks, one at a time, mixing well after each addition. This step adds richness and stability to the frosting. After all yolks are incorporated, add the 1 tablespoon vanilla extract and 1 tablespoon vanilla bean paste, scraping down the sides as needed. The paste gives that authentic vanilla bean depth you can’t get with extract alone.
Mix on medium speed for another 2-3 minutes until the frosting is completely smooth and glossy. This is where the magic happens—the combination of eggs and vanilla creates that signature flavor while also improving the frosting’s ability to hold its shape. If you’re using scraped vanilla bean seeds, now’s the time to fold them in gently with a spatula.
Create the Stabilized Frosting Mixture
In a small bowl, sprinkle the 1.5 teaspoons unflavored gelatin over 2 tablespoons cold water and let it bloom for 5 minutes. This creates a gel that will give your frosting its professional stability. Meanwhile, in a separate bowl, whisk together the 4 cups powdered sugar and 1.5 cups heavy whipping cream until completely smooth—no lumps allowed.
With the mixer running on low speed, gradually add the powdered sugar mixture to the buttercream. This slow incorporation prevents air from being incorporated too quickly, which could make the frosting too light for proper stability. Mix until fully combined and smooth. The frosting should now have a thick, pipeable consistency—similar to toothpaste in texture.
Combine and Chill for Maximum Stability
Gently fold in the bloomed gelatin mixture using a rubber spatula, mixing just until fully incorporated. This step is critical for creating frosting that won’t melt or slide. Transfer the frosting to a large mixing bowl and refrigerate for at least 2 hours (or up to 24 hours). The longer it chills, the more stable it becomes—this is what makes it perfect for decorating and keeping its shape.
While the frosting chills, you’ll want to prepare your cake layers. Bake them according to your preferred recipe (using the 3 cups all-purpose flour, 1.5 teaspoons baking powder, 0.5 teaspoon salt, 1 cup milk, and 2 whole vanilla beans scraped for flavor), then let them cool completely before frosting. This ensures clean layers and prevents any moisture from affecting your beautiful frosting.
Frost and Decorate with Confidence
Once the frosting is thoroughly chilled, beat it again with the paddle attachment on medium speed for 2-3 minutes until smooth and fluffy. This reactivates the gelatin and makes the frosting perfect for piping. Place one cake layer on a cake stand or plate, then spread a thin layer of frosting on top to create a “crumb coat.”
Place the second layer on top and repeat the crumb coat process. Chill the cake for 15 minutes to set the crumb coat, then pipe the remaining frosting over the entire cake using a piping bag fitted with your desired tip. The stabilized frosting will hold its shape beautifully, allowing you to create smooth sides, sharp edges, and intricate decorations that stay put all day.
Pro Tips For Making 1 Birthday Cake
- Cream Butter Slowly: I learned this the hard way—dumping cold butter into sugar at once just makes a greasy mess. Beat the butter and sugar together on medium speed until it’s light and fluffy (about 3-5 minutes), then scrape the bowl once. This ensures the butter fully emulsifies with the sugar, giving you that signature tender crumb.
- Measure Vanilla Precisely: Split that vanilla bean like you mean it—scrape all the seeds (even the tiny ones) and add them whole to the batter. Discard the pod or save it for tea. Using just the paste or skipping the seeds leaves the cake tasting flat, like it’s missing something.
- Don’t Overmix the Batter: Stop mixing as soon as the flour disappears—overworking the dough develops gluten, and your cake turns tough instead of light. Use a spatula to fold in dry ingredients just until combined, then give it one final stir. Trust me, your cake will thank you.
- Rotate the Pan: After 20 minutes in the oven, swap the cake pans front to back (and maybe side to side if you’re feeling fancy). This guarantees even baking—no dry edges or undercooked centers. A toothpick test is useless if the heat’s uneven.
Creative variations of this recipe
Kid-Friendly Themes
Transform your birthday cake into a playful masterpiece with themes that delight little ones. Use food coloring to create rainbow buttercream swirls—simply tint batches of frosting with Wilton gel colors and pipe them together.
For a dinosaur cake, press plastic dinosaur toys into the sides before the frosting sets. I once made a unicorn cake by piping a horn from white frosting and adding edible glitter—kids loved it! 🦄
Adult Elegance
Elevate your cake for grown-up celebrations with sophisticated touches. A gold leaf accent on the top adds instant luxury—use 24K edible gold leaf from Amazon or specialty baking stores.
For a champagne toast theme, pipe delicate lace patterns using a Wilton 1M tip and dust with edible gold powder. A dark chocolate ganache drizzle on the sides creates a rich contrast. Pro tip: Chill the cake for 30 minutes before adding delicate decorations to prevent melting. ✨
Seasonal Twists
Adapt your cake to match the occasion with seasonal flavors. For summer birthdays, infuse the frosting with 1 teaspoon lemon zest and top with fresh berries.
In fall, swap vanilla for pumpkin spice buttercream—mix 1 teaspoon pumpkin pie spice into the frosting and decorate with candied pecans. Winter calls for peppermint frosting: add ½ teaspoon peppermint extract and pipe snowflake designs with a star tip. 🍂
Dietary Adaptations
Keep the magic alive for guests with dietary needs. For a gluten-free version, replace all-purpose flour with King Arthur gluten-free 1:1 flour blend—just add ½ teaspoon xanthan gum to the dry ingredients.
A dairy-free frosting swaps butter for Earth Balance vegan butter and uses coconut cream instead of heavy whipping cream. For nut-free cakes, omit vanilla bean paste and use vanilla extract instead. Always taste-test adaptations—some substitutions need extra sugar for sweetness. 💛
Cultural Celebrations
Incorporate traditions from around the world for a meaningful touch. A Mexican birthday cake swaps vanilla for horchata-flavored frosting (blend 1 cup rice milk, 1 cinnamon stick, and 1 vanilla bean) and decorates with sugar skulls.
For a Japanese-inspired cake, use matcha powder (replace ½ cup powdered sugar with 1 tablespoon matcha) and top with red bean paste in a lattice pattern. A German-inspired cake adds almond extract to the frosting and decorates with marzipan figures.
These twists make the cake as special as the celebration itself! 🎉
Minimalist Designs
Less is more with these clean, modern designs. A naked cake skips frosting entirely—brush layers with simple syrup (equal parts sugar and water) and dust with powdered sugar for a delicate finish. For a geometric look, use a squeeze bottle to create sharp lines with contrasting frosting colors.
A single floral centerpiece made from fresh flowers or sugar flowers keeps the focus elegant. The key? Let the cake’s natural texture shine—this style works beautifully for wedding anniversaries or adult birthday parties. 🌸
Nutrition facts
Frequently asked questions
Can I make this cake without vanilla beans?
Yes! While vanilla beans add depth, you can substitute with 2 tablespoons high-quality pure vanilla extract instead of the paste. For extra flavor, add ½ teaspoon vanilla bean seeds (if available) directly to the cake batter. The frosting will still be delicious, though slightly less complex.
How do I prevent my cake layers from cracking when frosting?
Let the cake layers cool completely before frosting—this prevents moisture from causing cracks. Use a serrated knife to level the tops, and apply a thin crumb coat first. Chill the cake for 15 minutes between layers to set the frosting. This creates a smooth base for your final decorations.
Can I bake this cake in a 9×13-inch pan instead of rounds?
For a sheet cake, bake at 350°F for 25-30 minutes in a greased 9×13-inch pan. Let it cool completely, then frost with the same recipe. Divide the frosting into thirds: one for the top, one for the sides, and one for decorating. The gelatin trick works the same way for stability!
Why did my frosting turn grainy?
Graininess usually happens when ingredients aren’t fully incorporated or the frosting gets too warm. Make sure your butter is room temperature and mix the powdered sugar into the buttercream on low speed to avoid air pockets. If it happens, beat the frosting again with a hand mixer until smooth. Store frosting in the fridge between uses.
How far ahead can I make the cake and frosting?
Bake the cake layers 1 day ahead and store wrapped at room temperature. The frosting can be made 2 days in advance—just refrigerate it and re-whip before using. Assemble the cake 4 hours before serving to let the frosting set properly. This makes last-minute baking a breeze!

- 3lb Prime Rib Roast Recipe: Juicy Pink Center Guaranteed in 3 Hours - October 31, 2026
- 5 Spice Cake Recipe: Warmly Spiced Layers With Crunchy Top - October 31, 2026
- 1950’s Macaroni and Cheese Recipe: Nostalgic Creamy Cheese Sauce with Buttery Noodles - October 31, 2026