
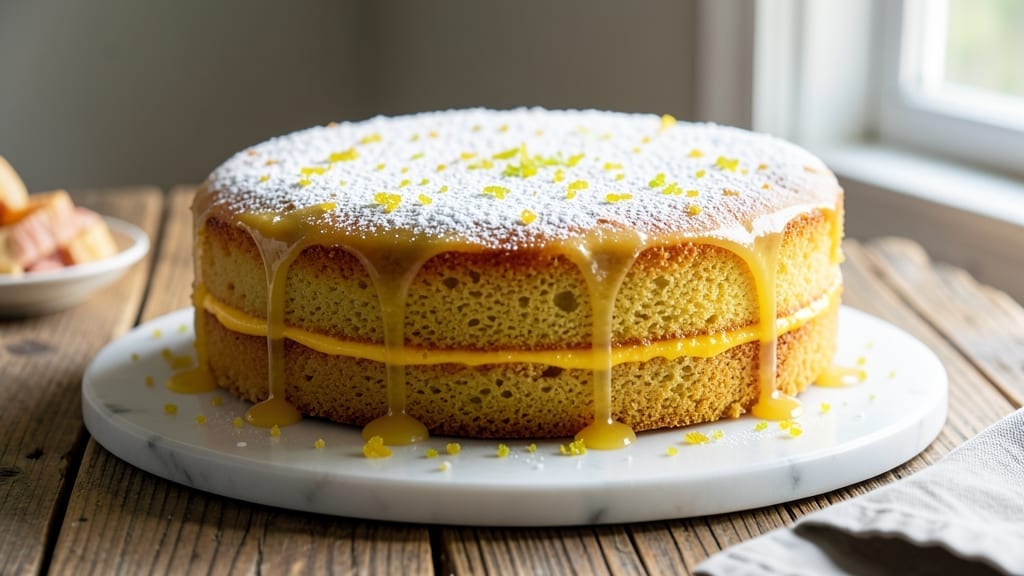
This 1-layer lemon cake delivers all the bright, buttery magic of classic lemon cake with none of the fuss—just a single, perfectly moist layer that’s easier to bake than you’d expect.
The secret lies in a tender crumb that stays soft for days, thanks to a clever mix of all-purpose and cake flour, while a tangy lemon glaze ties everything together with that signature zing.
I developed this recipe after years of baking lemon desserts, and it’s finally the one that delivers foolproof results every time—no overmixing, no sinking, just pure, zesty perfection.
What sets this lemon cake apart is its balance of simplicity and sophistication. You’ll bake it at 350°F for 25-30 minutes, yielding a golden dome with a delicate crust and a crumb so fine it practically melts in your mouth.
The recipe calls for fresh lemon juice and zest (never dried or bottled—trust me, it makes all the difference), but the real game-changer is the lemon glaze, which keeps the cake moist while adding that professional finish. No frosting required, though you can add one if you prefer.
The result is a cake that’s bright, buttery, and impossibly tender—ideal for brunch, afternoon tea, or any occasion where you want something light yet indulgent.
The glaze sets quickly, so you can slice it straight from the pan, and leftovers stay fresh for up to 4 days in the fridge or 3 months in the freezer. This is the kind of dessert that feels special without requiring hours in the kitchen.
Ready to bake? Here’s everything you need to create a restaurant-worthy lemon cake that’s simple enough for weeknights. Let’s get started.
Ingredients for 1 layer lemon cake
Bright citrus and buttery richness—this lemon cake delivers restaurant-quality flavor with minimal effort.
| Ingredient | Amount | Notes |
|---|---|---|
| All-Purpose Flour 🌾 | 1 ½ cups | Sifted for lightness |
| Cake Flour 🌾 | ½ cup | For ultra-tender crumb |
| Granulated Sugar 🍚 | 1 ½ cups | White or light brown |
| Unsalted Butter 🧈 | 1 cup | Cold, cubed, room temp |
| Large Eggs 🥚 | 2 whole | Room temperature |
| Fresh Lemon Juice 🍋 | ¾ cup | From 3-4 lemons |
| Lemon Zest 🍋 | 2 tbsp | Finely grated, no pith |
| Baking Powder 🧂 | 2 tsp | Aluminum-free preferred |
| Salt 🧂 | ½ tsp | Diamond Crystal preferred |
| Vanilla Extract 🌿 | 1 tsp | Pure, high-quality |
| Powdered Sugar 🍚 | 1 cup | For glaze, sifted |
| Milk 🥛 | ¼ cup | Whole milk preferred |
| Lemon Glaze 🍋 | ½ cup | Optional but recommended |
The flour blend is non-negotiable here. King Arthur all-purpose and Bob’s Red Mill cake flour give you that signature tender crumb, but any quality brands work. For the butter, Plugrá or Land O’Lakes unsalted are my go-tos—never salted, and always cold when creaming. The lemons? Meyer lemons if you can find them—they’re sweeter and more fragrant, but regular lemons work too. Look for bright, firm fruit with no soft spots. Fresh zest is worth the extra minute—it packs way more flavor than bottled. Pro tip: Use a microplane for zest to avoid bitter pith.
No cake flour? Substitute with 0.5 cup all-purpose plus 2 tbsp cornstarch. Short on lemons? Lemon extract at half the amount works in a pinch, but fresh is always better. The glaze can be made with just powdered sugar and milk, but adding 1 tbsp lemon juice makes it truly shine. For a richer cake, replace 0.25 cup milk with heavy cream. The baking powder should be fresh—if it’s over a year old, toss it. And if you’re worried about sinking, underbake slightly—it’ll keep cooking as it cools. That said, don’t pull it out before the toothpick test.
This cake stays moist for days, but it’s best eaten within 3 days for peak freshness. Wrap tightly in plastic and store at room temperature for up to 2 days, or refrigerate for 4 days. For freezing, slice first, then wrap each piece individually—keeps for 3 months. The glaze sets quickly, so assemble right before serving. If you make it ahead, store the cake and glaze separately and assemble just before eating. Trust me, the wait is worth it for that perfect balance of buttery crumb and zesty glaze.
Why You’ll Love This Recipe
- One Bowl Wonder: Mixing everything in one bowl? That’s how I roll—no extra dishes, no fuss. The cake flour keeps it light, while the butter and sugar blend like magic when you cream them together (I use my stand mixer for lazy days).
- Zesty Magic: That bright lemon flavor? It’s the star here. The eggs hold the moisture, the butter adds richness, and the sugar—well, it’s the perfect balance. Honestly, the first bite makes me forget I’m not at a fancy bakery.
- Weekend or Weeknight: Slice it for breakfast with yogurt, serve it at brunch, or pack it for lunch—this cake is my go-to. Between us, it’s the only dessert I make that actually gets eaten the same day it’s baked.
- Budget-Friendly Luxury: All-purpose flour and cake flour are cheap staples, and butter and eggs stretch further than you’d think. I’ve made this for 12 people for under $15—leftovers? They disappear faster than I can say “second slice.”
Step-by-step instructions for 1 layer lemon cake
This lemon cake delivers a perfectly balanced buttery crumb and vibrant citrus flavor every time.
Prepare the Dry and Wet Ingredients
In a medium bowl, whisk together the 1.5 cups all-purpose flour, 0.5 cup cake flour, 2 teaspoons baking powder, and 0.5 teaspoon salt. Sift the mixture twice to ensure a light, airy texture—this prevents a dense crumb. Set aside while you prepare the wet ingredients.
In a separate large bowl, cream together the 1 cup unsalted butter and 1.5 cups granulated sugar using an electric mixer on medium speed for 3-4 minutes. The mixture should become pale and fluffy, nearly doubling in volume. This step incorporates air, which creates that signature tender crumb. Scrape down the sides of the bowl with a spatula to ensure even mixing.
Combine Wet Ingredients and Fold in Dry Mix
Add the 2 whole large eggs, one at a time, mixing well after each addition. Stir in the 0.75 cup fresh lemon juice, 2 tablespoons lemon zest, and 1 teaspoon vanilla extract until fully incorporated. The batter should be smooth and slightly thick—if it looks too thin, don’t worry, the dry ingredients will adjust the consistency.
With the mixer on low speed, gradually add the dry ingredients to the wet mixture. Mix just until combined—overmixing develops gluten, which can make the cake dense. Stop mixing as soon as the flour disappears. For extra brightness, fold in a splash of the 0.25 cup milk if the batter appears too stiff. The batter should be smooth and slightly glossy.
Bake to Golden Perfection
Preheat your oven to 350°F and grease an 8-inch round cake pan (or line it with parchment paper). Pour the batter into the prepared pan and smooth the top with a spatula. Bake for 25-30 minutes, or until a toothpick inserted into the center comes out clean. The edges should be golden brown, and the top should spring back when gently pressed.
Real talk: Your oven might run hot, so start checking at the 20-minute mark. If the top browns too quickly, tent the cake with aluminum foil to prevent overbrowning while it finishes baking. Let the cake cool in the pan for 10 minutes before transferring it to a wire rack to cool completely.
Prepare the Lemon Glaze
While the cake cools, whisk together the 1 cup powdered sugar and 0.25 cup milk in a small bowl until smooth. Gradually drizzle in the 0.5 cup lemon glaze (if using) and mix until fully combined. The glaze should be thin enough to drizzle but thick enough to coat the cake. If it’s too thick, add a splash more milk; if too thin, add a bit more powdered sugar.
Once the cake is completely cool, place it on a wire rack over a baking sheet. Slowly pour the glaze over the top, letting it drip down the sides. Use a spoon to spread any excess glaze evenly. Let the glaze set for 10-15 minutes before slicing—this ensures a clean, professional finish.
Pro Tips For Making 1 Layer Lemon Cake
- Whisk Butter & Sugar Till Pale: I learned this the hard way—stopping too soon leaves butter lumps that make the cake dense. Use a stand mixer and beat until the mixture turns a light, fluffy yellow (about 3-5 minutes). That’s when the butter and sugar actually emulsify, not just look pretty.
- Sift Flours Together: Mixing all-purpose and cake flour by weight is easy, but sifting them first cuts out lumps and aerates the batter. Do this right in the bowl—no extra cleanup—so the cake rises evenly. (Yes, even if you’re impatient like me.)
- Skip Overmixing the Batter: Once you fold in the dry ingredients, stop as soon as they’re just combined. Overmixing develops gluten, and that’s how you end up with a tough, chewy lemon cake instead of a tender one. Two turns of a spatula is all it takes.
- Test Doneness with a Toothpick: The cake’s done when the toothpick comes out with a few moist crumbs, not wet batter. If it’s sticky, bake 5 more minutes—underbaking is the real enemy here. (Your future self will thank you for not cutting into it too soon.)
Make-ahead tips for leftovers
Prep Ahead Strategy
Bake the cake up to 3 days in advance—it actually tastes better as the flavors meld! Cool completely, wrap tightly in plastic wrap, and store at room temperature. The glaze can be made 1 day ahead and kept in an airtight container.
Refrigerate both separately until ready to assemble. This is my go-to method for stress-free dessert prep. 📅
Freezer-Friendly Slices
Slice the cake into individual portions and wrap each piece tightly in plastic wrap. Place them in a freezer bag with parchment paper between layers to prevent sticking. They’ll keep for 3 months—just thaw at room temperature for 1-2 hours before adding fresh glaze. Perfect for last-minute gatherings! ❄️
Glaze Prep Shortcut
Make the glaze 2 days ahead and store it in a small jar in the fridge. When ready to serve, whisk it briefly to smooth out any separation. This saves time on the day of serving and ensures a perfectly glossy finish every time.
I always prep this first thing in the morning for afternoon tea. 💫
Make-Ahead Assembly
Assemble the cake and glaze 4 hours before serving—the glaze will set completely but still look fresh. Store the assembled cake in the fridge until ready to serve.
This works especially well for brunch or holiday desserts when timing matters. Just let it sit at room temperature for 10 minutes before slicing for clean cuts. ✨
Portion Control Tips
For easy serving, use a 2-inch round cutter to portion the cake into individual slices. Wrap each slice in parchment paper and store in an airtight container.
This keeps them fresh for up to 3 days at room temperature or 1 month in the freezer. Great for meal prep or office treats! 🍴
Lemon Glaze Variations
Prep your glaze variations ahead: try adding 1 tsp lemon extract for extra zing or ½ tsp vanilla bean paste for depth. Store each variation separately in small jars. Mix and match based on your mood—classic, spiced, or berry-infused. This adds creative flexibility without extra effort. 🍋
Nutrition facts
Frequently asked questions
Can I substitute cake flour if I don’t have any?
Yes! For every 1 cup cake flour needed, mix 1 cup all-purpose flour with 2 tablespoons cornstarch. Sift the blend well to mimic the fine texture of cake flour. This keeps the crumb tender and prevents a dense cake.
Why does my lemon cake turn out dry?
Overbaking or overmixing are the usual culprits. Bake until a toothpick comes out clean but not dry—25-30 minutes at 350°F is ideal. Also, avoid overmixing the batter after adding flour, and consider adding 2 tablespoons sour cream or yogurt to the batter for extra moisture.
How do I make this cake vegan?
Replace the butter with 1 cup vegan butter or coconut oil, use 2 flax eggs (2 tbsp ground flaxseed + 6 tbsp water), and swap milk for plant-based milk. For the glaze, use almond milk or coconut cream. The texture will be slightly denser but still delicious!
Can I bake this in a different pan size?
Yes, but adjust the baking time. For a 9-inch round pan, bake 20-25 minutes; for a 6-inch pan, bake 30-35 minutes. Always check with a toothpick. The cake should spring back when pressed gently. Use parchment paper for easy removal.
What’s the best way to store leftovers?
Wrap the cake tightly in plastic wrap and store at room temperature for up to 3 days. For longer storage, refrigerate for 4 days or freeze slices for 3 months. Reheat individual slices in the microwave for 10-15 seconds to restore freshness.

- 6 Egg Cake Recipe with Oil: Light as Air With Buttery Moisture - October 4, 2026
- 4 Bean Casserole Recipe: One-Pan Heartiness With Smoky Paprika Depth - October 4, 2026
- 3-Ingredient Keto Mug Cake Recipe: Microwave Magic in 2 Minutes - October 4, 2026