
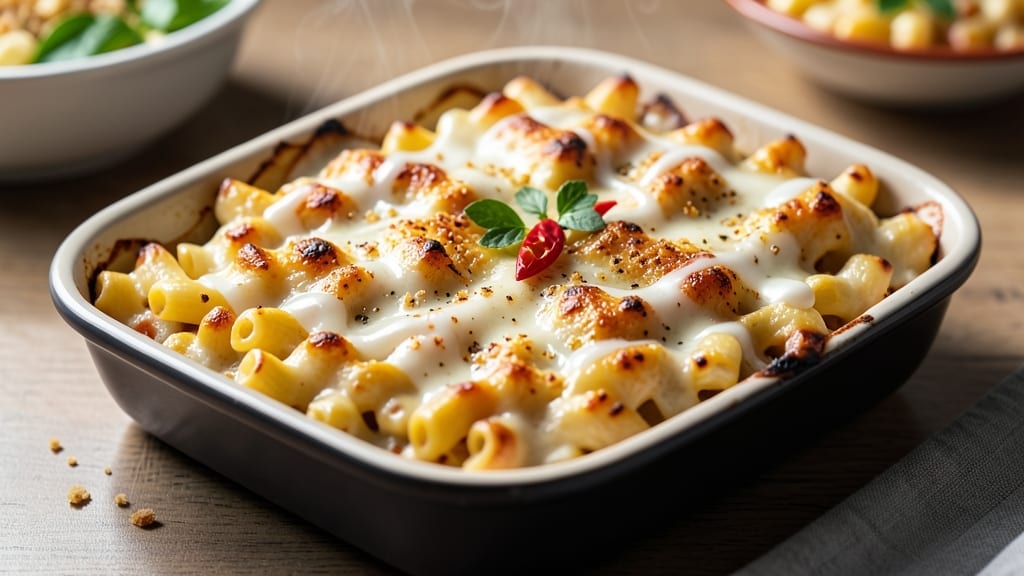
A 1 lb baked mac and cheese recipe delivers the perfect balance of crispy golden edges and gooey, cheesy layers—no soggy bottoms or bland bites here. This method transforms simple ingredients into a restaurant-worthy side dish with a foolproof technique that guarantees success every time.
The secret lies in the right cheese blend and baking method, ensuring each bite is rich, creamy, and perfectly textured.
This recipe serves 4 and requires just 30 minutes of active prep plus 25 minutes in the oven at 375°F. You’ll start with elbow macaroni cooked al dente, then mix it with a velvety cheese sauce made from sharp cheddar, Gruyère, and cream cheese for depth.
The sauce is the heart of the dish—smooth, tangy, and thick enough to coat every noodle without breaking.
After baking, you’ll have a crispy breadcrumb topping that contrasts beautifully with the creamy interior, while the edges caramelize into a golden crust. The result is a dish that’s indulgent yet balanced, perfect for weeknight dinners, holiday sides, or comforting meals.
Each forkful delivers that perfect mix of textures and flavors.
For extra flair, consider adding crispy bacon or jalapeños to the cheese sauce, or swapping the breadcrumb topping for a sprinkle of parmesan and crushed crackers. The possibilities are endless, but the foundation remains the same: crispy, cheesy, and impossible to resist. Let’s get started!
Ingredients for 1 lb baked mac and cheese
Crispy edges, gooey layers—these 14 ingredients transform simple pasta into restaurant-quality comfort.
| Ingredient | Amount | Notes |
|---|---|---|
| Elbow Macaroni 🍝 | 12 oz | Cooked al dente, drained |
| Sharp White Cheddar Cheese 🧀 | 6 oz | Shredded, aged 12+ months |
| Gruyère Cheese 🧀 | 4 oz | Shredded, nutty flavor |
| Cream Cheese 🧈 | 4 oz | Full-fat, room temperature |
| Heavy Cream 🥛 | ½ cup | Whole milk fat preferred |
| Whole Milk 🥛 | ¼ cup | Warmed slightly |
| All-Purpose Flour 🌾 | 1 tbsp | For thickening sauce |
| Dijon Mustard 🍯 | 1 tsp | Adds depth of flavor |
| Salt 🧂 | 1 ½ tsp | Kosher or sea salt |
| Black Pepper 🌶️ | ½ tsp | Freshly cracked preferred |
| Garlic Powder 🧄 | ½ tsp | For subtle garlic note |
| Panko Breadcrumbs 🍞 | ½ cup | For crispy topping |
| Unsalted Butter 🧈 | 2 tbsp | Melted for topping |
| Parmesan Cheese 🧀 | ¼ cup | Freshly grated for garnish |
The cheese blend is everything. Gruyère adds nutty depth while sharp cheddar delivers that classic tang—don’t skimp on quality here. I grab my Gruyère from Whole Foods (their French section has the good stuff), but any reputable cheese shop will carry it. For cheddar, look for aged 12+ months—the sharper, the better. The cream cheese? Full-fat, room temperature is non-negotiable—it’s what gives that velvety texture. Pro tip: grate your own cheese; pre-shredded gets clumpy and lacks flavor.
No Gruyère? Comté or aged Gouda works in a pinch, but you’ll lose some of that nutty complexity. Short on sharp cheddar? Pepper jack at half the amount adds heat. The panko topping can be swapped for crushed Ritz crackers or buttery breadcrumbs if you’re feeling fancy. For extra richness, stir in 1 tbsp of cream cheese into the sauce—trust me on this. And if you’re feeling adventurous, add 1/4 cup cooked bacon or jalapeños to the cheese mix before baking. The macaroni? Elbow shape is ideal—it holds the cheese sauce best without falling apart.
This reheats beautifully—just cover with foil and bake at 350°F for 10-15 minutes. Keeps for 4 days in the fridge, freezes for 2 months (wrap tightly in foil). For next-level crispiness, broil for 2-3 minutes at the end—watch it like a hawk. The sauce thickens as it cools, so if it seems too thin when you mix it, let it sit for 5 minutes** before baking. And save those leftover breadcrumbs—perfect for topping any casserole.
Why You’ll Love This Recipe
- Foolproof Assembly: I swear by this method—just boil the elbows, mix the cheeses (sharp cheddar + Gruyère + cream cheese) with heavy cream, pour it all together, and bake. No straining, no fuss, and no second-guessing.
- Triple-Cheese Magic: That Gruyère melts into a velvety blanket while the sharp cheddar adds bite, and the cream cheese? It keeps everything lusciously smooth. Honestly, the flavor balance is what makes this my go-to.
- Weeknight to Potluck: Same recipe, endless uses. I make it for lazy Tuesdays, bring it to game nights (yes, even on a Tuesday), and it’s the star of my holiday leftovers. The heavy cream makes it rich enough for company but simple enough for a solo dinner.
- Budget-Friendly Luxury: A pound of pasta, a block of cheddar, and a wedge of Gruyère stretch further than you’d think. Between us, this feeds four for under $10, and the leftovers reheat like a dream—no soggy edges in sight.
Step-by-step instructions for perfect baked mac and cheese
Here’s how to create the ultimate baked mac and cheese with a golden, crispy crust and gooey, cheesy layers.
Cook the Elbow Macaroni to Al Dente Perfection
Start by boiling a large pot of salted water until it reaches a rolling boil. Add the 12 oz elbow macaroni and cook until it’s al dente—about 1 minute less than the package instructions suggest. This ensures the pasta stays firm enough to hold its shape when baked. Drain the pasta in a colander and rinse briefly under cold water to stop the cooking process immediately. Shake off any excess water and return the drained pasta to the pot.
Here’s the thing—overcooked pasta makes for mushy mac and cheese. I like to test doneness by tasting a piece. It should have a slight bite to it, not be completely soft. The pasta will continue cooking slightly in the oven, so we want it just shy of fully cooked now.
Create the Ultimate Cheese Sauce
In the same pot with the drained pasta, reduce heat to medium-low and add the 4 oz cream cheese, 6 oz sharp white cheddar cheese, and 4 oz gruyère cheese. Stir constantly until the cheeses melt completely, creating a smooth base. This usually takes about 3-4 minutes. The gruyère adds a beautiful nutty depth that elevates this classic dish.
Once the cheeses are fully melted, whisk in the 0.5 cup heavy cream, 0.25 cup whole milk, 1 tbsp all-purpose flour, 1 tsp Dijon mustard, 1.5 tsp salt, 0.5 tsp black pepper, and 0.5 tsp garlic powder. The Dijon mustard adds a subtle tang that balances the richness of the cheese. Continue whisking for 2-3 minutes until the sauce thickens enough to coat the back of a spoon. This creates that perfect creamy texture we all love.
Prepare the Crispy Topping Mixture
While the cheese sauce simmers, melt the 2 tbsp unsalted butter in a small saucepan over low heat. Remove from heat and stir in the 0.5 cup panko breadcrumbs and 0.25 cup freshly grated parmesan cheese until well combined. The butter helps create a crispy, golden crust while the parmesan adds an extra layer of flavor. Let this mixture cool slightly while you prepare the baking dish.
This is where the magic happens—the crispy topping transforms a simple baked mac and cheese into something extraordinary. The panko gives it texture while the butter and parmesan create that irresistible golden crust. I like to spread it evenly over the top, pressing down gently to help it adhere to the cheese sauce.
Assemble and Bake for Gooey Perfection
Preheat your oven to 375°F and lightly grease a 9×9-inch baking dish. Transfer the cheesy pasta mixture to the prepared dish and spread it out evenly. Sprinkle the crispy topping mixture evenly over the top, pressing down gently with the back of a spoon to ensure it makes contact with the cheese sauce. This helps create that perfect crispy layer we’re after.
Bake for 20-25 minutes until the top is deep golden brown and the edges are bubbling. The center should still be slightly jiggly—this indicates it’s perfectly gooey inside. If you’re worried about the top browning too quickly, tent the dish loosely with aluminum foil for the last 10 minutes of baking to help cook through evenly.
Rest and Serve with Confidence
Remove the baking dish from the oven and let it rest for 5-10 minutes before serving. This resting period allows the cheese to set slightly, making it easier to slice and serve. The internal temperature should reach 165°F at this point, ensuring it’s safe to eat while maintaining that perfect creamy texture.
Here’s the moment you’ve been waiting for—serve with a spatula, cutting through the crispy crust to reveal the gooey, cheesy layers beneath. The contrast between the crispy top and creamy interior is what makes this mac and cheese truly special. Enjoy immediately while it’s hot and bubbly!
Pro Tips For Making 1 Lb Baked Mac And Cheese
- Preheat at 375°F: DESCRIPTION: I used to bake this at 350°F, thinking it was safer, but the cheese never got that perfect golden crust—just a sad, pale top. Crank it to 375°F for the last 10-15 minutes (after covering with foil) to melt the Gruyère into a glossy, caramelized layer. The oven’s residual heat will keep the inside creamy while the top transforms.
- Shred Cheese Coarse: DESCRIPTION: Skip the food processor for Gruyère and sharp cheddar—hand-shredding gives you bigger, meltier chunks that don’t turn into a gluey paste. If you’re lazy (like me), buy pre-shredded but pack it tightly in the saucepan to melt faster—it’ll still work, just less dramatic.
- Don’t Overmix the Sauce: DESCRIPTION: Stirring the cheese sauce until it’s silky smooth is tempting, but you’ll end up with a dense, rubbery texture. Once the cream cheese and heavy cream are fully melted, give it one final gentle fold—just enough to combine. Lumps? They’ll disappear in the oven. Overworking it guarantees a heavier bite.
- Broil for 2 Minutes: DESCRIPTION: After baking covered, uncover and broil for the last 2 minutes—not 5, not 10. Watch it like a hawk: the Gruyère will brown in a flash, but the heavy cream can scorch faster than you think. This is where the magic crust happens, so resist the urge to walk away.
Flavor customization for these flavors
Spicy Kick Options
Add 1/2 tsp cayenne pepper or 1/4 cup diced jalapeños to the cheese sauce for heat. For extra spice, mix 1 tbsp hot sauce (like Frank’s RedHot) into the sauce before baking.
I love adding crispy chorizo for both heat and smoky depth—just brown 1/2 cup in a pan first and stir it into the cheese sauce. 🌶️
Smoky BBQ Twist
Replace some cheese with 1/4 cup BBQ sauce—I recommend Sweet Baby Ray’s Original—mixed into the sauce. Top with crumbled bacon and extra panko for texture. For a smoky flavor without BBQ sauce, add 1 tsp smoked paprika and 1/2 tsp liquid smoke to the cheese mixture.
This works surprisingly well for a tangy, smoky mac and cheese. 🔥
Herb-Infused Variations
Stir 1 tbsp fresh thyme or rosemary into the cheese sauce for an earthy twist. I also love adding 1/4 cup sautéed mushrooms to the pasta before mixing with the cheese.
For a pop of color, fold in 1/4 cup finely chopped sun-dried tomatoes into the sauce. These herbs brighten up the dish without overpowering the cheese. ✨
Sweet & Savory Mix
Balance the richness with 1/2 cup caramelized onions or 1/4 cup maple syrup mixed into the cheese sauce. For a sweet-and-spicy combo, add 1/2 tsp cinnamon and 1/4 tsp cayenne to the sauce.
I’ve also tried adding 1/4 cup cooked apples (like Granny Smith) for a surprising but delicious sweetness. 🍯
Protein-Packed Additions
Mix in 1/2 cup cooked bacon, pulled chicken, or crispy sausage into the pasta before baking. For a vegetarian option, stir in 1/2 cup roasted butternut squash or 1/2 cup chickpeas for texture. The protein adds heartiness while keeping the dish balanced. 💪
Global Flavor Twists
For a Mexican-inspired version, add 1/2 tsp cumin and 1/4 tsp chili powder to the sauce, then top with crushed tortilla chips instead of panko. For a French bistro style, swap the panko for grated Gruyère and add a splash of white wine** to the sauce.
These variations keep the classic comfort while adding exciting new flavors. 🗺️
Nutrition facts
Frequently asked questions
Can I make this recipe with pre-shredded cheese?
Pre-shredded cheese works in a pinch, but freshly grated delivers better flavor and texture. The anti-caking agents in pre-shredded cheese can make the sauce grainy. If you must use it, remove any visible clumps and add 1 extra tablespoon of milk to compensate for the dryness. For the best results, invest in a good cheese grater for that authentic, creamy texture.
How do I prevent a watery cheese sauce?
Watery sauce happens when the cheese doesn’t melt properly or the sauce isn’t thickened enough. Always melt the cheeses over medium-low heat while stirring constantly. Add the flour first to create a roux, then whisk in the liquids. If the sauce still seems thin, let it sit for 5 minutes before baking—the starches will thicken it further. For extra insurance, stir in 1 extra tablespoon of cream cheese at the end.
Can I use a different type of pasta?
Elbow macaroni is ideal because its shape holds the cheese sauce well, but you can substitute with penne, cavatappi, or cavatappi shells for similar results. Avoid long, thin pasta like spaghetti—it won’t hold together as well when baked. If using shells, press them down gently in the baking dish to prevent them from popping out. For a fun twist, try rotini for extra texture.
Why did my mac and cheese get rubbery?
Rubbery texture usually means the pasta was overcooked before baking. Always cook pasta 1 minute less than package instructions and rinse briefly under cold water to stop cooking. Another common cause is baking at too high a temperature—stick to 375°F and avoid broiling unless you’re experienced. Finally, ensure your cheese sauce is fully melted and smooth before baking.
How do I reheat leftovers without drying it out?
Cover the baked mac and cheese tightly with aluminum foil and reheat in the oven at 350°F for 10-15 minutes. For microwave reheating, sprinkle 1 tablespoon of milk over the top and cover with a damp paper towel to retain moisture. Microwave on 50% power for 1-2 minutes, then let it sit for 1 minute before serving. The oven method gives the best texture recovery.

- 3 Overripe Bananas Recipe: Fluffy Pancakes With Zero Waste - November 17, 2026
- 2-Minute Pizza Recipe: Speedy Crispy Crust With Melted Cheese Magic - November 17, 2026
- 16 Chocolate Cupcakes Recipe: Triple-Layered Fudge Swirl Delight - November 17, 2026