
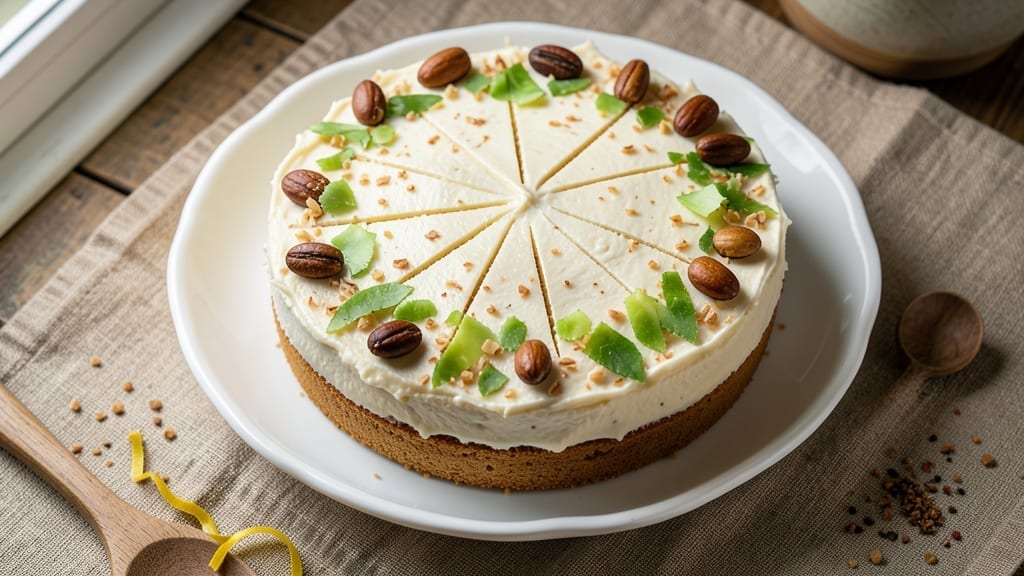
A 6-inch coconut cake with tropical layers and a vanilla bean swirl transforms any dessert table into a vacation spot. The moist, tender crumb infused with coconut milk and toasted coconut flakes creates a texture that’s impossibly light yet rich, while the vanilla bean swirl adds a sophisticated, floral depth.
This recipe delivers restaurant-quality results in a single 6-inch pan, perfect for special occasions or satisfying a craving without the fuss of layering multiple pans.
The secret to achieving this cake’s signature texture lies in the combination of coconut milk and buttermilk, which keeps the crumb tender and prevents dryness. A touch of baking powder ensures a gentle lift, while the toasted coconut flakes add a subtle crunch that contrasts beautifully with the soft layers.
The vanilla bean swirl, made from a simple mixture of vanilla bean paste and cream cheese, adds visual appeal and a luxurious flavor that ties everything together.
By the time you pull this cake from the oven, you’ll have golden layers infused with coconut aroma, a swirl of vanilla cream that peeks through, and a finish that’s perfectly moist—not dense, not dry, but just right.
The cake holds its shape beautifully, making it easy to slice and serve, while the coconut flavor shines without overpowering. This is the kind of dessert that makes guests ask for the recipe before they even take their first bite.
Serve it warm with a scoop of coconut ice cream or a drizzle of caramel sauce for an extra touch of indulgence. The 6-inch size makes it ideal for intimate gatherings, book clubs, or even a special treat for two.
Here’s everything you need to create this tropical masterpiece in your own kitchen.
Ingredients for 6 inch coconut cake
Here’s what you need to create this tropical masterpiece in your own kitchen.
| Ingredient | Amount | Notes |
|---|---|---|
| All-Purpose Flour 🌾 | 1 ½ cups | Sifted for even texture |
| Granulated Sugar 🍚 | 1 ¼ cups | White or light brown |
| Coconut Milk (canned, full-fat) 🥥 | 1 can | Shake well before using |
| Buttermilk 🥛 | ¾ cup | Substitute with 0.75 cup milk + 1 tsp vinegar |
| Unsalted Butter (room temperature) 🧈 | ¾ cup | Full-fat for richness |
| Large Eggs 🥚 | 2 whole | Room temperature preferred |
| Vanilla Bean Paste 🌿 | 1 tbsp | High-quality for authentic flavor |
| Baking Powder 🍞 | 1 ½ tsp | Freshly opened for lift |
| Salt 🧂 | ½ tsp | Fine sea salt preferred |
| Toasted Coconut Flakes 🥥 | ½ cup | Unsweetened, store-bought or homemade |
| Cream Cheese (room temperature) 🧀 | 4 oz | Full-fat for smooth swirl |
| Vanilla Extract 🌿 | ½ tsp | Pure vanilla preferred |
The coconut milk and butter are non-negotiable for that signature tropical flavor. Grab a can of full-fat coconut milk—the kind that separates—and unsalted butter from the dairy aisle. I always buy Trader Joe’s brand for both—they’re consistent and affordable. For the toasted coconut flakes, store-bought unsweetened works fine, but toasting them yourself in a dry pan for 2-3 minutes adds a nutty depth. The vanilla bean paste is worth the splurge—Nescafé or Madagascan brands bring that real vanilla aroma. If you can’t find vanilla bean paste, pure vanilla extract plus a scraped vanilla bean does the trick.
No buttermilk? Mix 0.75 cup milk with 1 tsp vinegar or lemon juice and let it sit for 5 minutes. The cream cheese should be room temperature—microwave it for 20 seconds if needed. Substituting coconut milk? Coconut cream works too, just use the thick part from the can. For the sugar, white or light brown both work, but brown adds subtle caramel notes. The baking powder needs to be fresh—if it’s older than 6 months, test it first by mixing with water—it should bubble. No vanilla bean paste? Double the vanilla extract and add a pinch of ground vanilla bean if you’ve got one.
Store the dry ingredients (flour, sugar, baking powder) in airtight containers for up to 6 months. Coconut milk and buttermilk keep in the fridge for 1 week after opening. The toasted coconut flakes last 2 months in the pantry, but they’re best used within a month. Once baked, this cake stays moist for 3 days at room temperature, or 5 days in the fridge. For the vanilla swirl, assemble it last-minute—it’s best when used fresh, but you can prep the cream cheese mixture ahead and keep it chilled.
Why You’ll Love This Recipe
- No Mixer Needed: I swear by this—just a bowl and a whisk. The buttermilk and coconut milk blend so smoothly with the butter that you’ll end up with a light, airy texture without a single drop of sweat. Honestly, it’s the kind of recipe that makes me question why I ever owned a stand mixer.
- Tropical in Every Bite: That first forkful? Pure coconut magic. The full-fat canned coconut milk gives it a rich, almost custardy depth, while the sugar caramelizes just enough to balance the natural sweetness. I’ll be real: it’s the kind of cake that disappears faster than my willpower on a lazy Sunday.
- Portion Control Perfection: Six inches might sound small, but it’s just right—one slice feels special, yet you won’t regret baking two. Between us, I’ve taken these to potlucks, book clubs, and even as a “dessert” for my health-conscious friend (she didn’t even notice the sugar). It’s the cake that plays well with everyone.
- Pantry Staple Power: Flour, sugar, butter—ingredients you already have. The canned coconut milk? Often cheaper than fresh and lasts forever. I’ve made this on a budget, as a last-minute gift, and even when I forgot to buy cake mix. It’s my go-to when I need something reliable, fast, and still impressive.
Step-by-step instructions for tropical layers with vanilla bean swirl
Here’s how to create a perfectly moist coconut cake with rich vanilla swirls—every layer just right.
Prepare the Cream Cheese Swirl Filling
In a medium bowl, beat the 4 oz cream cheese (room temperature) and 0.75 cup unsalted butter (room temperature) together until completely smooth and creamy. I like to use a hand mixer for this step—it ensures no lumps remain. Once combined, add 1.25 cups granulated sugar and mix until fully incorporated.
Next, add 0.5 tsp vanilla extract and 1 tbsp vanilla bean paste, mixing until the paste is evenly distributed. The filling should be thick but spreadable. Cover this mixture and place in the refrigerator while you prepare the cake batter—this keeps it cool and ready for swirling later.
Mix the Cake Batter
In a large mixing bowl, combine 1.5 cups all-purpose flour, 1.5 tsp baking powder, and 0.5 tsp salt. Sift this dry mixture together to ensure an even texture—this prevents dense spots in your cake. In a separate bowl, whisk together 2 whole large eggs, 0.75 cup buttermilk, and 1 can coconut milk (shaken well) until smooth.
Gradually add the dry ingredients to the wet mixture, alternating with 0.5 cup toasted coconut flakes, mixing just until combined. Be careful not to overmix—the batter should be thick but pourable. Fold in the remaining 0.5 cup toasted coconut flakes by hand to keep them whole and evenly distributed.
Layer and Swirl the Cake
Preheat your oven to 350°F and grease a 6-inch round cake pan, lining the bottom with parchment paper for easy removal. Pour about ⅓ of the cake batter into the prepared pan and spread it evenly. Use a spatula to create a well in the center, leaving space for the swirl.
Scoop ⅓ of the cream cheese filling onto the center of the batter layer. Using the back of the spatula, gently swirl the filling into the batter, creating a marbled effect. Repeat with another layer of batter and filling, then top with the final layer of batter. This creates that beautiful vanilla-coconut swirl throughout the cake.
Bake to Golden Perfection
Bake the cake for 35-40 minutes, or until a toothpick inserted into the center comes out clean. The top should be golden brown and slightly domed in the center—this indicates it’s fully baked. If the top browns too quickly, tent the cake with foil to prevent over-browning while the center finishes cooking.
Once baked, remove the cake from the oven and let it cool in the pan for 10 minutes. Then transfer it to a wire rack to cool completely. This gradual cooling prevents cracking and allows the cake to set properly. The finished cake should be moist, tender, and full of tropical coconut flavor with pockets of rich vanilla swirl.
Pro Tips For Making 6 Inch Coconut Cake
- Whisk Butter First: DESCRIPTION: Beat the room-temperature butter and sugar until light and fluffy—about 3-4 minutes with an electric mixer. I learned this the hard way: cutting corners here means a dense, dry cake, no matter how much coconut milk you add. (Yes, even if you’re impatient like me.)
- Shake Coconut Milk: DESCRIPTION: Give the canned coconut milk a good shake before measuring—especially if it’s been sitting. The cream settles, and you want that rich, thick layer for moisture and flavor. I once used unshaken milk and wondered why my cake tasted watered down.
- Don’t Overmix Wet Ingredients: DESCRIPTION: Stop folding in the buttermilk and coconut milk once the batter is just combined—no streaks, no lumps. Overmixing develops gluten, and this cake’s all about tender crumb. I’ve seen people mix until their arms ache; resist the urge.
- Bake Until Golden, Not Dry: DESCRIPTION: Pull the cake out when the edges are set and the center springs back slightly—it’ll keep cooking with residual heat. Overbaking turns it gummy, and no one wants that. A toothpick with moist crumbs (not wet batter) is your guide.
Pro cooking tips for this dish
Cream Cheese Swirl Mastery
The secret to those stunning vanilla swirls lies in temperature control. Always use room-temperature cream cheese—cold lumps will ruin the smooth texture. Beat it with room-temperature butter until completely creamy, then fold in the sugar gradually to avoid graininess.
I like to chill the filling for 15-20 minutes before swirling to make it easier to manipulate without melting. 🥥
Batter Consistency Tips
Your coconut cake batter should be thick but pourable—like heavy pudding. If it’s too thin, add 1-2 tablespoons more flour; if too thick, whisk in 1 tablespoon coconut milk.
The key is gentle folding when adding toasted coconut flakes to keep them whole and evenly distributed. Overmixing develops gluten, leading to a tough crumb.
Layering Like a Pro
For perfect swirls, divide your batter into three equal portions (about ⅓ cup each). Create a well in the center of each layer by pressing down with a spoon—this gives the filling room to swirl beautifully.
Use a small offset spatula to drag the filling through the batter in smooth, even strokes. The goal is a marbled effect, not a solid layer.
Oven Temperature Tricks
Preheat your oven to 350°F and place your 6-inch cake pan on the middle rack for even baking. If the top browns too quickly, tent with aluminum foil after 20 minutes.
The cake is done when a toothpick comes out clean (usually 35-40 minutes). Let it cool 10 minutes in the pan, then transfer to a rack—this prevents collapse.
Coconut Flake Perfection
Toast your coconut flakes in a dry skillet over medium-low heat for 2-3 minutes until golden and fragrant. Let them cool completely before adding to the batter—warm flakes release moisture and can make the batter too wet. For extra crunch, sprinkle 1 tablespoon extra toasted flakes on top before baking.
Troubleshooting Common Issues
If your cake cracks during cooling, it likely cooled too quickly. Wrap the pan in a clean kitchen towel while baking to slow cooling. For a domed top, avoid opening the oven door during baking—temperature fluctuations cause this.
If the cake pulls away from the pan, ensure your pan is properly greased with butter and lined with parchment paper.
Nutrition facts
Frequently asked questions
Can I make this 6-inch coconut cake gluten-free?
Yes! Swap the all-purpose flour for a 1:1 gluten-free baking flour blend (like Bob’s Red Mill) and ensure your baking powder is labeled gluten-free. The texture may be slightly denser, but the coconut flavor will still shine. Adjust liquid measurements if needed—some blends absorb differently.
How do I store leftovers without drying out the cake?
Wrap the cake tightly in plastic wrap, then place it in an airtight container with a slice of bread to absorb moisture. It stays fresh for 3 days at room temperature or 5 days refrigerated. For longer storage, freeze slices between parchment paper for up to 2 months. Thaw overnight in the fridge.
Why did my cake sink in the center?
This usually happens from overbaking or opening the oven door too soon. Check doneness with a toothpick at 35 minutes—if it’s done early, remove it immediately. For next time, tent with foil after 20 minutes to prevent over-browning while the center finishes.
Can I use coconut cream instead of coconut milk?
Yes! Use the thick coconut cream from the can (about ½ cup) and add ½ cup water or milk to replace the full can. The texture will be slightly richer, but the flavor remains delicious. Just whisk well before measuring to avoid lumps.
What’s the best way to serve this cake?
Warm slices pair perfectly with coconut whipped cream or a drizzle of toasted coconut caramel sauce. For a tropical touch, serve with passion fruit coulis or fresh mango slices. The 6-inch size makes it ideal for brunch, book clubs, or a special dessert for two!

- 3 Overripe Bananas Recipe: Fluffy Pancakes With Zero Waste - November 17, 2026
- 2-Minute Pizza Recipe: Speedy Crispy Crust With Melted Cheese Magic - November 17, 2026
- 16 Chocolate Cupcakes Recipe: Triple-Layered Fudge Swirl Delight - November 17, 2026