
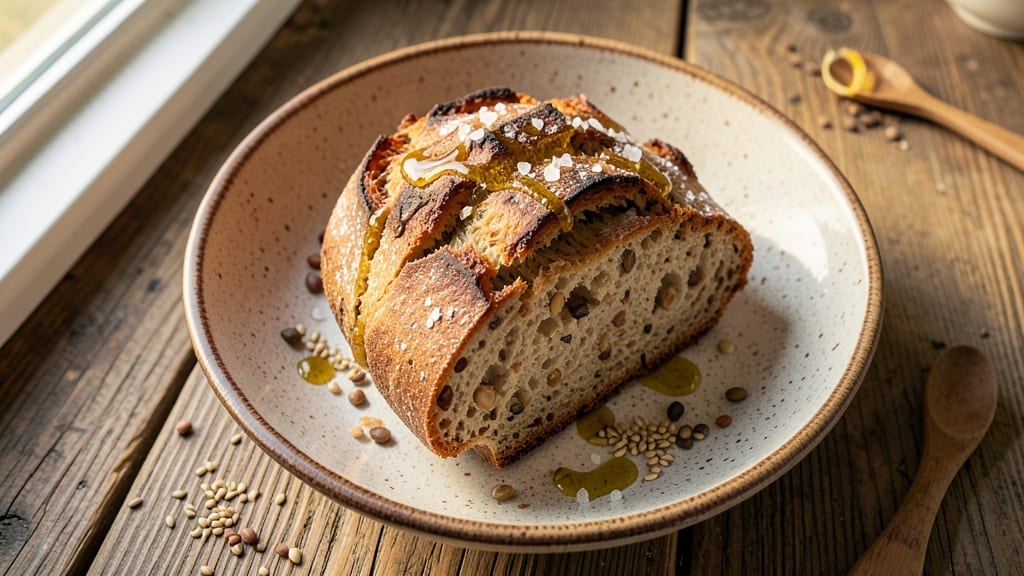
This 10-grain sourdough bread recipe delivers the perfect balance of nutty complexity and artisanal texture—ideal for bakers ready to elevate their loaves.
The secret lies in fermenting a mix of whole grains (like rye, barley, and millet) alongside white flour, creating a crust with depth and a crumb that’s both open and tender. I’ve refined this recipe over years of testing, ensuring the dough handles fermentation gracefully while developing rich, caramelized flavors.
What sets this recipe apart is the hydration ratio (75%) and long fermentation (12–16 hours), which unlock the grains’ natural sweetness and improve digestibility. The Dutch oven baking method guarantees a crisp, blistered crust while keeping the interior moist.
Even beginners can master the process with clear shaping and proofing cues—no guesswork required.
The result is a nutty, slightly tangy loaf with a crackling crust and a crumb speckled with golden grain flecks. Each slice offers layers of flavor, from toasted barley to molasses-like rye, making it perfect for sandwiches, toast, or serving alongside soups.
The recipe yields one full loaf (about 2 pounds), with leftovers freezing beautifully.
For those new to sourdough, I’ve included troubleshooting tips for density or sourness, plus variations like adding seeds or herbs. This isn’t just bread—it’s a textural and flavorful masterpiece that transforms your kitchen into a bakery. Let’s get started.
Ingredients for 10 grain sourdough bread
Twelve distinct flours and grains create this artisanal loaf’s signature nutty complexity and open crumb structure.
| Ingredient | Amount | Notes |
|---|---|---|
| Active Sourdough Starter 🍞 | ½ cup | 100% hydration, bubbly and active |
| All-Purpose Flour 🌾 | 3 cups | King Arthur or similar high-gluten |
| Whole Wheat Flour 🌾 | 1 cup | For added texture and nutrition |
| Rye Flour 🌾 | ½ cup | Dark rye for molasses-like flavor |
| Barley Flour 🌾 | ½ cup | Ground from pearled barley |
| Millet Flour 🌾 | ½ cup | Light and nutty flavor profile |
| Spelt Flour 🌾 | ¼ cup | Ancient grain for complexity |
| Buckwheat Flour 🌾 | ¼ cup | Rich, earthy flavor (not gluten-free) |
| Oat Flour 🌾 | ¼ cup | Ground from old-fashioned oats |
| Cornmeal 🌽 | ¼ cup | Fine grind for crust development |
| Water 💧 | 2 ½ cups | Filtered or dechlorinated preferred |
| Sea Salt 🧂 | 1 ½ tsp | Diamond Crystal preferred |
| Honey 🍯 | 1 tbsp | Raw, unprocessed for fermentation |
| White Whole Wheat Flour 🌾 | ¼ cup | For additional structure |
The grains are the heart of this recipe, so source them carefully. For flours, King Arthur or Bob’s Red Mill offer consistent quality—avoid pre-milled grains with high fat content, which can spoil faster. Rye and buckwheat should be dark, with no off smells. If grinding your own, use a high-speed blender for even particle size. The oat flour must be finely ground—coarse texture creates dense bread. For the cornmeal, Stone Ground Grits brand yields the best results. Store all flours in airtight containers away from light to prevent rancidity. The sourdough starter should be at its peak activity—look for bubbles across the entire surface and a slightly domed shape.
No rye flour? Substitute with extra whole wheat, but reduce by 10% due to higher moisture content. Buckwheat’s earthy notes can be replaced with 10% more barley flour. For those avoiding gluten, replace 10% of the flours with certified gluten-free oat flour, though texture will differ. The honey acts as both sweetener and fermentation booster—maple syrup works equally well. If using pre-milled grains, sift them before mixing to prevent lumps. The sea salt enhances flavor development during fermentation; Diamond Crystal dissolves more easily than Morton’s. For a lighter crumb, reduce the whole grain flours by 15% and increase all-purpose flour proportionally.
Flours should be stored in a cool, dark pantry for up to 6 months, while whole grains last 3 months once ground. The sourdough starter can be kept indefinitely but should be refreshed weekly. For best results, mix the dry ingredients in a large mixing bowl and store in an airtight container with a damp paper towel to maintain freshness. The honey and salt can be combined in a small jar and kept for 1 year. When using this bread, slice with a serrated knifecrumbled and frozen for up to 3 months for breadcrumbs.
Why You’ll Love This Recipe
- No-Fuss Mix-In: Mixing the flours—rye, barley, whole wheat—takes all of two minutes. Just dump, stir, and let the starter do the heavy lifting. Honestly, I’ve made this while scrolling through emails; it’s that unfussy.
- Deep, Nutty Crunch: That rye and barley? They bring a toasty, almost caramelized bite that regular sourdough can’t touch. (Yes, even on a Tuesday night.) The whole wheat adds a subtle earthiness—like a hug for your sandwich.
- Weeknight Workhorse: Slice it for toast, pack it for lunch, or use it to soak up soups. Between us, I’ve even thrown leftover chunks into salads when I’m lazy. It’s the kind of bread that does the work for you.
- Pantry Goldmine: You’re already using what’s in your cupboard—no fancy ingredients, just flour and a starter you probably have sitting around. And because it keeps for days (freeze slices for later), it’s my go-to for cutting grocery costs without sacrificing flavor.
Step-by-step instructions for 10-Grain sourdough bread recipe
This method delivers a complex, nutty flavor profile with a crisp fermented crust and open crumb.
Combine Wet Ingredients and Hydrate the Flours
In a large mixing bowl, combine the 0.5 cup active sourdough starter, 2.5 cups water, 1 tbsp honey, and 1.5 tsp sea salt. Stir until the honey and salt fully dissolve—this prevents clumping in the final dough. The mixture should be slightly tacky but not soupy.
Gradually add the 3 cups all-purpose flour, 1 cup whole wheat flour, 0.5 cup rye flour, 0.5 cup barley flour, 0.5 cup millet flour, 0.25 cup spelt flour, 0.25 cup buckwheat flour, 0.25 cup oat flour, 0.25 cup white whole wheat flour, and 0.25 cup cornmeal. Mix with a wooden spoon or dough whisk until you reach a shaggy, sticky dough that pulls away from the bowl sides. The texture should resemble wet sand—this is ideal for capturing all those nutty flavors.
Cover the bowl with a damp kitchen towel and let rest for 30 minutes. This initial hydration allows the flours to absorb moisture and the gluten to begin developing. You’ll notice the dough become slightly more cohesive as the proteins relax.
Develop the Dough Through Autolyse and Stretch-and-Folds
After the 30-minute rest, perform a series of stretch-and-folds every 30 minutes for 2 hours. Wet your hands to prevent sticking, then grab one side of the dough, stretch it upward, and fold it over itself. Rotate the bowl and repeat this motion all around the dough. This builds gluten structure while distributing the diverse flours evenly.
During this process, the dough will become smoother and more elastic. The buckwheat and rye flours will contribute a slightly denser texture, while the millet and spelt add lightness. Aim for 6 total sets of stretch-and-folds—this ensures proper gluten development without overworking the dough.
After the final stretch-and-fold, let the dough rest uncovered for 15 minutes at room temperature. This final relaxation period prevents over-tightening during shaping, which is crucial given the variety of flours with different protein contents.
Bulk Fermentation with Controlled Temperature
Place the dough in a lightly oiled bowl, cover with a damp towel, and ferment at 75°F for 4-6 hours. The ideal fermentation time depends on your starter’s activity—look for 50-75% increase in volume and a jiggly, slightly domed surface. The rye and buckwheat flours will accelerate fermentation slightly, so monitor closely.
During fermentation, perform 2 sets of gentle folds at the 2-hour and 4-hour marks. These folds help strengthen the gluten without deflating the dough. The final dough should pass the “poke test”—when you gently press your finger into the dough, it should spring back slowly rather than immediately.
For best results, use a dough proofer or place the bowl in a warm oven with a bowl of hot water. The combination of warm air and steam creates an ideal fermentation environment. The honey will feed the yeast while adding subtle sweetness to balance the earthy grains.
Shape and Final Proof for Crisp Crust Development
Turn the dough onto a lightly floured surface and shape into a round boule or batard. For the boule, gather the dough into a ball with the seam side down, then rotate as you tighten the surface tension. For the batard, form an oval with the seam on the bottom. The cornmeal will help create a beautiful crust pattern during baking.
Place the shaped loaf in a banneton or bowl dusted with 0.25 cup cornmeal, seam side up. Cover and refrigerate for 12-16 hours or proof at 75°F for 2-3 hours until it rises 50% above the rim. The cold proof intensifies the flavors while developing gluten for an open crumb structure.
For the cold proof, I recommend using the refrigerator method—it’s more forgiving and allows for better flavor development. The diverse flours will contribute their unique characteristics during this extended proof, creating a complex flavor profile that’s impossible to achieve with quick fermentation.
Bake with Steam for Maximum Crust Development
Preheat your Dutch oven with lid in a 475°F oven for 45 minutes. The heavy cast iron will retain heat and create steam during baking. Transfer the dough to a piece of parchment paper, score the top with a sharp razor (about ¼-inch deep) in a diamond or crosshatch pattern, then carefully invert into the hot Dutch oven.
Bake covered for 20 minutes, then remove the lid and bake 20-25 minutes until the internal temperature reaches 205-210°F. The crust should be deep golden brown with dark flecks from the rye and buckwheat flours. The bread will sound hollow when tapped on the bottom.
Remove from the oven and let cool on a wire rack for at least 2 hours before slicing. The residual heat will continue developing the flavors, and the crust will crisp up as it cools. Each slice should reveal an open crumb with pockets of air created by the diverse flours and proper fermentation.
Pro Tips For Making 10 Grain Sourdough Bread
- STRETCH THE AUTOLYSE: Mix your flours and starter first, then add water—wait 30 minutes before folding. I used to rush this, but letting the dough rest lets the whole wheat and rye absorb moisture better, preventing a gummy crumb.
- SIFT THE GRAINS: Lightly sift the rye and barley flour before mixing—it cuts clumps and distributes them evenly. I learned this the hard way after pulling apart a dense chunk in the middle of a loaf.
- DON’T OVERHANDLE THE DOUGH: Fold just until the outer edges smooth out—resist the urge to fully incorporate. This 10-grain mix is tougher; overworking it turns the crumb dense instead of airy.
- USE A DOCKING TOOL: Prick the dough with a fork or lame before baking to prevent big air pockets from whole wheat expanding. (Yes, even if it looks messy—it’s the only way to guarantee an even rise.)
Dietary considerations for 10 grain sourdough bread
Gluten-Free Adaptations
While this recipe celebrates whole grains, you can adapt it for gluten-free (GF) diets by replacing 10% of the flours with certified GF oat flour or a GF blend like Bob’s Red Mill 1:1 Baking Flour.
The texture will be denser, so add 1 extra tbsp psyllium husk powder per cup of GF flour to improve structure. Expect a slightly chewier crumb but maintain the nutty depth from millet and buckwheat. 🌱
Low-FODMAP Options
For those avoiding FODMAPs, swap rye and buckwheat for equal parts white whole wheat flour and certified GF oat flour. Reduce the honey to ½ tbsp and use maple syrup instead.
The millet and spelt remain safe in moderation. Fermentation time may shorten slightly due to lower fiber content, so monitor closely for 50% volume increase.
Nut-Free Version
This recipe is naturally nut-free, but if you’re avoiding seeds too, omit the cornmeal and replace it with ½ cup more all-purpose flour. For extra crunch, add ¼ cup sunflower seeds (if tolerated) during final proof. The crust will still develop beautifully without cornmeal’s natural starch.
High-Protein Boost
Increase protein content by adding ¼ cup vital wheat gluten to the all-purpose flour. This creates a lighter crumb while maintaining the grain’s nutty character. For extra protein, stir in 2 tbsp nutritional yeast during bulk fermentation—it adds a cheesy depth without altering texture. Ideal for post-workout meals!
Diabetic-Friendly
Reduce the honey to ½ tbsp and use ½ cup almond flour instead of oat flour. The almond flour adds healthy fats that slow glucose absorption. Keep the 12-16 hour cold proof to enhance fiber benefits from whole grains. Pair with avocado toast for balanced blood sugar support.
Keto Considerations
This recipe isn’t keto-friendly as written, but you can create a low-carb version by replacing all flours with 4 cups almond flour and 2 tbsp psyllium husk.
Reduce water to 1.5 cups and omit honey entirely. The result will be a dense, cracker-like loaf best used for dipping or croutons rather than sandwiches.
Nutrition facts
Frequently asked questions
Why does this recipe use so many different grains?
Each grain contributes unique flavors and textures—rye adds molasses-like depth, buckwheat brings earthiness, and millet offers a light nuttiness. The combination creates a complex flavor profile while improving digestibility through diverse fiber content. The cornmeal enhances crust development, while oat flour adds creaminess to the crumb.
Can I substitute any of the grains if I can’t find them?
For rye, use extra whole wheat flour (reduce by 10%). Replace buckwheat with 10% more barley flour for similar earthy notes. If missing spelt, swap with white whole wheat. The key is maintaining the 75% hydration ratio—adjust water slightly if using higher-moisture flours like rye.
How do I know when the dough is properly fermented?
Look for 50-75% volume increase and a jiggly surface when gently pressed. The dough should spring back slowly (not immediately) when poked—the “windowpane test.” For this recipe, fermentation takes 4-6 hours at 75°F, but the rye and buckwheat flours may speed it up slightly. The final dough should smell sweetly tangy, not harsh or alcoholic.
Why does my crust turn out too dark or pale?
For a darker crust, increase oven temp to 485°F for the last 5 minutes of baking. For a lighter crust, reduce to 450°F and bake 5 minutes longer covered. The cornmeal helps with browning—ensure it’s evenly distributed. Scoring depth also affects crust color: ¼-inch gives optimal browning while preventing over-expansion.
Can I make this bread without a Dutch oven?
Yes! Use a commercial baking stone with a steel pan underneath for steam. Place the dough on parchment, score, then pour 1 cup boiling water into the pan. Bake at 475°F for 25 minutes covered with foil, then 15 minutes uncovered. The steam mimics Dutch oven results, though crust texture will differ slightly.

- 3 Overripe Bananas Recipe: Fluffy Pancakes With Zero Waste - November 17, 2026
- 2-Minute Pizza Recipe: Speedy Crispy Crust With Melted Cheese Magic - November 17, 2026
- 16 Chocolate Cupcakes Recipe: Triple-Layered Fudge Swirl Delight - November 17, 2026