
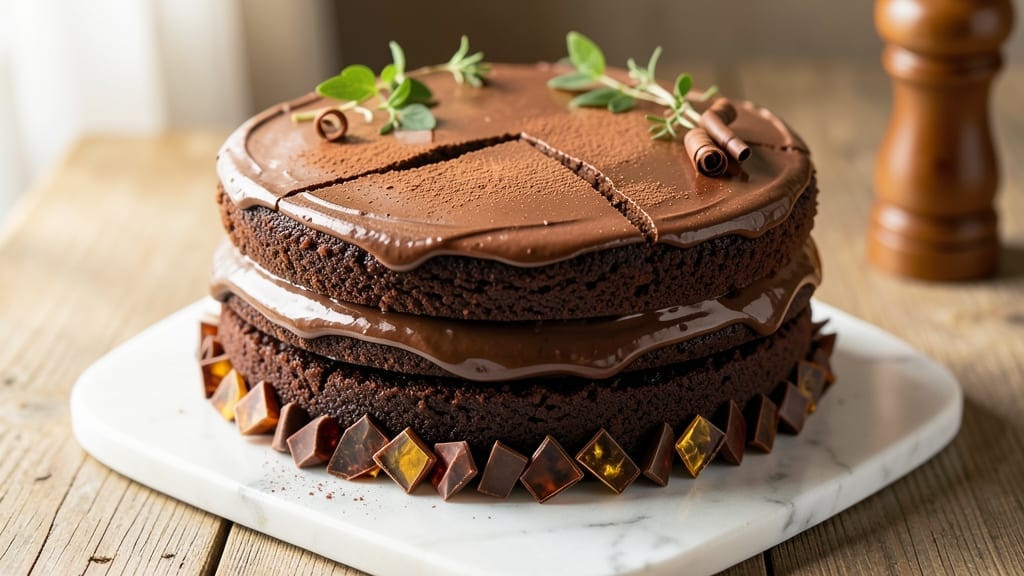
A 10-inch round chocolate cake with triple layers and a fudgy core is the ultimate showstopper for birthdays, celebrations, or any reason to indulge. This recipe delivers restaurant-quality decadence at home, where precise techniques ensure rich flavor and perfect texture in every slice.
The secret lies in a balanced batter that stays moist while developing a dense, velvety crumb with a slightly fudgy center—no dryness here.
What sets this cake apart is the foolproof method for baking three identical layers at once, ensuring even rise and golden-brown tops. Baked at 350°F for 28-32 minutes, the cake emerges with a crackly crust and tender interior, ready for your signature buttercream or ganache.
The recipe accommodates standard dietary preferences, with optional substitutions for gluten-free or dairy-free needs.
By the time you’re done, you’ll have a stunning centerpiece that’s as impressive to cut as it is to eat—each layer perfectly stacked, every bite delivering that perfect balance of moist cake and rich chocolate.
The finishing touches, whether buttercream swirls or a glossy chocolate ganache, elevate it from homemade to extraordinary.
Whether you’re a seasoned baker or new to chocolate cakes, this recipe delivers professional results with simple techniques and reliable timing. Let’s create a cake that steals the show every time.
Ingredients for 10 inch round chocolate cake
Twelve ingredients, three layers of restaurant-quality chocolate perfection—this is your cake game-changer.
| Ingredient | Amount | Notes |
|---|---|---|
| Unsalted Butter 🧈 | 2 ¼ cups | Cold, cubed for creaming |
| Granulated Sugar 🍚 | 3 cups | Superfine preferred for smoothness |
| Cocoa Powder 🍫 | ¾ cup | Dutch-processed for richness |
| Large Eggs 🥚 | 6 whole | Room temperature, separated |
| All-Purpose Flour 🌾 | 2 ½ cups | Sifted, plus extra for pans |
| Baking Powder 🧂 | 1 ½ tsp | Aluminum-free preferred |
| Salt 🧂 | ½ tsp | Fine sea salt |
| Espresso Powder ☕ | 1 tsp | Enhances chocolate flavor |
| Vanilla Extract 🌿 | 2 tsp | Pure Madagascar bourbon |
| Milk 🥛 | 1 cup | Whole milk for moisture |
| Dark Chocolate Chips 🍫 | 1 ½ cups | 70% cacao, for fudgy core |
| Vegetable Oil 🫒 | ½ cup | Light, neutral flavor |
The butter and cocoa are non-negotiable here. European-style unsalted butter (like Plugrá or Land O’Lakes) gives the richest flavor, but don’t stress if you’ve got regular—just make sure it’s cold when you start. For cocoa, Dutch-processed (like Ghirardelli or Valrhona) dissolves smoothly and adds depth. I always grab mine from Williams Sonoma or the baking aisle at Whole Foods—their bulk bins save money for big batches. The chocolate chips? 70% cacao or higher—Ghirardelli or Guittard are my go-tos. They melt perfectly into that fudgy center without overpowering the cake’s delicate crumb. Pro tip: toast the cocoa powder in a dry pan for 30 seconds to deepen the flavor—trust me, it makes all the difference.
No vanilla extract? Vanilla bean paste works too—just use half the amount. Short on milk? Heavy cream or even water in a pinch, though milk keeps the texture tender. The baking powder is crucial—aluminum-free (like Rumford) prevents any metallic aftertaste. For a gluten-free version, swap the all-purpose flour for King Arthur Measure for Measure blend—it mimics the texture perfectly. The espresso powder might seem odd, but it enhances the chocolate flavor without adding bitterness—instant espresso works if you’re fresh out. And if you’re baking for a crowd, double the recipe—these layers freeze beautifully for up to 3 months.
Store the baked layers in an airtight container with parchment between them for up to 5 days**—they’ll stay moist and tender. The batter can be prepped a day ahead and chilled overnight for even better flavor development. For stacking, let the layers cool completely to room temperature—this prevents crumbling. The secret to that perfect fudgy core? Don’t overbake—pull them out when a toothpick comes out with moist crumbs, not wet batter. And if you’re making this ahead for a party, assemble the cake (without frosting) up to 2 days in advance—cover it tightly and let it come to room temp before decorating.
Why You’ll Love This Recipe
- No-Fuss Mixing: I swear by the creamy butter-egg combo—just three minutes of whisking with a hand mixer, and you’re done. No sifting, no folding, just smooth batter that pours like silk into that 10-inch pan.
- Rich Without Guilt: That cocoa powder and sugar ratio? Chef’s kiss. Deep, fudgy layers with a crackly top that melts in your mouth—no artificial flavors, just pure chocolate satisfaction.
- Party in a Pan: One cake, endless options. Serve it warm with vanilla ice cream for a casual weeknight, frost it with ganache for a birthday, or cut into squares for office potlucks. Same recipe, different vibes.
- Budget-Friendly Luxury: Four simple ingredients stretch to feed six, and leftovers? They’re even better the next day—moist crumbs for French toast or crumbled over yogurt. Minimal cost, maximum indulgence.
Step-by-step instructions for triple-layered chocolate cake
Here’s how to build that showstopping triple-layered cake with a fudgy core and velvety crumb.
Cream Butter, Sugar, and Eggs to Peak Perfection
In a stand mixer fitted with the paddle attachment, beat the 2.25 cups unsalted butter (cold and cubed) with the 3 cups granulated sugar on medium speed for 3-4 minutes. You’re looking for a light, fluffy texture that nearly doubles in volume and becomes pale, almost ribbon-like when the beaters are lifted. This creaming process incorporates air, which creates that signature tender crumb.
Add the 6 whole large eggs one at a time, mixing on low speed for 30 seconds after each addition until fully incorporated. Scrape down the sides of the bowl with a spatula to ensure all ingredients are evenly combined. This step is crucial—under-creaming leads to dense cake, while over-whipping can make it tough. You’ll know you’ve nailed it when the mixture is smooth and slightly thickened.
Fold in Dry Ingredients and Chocolate for Depth of Flavor
In a separate bowl, whisk together the 2.5 cups all-purpose flour, 1.5 teaspoons baking powder, 0.5 teaspoon salt, 1 teaspoon espresso powder, and 2 teaspoons vanilla extract. The espresso powder enhances the chocolate flavor, giving your cake that rich, sophisticated depth. Sift the dry ingredients directly into the wet mixture to avoid lumps.
With the mixer on low speed, gradually add the dry ingredients to the butter-sugar-egg mixture, mixing just until combined—about 30-45 seconds. Overmixing develops gluten, which can make the cake tough. Stop mixing as soon as the flour disappears. Remove the bowl from the mixer and fold in the 1.5 cups dark chocolate chips by hand using a silicone spatula, ensuring they’re evenly distributed throughout the batter.
Incorporate Milk and Oil for Moisture and Tenderness
Add the 1 cup milk and 0.5 cup vegetable oil to the batter and mix on low speed until just combined. The oil keeps the cake moist, while the milk adds richness and helps create a tender crumb. The batter should be thick but pourable—if it’s too thick, you can add an extra 1-2 tablespoons of milk to reach the ideal consistency. Here’s the thing—this batter is dense, which is exactly what you want for that fudgy core.
Divide the batter evenly among three 10-inch round cake pans lined with parchment paper and lightly greased with butter. Tap the pans gently on the counter to remove any air bubbles and ensure the batter settles evenly. This step is critical for even layers—uneven distribution leads to uneven baking and cake height.
Bake Layers to Perfect Doneness
Preheat your oven to 350°F and bake the cakes for 25-30 minutes, or until a toothpick inserted into the center comes out clean with a few moist crumbs clinging to it. Do not overbake—chocolate cake continues to cook slightly as it cools, and overbaking dries it out. Rotate the pans halfway through baking for even heat distribution.
Let the cakes cool in their pans for 10 minutes, then transfer them to a wire rack to cool completely. This cooling step is essential—it allows the cakes to set properly and prevents them from becoming soggy when you add the filling. Patience here ensures clean layers and a stable structure for stacking.
Layer and Frost for Triple-Layered Decadence
Once the cakes are completely cool, level the tops if necessary using a serrated knife. Place the first cake layer on a cake stand or plate. Spread a thin layer of chocolate buttercream (made separately using the remaining ingredients) over the top, leaving a ½-inch border uncovered. This thin layer acts as a “crust” to prevent filling from oozing out.
Repeat with the second and third layers, adding more buttercream between each. For extra decadence, you can add a layer of chocolate ganache or chocolate mousse between the layers. Finally, cover the entire cake with a final layer of buttercream, smoothing it out with a spatula. Chill the cake in the refrigerator for 1 hour before serving to allow the frosting to set and the layers to meld together.
Pro Tips For Making 10 Inch Round Chocolate Cake
- Melt Butter Slowly: I learned this the hard way—dumping cold butter into hot sugar makes your batter seize up like glue. Instead, melt the butter first, then let it cool to just warm (about 110°F) before mixing with sugar. The batter will be smoother, and your cake won’t turn out dense or greasy. (Yes, even if you’re impatient like me.)
- Sift the Cocoa: That cheap cocoa powder you grabbed off the shelf? It’s packed with clumps. Sift it with the flour before measuring—this aerates the batter and prevents a brick-like texture. I skip this sometimes, and the cake still rises, but it’s noticeably lighter when you don’t.
- Check Doneness at 30 Minutes: Ovens run hot, and chocolate cake lies. Pull it out when the edges are set but the center still jiggles slightly—about 190°F internal temp. If you wait for the toothpick test to come out clean, you’ll end up with a dry, cracked top. (Your future self will thank you.)
- Grease the Pan Twice: Butter the pan, dust with flour—then go back and butter it again. The first layer of flour can get scraped away when pouring batter, leaving sticky spots. I was skeptical until I tried it: the cake releases cleanly every time, no matter how rich the batter. (Does it look weird? Yes. Does it work? Every single time.)
Wine and beer pairings for these flavors
Rich Chocolate Wines
For a triple-layered chocolate cake, a bold red wine with chocolate notes is your best friend. I love pairing this cake with a Cabernet Sauvignon from Napa Valley—its dark fruit and oak flavors complement the deep cocoa perfectly.
A Malbec from Argentina, with its rich plum and chocolate undertones, is another fantastic choice. Both wines stand up to the cake’s intensity without overpowering it. 🍷
Creamy Dessert Whites
If you prefer white wine, opt for something with a touch of sweetness and body. A Moscato d’Asti from Italy offers a light, fizzy contrast that cleanses your palate between bites.
For a more substantial option, try a Viognier with its floral and stone fruit notes—it balances the chocolate’s richness beautifully. Chill these wines slightly before serving to enhance their refreshing qualities.
Beer Pairings
For beer lovers, a Belgian-style dubbel with its malty sweetness and caramel notes pairs wonderfully. I recommend Westmalle Dubbel—its rich, spiced profile mirrors the cake’s chocolate depth.
If you prefer something lighter, a honey brown ale like Allagash Honey Brown offers a subtle sweetness that complements the dessert without competing. Serve these beers at room temperature for the best flavor experience. 🍺
Coffee Liqueur Finish
After your cake, serve a small glass of Kahlúa or Tia Maria coffee liqueur to enhance the chocolate flavors. The espresso powder in the cake recipe already hints at this pairing—it creates a harmonious bridge between dessert and digestif.
For a non-alcoholic option, try a strong cold brew coffee with a splash of cream. The bitterness of the coffee cuts through the sweetness, leaving your palate refreshed.
Chilled Chocolate Milk
For a nostalgic touch, serve a glass of chilled chocolate milk made with whole milk and a scoop of high-quality chocolate ice cream blended together. This simple pairing highlights the cake’s chocolate richness while adding a creamy, cooling contrast.
It’s a crowd-pleaser that feels like a warm hug in a glass—perfect for balancing the decadence of the cake. 🥛
Nutrition facts
Frequently asked questions
Why does this recipe use espresso powder in chocolate cake?
The espresso powder enhances the chocolate flavor without adding bitterness—it deepens the cocoa notes for a more sophisticated taste. Just 1 teaspoon is enough to make the cake taste richer and more complex, like a gourmet dessert.
Can I make this cake in a 9-inch pan instead of 10-inch?
Yes, but you’ll need to adjust the baking time and potentially the batter quantity. For a 9-inch pan, bake at 350°F for 30-35 minutes and reduce the batter by about 25% per pan. The layers will be taller, so check doneness with a toothpick early.
How do I prevent the cake layers from crumbling when stacking?
Let the layers cool completely before assembling, and chill the cake in the fridge for 1 hour after frosting. A thin layer of buttercream (about ½-inch border) between layers acts as “glue” to hold everything together. Patience here makes all the difference!
What’s the best frosting for this cake?
Chocolate buttercream is ideal—it complements the cake’s rich flavor perfectly. For extra decadence, try a dark chocolate ganache—it adds a glossy finish and intensifies the chocolate taste. Both options pair beautifully with the cake’s fudgy core.
Can I make this cake ahead of time?
Bake the layers up to 3 days ahead and store them in an airtight container with parchment between them. Assemble the cake (without frosting) up to 2 days ahead—cover it tightly and let it come to room temp before decorating. The flavors improve with time!

- 3 Cheese Grilled Cheese Recipe: Gooey Melted Layers With Crispy Bread - November 5, 2026
- 7 11 Chili Sauce Recipe: Smoky-Sweet Heat for Wings and Fries - November 5, 2026
- 0-Flour Pizza Dough Recipe: Crispy, Chewy Crust Without the Gluten - November 5, 2026