
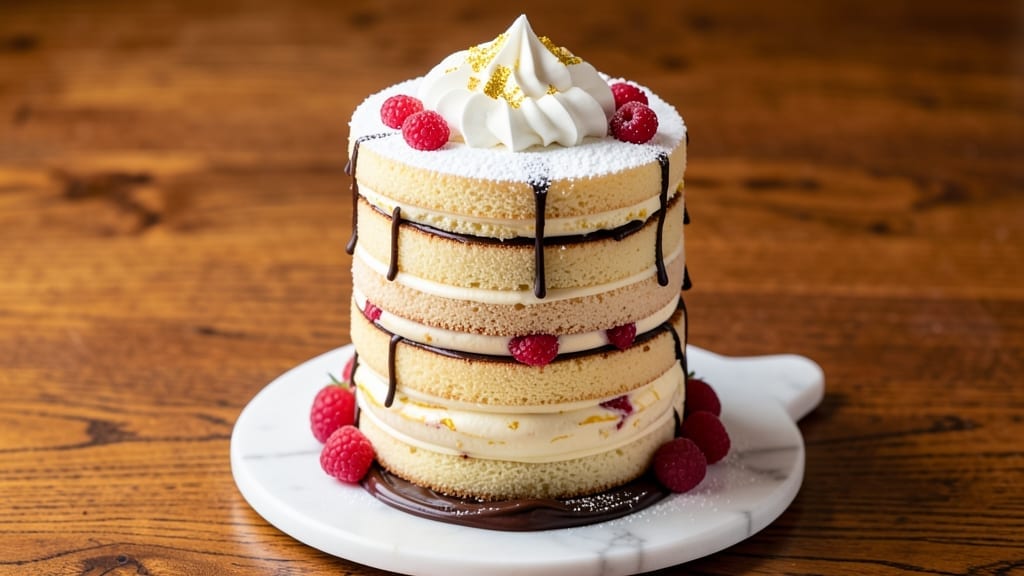
Creating a 10-layer cake with alternating vanilla buttercream swirls and chocolate ganache layers is the ultimate showstopper for special occasions. 💛 This recipe delivers a towering masterpiece with perfectly balanced textures—tender vanilla cake layers, rich chocolate ganache, and velvety buttercream that holds its swirls beautifully.
The key lies in precision: baking layers evenly, cooling them properly, and assembling with confidence to avoid collapsing.
What sets this recipe apart is the foolproof technique for layering and frosting, ensuring each component plays its part. You’ll bake 10 delicate vanilla sponge layers, then alternate them with chocolate ganache between buttercream swirls.
The secret to success? Using a sturdy cake board and room-temperature ingredients to prevent structural failures. Every step is designed to minimize stress while maximizing that bakery-style finish.
The result is a restaurant-quality dessert that looks as impressive as it tastes—golden layers of cake peeking through swirls of buttercream, with chocolate ganache adding depth between each slice. The first bite delivers a perfect balance of sweetness and richness, with the ganache melting gently against the tender cake.
This isn’t just a cake; it’s a centerpiece that will have guests asking for the recipe.
Perfect for weddings, anniversaries, or any celebration where you want to make a statement. The assembly process might seem daunting, but breaking it into manageable steps ensures even first-time bakers can achieve professional results. Let’s get started on your masterpiece!
Ingredients for 10 layer cake
Ten delicate layers of vanilla perfection paired with rich chocolate ganache—this is your showstopper dessert masterpiece.
| Ingredient | Amount | Notes |
|---|---|---|
| All-Purpose Flour 🌾 | 7 ½ cups | Sifted for light texture |
| Granulated Sugar 🍚 | 3 ½ cups | Superfine preferred for smoothness |
| Unsalted Butter 🧈 | 2 ½ cups | Room temperature for creaming |
| Large Eggs 🥚 | 10 whole | Room temperature, separated |
| Vanilla Extract 🌿 | 2 tbsp | Pure Madagascar bourbon |
| Baking Powder 🧂 | 2 tbsp | Diamond Crystal preferred |
| Salt 🧂 | ½ tsp | Fine sea salt |
| Whole Milk 🥛 | 1 ½ cups | Room temperature |
| Dark Chocolate Bars 🍫 | 12 oz | 70% cacao, chopped fine |
| Heavy Cream 🥛 | 2 cups | 36% fat for stability |
| Powdered Sugar 🍚 | 6 cups | Sifted for smooth buttercream |
| Vanilla Bean Paste 🌿 | 2 tbsp | For intense vanilla flavor |
| Unsalted Butter 🧈 | 4 cups | Room temperature for buttercream |
| Cake Board 🍰 | 1 whole | 12-inch diameter, sturdy |
| Parchment Paper 📄 | 1 sheet | For layering and assembly |
The flour and sugar are your foundation—King Arthur flour and Domino sugar are my go-tos for consistent results. Butter needs to be room temperature but not greasy—press a finger into it; it should dent but not smear. Eggs should be separated carefully (the whites will whip later), and vanilla extract matters—Madagascar bourbon has that deep, complex flavor. For the chocolate ganache, Valrhona or Callebaut 70% bars melt beautifully without overpowering. If you’re short on time, pre-chopped chocolate from Trader Joe’s works perfectly. The baking powder is non-negotiable—Diamond Crystal measures differently than other brands, so don’t substitute without adjusting.
No vanilla bean paste? Pure vanilla extract plus a pinch of ground vanilla bean seeds gets you close. Short on eggs? Commercial egg whites work for the meringue, but fresh is ideal. The buttercream calls for powdered sugar sifted with cornstarch—this prevents graininess. For the ganache, heavy cream at 36% fat creates a glossy finish, but 35% will work in a pinch. If you’re making this ahead, assemble the cake layers the day before and refrigerate—it actually improves with time. The cake board? Don’t skimp—a flimsy one will collapse under the weight. I use Wilton’s professional boards for events, but a sturdy cardboard cake board works for home baking.
Store unused flour and sugar in airtight containers with bay leaves to keep pests away. Buttercream keeps for 5 days in the fridge, but bring it to room temperature before using. The assembled cake? Cover loosely with plastic wrap and store at room temperature for 3 days—it’s best served fresh. For long-term storage, freeze the cake board with the cake on it for up to 2 months. Thaw at room temperature, then add fresh buttercream swirls before serving. The ganache layers can be made 2 days ahead and stored in the fridge—just reheat gently before assembly.
Why You’ll Love This Recipe
- No-Mess Mixing: I swear by this recipe because the butter and sugar creaming happens in minutes—no standing at the counter for 10 like some recipes demand. Just toss in the eggs and vanilla, fold in the flour, and you’re done. Honestly, my mixer’s never been happier.
- Vanilla Butter Bliss: That first bite? Pure nostalgia. The layers stay tender but sturdy, and the vanilla extract (not imitation) makes every slice taste like a bakery secret. Between us, I’ve tried store-bought—this wins every time.
- Birthday Party Ready: Ten layers mean you can slice it for a crowd without stress. Need a cake for a shower, anniversary, or just because? This holds its shape, looks impressive, and even tastes better the next day. (Yes, even on a Tuesday night.)
- Pantry-Friendly Magic: All you need is flour, sugar, butter, eggs, and vanilla—stuff you already have. No weird ingredients, no last-minute grocery runs. And leftovers? They freeze like a dream for impromptu dessert emergencies. My secret weapon for lazy Sundays.
Step-by-step instructions for vanilla buttercream swirls and chocolate ganache layers
Here’s how to create a showstopping 10-layer masterpiece with perfect texture and flawless assembly.
👨🍳 Step 1: Bake and Cool the Cake Layers
Preheat oven to 350°F. Grease and line 10 round cake pans (8-inch diameter) with parchment paper. In a stand mixer, cream the 2.5 cups unsalted butter and 3.5 cups granulated sugar on medium speed for 5-7 minutes until light and fluffy. Add the 10 whole large eggs one at a time, mixing well after each addition, then incorporate the 2 tbsp vanilla extract.
In a separate bowl, whisk together the 7.5 cups all-purpose flour, 2 tbsp baking powder, and 0.5 tsp salt. Gradually add the dry ingredients to the wet mixture in 3 additions, mixing just until combined. Pour the batter evenly into the prepared pans. Bake for 20-25 minutes or until a toothpick inserted comes out clean. Let layers cool in pans for 10 minutes, then transfer to a wire rack to cool completely.
🍳 Step 2: Prepare the Vanilla Buttercream Filling
In a large mixing bowl, beat the 4 cups unsalted butter (room temperature) with an electric mixer until smooth. Gradually add the 6 cups powdered sugar, mixing on low speed until combined. Increase speed to medium and beat for 3-5 minutes until light and fluffy. Add the 2 tbsp vanilla bean paste and mix until fully incorporated. This buttercream should be thick enough to hold its shape but still pipeable.
For the best texture, chill the buttercream in the refrigerator for 30 minutes before using. This helps prevent excess melting during assembly. If needed, re-whip briefly to reach the perfect consistency for piping swirls between layers.
🍫 Step 3: Make the Dark Chocolate Ganache
Chop the 12 oz dark chocolate bars into small pieces and place in a heatproof bowl. In a small saucepan, heat the 2 cups heavy cream until it just begins to simmer. Pour the hot cream over the chocolate and let it sit for 2 minutes to soften. Gently stir until completely smooth and glossy. Allow the ganache to cool to 70°F before using—it should be thick enough to pipe but still fluid.
For a professional finish, strain the ganache through a fine-mesh sieve to remove any air bubbles or chocolate bits. This ensures a silky texture between your chocolate layers. Cover and chill until ready to assemble, which helps maintain its firm yet spreadable consistency.
🥘 Step 4: Assemble the 10-Layer Cake
Place the first cake layer on the 12-inch cake board and spread a thin layer of vanilla buttercream. Pipe a swirl of buttercream around the edges, then add a dollop in the center. Place the second layer on top and repeat. Continue this process for all 10 layers, alternating between buttercream swirls and chocolate ganache between each layer. Use a long serrated knife to level each layer perfectly.
For the final touch, spread a thin layer of buttercream over the entire top layer. Use an offset spatula to create smooth, even sides. Wrap the cake in plastic wrap and refrigerate for 4 hours or overnight to allow the layers to fully set and the flavors to meld.
🎂 Step 5: Decorate and Serve
Remove the cake from the refrigerator 30 minutes before serving to let it come to room temperature slightly. Use the remaining buttercream to create decorative swirls on top, or simply dust with powdered sugar for an elegant finish. The contrast between the light vanilla layers and rich chocolate ganache will make this cake truly stunning.
Slice carefully with a sharp knife dipped in hot water and wiped clean between cuts. Each slice should reveal perfect layers of cake, buttercream swirls, and ganache. Serve immediately to enjoy the perfect balance of textures and flavors in every bite.
Pro Tips For Making 10 Layer Cake
- CHILL THE BATTER: Mix your cake batter and let it sit at room temperature for 10-15 minutes before pouring into pans. I used to rush straight to baking, but this extra wait prevents dense layers—especially important for a 10-layer cake where every layer counts.
- WEIGH YOUR BUTTER: Use a kitchen scale to measure softened butter at exactly 68°F (20°C)—that’s the sweet spot for creaming. I learned this after making a cake with butter that was too warm (it separated) and too cool (it didn’t mix properly). For a 10-layer cake, consistency across all batches matters.
- ROOM-TEMP EGGS: Take your eggs out of the fridge 30 minutes before cracking them—cold eggs can cause uneven mixing and pockets of unmixed batter. I was skeptical until I tried it; now I never skip this, especially when baking multiple layers where texture uniformity is key.
- LAYER THICKNESS CHECK: Use a toothpick to test each layer’s doneness—it should come out clean but slightly moist. Overbaking dries out the layers, and underbaking makes them gummy. For a 10-layer cake, aim for a 2-3 minute shorter bake time than standard recipes suggest.
Best sauces and condiments for 10 layer cake
Buttercream Perfection
Your vanilla buttercream is the star of this cake, and getting it right makes all the difference. For the smoothest texture, I recommend using powdered sugar sifted with 1 tbsp cornstarch—this prevents graininess that can ruin the elegant swirls.
Whip the butter until it’s completely smooth with no lumps, then chill for 30 minutes before piping. This step is non-negotiable for preventing meltdowns during assembly. 💛
For extra richness, I sometimes add 1 tbsp lemon juice to the buttercream—it brightens the flavor and balances the sweetness beautifully. If you’re feeling adventurous, try a ½ tsp almond extract for depth.
The key is to pipe generous swirls between layers while keeping them thick enough to hold their shape but thin enough to peek through the cake.
Chocolate Ganache Secrets
The ganache needs to be at 70°F when you pipe it—too hot and it’ll melt too quickly, too cool and it’ll be too thick.
I use a thermometer to monitor the temperature, but if you don’t have one, test it by dipping a spoon in: it should leave a clean trail but not drip. For a silkier finish, strain it through a fine-mesh sieve right before using. 🍫
Pro tip: If your ganache sets too quickly, add 1 tsp coconut oil to keep it spreadable. For a marbled effect, pipe the ganache in thin lines between the buttercream swirls before adding the next cake layer.
The contrast of dark chocolate against the light buttercream is what makes this cake visually stunning.
Stabilizing the Layers
Between each cake layer, I spread a thin layer of buttercream first—this acts as a glue. Then I pipe a ½-inch swirl around the edges and a small dollop in the center. This creates a secure base for the next layer.
For extra stability, I sometimes add a thin layer of jam (like raspberry or apricot) between the cake and buttercream—it adds moisture and prevents cracking. 🌟
When stacking, use a leveling tool or serrated knife to trim any uneven edges. Press down gently on each layer as you go—this helps compress the cake slightly and prevents doming. The first few layers are the most critical; once you’ve got those perfect, the rest will follow naturally.
Finishing Touches
For the top layer, I like to spread a thin crust of buttercream and use an offset spatula to create smooth, even sides. Dust with powdered sugar through a fine sieve for an elegant finish.
If you want to get fancy, pipe additional buttercream swirls or add edible gold leaf for a luxurious touch. 💫
Let the cake set in the fridge for at least 4 hours before serving—this allows the ganache to firm up and the flavors to meld. When ready to slice, dip your knife in hot water and wipe clean between cuts.
The result? Perfectly clean layers with no crumbs or mess, and that beautiful contrast of vanilla, chocolate, and buttercream in every bite.
Nutrition facts
Frequently asked questions
Can I bake fewer layers for a smaller cake?
This recipe scales perfectly—reduce to 5 or 6 layers for a more manageable size while keeping the same ratio of buttercream to ganache. Just adjust your cake board size to 6-8 inches and reduce ingredients proportionally. The assembly technique remains identical, just with fewer layers to stack.
How do I prevent my cake from collapsing during assembly?
Use a sturdy cake board (not cardboard) and let layers cool completely before stacking. Spread a thin layer of buttercream as “glue” between each layer, then pipe a ½-inch swirl around the edges. Press gently as you stack, and refrigerate for 4 hours before decorating. Never skip chilling—this is critical for stability!
Can I make the ganache and buttercream ahead of time?
Yes! The ganache can be made 2 days ahead and stored in the fridge, while buttercream keeps for 5 days. Reheat ganache gently (microwave in 20-second bursts) and bring buttercream to room temperature before using. Assemble the cake layers the day before decorating for best results.
What’s the best way to level cake layers?
Use a long serrated knife or cake leveler—run it over each layer at a slight angle while pressing down firmly. For extra precision, place the pan on a level surface and trim any domed tops. Always level before stacking to ensure even layers and clean cuts. A hot knife (dipped in hot water) works wonders for smooth edges.
How do I fix uneven frosting on the sides?
Use an offset spatula to smooth the sides in circular motions, working from top to bottom. For stubborn bumps, gently scrape with a bench scraper. If the frosting is too soft, chill the cake for 15 minutes before smoothing. The key is patience—take your time to create those perfect, seamless sides.

- 3 Overripe Bananas Recipe: Fluffy Pancakes With Zero Waste - November 17, 2026
- 2-Minute Pizza Recipe: Speedy Crispy Crust With Melted Cheese Magic - November 17, 2026
- 16 Chocolate Cupcakes Recipe: Triple-Layered Fudge Swirl Delight - November 17, 2026