
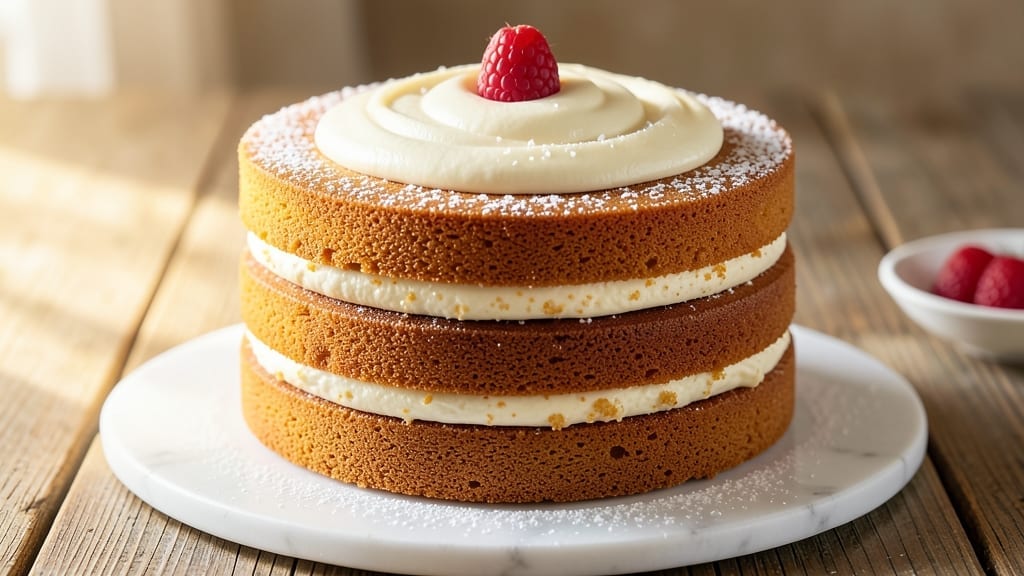
A three-layer butter cake with vanilla swirls and rich chocolate filling is the ultimate showstopper for celebrations—whether it’s a birthday, wedding, or just because. This recipe delivers moist, tender layers that stay fresh for days, with a velvety buttercream that holds its shape perfectly.
The secret lies in precise baking times and a foolproof assembly method that even beginners can master.
What makes this recipe stand out is the chocolate ganache filling that adds depth without overpowering the vanilla buttercream. Each layer is baked to a perfect golden finish, then filled and frosted with care to create a cake that looks as impressive as it tastes.
The swirl technique ensures every slice reveals those signature marbled layers, making it a crowd-pleaser every time.
By following this method, you’ll achieve a professional-looking cake with crisp edges, tender crumb, and a smooth frosting that stays put. The key steps—baking layers evenly, cooling completely, and assembling with confidence—are broken down clearly to ensure success. No fancy equipment is needed, just patience and attention to detail.
Perfect for special occasions or impressing guests, this cake delivers restaurant-quality results at home. Once you try it, you’ll never buy a boxed mix again. Let’s get started on creating your masterpiece.
Ingredients for 3 layer butter cake
Twelve essential ingredients transform into a showstopping three-layer cake with velvety layers and decadent fillings.
| Ingredient | Amount | Notes |
|---|---|---|
| All-Purpose Flour 🌾 | 4 ½ cups | Sifted for light texture, not pre-mixed |
| Unsalted Butter 🧈 | 2 ¼ cups | Cold, cubed for precise baking |
| Granulated Sugar 🍚 | 2 ½ cups | Superfine preferred for smooth batter |
| Large Eggs 🥚 | 6 whole | Room temperature for even baking |
| Vanilla Extract 🌿 | 2 tbsp | Pure Madagascar bourbon preferred |
| Baking Powder 🧂 | 2 tbsp | Diamond Crystal brand recommended |
| Salt 🧂 | 1 ½ tsp | Fine sea salt for balance |
| Milk 🥛 | 1 ½ cups | Whole milk for richness |
| Dark Chocolate Chips 🍫 | 1 ½ cups | 70% cocoa, chopped for filling |
| Heavy Whipping Cream 🥛 | 1 ½ cups | Cold, for perfect ganache |
| Powdered Sugar 🍚 | 4 cups | Sifted for smooth buttercream |
| Vanilla Bean Paste 🌿 | 2 tbsp | For intense vanilla flavor |
| Buttercream Frosting 🧈 | 3 cups | Optional additional for final layer |
| Powdered Sugar (extra) 🍚 | ½ cup | For dusting between layers |
The flour and butter are your foundation—King Arthur flour and Plugrá butter ensure that tender crumb and perfect rise. For the butter, buy it a day ahead and let it firm up in the fridge; this makes all the difference in achieving those signature crisp edges. If you’re in a pinch, Land O’Lakes unsalted works perfectly too. The vanilla extract? Madagascar bourbon is the gold standard—it’s worth the splurge for that rich, complex flavor that shines through every slice. And speaking of vanilla, the bean paste adds those tiny specks that make the cake look (and taste) truly professional.
No superfine sugar? Pulse regular granulated sugar in a food processor for 30 seconds—it dissolves more smoothly. Out of dark chocolate chips? High-quality chocolate bars chopped into chunks work just as well, and you’ll get bigger pieces for that restaurant-quality look. The heavy whipping cream for the ganache needs to be cold but not icy—if it’s too warm, the ganache will seize up. For the buttercream, European-style butter like Bergère gives a richer, smoother texture. If you can’t find it, Land O’Lakes or Parkay are solid backups. And here’s a pro tip: Sift your powdered sugar before mixing—lumps in the buttercream are a nightmare to fix later.
Store the cake layers in an airtight container between parchment paper for up to 3 days at room temperature, but honestly? It’s best enjoyed fresh. The ganache filling keeps well in the fridge for 5 days if you make it ahead, but let it come to room temperature before assembling. For long-term storage, freeze the fully assembled cake (without the final dusting) for up to 3 monthsBake the layers and make the ganache the day before, then assemble when you’re ready to impress. Trust me, the wait is worth it.
Why You’ll Love This Recipe
- No-Fuss Layers: I swear by this recipe because it’s three cakes in one—but honestly, the hardest part is waiting for the butter to soften. Mix, bake, repeat. That’s it. No fancy folding or stressing over overmixing the flour and sugar.
- Butter So Rich: The moment you slice into that first layer? Pure indulgence. Creamed butter and sugar give it that melt-in-your-mouth tenderness, while the vanilla extract ties it all together. It’s the kind of cake that makes you forget about “healthy” for a second.
- Birthday Party Ready: Between us, this is my go-to for celebrations—no one will guess it’s not from a bakery. The layers stay moist for days, so you can prep ahead and still serve slices that look (and taste) like they were made fresh. Guaranteed crowd-pleaser.
- Budget-Friendly Luxury: All the ingredients are pantry staples, and the recipe stretches to feed a crowd without breaking the bank. Leftovers? They’re the best part—slice it up for breakfast toast the next morning, and no one will complain.
Step-by-step instructions for decadent vanilla swirl and chocolate filling cake
This is where the magic happens—let’s build that showstopping three-layer cake with perfect texture and rich flavors.
Prepare the Cake Layers and Vanilla Swirl
Preheat your oven to 350°F and grease three 8-inch round cake pans, lining the bottoms with parchment paper. In a large mixing bowl, cream together the 2.25 cups unsalted butter and 2.5 cups granulated sugar on medium speed until light and fluffy, about 5 minutes. This step is crucial—you’re incorporating air that will make your layers light as a cloud.
Add the 6 whole large eggs one at a time, mixing well after each addition. Then stir in the 2 tbsp vanilla extract and 2 tbsp vanilla bean paste for that intense vanilla flavor. In a separate bowl, whisk together the 4.5 cups all-purpose flour, 2 tbsp baking powder, and 1.5 tsp salt. Gradually add the dry ingredients to the wet mixture, alternating with the 1.5 cups milk, beginning and ending with the flour. Mix just until combined—overmixing develops gluten and makes your cake tough.
Divide the batter evenly among the prepared pans. For the swirl effect, sprinkle ½ cup dark chocolate chips evenly over the top of one layer’s batter. Use an offset spatula to gently swirl the batter and chocolate chips together, creating marbled patterns. Bake each layer for 25-30 minutes or until a toothpick inserted into the center comes out clean. Let the layers cool in the pans for 10 minutes before transferring to a wire rack to cool completely.
Make the Chocolate Ganache Filling
While the cake layers are cooling, prepare the decadent chocolate filling. In a medium saucepan, combine the 1.5 cups dark chocolate chips and 1.5 cups heavy whipping cream. Place the saucepan over low heat and stir gently until the chocolate is completely melted and the mixture is smooth. Remove from heat and let it cool slightly to room temperature, about 20 minutes. This ganache needs to be thick enough to pipe but still spreadable.
For a perfect finish, place the saucepan in an ice bath to chill the ganache more quickly if needed. The ganache should be thick enough to hold its shape when piped but still smooth enough to spread. If it’s too thin, chill it further. This step is where the rich chocolate flavor shines through, creating the perfect contrast to the vanilla layers.
Assemble the Cake with Buttercream and Chocolate Layers
Once all layers are completely cool, it’s time to assemble the cake. Place the first layer on a cake stand or plate. Using an offset spatula, spread a thin layer of 1 cup buttercream frosting over the top. This helps the ganache adhere better. Spoon or pipe about ½ cup of the chocolate ganache evenly over the frosting, spreading it out to cover the entire layer. Place the second cake layer on top and repeat the process with another ½ cup ganache.
For the final layer, spread a thin layer of frosting on the top of the third cake layer. Pipe or spread the remaining ½ cup ganache over the top. Use a long serrated knife to level the top of the cake, ensuring it’s even. Dust the top and sides of the cake with the 0.5 cup powdered sugar (extra) using a fine-mesh sieve for an elegant finish. Chill the cake in the refrigerator for 30 minutes to allow the ganache to set slightly before serving.
Frost the Cake for a Professional Finish
Remove the cake from the refrigerator and apply the remaining 1 cup buttercream frosting to the top and sides. Use a spatula to create a smooth, even surface. For a polished look, use a bench scraper to create clean edges. Pipe any additional buttercream frosting around the base of the cake if desired, using a star tip for decorative swirls.
Let the cake sit at room temperature for 10-15 minutes before slicing to allow the frosting to firm up slightly. This final step ensures that your cake not only tastes incredible but also looks stunning. Serve immediately to enjoy the perfect balance of rich chocolate and velvety vanilla layers.
Pro Tips For Making 3 Layer Butter Cake
- Cream Butter Slowly: I used to rush this step and end up with greasy layers instead of tender ones. Beat the butter and sugar together until it’s light and fluffy—about 3-5 minutes—so the sugar crystals break down properly. Stop when the mixture looks like wet sand; overmixing just adds air you’ll regret later.
- Sift the Flour Twice: Skimping here means dense, uneven layers. Sift the flour before measuring, then sift it again right into the bowl when mixing. This cuts out lumps and ensures the batter stays smooth, which is non-negotiable for a clean, even crumb.
- Don’t Overfill Pans: I learned this after watching my first cake dome instead of rise evenly. Fill your pans only ⅔ full—any more, and the center won’t bake through before the edges burn. Tap the pans gently on the counter to settle the batter; this small step makes a real difference.
- Chill the Batter: Sounds weird, but it works: Let the batter rest in the fridge for 15-20 minutes before baking. This relaxes the gluten, so your layers stay soft instead of tough. Pro move—just don’t skip it if you want that melt-in-your-mouth texture.
Common mistakes when making great 3 layer butter cake
Overmixing the Batter
I can’t stress this enough: stop mixing the moment the flour disappears. Overmixing develops gluten, which makes your cake layers tough instead of tender. The ideal texture is like a thick pancake batter—just combined enough to see no dry flour spots.
I’ve ruined more cakes than I’d admit by mixing too long, so trust your eyes, not the timer. 💫
Uneven Baking Times
Baking all three layers at once? Big mistake. Your oven’s heat distribution varies, so layers bake at different rates. Instead, bake one layer at a time—25-30 minutes at 350°F—until a toothpick comes out clean.
If you’re short on time, rotate pans halfway through for even browning. Pro tip: Use an oven thermometer to confirm your oven’s actual temperature—many run hot!
Skipping the Cooling Phase
Rushing to assemble while layers are still warm is a recipe for disaster. Let each layer cool completely in the pan for 10 minutes, then transfer to a wire rack. Warm layers release moisture, making the ganache slide off and the buttercream melt.
I’ve seen cakes collapse mid-assembly because someone couldn’t wait. Patience here makes all the difference—trust me, your cake will thank you. ⏳
Incorrect Ganache Temperature
The ganache needs to be room temperature (about 70°F) when assembling—too hot and it melts the buttercream, too cold and it won’t spread. If your kitchen is warm, chill it slightly in the fridge.
For a quick fix, place the saucepan in an ice bath for 2-3 minutes while stirring constantly. The perfect consistency should coat the back of a spoon but still be pourable. Test it before committing to your cake!
Rushing the Frosting Process
Applying frosting too quickly leads to messy edges and uneven layers. Chill the cake for 30 minutes after assembly to let the ganache set slightly—this prevents sliding. Work in stages: frost the sides first, then the top, and use a bench scraper to create clean lines.
If your frosting is too soft, chill it for 10 minutes before applying. I’ve seen cakes look like a toddler’s finger-painting because someone didn’t take this step seriously!
Ignoring the Powdered Sugar Dust
That final dusting of powdered sugar isn’t just for looks—it adds a subtle sweetness and prevents the ganache from sticking to your fingers. Use a fine-mesh sieve and tap gently to avoid clumps. For extra elegance, dust the sides first, then the top.
A light, even layer is key—don’t go overboard, or you’ll end up with a cake that looks like it’s been rolled in sugar. This is where the little details make your cake look professional. ✨
Nutrition facts
Frequently asked questions
Can I make this cake in a different pan size?
Yes, but you’ll need to adjust baking times. For 6-inch pans, bake layers for 20-25 minutes at 350°F, and for 10-inch pans, increase to 30-35 minutes. Always use a toothpick test to check doneness. The key is maintaining the same batter depth—about 1.5 inches per layer—so the center bakes evenly.
How do I store leftover cake?
Keep the fully assembled cake in an airtight container at room temperature for up to 3 days. For longer storage, refrigerate for 5-7 days or freeze for 3 months. Thaw frozen cakes overnight in the fridge before serving. Pro tip: Wrap each layer individually in plastic wrap before assembling to prevent drying.
Can I substitute the chocolate ganache with another filling?
Try a raspberry jam (spreadable consistency) or cream cheese frosting for a tangy twist. For a nutty option, use hazelnut praline paste. Just ensure your filling isn’t too runny—it should hold its shape when piped. The ganache’s rich texture contrasts beautifully with the vanilla layers, but these alternatives work too!
Why did my cake layers sink in the middle?
This usually happens from overmixing or opening the oven too soon. The batter needs time to set before the oven’s heat fully penetrates. Let layers bake until a toothpick comes out clean, even if they look slightly underdone. For extra insurance, chill the batter for 30 minutes before baking. Patience is key—rushing leads to collapsed centers!
How do I make this cake gluten-free?
Replace the all-purpose flour with a 1:1 gluten-free baking flour blend (like Bob’s Red Mill) plus ½ tsp xanthan gum. Reduce milk by ¼ cup—gluten-free batters are often wetter. Bake at 325°F instead of 350°F to prevent over-browning. Test one layer first, as gluten-free cakes can behave differently. The texture won’t be identical, but it’ll still be delicious!

- 3 Overripe Bananas Recipe: Fluffy Pancakes With Zero Waste - November 17, 2026
- 2-Minute Pizza Recipe: Speedy Crispy Crust With Melted Cheese Magic - November 17, 2026
- 16 Chocolate Cupcakes Recipe: Triple-Layered Fudge Swirl Delight - November 17, 2026