
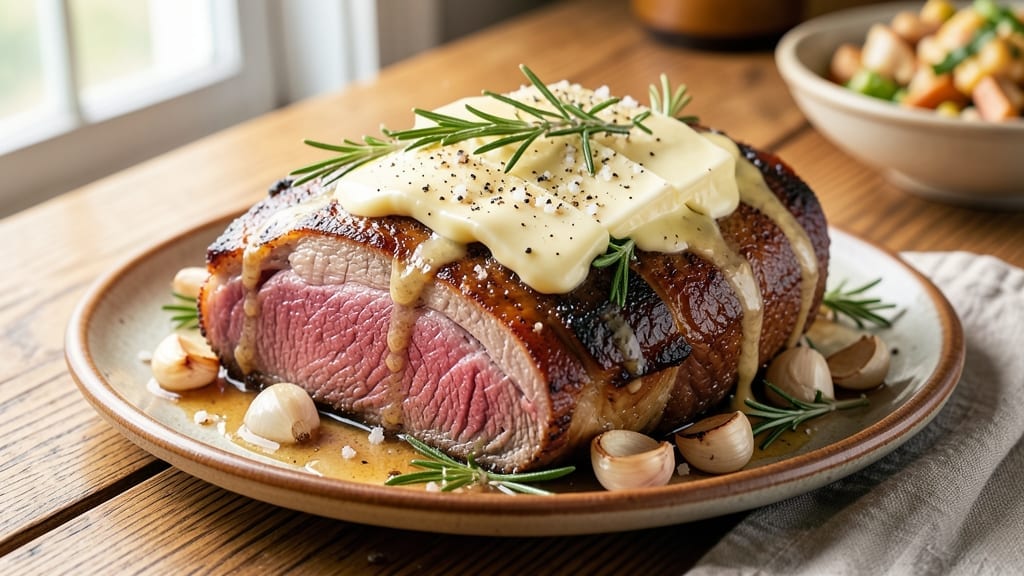
A 10 lb ribeye roast cooked to perfection means a juicy pink center and a flavorful crust that’ll impress any crowd. This reverse-sear method guarantees restaurant-quality results every time, with precise temperature control for tender, melt-in-your-mouth meat.
The secret lies in slow cooking to even doneness before a high-heat sear for that coveted crust—no guesswork, just foolproof technique.
What sets this recipe apart is the balance of time and temperature. Start by roasting the beef at a low heat until it reaches 110°F internally, then finish with a quick sear in a hot pan or broiler.
This method ensures the outside gets crispy while the inside stays tender, even for a large cut like a 10-pound roast. The result? A perfectly pink core with a rich, caramelized exterior that’s impossible to resist.
Once cooked, let the roast rest for 20 minutes before slicing—this step is non-negotiable for retaining juices and ensuring every bite is succulent. Serve with classic sides like roasted garlic mashed potatoes or a fresh garden salad to round out the meal.
The reverse-sear technique transforms a simple roast into a showstopper that feels like a special occasion.
Whether you’re hosting a dinner party or feeding a hungry family, this method delivers consistent, professional results. The key is patience and precision—no shortcuts, just a perfectly cooked roast that’ll have everyone asking for seconds. Let’s get started on mastering this technique.
Ingredients for 10 lb ribeye roast
The essential ingredients for a flawless 10 lb ribeye roast with a perfect pink center and crisp crust.
| Ingredient | Amount | Notes |
|---|---|---|
| Ribeye Roast 🥩 | 10 lb | Bone-in, 1-1.5 inch thickness |
| Kosher Salt 🧂 | 1 ½ tbsp | Diamond Crystal preferred |
| Freshly Ground Black Pepper 🌶️ | 1 ½ tbsp | Coarse grind preferred |
| Unsalted Butter 🧈 | ½ cup | Cold, cubed for sear |
| Garlic Cloves 🧄 | 10 whole | Smash lightly for flavor |
| Fresh Rosemary 🌿 | ¼ cup | Chopped, fresh preferred |
| Fresh Thyme 🌿 | ¼ cup | Chopped, stems removed |
| Extra-Virgin Olive Oil 🫒 | ¼ cup | High-quality, fruity |
| Beef Tallow or Duck Fat 🍳 | ¼ cup | For high-heat sear |
| Red Wine 🍷 | 1 cup | Bold, dry variety |
| Vegetable Oil 🫒 | 2 tbsp | High smoke point |
| Balsamic Vinegar 🍶 | 1 tbsp | For finishing touch |
| Fresh Parsley 🌿 | ⅛ cup | Chopped, for garnish |
The ribeye roast is non-negotiable—look for a bone-in cut with good marbling from a trusted butcher or Costco for consistency. A 1-1.5 inch thickness ensures even cooking. Season generously with Diamond Crystal kosher salt (it dissolves better than table salt) and freshly cracked black pepper. For the sear, beef tallow or duck fat delivers superior heat retention over butter alone—Trader Joe’s carries both affordably. Fresh herbs like rosemary and thyme should be vibrant and fragrant; avoid wilted stems. The red wine can be whatever bold bottle you’re drinking with dinner—Cabernet Sauvignon or Merlot work perfectly.
No beef tallow? Lard or bacon fat (rendered) works in a pinch, though the flavor profile differs slightly. Substitute olive oil for the high-heat sear if needed, but expect less caramelization. Fresh herbs can be swapped for dried at one-third the amount, though texture suffers. The balsamic vinegar adds depth—aged balsamic glaze from Whole Foods intensifies the flavor without overpowering. For a vegetarian-friendly option, replace the roast with a portobello mushroom medley (though texture will differ). Always pat the meat dry before seasoning to ensure maximum crust adhesion.
The roast should rest 20 minutes before slicing—this is critical for juiciness. Store leftovers in an airtight container for up to 5 days in the fridge or 3 months frozen. For reheating, low oven (275°F) with a splash of beef broth prevents drying. Portion into individual slices for easy serving. The butter and garlic mixture can be prepped ahead and stored in the fridge for 3 days—just bring to room temperature before using. Always use a meat thermometer for accuracy, especially with large cuts.
Why You’ll Love This Recipe
- Two-Handed Prep: Honestly, this roast takes all of five minutes to prep—just salt, pepper, and a few slashes to let the butter work its magic. No chopping, no fuss, just a big slab of beef waiting for the oven.
- Butter-Kissed Magic: That pat of cold butter melting into the slashes? It turns the outside into a golden crust while keeping the inside so tender it nearly falls apart. Between us, the first bite makes me close my eyes.
- Weekend Feast, Weeknight Fix: I’ve served this to 12 people at Thanksgiving and reheated slices for my kids’ lunches all week. The same roast works for holidays or lazy Tuesday dinners—just scale the sides.
- Leftovers That Don’t Suck: Most roasts turn to shoe leather when reheated, but this one? Slice it thin, sear it in a hot pan, and suddenly you’ve got ribeye sandwiches or hash that taste almost as good as the original. (Yes, even on a Tuesday night.)
Step-by-step instructions for 10 lb ribeye roast
Master this reverse-sear technique for a roast with a flawless crust and juicy pink center every time.
Prepare the Ribeye Roast for Even Cooking
Remove the 10 lb ribeye roast from the refrigerator and pat it completely dry with paper towels, including the cavity. This step is crucial—any moisture will prevent proper browning. Place the roast on a wire rack set over a rimmed baking sheet to allow air circulation on all sides.
In a small bowl, combine the 1.5 tbsp kosher salt and 1.5 tbsp freshly ground black pepper. Rub this mixture generously over the entire surface of the roast, pressing firmly to ensure even distribution. Pay special attention to the bone-in areas where flavor tends to concentrate. Let the seasoned roast sit at room temperature for 30 minutes before cooking to ensure even heat distribution throughout the meat.
Create the Herb Butter Compound
While the roast comes to room temperature, prepare the herb butter by combining the 0.5 cup unsalted butter, 10 whole garlic cloves (lightly smashed), 0.25 cup chopped fresh rosemary, and 0.25 cup chopped fresh thyme in a mixing bowl. Use a fork to mash the garlic slightly—this releases more flavor without turning to paste. The mixture should be well incorporated but still have visible herb flecks.
Form the herb butter into a log by wrapping it tightly in plastic wrap. Chill in the refrigerator until ready to use. This prepped butter will create a rich, aromatic crust during the searing phase and add depth of flavor throughout the roast. Keep it cold until you’re ready to apply it to the hot roast.
Low-Temperature Oven Cook for Even Doneness
Preheat your oven to 250°F—this low temperature is key to achieving an even cook without overbrowning the exterior. Place the seasoned roast on the middle rack and insert a meat thermometer into the thickest part of the roast, avoiding the bone. Cook until the internal temperature reaches 115°F, which should take approximately 3 to 4 hours.
During this time, resist the urge to open the oven door—each time you do, you lose heat and extend cooking time. The roast should develop a light sheen of moisture on the surface, indicating it’s ready for the searing phase. This slow cook ensures the center remains perfectly pink while the exterior prepares for the final crust.
Reverse-Sear for Crispy Exterior
Remove the roast from the oven and let it rest for 5 minutes while you prepare for the sear. Heat a large oven-safe skillet over high heat until it’s smoking hot. Add 2 tbsp vegetable oil and 0.25 cup beef tallow or duck fat to create a high-heat fat bath.
Unwrap the chilled herb butter log and press it firmly onto the surface of the roast, coating it completely. Place the roast in the hot skillet, fat-side down, and sear for 3 minutes until a deep golden-brown crust forms. Flip carefully and sear the other side for another 2 minutes. The high heat will create a Maillard reaction, locking in juices while developing that coveted crust.
Rest and Finish with Red Wine Reduction
Transfer the seared roast to a cutting board and let it rest for 15 minutes—this crucial step allows the juices to redistribute throughout the meat. While it rests, deglaze the skillet with 1 cup red wine, scraping up all the browned bits with a wooden spoon. Simmer the wine reduction until it reduces by half, then stir in 1 tbsp balsamic vinegar and let it cook until syrupy.
Slice the roast against the grain into 10 equal portions and drizzle each serving with the red wine reduction. Garnish with 0.125 cup chopped fresh parsley for a pop of color and freshness. The result should be a roast with a perfectly crisp exterior and a juicy, pink center that melts in your mouth—exactly as promised.
Pro Tips For Making 10 Lb Ribeye Roast
- CRANK THE HEAT FIRST: Sear that 10-pound ribeye over screaming-hot coals or a cast-iron skillet until it hits 145°F internally—don’t skimp on the initial blaze. I learned this the hard way when my first attempt came out gray inside; the crust locks in flavor and keeps the meat juicy through the low-and-slow finish.
- SALT LIKE IT’S 1950: Generously coat the roast with kosher salt 24 hours ahead—yes, even if you’re impatient. The salt penetrates deeper than last-minute dry-brining, and the crust will be restaurant-quality crisp. Skip this, and you’ll end up with a bland exterior no matter how much pepper you add.
- STOP AT 130°F: Pull the roast off the heat at 130°F for medium-rare—it’ll climb to 135°F while resting. I used to obsess over hitting the exact temp early, but the carryover rise is your friend here. Trust the thermometer, not the guesswork.
- BUTTER THE GARLIC RIGHT: Melt 4 tablespoons of unsalted butter with 8 smashed garlic cloves in a pan before adding the roast—this creates a flavor bomb that baste the meat as it cooks. I was skeptical until I tried it; now it’s non-negotiable for a 10-pound roast.
Essential equipment for this dish
Precision Thermometer
Invest in a laser thermometer like the ThermoWorks Smoke—it gives you instant, accurate internal temps without piercing the meat. I’ve found this is non-negotiable for large roasts like a 10 lb ribeye where even 5°F can mean overcooking.
Place the probe in the thickest part, avoiding fat or bone, and monitor closely during the 250°F phase. 🌡️
Oven-Safe Skillet
A cast-iron skillet (I use Lodge 12-inch) is your best friend for the reverse-sear finish. Its heat retention and even surface create that perfect crust. Make sure it’s oven-safe so you can sear on the stovetop and finish in the oven if needed.
For extra insurance, preheat it until smoking hot before adding the roast.
Wire Rack Setup
Place your roast on a wire rack set over a rimmed baking sheet—this allows air circulation on all sides for even cooking. I’ve tried roasting directly on a pan, and the bottom always ends up steamed instead of browned.
A Vosges Dual Wire Rack (available at Williams Sonoma) is my go-to because it fits most baking sheets and elevates the meat perfectly.
High-Heat Fat
For that caramelized crust, you need fat with a high smoke point. Beef tallow or duck fat (from Trader Joe’s) works best—I avoid butter here because it burns too easily.
If you’re in a pinch, lard or avocado oil will do, though the flavor won’t be as rich. Use 2 tbsp vegetable oil as a base to prevent sticking during the sear.
Resting Board
A large wooden cutting board (like John Boos 18×12-inch) is ideal for resting your roast. Wood retains heat better than glass or plastic, keeping the meat warm while juices redistribute. I like to tent it loosely with foil to prevent drying.
Never skip the 15-minute rest—this is when the magic happens, and it’s the difference between dry slices and melt-in-your-mouth perfection.
Deglazing Tools
For the red wine reduction, grab a wooden spoon (metal can scratch your skillet) and a small saucepan for reducing. A fine-mesh strainer helps remove any herb bits if you want a smooth finish.
I also keep balsamic vinegar (aged, from Whole Foods) on hand to add depth—just 1 tbsp is all you need for a perfect glaze. 🍷
Nutrition facts
Frequently asked questions
Why does the recipe specify a 115°F internal temperature before searing?
The 115°F target ensures a perfectly pink center while allowing the reverse-sear technique to work its magic. At this temperature, the meat is still tender but firm enough to handle the high-heat sear without falling apart. This method guarantees a juicy interior with that coveted crust—no more dry, overcooked roasts!
Can I use a different cut of beef for this recipe?
While ribeye is ideal for its marbling and flavor, you can adapt this method for strip loin or tomahawk steak. However, avoid leaner cuts like sirloin—they won’t yield the same juicy results. For a 10 lb roast, stick to well-marbled, bone-in cuts to maintain moisture during the long cook.
What if my oven doesn’t go as low as 250°F?
No problem! Set your oven to the lowest temperature possible (usually 225°F or 200°F) and increase the cooking time by 10-15 minutes per degree difference. The key is patience—slow cooking is what creates that perfect pink center. Just monitor closely with your meat thermometer.
How do I adjust the cooking time for a smaller or larger roast?
Use the 15 minutes per pound rule for the low-temperature phase: 10 lb = ~2.5 hours to 115°F. For a 12 lb roast, aim for 3 hours at 250°F. The sear time remains the same (5 minutes total) since it’s about surface temperature, not internal. Always check with a thermometer!
What’s the best way to reheat leftovers without drying them out?
Slice the roast into individual portions and reheat in a 275°F oven for 10-15 minutes with a splash of beef broth. For quick reheating, use a skillet over medium-low heat for 2 minutes per side. Never microwave—it turns beef rubbery. Leftovers keep well for 5 days in the fridge.

- 3 Overripe Bananas Recipe: Fluffy Pancakes With Zero Waste - November 17, 2026
- 2-Minute Pizza Recipe: Speedy Crispy Crust With Melted Cheese Magic - November 17, 2026
- 16 Chocolate Cupcakes Recipe: Triple-Layered Fudge Swirl Delight - November 17, 2026