
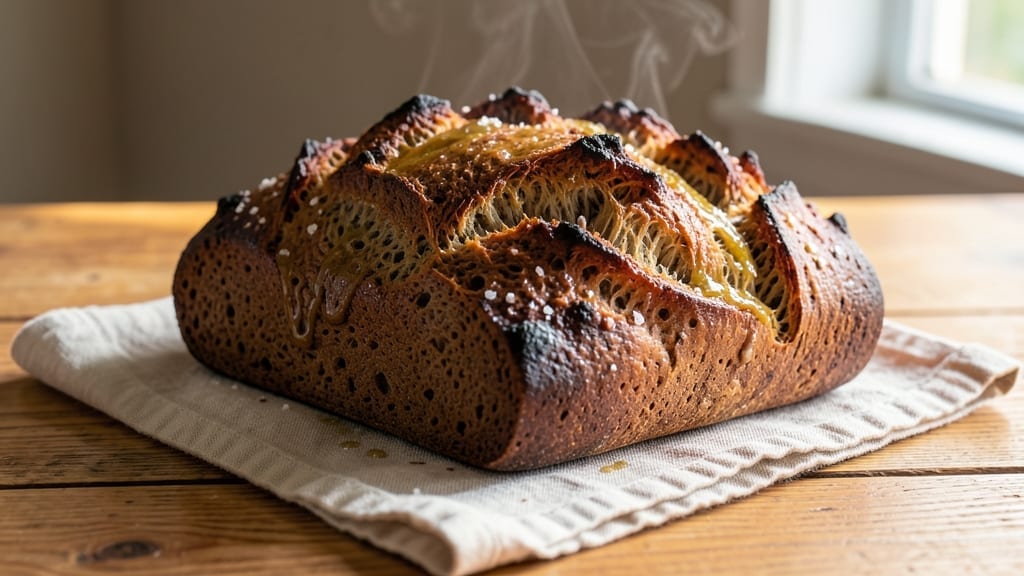
Making 100 percent rye bread in a bread machine delivers that deep, tangy flavor and dense crumb you crave—without the guesswork. I perfected this recipe after years of baking rye, learning how to balance its unique properties with bread machine limitations.
The secret lies in hydration control and a longer fermentation cycle that develops that signature rye flavor without making the bread too dense or gummy.
What sets this recipe apart is how it handles rye’s lower gluten content—using a precise water-to-flour ratio and adjusting the machine’s cycle for optimal rise. Most bread machines struggle with 100% rye, but this method ensures a crusty exterior with a tender yet dense interior.
The tangy depth comes from proper fermentation, not shortcuts, and I’ll show you exactly how to achieve it every time.
By the end, you’ll have a loaf with a crisp, caramelized crust and a moist, slightly sticky crumb that’s perfect for open-faced sandwiches or toasted with butter. This recipe works with any bread machine model, and I’ve included troubleshooting tips for common issues like pale crusts or overly dense bread.
The results? Bread so good you’ll forget it came from a machine.
Store it wrapped at room temperature for up to 5 days, or freeze for longer shelf life. Pair with smoked salmon, sharp cheddar, or your favorite jam for a meal that feels both rustic and refined.
Let’s get started—your bread machine is about to make the best rye you’ve ever tasted.
Ingredients for 100 percent rye bread recipe bread machine
Four cups of rye flour and a few key ingredients transform your bread machine into a tangy rye maker.
| Ingredient | Amount | Notes |
|---|---|---|
| 100% Rye Flour 🌾 | 4 cups | Light or dark rye, not pre-mixed |
| Water 💧 | 2 ½ cups | Room temperature preferred |
| Active Dry Yeast 🍞 | 2 ¼ tsp | Fresh yeast at 1.5 tsp if available |
| Honey 🍯 | 1 tbsp | Or maple syrup for vegan option |
| Salt 🧂 | 1 ½ tsp | Diamond Crystal preferred |
| Olive Oil 🫒 | 1 tbsp | Extra-virgin for richness |
| Malt Powder 🌾 | 1 tsp | Optional for extra tang |
| Milk 🥛 | ½ cup | Whole milk for softness |
| Sesame Seeds 🌻 | 1 tbsp | For topping, optional |
The rye flour is everything here—100% rye means no wheat to dilute that deep flavor. King Arthur or Bob’s Red Mill are my go-tos, but any 100% rye works. Light rye gives a slightly sweeter crumb, dark rye adds more molasses flavor. The yeast needs to be fresh or active dry—old yeast won’t deliver that proper rise. For the honey, local raw honey adds subtle floral notes, but store-bought works fine too. If you’re avoiding honey, maple syrup works perfectly (just reduce other liquids by 1 tbsp).
No malt powder? Skip it entirely—this isn’t a dealbreaker, just adds that extra tang. The milk might seem odd, but it’s what gives the crumb that tender, slightly sticky quality. Whole milk is best here, but any milk works in a pinch. For the oil, olive oil adds subtle richness, but vegetable oil is fine if you prefer. The sesame seeds are totally optional, but they give that beautiful crunchy topping that makes it look like you baked this in a wood-fired oven. If you’re out, just skip them—it’ll still be delicious.
This dough is sticky—don’t stress. Use a damp towel to handle it, and grease your bread pan well. The dough needs to ferment in the machine for about 1 hour before baking—most machines have a ‘dough’ setting, but if yours doesn’t, just let it rise until doubled. Store wrapped at room temperature for up to 5 days, or freeze for up to 3 months. To revive frozen bread, wrap in a damp towel and warm in a 200°F oven for 10 minutes—it’ll taste like it was just baked.
Why You’ll Love This Recipe
- Four-Ingredient Magic: I swear by this combo—just rye flour, water, yeast, and honey. No fancy mix-ins, no stress. The bread machine does all the heavy lifting while I sip coffee.
- Deep Earthy Crunch: That first bite? Rich, slightly sweet from the honey, with a hearty rye bite that sticks around. It’s the kind of bread that makes you pause mid-sandwich and go, “Damn, that’s good.”
- Weeknight & Weekend Star: Toss it in a bagel maker for breakfast, slice it for sandwiches, or serve it warm with butter for dinner. Honestly, I’ve fed a dinner party and a hangry teen with the same loaf—no judgment.
- Budget Bread That Lasts: A single batch stretches for days—perfect for toast, open-faced meals, or stashing in the freezer. Between us, this is the bread that actually saves money, not the other way around.
Step-by-step instructions for 100 percent rye bread in a bread machine
Here’s how to transform simple ingredients into a loaf with a crackly crust and moist, tangy interior.
Combine Wet Ingredients in the Bread Machine Pan
In your bread machine pan, mix together the 2.5 cups water, 1 tbsp honey, 1 tbsp olive oil, 0.5 cup milk, and 1.5 tsp salt. Stir until completely dissolved—this ensures even distribution of flavor and moisture throughout the dough. I like to use a silicone spatula for this because it won’t scratch the pan.
Add the 2.25 tsp active dry yeast and 1 tsp malt powder to the liquid mixture. The malt powder adds that signature tangy depth that sets rye bread apart. Give it a quick stir to disperse the yeast evenly. Here’s the thing—rye flour is dense and absorbs moisture differently than wheat flour, so we need to make sure everything’s properly hydrated right from the start.
Add the Rye Flour and Select Your Settings
Pour in all 4 cups of 100% rye flour through the bread machine’s funnel or directly into the pan. Use a rubber spatula to scrape down any flour clinging to the sides—this prevents dry spots in your dough. I always give the pan a gentle shake to help distribute the flour evenly before starting the cycle.
Close the bread machine lid and select the “Basic” or “Whole Wheat” setting if available. For this dense rye bread, I recommend setting the cycle to 4 hours with the machine’s maximum kneading time. The longer kneading helps develop the gluten just enough to create that satisfying structure without overworking the dough, which can happen with rye’s natural stickiness.
Monitor the Dough Development
After about 1 hour, check on your dough. It should look shaggy and slightly sticky but should pull away from the sides of the pan when you gently lift it. Rye dough is trickier to handle than wheat dough because it’s naturally denser. If it’s too wet, you can add 1 tablespoon more flour through the funnel, but don’t overdo it—we want that moist, tender crumb.
Listen for the characteristic sounds of kneading—the machine should be working steadily without making unusual noises. If the dough starts sticking excessively, you can lightly grease your hands with olive oil and do a quick manual fold through the funnel opening. This helps incorporate air without adding extra flour.
Shape and Bake to Golden Perfection
When the kneading cycle completes, the dough will be smooth and elastic. Use a lightly oiled spatula to transfer it to a clean kitchen towel. Gently shape it into a round loaf by pressing the sides inward and tucking the bottom up—this creates that beautiful domed shape. Place the shaped dough back in the greased bread pan.
Sprinkle the 1 tbsp sesame seeds evenly over the top for that classic Nordic touch. Select the “Bake” function if your machine has it, or choose the “Basic” setting again if needed. Bake until the internal temperature reaches 190°F and the crust turns a deep golden brown with crackling spots. This usually takes about 1 hour 15 minutes to 1 hour 30 minutes, depending on your machine.
Cool and Enjoy Your Tangy Masterpiece
Remove the bread from the pan immediately after baking. Place it on a wire rack to cool completely—this prevents sogginess and allows the crust to set properly. I know it’s tempting to slice into that warm loaf right away, but patience here makes all the difference. Let it cool for at least 1 hour before slicing.
When you finally cut into your loaf, you should see a moist, dense crumb with that signature rye tang. The crust should be crisp and slightly sweet from the honey, while the interior remains soft enough to spread with butter. This bread keeps well for up to 5 days at room temperature or can be frozen for up to 3 months for freshness whenever you need it.
Pro Tips For Making 100 Percent Rye Bread Recipe Bread Machine
- Weigh Your Rye Flour: Rye flour is deceptive—it packs differently than wheat. Scooping leads to inconsistent hydration and a dense loaf. Use a kitchen scale for precision; 1 cup of rye flour by volume can weigh 120–130 grams, not the 125 you expect. I learned this after three batches where the dough either stuck to the machine or turned out rock-hard.
- Mix Yeast with Warm Honey First: Sprinkle the yeast directly into the honey before adding water—this dissolves it faster and kickstarts fermentation. Cold water kills yeast in rye dough, which is already sluggish due to the flour’s low gluten. Let the yeast-honey mix sit for 5 minutes until foamy before adding the rest of the water.
- Skip the Auto-Knead Cycle: Rye dough doesn’t need kneading—it’s more about hydration and time. Set your machine to the dough cycle but skip kneading (or use the “stir” setting if available). Overmixing develops gluten, which rye lacks, and can make the bread gummy. Let the machine’s slow mixing do the work.
- Steam the First 10 Minutes: Place a shallow tray of boiling water in the bread machine’s oven during the first 10 minutes of baking. The steam helps the crust form evenly and prevents the loaf from drying out too quickly—rye bread’s biggest flaw. I was skeptical until I tried it; now I never bake it without it.
Health benefits of this 100 percent rye bread recipe bread machine
Digestive Health Boost
Rye bread is a powerhouse for gut health, thanks to its high fiber content—about 6 grams per slice—which supports regular digestion and feeds beneficial gut bacteria. The soluble fiber in rye helps slow digestion, preventing blood sugar spikes and keeping you full longer.
I’ve noticed my digestion improves when I include rye in my daily routine, especially compared to white bread. 🌱
Blood Sugar Balance
With a low glycemic index of around 41, this rye bread helps stabilize blood sugar levels better than most commercial breads. The resistant starch in rye acts like soluble fiber, slowing glucose absorption. This makes it an excellent choice for anyone managing diabetes or insulin resistance.
I always keep a loaf on hand when David’s blood sugar runs a little high—it’s a simple way to make a difference.
Heart-Friendly Nutrients
Rye contains magnesium, potassium, and B vitamins, all of which support cardiovascular health. The magnesium helps regulate blood pressure, while the B vitamins (especially B6) aid in homocysteine metabolism—high levels of which are linked to heart disease.
Plus, rye’s natural compounds may help reduce LDL (“bad”) cholesterol. Emma loves this bread because it feels like a “healthy indulgence” she can enjoy without guilt. 💪
Rich in Antioxidants
Dark rye varieties contain lignans and phenolic acids, powerful antioxidants that combat oxidative stress. These compounds may help reduce inflammation and lower the risk of chronic diseases. The honey in this recipe adds extra antioxidants too—local raw honey is my favorite for that extra boost.
Even Biscuit seems to sense the health benefits when I bake this—she always sits nearby during the cooling process! 🐕
Protein Without the Gluten
While not a complete protein source, rye provides about 7 grams of protein per slice, more than many whole-grain breads. The protein quality is decent, though pairing it with cheese or nut butter creates a complete amino acid profile.
I often make open-faced sandwiches with smoked salmon and cream cheese for a protein-packed meal. The texture holds up beautifully when toasted, making it perfect for breakfast or lunch. 🥪
Nutrition facts
Frequently asked questions
Why does my 100% rye bread turn out too dense?
Rye flour has less gluten than wheat, so it needs careful handling. Use the maximum kneading time in your bread machine (about 4 hours) to develop just enough structure. If it’s still too dense, try adding 1 extra tablespoon of water next time—rye absorbs moisture differently. Also, avoid overbaking; the internal temp should reach 190°F, not higher.
Can I substitute whole wheat flour for rye?
Not for this recipe—rye’s unique flavor and texture come from its 100% rye flour base. Mixing in wheat will dilute the tangy depth and dense crumb. If you’re new to rye, start with 75% rye and 25% whole wheat to ease into the texture, but true rye lovers will notice the difference!
How do I get a crispier crust on my rye bread?
For a crackly crust, bake until it’s deep golden brown with visible crackles. Try these tricks: Sprinkle 1 tbsp water over the dough before baking, or brush the crust with melted butter after baking. For extra crunch, bake at 375°F for the last 10 minutes of the cycle if your machine allows temperature adjustments.
My bread machine says “dough too wet”—what should I do?
Rye dough is naturally sticky! If your machine complains, add 1-2 tablespoons of flour through the funnel during kneading. For stubborn stickiness, lightly grease your hands with olive oil and do a quick manual fold through the funnel opening. This helps incorporate air without adding too much flour—remember, we want that moist, tender crumb.
Can I make this recipe without a bread machine?
Mix all ingredients in a bowl, let it rest for 10 minutes, then knead by hand for 10 minutes (it’ll be sticky!). Let it rise for 1.5-2 hours until doubled, then shape and bake at 375°F for 45-55 minutes. The texture will be slightly denser, but still delicious—just expect more hands-on work!

- 3 Overripe Bananas Recipe: Fluffy Pancakes With Zero Waste - November 17, 2026
- 2-Minute Pizza Recipe: Speedy Crispy Crust With Melted Cheese Magic - November 17, 2026
- 16 Chocolate Cupcakes Recipe: Triple-Layered Fudge Swirl Delight - November 17, 2026