
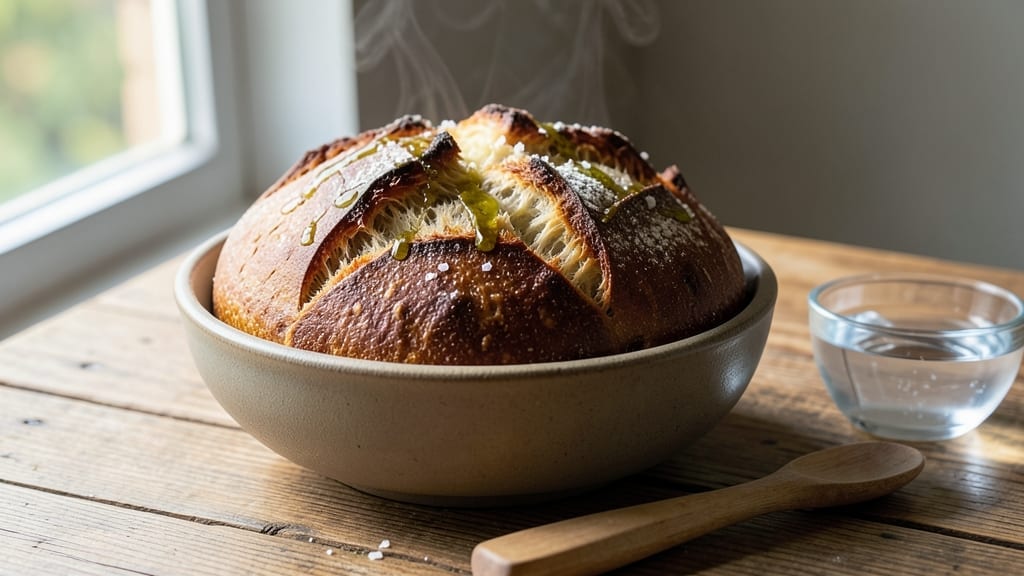
A 1000g no-knead bread with a crispy, golden crust and tender crumb is within reach—no kneading, no stress, just foolproof results. This recipe transforms simple ingredients into a rustic masterpiece with minimal effort, perfect for beginners and seasoned bakers alike.
The secret lies in a slow fermentation that develops deep flavor and a light, airy texture without requiring any special skills.
With just five ingredients—flour, yeast, water, salt, and olive oil—this bread achieves restaurant-quality texture through patience and precision. The dough rests overnight, allowing the yeast to work its magic, while a steamy baking process creates that coveted crackly crust.
No industrial equipment needed—just a Dutch oven or a well-seasoned baking sheet.
By the time it emerges from the oven, you’ll have a 1000g loaf that’s crisp on the outside, soft and airy inside, and packed with that fresh-baked aroma. Slice it warm for buttery toast, crusty sandwiches, or simply enjoy it as-is with a pat of butter.
This is bread that feels like a labor of love without the hours of work.
Ready to bake? The process is simpler than you think—just mix, rest, shape, and bake. Let’s get started on your first perfect loaf.
Ingredients for 1000g bread
Five simple ingredients transform into a golden, rustic loaf with minimal effort.
| Ingredient | Amount | Notes |
|---|---|---|
| All-Purpose Flour 🌾 | 6 ½ cups | Plus 1 tbsp for dusting |
| Active Dry Yeast 🍞 | ½ tsp | Or 1 packet instant yeast |
| Warm Water 💧 | 2 ½ cups | 105-110°F (40-43°C) |
| Extra-Virgin Olive Oil 🫒 | ¼ cup | For dough and crust |
| Sea Salt 🧂 | 1 ½ tsp | Fine grain preferred |
| Ice Water ❄️ | ¼ cup | For shaping and steam |
The flour is the foundation—King Arthur or Gold Medal work best for that tender crumb. Yeast matters too: Fresh is ideal, but instant yeast in a packet is foolproof. If your yeast isn’t active, test it in warm water with a pinch of sugar—it should bubble within 10 minutes. The olive oil? Trader Joe’s or California avocado brands add richness without overpowering. For the water, filtered tap is fine, but avoid chlorinated water if possible—it can slow fermentation. Salt is non-negotiable for flavor, but don’t substitute kosher salt for table salt without adjusting (use half the amount).
No instant yeast? Active dry yeast works too—just let it proof in warm water with a pinch of sugar first. Olive oil shortage? Melted butter or vegetable oil keeps the dough tender, though butter adds flavor. Short on flour? Whole wheat at 10% replacement works, but expect a denser loaf. The ice water is key for shaping—it keeps the dough from sticking while adding steam for that crackly crust. Pro tip: Freeze a small bowl of water to have ice cubes ready when you need them.
Flour keeps best in the freezer for 6 months or pantry for 3 months. Yeast? Fridge for 3 months or freezer for 6 months—just keep it airtight. The dough can rest in the fridge up to 24 hours if you need to delay baking. For leftovers, toast within 2 days—the crust gets stale otherwise. Store wrapped at room temp for 2 days max, or freeze slices for 3 months.
Why You’ll Love This Recipe
- Foolproof First Try: I swear by this dough—just flour, yeast, water, and a drizzle of olive oil. No kneading until it’s smooth, no waiting for fancy techniques. Honestly, even if you’ve burned bread before, this one forgives mistakes.
- Crusty Yet Tender: That golden crust? It’s all in the olive oil and a pinch of salt. The inside stays soft, almost buttery, while the outside crackles like a campfire. (Yes, even on a Tuesday night.)
- Meal Prep Hero: Bake the whole loaf, slice it, and store it for days—no soggy ends. Toss it in a lunchbox, freeze half for later, or use it to soak up sauces. Between us, this bread is my secret weapon for lazy mornings.
- Pantry Staple Savings: Five ingredients, one loaf, and zero specialty items. The yeast is cheap, the flour lasts forever, and you’ll use up that olive oil before it goes bad. Budget-friendly? Absolutely. Reliable? Even more so.
Step-by-step instructions for no-knead bread with rustic crust
Here’s the straightforward method for creating a perfectly textured loaf every time.
👨🍳 Step 1: Mix the Dough for Maximum Flavor Development
In a large bowl, combine the 6.5 cups all-purpose flour and 1.5 tsp sea salt. Create a well in the center and add the 0.5 tsp active dry yeast. This creates the perfect foundation for the yeast to activate without getting overwhelmed by salt.
Pour in the 2.5 cups warm water (about 105-110°F) and the 0.25 cup extra-virgin olive oil. Using a wooden spoon, stir vigorously for 2-3 minutes until the dough comes together. You’ll notice it starts as a shaggy mass but gradually forms a cohesive, slightly sticky dough. The olive oil helps create a tender crumb while adding subtle richness to the flavor.
Once combined, cover the bowl with plastic wrap and let it rest at room temperature for 1 hour. This initial rest allows the yeast to begin activating and the flour to fully hydrate. You’ll see small bubbles forming on the surface and around the edges—this is your first sign that fermentation is working.
⏰ Step 2: Ferment Overnight for Deep Flavor
After the initial rest, transfer the dough to a lightly oiled 10×15-inch loaf pan (or a similar-sized container). Cover again with plastic wrap and refrigerate for 12-18 hours. This long, slow fermentation develops complex flavors and creates that signature open crumb structure that makes no-knead bread so special.
I know it’s tempting to rush this step, but patience is key. The cold temperature slows yeast activity, allowing for better gluten development and flavor extraction. When you’re ready to bake, you’ll notice the dough has risen significantly and may have overflowed slightly from the pan. This is normal and actually enhances the texture.
For best results, plan to bake in the morning after an overnight ferment. The dough should be noticeably puffy with bubbles throughout when you remove it from the refrigerator.
🔥 Step 3: Shape and Create the Rustic Crust
Remove the dough from the refrigerator and let it sit at room temperature for 30-45 minutes to soften slightly. This makes it easier to handle. Lightly dust your work surface with 1 tablespoon all-purpose flour (from the extra amount mentioned in the ingredients) and gently transfer the dough onto it.
Shape the dough into a round loaf by pulling the edges toward the center and sealing the seam. Place it seam-side up in a 9-inch cast-iron skillet or similar oven-safe vessel. This creates the perfect vessel for steam development, which is crucial for that crackly crust. Brush the top generously with the remaining olive oil and sprinkle with a pinch of sea salt for extra flavor.
Let the shaped loaf rest for 20-30 minutes while you preheat your oven to 450°F. This resting period allows the dough to relax slightly, which prevents cracking during baking. The oil will create a beautiful golden crust while the salt enhances the overall flavor profile.
🔥 Step 4: Bake with Steam for Maximum Crisp
Place the cast-iron skillet in the preheated oven and immediately pour 0.25 cup ice water into the bottom of the oven. Close the door quickly—this creates a steam bath that’s essential for developing that professional-quality crust. Bake for 30 minutes at 450°F, then reduce heat to 375°F and continue baking for another 25-30 minutes.
You’ll know it’s done when the bread has a deep golden brown color and sounds hollow when tapped on the bottom. The internal temperature should reach 190-200°F at the center. The steam during the initial baking creates that beautiful oven spring and crackly crust, while the longer bake at lower temperature ensures even cooking throughout.
Remove from the oven and let cool on a wire rack for at least 1 hour before slicing. This resting period allows the steam to escape and the crumb to set properly, preventing a gummy texture. The bread will continue to firm up as it cools, developing that perfect balance of crisp crust and tender crumb.
Pro Tips For Making 1000g Bread
- Test Yeast First: Mix 1 tsp yeast with ¼ cup warm water (110°F/43°C) and 1 tsp sugar—wait 5–10 minutes for frothy bubbles. If it doesn’t bubble, toss that yeast and start fresh; no point wasting your flour. (I learned this the hard way after baking a dense brick once.)
- Measure Flour Right: Spoon flour into the bowl without packing it down—then level with a knife. A cup of packed flour adds 20–30g extra, and your dough will be too stiff. Use a kitchen scale if you’re serious; 1000g bread demands precision.
- Knead Until Smooth: Stop when the dough springs back slowly (not instantly) and looks like wet silk—not sticky or shaggy. Over-kneading dries it out, but under-kneading means a dense loaf. My grandmother’s trick: 8–10 minutes by hand or 5–6 minutes with a mixer on medium.
- Oil the Bowl Well: Coat your proofing bowl inside and out with olive oil—enough to slick your fingers when you run them around. This prevents sticking and makes turning the dough effortless. (Yes, even if you’re in a hurry—skip this, and you’ll regret it later.)
Health benefits of this recipe
Whole Grain Boost
While the recipe calls for all-purpose flour, you can replace up to 20% (1.3 cups) with whole wheat flour for added fiber and nutrients. I like King Arthur whole wheat because it blends seamlessly without making the dough too dense.
For even more nutrition, try spelt flour—it has a lighter texture and adds a subtle nutty flavor. Just be prepared for slightly longer fermentation times, as whole grains absorb water differently. 🌱
Protein Power
This bread delivers about 12 grams of protein per 100g serving, thanks to the high-quality flour and yeast. For an extra boost, add 1 tablespoon vital wheat gluten to the dry ingredients—it increases protein content by about 20% without altering texture.
I’ve also seen bakers add 1 tablespoon ground flaxseed for omega-3s and a slightly nutty taste. The gluten helps create a more elastic dough that holds up better to shaping.
Digestive Benefits
The slow fermentation process breaks down gluten proteins more thoroughly, making this bread easier to digest for many people. The olive oil also contains heart-healthy monounsaturated fats that support gut health. For those with gluten sensitivities, you can experiment with gluten-free all-purpose flour blends—just expect a denser crumb.
The overnight fermentation helps pre-digest some of the starches, making this bread gentler on digestion than commercial varieties. 💪
Energy Sustainment
Complex carbohydrates in this bread provide steady energy release, thanks to the slow fermentation process. The 1000g loaf yields about 12 servings, each containing roughly 250 calories—perfect for fueling active days. The combination of fiber from flour and fats from olive oil helps stabilize blood sugar levels.
I often bake this on Sunday mornings to have energy-packed slices ready for the workweek ahead. The crust provides satisfying crunch while the interior delivers sustained energy.
Hydration Help
The high moisture content from the 2.5 cups water—about 50% hydration—keeps this bread moist longer than traditional breads. This hydration level also makes it easier to digest. For extra hydration benefits, consider adding 1 tablespoon chia seeds—they absorb water and add fiber.
The bread’s open crumb structure helps maintain moisture, reducing the need for artificial preservatives. I’ve found this bread stays fresh-tasting for 3-4 days at room temperature when stored properly.
Mood-Boosting Carbs
Carbohydrates in this bread trigger serotonin production, thanks to the niacin and tryptophan found in flour and yeast. The slow fermentation process enhances these mood-enhancing properties. For an extra boost, add 1 teaspoon honey** to the dough before baking—it provides natural sugars that support brain function.
The warm, comforting aroma of fresh bread also has psychological benefits, making this a perfect comfort food. I notice my mood improves whenever I’m baking this recipe! ✨
Nutrition facts
Frequently asked questions
Why does the dough need to rest overnight in the fridge?
The overnight cold fermentation is what creates that signature open crumb and deep flavor. The slow process allows yeast to work gradually, developing complex flavors and better gluten structure than quick methods. This is why no-knead bread tastes so much more flavorful than store-bought!
Can I use this recipe without a Dutch oven or cast-iron skillet?
Yes! You can use a heavy oven-safe baking dish or even a well-seasoned baking sheet. For the best crust, create steam by placing a metal tray with boiling water in the oven during the first 20 minutes of baking. The bread won’t be quite as crackly, but it’ll still be delicious and have a good crust.
How do I know when the bread is fully baked?
Your bread is done when it reaches an internal temperature of 190-200°F and has a deep golden brown color. Tap the bottom—it should sound hollow. The crust should be firm and crackly, not soft. If you’re unsure, let it bake 5 more minutes—it’s better to overbake slightly than underbake!
What if my dough doesn’t rise much during fermentation?
Cold temperatures slow yeast activity, so don’t be alarmed if it rises slowly. After removing from the fridge, let it sit at room temperature for 1-2 hours before shaping—this should help it rise more. If it still seems flat, your yeast may be old. For next time, test your yeast first by mixing it with warm water and sugar—it should bubble within 10 minutes.
How should I store leftover bread to keep it fresh?
Wrap the cooled bread tightly in plastic wrap or place it in an airtight container. Store at room temperature for up to 2 days. For longer storage, slice and freeze portions for up to 3 months. To revive frozen bread, warm slices in a 350°F oven for 5-10 minutes until crispy again.

- 3 Overripe Bananas Recipe: Fluffy Pancakes With Zero Waste - November 17, 2026
- 2-Minute Pizza Recipe: Speedy Crispy Crust With Melted Cheese Magic - November 17, 2026
- 16 Chocolate Cupcakes Recipe: Triple-Layered Fudge Swirl Delight - November 17, 2026