
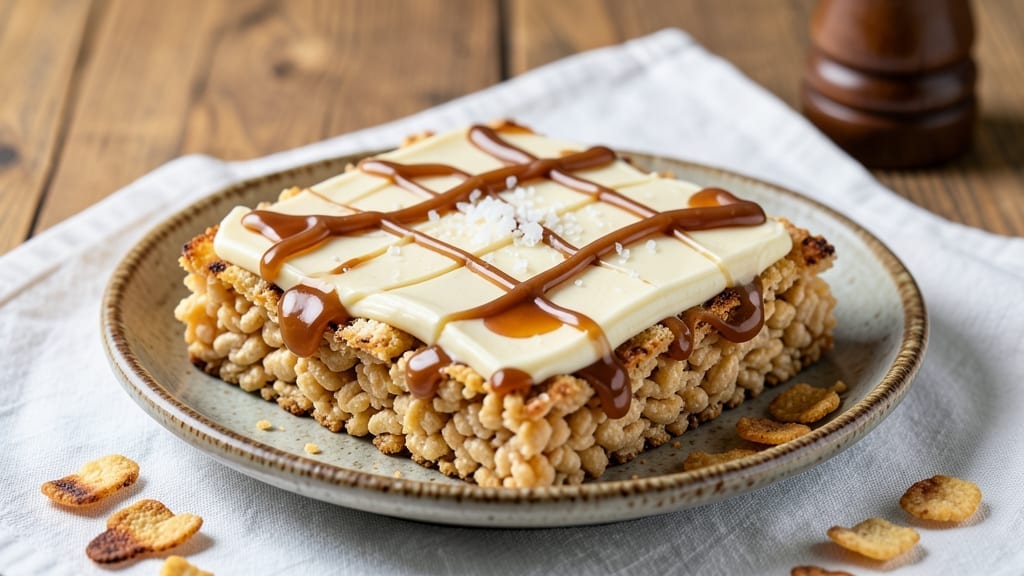
This 12-ounce Rice Krispies recipe delivers the nostalgic, crispy-sweet magic of classic treats with a foolproof no-bake method that even kids can help with. The secret lies in balancing melted marshmallows and butter just right—creamy enough to coat every cereal piece but firm enough to set into perfect bars.
I’ve perfected this version after years of trial and error, ensuring no soggy centers or overly sticky batches.
The beauty of this recipe is its versatility—whether you’re making classic treats, adding mix-ins like peanut butter or M&M’s, or adapting it for dietary needs (like gluten-free or vegan options), the foundation stays the same.
With just 10 minutes of prep and 15 minutes of cooling, you’ll have a pan of golden, crispy squares that disappear faster than you can slice them. The key? Working quickly and pressing the mixture evenly for that signature crunch.
What you’ll end up with is a restaurant-quality dessert that tastes like childhood memories—crispy on the outside, gooey on the inside, and impossible to resist. The aroma of melting marshmallows alone will have everyone gathering around the kitchen, and the texture?
Pure perfection. This is the kind of treat that’s easy to make but feels like a special occasion every time.
Pro tip: Line your pan with parchment paper for easy slicing, and store leftovers in an airtight container to keep them fresh for days. Ready to recreate this classic? Let’s get started!
Ingredients for 12 oz rice krispies
Classic Rice Krispies treats with a foolproof no-bake method—just 8 ingredients for nostalgic crunch.
| Ingredient | Amount | Notes |
|---|---|---|
| Rice Krispies Cereal 🍪 | 12 oz | Original or gluten-free variety |
| Large Marshmallows 🧸 | 10 oz | Mini marshmallows for extra crunch |
| Unsalted Butter 🧈 | ½ cup | Cut into small cubes for quick melt |
| Vanilla Extract 🌿 | 1 tsp | Pure vanilla for authentic flavor |
| Salt 🧂 | ¼ tsp | Fine sea salt for subtle balance |
| Parchment Paper 📄 | 1 sheet | For easy release and clean cuts |
| Peanut Butter 🥜 | ¼ cup | Optional for extra richness |
| M&M's 🍬 | ½ cup | Optional mix-in for color |
The marshmallows and butter are the stars here. Kroger or Walmart brands work perfectly for mini marshmallows—they melt evenly and keep the texture light. Butter should be at room temperature (no need to melt it first—just cut into small cubes). Store-brand butter is fine, but don’t use salted. The vanilla extract? Grab the pure stuff—no imitation. I always double-check the expiration date on marshmallows; they lose moisture fast. If you’re using gluten-free cereal, make sure it’s crispy and not chewy—Quaker makes a great version.
No vanilla? Almond extract at half the amount works in a pinch, but it’ll taste different. Short on butter? Coconut oil is a 1:1 swap, though it adds a slight coconut flavor. Want extra crunch? Add 1/4 cup chopped nuts or crushed pretzels to the mix before pressing. The peanut butter and M&M’s are optional, but they’re game-changers—Jif or Skippy for peanut butter, and any color M&M’s work. Pro tip: if your marshmallows aren’t melting smoothly, microwave the butter and marshmallows in 20-second bursts instead of all at once.
Line your pan with parchment paper—no sticking, no tears. Press the mixture firmly but evenly for that classic crunch. Let them cool for at least 2 hours before slicing, or they’ll crumble. Store leftovers in an airtight container with parchment between layers to keep them crispy for up to 5 days. Freeze for up to 3 months if you’re making a big batch—just thaw at room temp for 10 minutes before slicing. And if you’re feeling fancy, drizzle melted chocolate over the top before they set.
Why You’ll Love This Recipe
- Pantry-to-Pot Magic: I swear, this recipe is the closest thing to cheating I’ll ever admit to—just melt butter, toss in cereal and marshmallows, and boom, golden perfection. No fancy skills, no measuring cups (okay, fine, one measuring cup), and zero cleanup beyond a spatula scrape.
- Vanilla-Kissed Crunch: That little splash of vanilla? It’s the secret weapon. The buttery marshmallow goo clings to the Rice Krispies, but the vanilla ties it all together—sweet, toasty, and just a little sophisticated. Honestly, it’s the kind of flavor that makes you pause mid-bite and think, “Wait, I made this?”
- Campfire Vibes, Any Night: Between us, I’ve served this at sleepovers, potlucks, and even as a “fancy” dessert for date night. The marshmallows puff up just enough to feel special, but it’s still the same easy recipe. (Yes, even on a Tuesday night.)
- Budget Snack Hero: A 12 oz box of cereal, a bag of marshmallows, and butter I already had—this recipe costs pennies per serving. And the leftovers? They last forever in the fridge, so I’m always covered for last-minute cravings or when the kids suddenly remember they’re hungry.
Step-by-step instructions for no-bake Rice Krispies treats
Here’s how to make these classic treats with perfect texture every time.
Melt Butter and Marshmallows Together
Cut the 0.5 cup unsalted butter into small cubes for even melting. Place the butter and 10 oz large marshmallows in a large, heavy-bottomed saucepan over medium-low heat. The marshmallows should start melting almost immediately, but keep the heat gentle to prevent burning.
Stir constantly with a wooden spoon or silicone spatula until the mixture becomes smooth and glossy, about 5-7 minutes. You’ll know it’s ready when it reaches 160°F on a candy thermometer and pulls away from the sides of the pan in a thin sheet. If you don’t have a thermometer, test by dipping a spoon in the mixture – when it leaves a shiny, clear coating on the back of the spoon, it’s done.
Add Vanilla, Salt, and Optional Mix-Ins
Remove the pan from heat and stir in the 1 tsp vanilla extract and 0.25 tsp salt until fully combined. If using, fold in the 0.25 cup peanut butter until smooth and creamy. The mixture should be thick but still pourable – if it’s too thick, warm it gently for 30 seconds to loosen.
For extra color and crunch, gently fold in the 0.5 cup M&M’s using a spatula. Be careful not to overmix or the treats will become dense. The M&M’s will spread evenly throughout the mixture, creating pockets of color in every bite.
Fold in Rice Krispies Cereal
Working quickly, stir in the 12 oz Rice Krispies Cereal all at once. Use a wooden spoon to gently fold the cereal into the marshmallow mixture until completely coated. The cereal will absorb the marshmallow mixture, creating that signature crunchy texture. Don’t worry if it looks messy – this is normal and will even out as you press it into the pan.
Press into Parchment-Lined Pan
Line a 9×13-inch baking dish with the parchment paper, leaving an overhang on two sides for easy removal. Spoon the cereal mixture into the prepared pan and press down firmly and evenly using a greased 8×8-inch square of parchment paper or a piece of wax paper. Press down until the mixture reaches the edges of the pan and the top looks smooth.
For perfectly even pressing, use a glass or metal measuring cup to press down in sections. The treats should be about ½-inch thick when pressed. Let the treats cool in the pan for 1 hour before cutting into squares or bars.
Pro Tips For Making 12 Oz Rice Krispies
- MELT MARSHMALLOWS SLOW: I learned this the hard way—dumping all the marshmallows in at once turns your pot into a sticky disaster. Instead, add them in batches of 6-8 at a time, stirring constantly until each batch fully melts before adding more. This keeps the heat even and prevents clumping.
- CUT BUTTER INTO TABLESPOONS: Skip the measuring cups—break your ½ cup unsalted butter into 8 equal tablespoons (about 1 tablespoon each). Melt one piece at a time into the pot; this controls the butter’s release and prevents the mixture from getting too greasy before the marshmallows are ready.
- STIR LIKE YOU MEAN IT: The moment you stop stirring, that’s when the bottom starts burning. Keep the spoon moving in steady, wide circles—no quick flicks—especially after the butter melts. If you’re distracted, set a timer for 30-second bursts of focused stirring. (Yes, even if you’re impatient like me.)
- SAVE TIME WITH COLD CEREAL: Ditch the preheating step: dump your 12 oz Rice Krispies directly into the melted marshmallow-butter mix. The cold cereal will cool the pot slightly, giving you a few extra seconds to mix everything evenly before it sets. No waiting, no burnt edges—just smoother blending.
Storing and reheating your leftovers
Room Temperature Storage
Keep your Rice Krispies treats at room temperature in an airtight container with layers separated by parchment paper to maintain crispiness. Store them in a cool, dry place (like your pantry) for up to 3 days—the parchment prevents sogginess and keeps the texture perfect.
I always use Rubbermaid Brilliance containers with snap-on lids for that extra seal. 📦
Fridge Storage Tips
For longer freshness, transfer treats to the fridge where they’ll stay crisp for up to 5 days. Place them in the original pan or a glass airtight container—glass preserves texture better than plastic.
If you’ve added peanut butter or M&M’s, refrigeration helps prevent melting. Just let them sit at room temperature for 10 minutes before serving to restore that perfect crunch. ❄️
Freezing for Later
Freeze your treats for up to 3 months in a single layer on a parchment-lined tray before transferring to a freezer bag. This prevents freezer burn and makes them easy to grab later.
Thaw at room temperature for 10-15 minutes—no microwave needed! For extra protection, wrap individual squares in plastic wrap before freezing. 🧊
Reheating Crispiness
If your treats lose their crunch, revive them by placing squares on a baking sheet in a 200°F oven for 2-3 minutes. This reactivates the starches without melting the marshmallow centers.
For a quick fix, sprinkle a tiny bit of powdered sugar (about ¼ tsp) on top and let sit for 5 minutes—it absorbs moisture and restores crispness. 🔥
Mix-In Considerations
If your treats include peanut butter or chocolate drizzle, store them separately in the fridge to prevent melting. For M&M’s or nuts, keep them in an airtight container with a paper towel to absorb any oil.
These additions can make treats softer faster, so handle them with care during storage. 🥜
Travel-Friendly Packing
For on-the-go treats, pack individual squares in wax paper and secure them with a rubber band. Store in a cool bag with an ice pack to maintain texture during transport. This method keeps them crisp for up to 24 hours outside the fridge—perfect for picnics or road trips! ✈️
Nutrition facts
Frequently asked questions
Can I use mini marshmallows instead of large ones?
Yes! Mini marshmallows work perfectly and actually create extra crunch in your treats. Just use the same 10 oz weight—they’ll melt faster, so keep the heat at medium-low and stir constantly. The texture will be slightly lighter but just as delicious.
Why did my Rice Krispies treats turn out sticky?
Sticky treats usually happen when the marshmallow mixture didn’t cool enough before pressing or the cereal absorbed too much moisture. Let the mixture sit for 5 minutes after removing from heat before adding cereal, and press firmly into the pan. If they’re still sticky after cooling, place them in the fridge for 30 minutes to firm up.
How do I make these treats gluten-free?
Use a gluten-free Rice Krispies cereal (like Quaker’s version) and check that all other ingredients—like marshmallows and butter—are certified gluten-free. The process stays exactly the same, and the texture will be just as crispy!
Can I make these treats without butter?
Replace the 0.5 cup butter with 0.5 cup coconut oil (melted) or 0.5 cup vegetable shortening for a similar texture. The coconut oil adds a subtle coconut flavor, while shortening keeps the classic taste. Just be sure to melt the substitute first for smooth mixing.
What’s the best way to cut them into squares?
Use a sharp chef’s knife or a wire cutter** (like a pizza cutter) for clean edges. Dip the knife in hot water between cuts to prevent sticking. For even squares, lightly score the top with a toothpick before cutting—this guides your cuts and makes them look professional!

- 3lb Prime Rib Roast Recipe: Juicy Pink Center Guaranteed in 3 Hours - October 31, 2026
- 5 Spice Cake Recipe: Warmly Spiced Layers With Crunchy Top - October 31, 2026
- 1950’s Macaroni and Cheese Recipe: Nostalgic Creamy Cheese Sauce with Buttery Noodles - October 31, 2026