
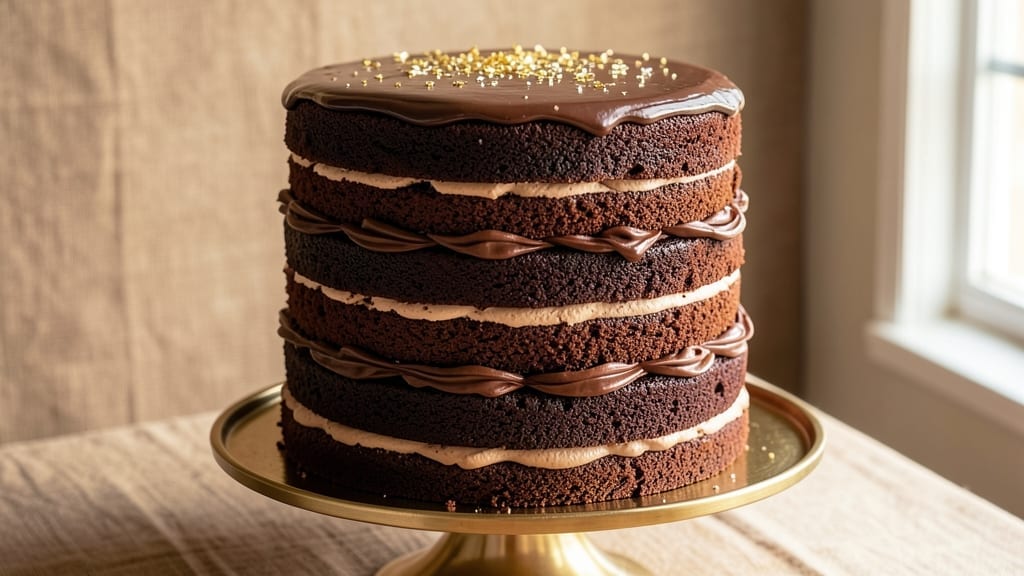
This 13-layer chocolate cake recipe delivers the ultimate decadence—fudgy, rich layers separated by velvety cream fillings that make every slice a masterpiece. 💛 The secret lies in precise baking times and chilled layers that stack perfectly without collapsing, creating a showstopper dessert that tastes as incredible as it looks.
After years of perfecting the balance between dense cake and light frosting, I’ve developed a method that ensures each layer stays moist and flavorful.
The process begins with baking 13 identical chocolate cake layers in two batches, allowing them to cool completely before assembly. Each layer is generously filled with homemade chocolate ganache and buttercream, creating a luscious, creamy contrast to the fudgy cake.
The key to success? Patience—letting the cake rest between layers ensures stability, while a final dusting of cocoa powder adds that professional touch.
What you’ll end up with is a towering, creamy masterpiece that’s as impressive to slice as it is to eat. The combination of rich chocolate and smooth fillings makes this cake irresistible, perfect for celebrations or when you want to impress.
Every bite delivers a perfect harmony of textures—dense cake, velvety frosting, and a hint of cocoa on top.
This recipe scales beautifully, whether you’re feeding a crowd or treating yourself to a decadent dessert. Ready to create your own edible work of art? Let’s get started with the ingredients and step-by-step instructions.
Ingredients for 13 layer chocolate cake
Decadent layers of fudgy cake and velvety cream await—here’s what creates this showstopper masterpiece.
| Ingredient | Amount | Notes |
|---|---|---|
| Unsalted Butter 🧈 | 3 ½ cups | Room temperature for creaming |
| Granulated Sugar 🍚 | 4 ½ cups | Superfine preferred for smoothness |
| All-Purpose Flour 🌾 | 5 ½ cups | Sifted, spooned lightly |
| Cocoa Powder 🍫 | 2 cups | Dutch-processed for richness |
| Large Eggs 🥚 | 26 whole | Room temperature, separated |
| Baking Powder 🧂 | 1 ½ tbsp | Diamond Crystal preferred |
| Salt 🧂 | 1 ½ tsp | Fine sea salt preferred |
| Vanilla Extract 🌿 | 2 tbsp | Pure Madagascar bourbon |
| Hot Water 💧 | 1 ½ cups | For blooming cocoa |
| Heavy Cream 🥛 | 6 cups | Cold for ganache |
| Chocolate Chips 🍫 | 2 cups | 70% cacao, chopped fine |
| Powdered Sugar 🍚 | 4 cups | For buttercream |
| Unsweetened Cocoa Powder 🍫 | ½ cup | For dusting |
The butter and eggs are your secret weapons here. European-style butter (like Plugrá) has higher fat content, making the cake layers richer and more tender. Eggs need to be room temperature—cold eggs create air pockets that ruin the delicate structure. I always separate them in advance, letting yolks and whites warm to exactly 70°F for perfect volume. For the cocoa, Valrhona or Callebaut brands deliver that professional depth—don’t skimp on quality here. The flour? King Arthur or Gold Medal are my go-tos for consistent results. Every ingredient matters when you’re baking 13 layers—precision is key.
No Dutch-processed cocoa? Natural cocoa plus 1/4 tsp baking soda works in a pinch, but the flavor won’t be as smooth. Short on vanilla? Vanilla bean paste doubles as extract and adds flecks of gold. The heavy cream must be cold—room temp cream won’t whip properly for your ganache. Chocolate chips giving you grief? Chop good quality dark chocolate bars instead (70% cacao or higher). For the buttercream, powdered sugar should be sifted to avoid lumps—Domino brand is my secret weapon. And trust me on the powdered sugar quantity—measure it precisely or your frosting will be too runny to hold those layers together.
This is a two-day project—plan ahead. Store baked layers in airtight containers between parchment paper, refrigerated for up to 3 days. The ganache and buttercream can be made 2 days ahead, stored separately in the fridge. When assembling, work in a cool room (65°F or lower) to prevent melting. The final cake keeps 5 days refrigerated or 1 month frozen—wrap tightly in plastic wrap and foil. For serving, bring to room temp for 1 hour before slicing—this ensures clean cuts through all those layers.
Why You’ll Love This Recipe
- Layered Magic: I’ll be real—this cake isn’t about fancy techniques. You just alternate batter and chocolate ganache in a single pan, then chill. No piping bags, no stress. The layers stay staggeringly even if you’re not a pro.
- Rich Without Guilt: That cocoa powder and butter combo? It’s decadent but not heavy. The sugar caramelizes just enough to make every bite taste like a bakery’s secret, and the eggs keep it moist without being greasy. Honestly, it’s the kind of cake that makes you forget it’s “just” flour and sugar.
- Party Starter: Between us, this is my go-to for birthdays, game days, or when I need dessert fast. Slice it into squares, and it’s easy to serve—no awkward forks or crumbs. My daughter picks out the fudgiest layers, but no one leaves hungry.
- Leftovers? Better: This cake actually improves the next day. The ganache firms up just enough to hold its shape, and the butter keeps it tender. I’ve had it for breakfast (yes, even on a Tuesday) with a sprinkle of sea salt. Budget-friendly? Absolutely. Worth the wait? Always.
Step-by-step instructions for building the ultimate 13-Layer chocolate cake
This isn’t just a cake—it’s a masterpiece of layers, textures, and decadence. Let’s build it right.
👨🍳 Step 1: Bloom the Cocoa and Prepare the Cake Batter
First, we’re creating the signature chocolate flavor base. In a heatproof bowl, whisk together the 2 cups cocoa powder and 1.5 cups hot water. Let it sit for 5 minutes—you’ll see it transform into a thick, glossy chocolate paste. This “blooming” process intensifies the chocolate flavor and creates that signature fudgy texture.
In a separate large mixing bowl, beat the 3.5 cups unsalted butter and 4.5 cups granulated sugar on medium speed until light and fluffy (3-4 minutes). This air incorporation is what gives our cake that tender, melt-in-your-mouth quality. Scrape down the sides occasionally to ensure even mixing.
Add the bloomed cocoa mixture, then incorporate the 26 whole large eggs one at a time, mixing well after each addition. Stir in the 2 tbsp vanilla extract and 1.5 tsp salt. Sift in the 5.5 cups all-purpose flour and 1.5 tbsp baking powder, mixing just until combined—don’t overmix or you’ll develop gluten and ruin that delicate crumb.
🍳 Step 2: Bake 13 Perfect Layers
Preheat your oven to 350°F and prepare 13 round 3-inch cake pans (or use one pan and bake in batches). Grease them generously with butter and dust with cocoa powder to prevent sticking. Divide the batter evenly among the pans—you’ll need about ⅓ cup per pan for each layer.
Bake for 10-12 minutes until the edges are set and a toothpick inserted comes out with moist crumbs (not wet batter). The centers should still look slightly underdone—they’ll continue cooking as they cool. Let the layers cool in their pans for 5 minutes, then transfer to a wire rack to cool completely. This cooling step is crucial—warm layers will collapse when stacked.
Here’s the thing—if your oven runs hot, reduce the temperature to 340°F and check at 8 minutes. Underbaking is better than overbaking for this delicate structure. Each layer should be about ½-inch thick when fully cooled.
🥘 Step 3: Prepare the Ganache Filling
While the layers cool, let’s make the creamy centerpiece. In a saucepan, combine 6 cups heavy cream and 2 cups chocolate chips. Bring to a gentle simmer over medium heat, stirring occasionally until the chocolate melts completely. Remove from heat and let it cool slightly—it should be thick but still pourable (70-75°F).
For extra richness, whisk in 0.5 cup unsweetened cocoa powder until fully incorporated. This ganache will be our signature filling between layers. If it thickens too much as it cools, gently reheat and stir until smooth again. The texture should be like thick pudding—creamy but with body to hold the layers.
👨🍳 Step 4: Assemble the Cake with Precision
This is where the magic happens. Place the first layer on your serving plate or cake stand. Spread 2-3 tablespoons of the warm ganache evenly over the top. Place the second layer on top, press down gently, then add another 2-3 tablespoons of ganache. Repeat this process for all 13 layers, alternating with ganache between each.
Here’s the pro tip: don’t rush the assembly. Each layer should be perfectly level—use a serrated knife to trim any uneven edges. The ganache should be at room temperature when you assemble, but not too warm or it will melt through the layers. Work quickly but carefully to maintain that perfect structure.
🍽️ Step 5: Create the Decadent Buttercream and Finish
In a stand mixer fitted with the paddle attachment, beat the 3.5 cups unsalted butter (softened) and 4 cups powdered sugar on medium speed until light and fluffy (3-4 minutes). Add the 2 tbsp vanilla extract and mix until combined. This buttercream needs to be smooth and airy—like whipped cream but with structure.
Spread the buttercream evenly over the entire cake, then dust the top with a thin layer of 0.5 cup unsweetened cocoa powder for that signature chocolate cake look. Chill the cake in the refrigerator for at least 4 hours (overnight is best) to let all the flavors meld and the layers set properly.
Slice with a hot, clean knife for clean cuts, and serve each piece with a dollop of extra ganache on the side. Each bite should deliver that perfect balance of fudgy cake, creamy ganache, and rich buttercream—layer upon decadent layer of chocolate perfection.
Pro Tips For Making 13 Layer Chocolate Cake
- Whip Butter First: Cream your unsalted butter and sugar together until it’s pale yellow—not just combined. I learned this the hard way with a dense, brick-like cake. Use a stand mixer and let it run for 3-4 minutes. That light, airy texture is what makes 13 layers actually fluffy, not just stacked.
- Sift the Cocoa: Don’t just dump cocoa powder into your dry ingredients—sift it first. This prevents lumps and ensures even distribution, which is critical for a smooth, consistent flavor in every layer. (Yes, even if you’re tempted to skip it.)
- Rotate Pans Mid-Bake: Swap your cake pans from front to back halfway through baking. I used to forget, and the edges would overbake while the centers stayed underdone. A quick pivot guarantees even cooking—no dry edges, no gummy middles.
- Cool Layers Completely: Let each layer cool for at least 10 minutes before adding frosting. I know, it’s agonizing, but rushing it makes the frosting slide off or turn grainy. A cool cake holds its structure—trust me, the patience pays off.
Serving suggestions for this 13 layer chocolate cake
Presentation Plating
Serve each slice on a chocolate-dusted plate to maintain the visual drama. Use a sharp serrated knife (I recommend Mercer Culinary Genesis) heated in hot water, then wiped clean—this ensures perfect cuts through all layers.
For extra flair, garnish with edible gold leaf or a sprinkle of crushed hazelnuts for texture contrast. 🍽️
Portion Control
Given the cake’s decadence, I recommend serving 3-4 slices per person for a full dessert experience. For a crowd, pre-slice the cake into 1-inch wedges using a cake comb—this keeps portions consistent and prevents messy cuts.
Store any leftovers in an airtight container at room temperature for 2 days or refrigerate for 5 days.
Garnish Ideas
Fresh raspberries or blackberries add a bright contrast to the rich chocolate. For a boozy touch, drizzle with raspberry liqueur reduction (simmer ½ cup raspberry jam with 2 tbsp Frangelico for 5 minutes). A dusting of matcha powder or espresso powder enhances the chocolate depth without overpowering.
Serving Occasions
This cake is perfect for birthday celebrations, holiday feasts, or as a showstopper centerpiece. For a romantic dinner, serve with vanilla bean ice cream on the side.
At weddings, pair it with champagne-soaked strawberries for an elegant touch. The cake’s dramatic height makes it ideal for photography moments—just avoid direct sunlight to prevent melting.
Dietary Accommodations
For gluten-free guests, use a 1:1 gluten-free flour blend (like Bob’s Red Mill) and ensure all ingredients are certified GF. To reduce sugar, substitute ½ cup granulated sugar with monk fruit sweetener in the batter and buttercream. Always inform guests about the cake’s richness—this isn’t a light dessert!
Themed Variations
Transform this classic into a peppermint mocha version by adding 1 tsp peppermint extract to the batter and dusting with crushed candy canes. For a coffee lover’s twist, infuse the ganache with 2 tbsp instant espresso powder and top with a sprinkle of coffee beans.
Seasonal adaptations like orange zest in the buttercream work beautifully for winter holidays. 🍫✨
Nutrition facts
Frequently asked questions
How do I prevent my 13-layer cake from collapsing during assembly?
Let each layer cool completely before stacking—warm layers will melt the ganache and cause collapse. Chill the cake between layers for 10-15 minutes in the fridge, and work in a cool room (65°F or lower). Use a serrated knife to trim uneven edges before adding ganache.
Can I make this cake in smaller batches (fewer layers)?
Scale down to 6-8 layers using the same batter ratio. For a single 3-inch pan, bake 4 layers at a time, cooling completely between batches. The assembly technique remains identical—just adjust your serving plate size.
What’s the best way to store leftover cake?
Wrap the entire cake tightly in plastic wrap, then foil. Store at room temperature for 2 days or refrigerate for 5 days. For longer storage, freeze for 1 month. Bring to room temp before serving to restore texture.
Why does my ganache turn grainy when cooling?
Grainy ganache happens when chocolate doesn’t fully melt or cools too quickly. Use 70% cacao chocolate chips and heat the cream to 180°F before mixing. Let the ganache cool to 70-75°F before assembling—this prevents separation.
Can I substitute buttercream with whipped cream?
Not recommended—whipped cream lacks the structure to hold 13 layers. For a lighter option, try Italian meringue buttercream (stabilized with egg whites) or cream cheese frosting. Both provide better support while keeping a creamy texture.

- 6 Egg Cake Recipe with Oil: Light as Air With Buttery Moisture - October 4, 2026
- 4 Bean Casserole Recipe: One-Pan Heartiness With Smoky Paprika Depth - October 4, 2026
- 3-Ingredient Keto Mug Cake Recipe: Microwave Magic in 2 Minutes - October 4, 2026