
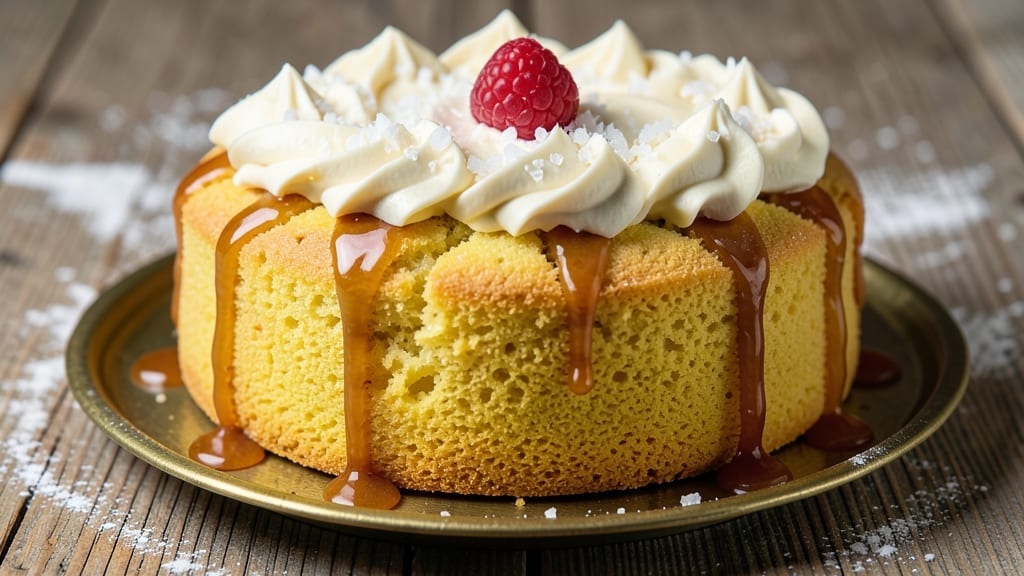
This 13×9 yellow cake recipe delivers the perfect balance of tender crumb and foolproof moisture—no dry crumbs or dense centers here. 💛 I’ve baked countless cakes, and this method consistently produces a cake that’s light, fluffy, and packed with vanilla flavor, making it the ideal base for frosting or serving plain.
The secret lies in the creaming method and precise baking time, which ensures even rise and golden edges every time.
The recipe uses simple ingredients you likely already have on hand: all-purpose flour, baking powder, eggs, butter, and vanilla extract. What sets this apart is the 15-minute rest before baking, which allows the batter to settle and prevents cracking.
Baked at 350°F for 30-35 minutes, this cake is designed to fit perfectly in a standard 13×9-inch pan, with no adjustments needed for even baking.
What you’ll end up with is a cake that’s moist for days, with a fine crumb and subtle vanilla aroma that fills your kitchen. The edges stay tender, not dry, and the texture is light enough to cut cleanly.
Whether you’re layering it for a celebration or serving slices as-is, this cake delivers restaurant-quality results without the fuss.
For extra indulgence, pair it with a simple vanilla buttercream or a tangy cream cheese frosting. The recipe also scales easily—double the batter for a sheet cake or halve it for cupcakes. Let’s get baking!
Ingredients for 13×9 yellow cake
Nine simple ingredients transform into a moist, golden 13×9 cake—perfect for any occasion.
| Ingredient | Amount | Notes |
|---|---|---|
| All-Purpose Flour 🌾 | 2 ½ cups | Sifted for light texture |
| Granulated Sugar 🍚 | 1 ½ cups | White or light brown |
| Unsalted Butter 🧈 | 1 cup | Room temperature, full-fat |
| Large Eggs 🥚 | 2 whole | Room temperature, separated |
| Pure Vanilla Extract 🌸 | 2 tsp | High-quality, not imitation |
| Baking Powder 🧂 | 2 tsp | Freshly opened, not expired |
| Salt 🧂 | ½ tsp | Fine sea salt |
| Milk 🥛 | ½ cup | Whole milk preferred |
| Vegetable Oil 🫒 | ¼ cup | Light, neutral flavor |
The butter and sugar creaming is non-negotiable here—room temperature butter is key for smooth batter. Kirkland Signature or Land O’Lakes brands are reliable for consistent quality. For vanilla, McCormick or Nielsen-Massey extracts deliver that authentic bakery flavor. The flour should be sifted to avoid dense crumbs, and I always measure it by spooning and leveling—never scooping directly from the bag. Eggs should be separated only if you’re making a sponge layer, but for this recipe, whole eggs work perfectly.
No butter? Applesauce or coconut oil can replace half the butter, but texture will shift slightly. Short on vanilla? Vanilla bean paste works better than imitation, and a tiny pinch of cinnamon adds depth. The milk can be swapped for buttermilk or even water in a pinch, though buttermilk adds tang. For a richer cake, add 1 tbsp sour cream to the batter. The baking powder must be fresh—if it’s over a year old, test it with vinegar (bubbles mean it’s good).
Store the baked cake in an airtight container at room temperature for up to 3 days—it stays moist surprisingly well. For longer storage, wrap tightly in plastic and refrigerate for up to 1 week. The batter can be prepped ahead and refrigerated for 24 hours before baking, but let it sit at room temp for 30 minutes before pouring. Freezing? Slice and wrap individually—3 months in the freezer, thaw at room temp.
Why You’ll Love This Recipe
- No Mixer Needed: I swear by this recipe because it’s just butter, sugar, eggs, and flour—no stand mixer required. Cream the butter and sugar by hand, crack in the eggs one at a time, and fold in the flour like you’re making a giant pancake. Ten minutes of active work, and you’re done.
- Vanilla Kiss: That single teaspoon of pure vanilla extract? It’s the secret. The cake’s got a tender crumb with just enough sweetness to balance the buttery richness, and the vanilla lingers like a warm hug. Honestly, I’ve tried boxed mixes, but this one tastes like real cake.
- Leftover Heaven: Bake it once, enjoy it twice. This recipe makes a big pan, so you’ve got slices for breakfast, lunch, or dessert—trust me, I’ve done it. The texture stays moist for days, and it’s perfect for quick sandwiches or a midnight snack when the fridge is empty.
- Budget-Friendly Staples: All you need is flour, sugar, butter, eggs, and vanilla—ingredients you already have. No fancy shortcuts, no overpriced add-ins. My grocery bill stays low, and my freezer stays stocked with cake that’s always a hit. (Yes, even on a Tuesday night.)
Step-by-step instructions for 13×9 yellow cake
Here’s the method for a perfectly moist vanilla cake every time.
👨🍳 Step 1: Prepare Your Mixing Tools and Ingredients
Start by preheating your oven to 350°F and grease a 13×9-inch baking pan thoroughly with vegetable oil, then line it with parchment paper for easy removal. Sift together the 2.5 cups all-purpose flour, 2 tsp baking powder, and 0.5 tsp salt in a medium bowl. Set aside—this dry mix is your foundation for light, airy texture.
In a separate small bowl, whisk together the 0.5 cup milk and 2 tsp pure vanilla extract. This pre-mix ensures even flavor distribution throughout the batter. Let both mixtures sit at room temperature while you prepare the remaining ingredients—this prevents temperature shocks that can cause the cake to sink.
🍳 Step 2: Cream Butter and Sugar for Maximum Moisture
In a large mixing bowl, combine the 1 cup unsalted butter (at room temperature) and 1.5 cups granulated sugar. Using an electric mixer on medium-high speed, beat for 3-4 minutes until the mixture is light, fluffy, and nearly doubled in volume. You’ll see the color change from pale yellow to a lighter hue—this indicates proper aeration.
This creaming process incorporates air into the batter, which creates the cake’s signature tender crumb. If your butter isn’t soft enough, microwave it in 10-second intervals until it’s pliable but not melted. Overheating butter can cause the mixture to separate later.
🍳 Step 3: Add Eggs One at a Time for Perfect Structure
Add the 2 whole large eggs to the butter-sugar mixture, one at a time, mixing on low speed after each addition. Scrape down the sides of the bowl with a rubber spatula to ensure even incorporation. Then add the milk-vanilla mixture and mix on low speed for 30 seconds until just combined.
Here’s where it gets crucial: gradually add about ⅓ of the dry ingredients to the wet mixture. Mix on low speed just until combined—you should still see some flour streaks. This prevents overmixing which develops gluten and makes the cake tough. The goal is to create a smooth, thick batter with a ribbon consistency that holds its shape briefly when the whisk is lifted.
🥘 Step 4: Combine Remaining Ingredients for Foolproof Texture
With the mixer on low speed, gradually add the remaining 2 cups all-purpose flour to the batter. Mix just until the flour is incorporated and no dry spots remain—about 20-30 seconds. Be careful not to overmix; the batter should be smooth but still slightly thick. Pour the batter into your prepared 13×9-inch pan and smooth the top with a spatula.
This step is all about balance. The combination of butter, oil, and eggs creates moisture, while the baking powder provides lift. The gradual incorporation of flour ensures even distribution of these components, which guarantees that every slice will be tender and moist—not dense or dry.
🔥 Step 5: Bake to Golden Perfection with Internal Checks
Bake the cake in the preheated 350°F oven for 25-30 minutes, or until a toothpick inserted into the center comes out clean with just a few moist crumbs clinging to it. The edges should be golden brown, but the center should still look slightly underdone—this indicates proper doneness.
I know it’s tempting to open the oven door to check early, but resist! Every time you open the oven, you lose heat and steam, which can cause the cake to sink. Instead, trust the toothpick test and the visual cues. When the cake is done, remove it from the oven and let it cool in the pan for 10 minutes before transferring to a wire rack to cool completely.
Pro Tips For Making 13×9 Yellow Cake
- Cream Butter Slowly: DESCRIPTION: I learned this the hard way—dumping cold butter into sugar at once just makes a greasy mess. Instead, cut the butter into small cubes and add them one at a time while mixing on medium-low. The sugar will gradually dissolve, and you’ll end up with a smoother batter that’s less likely to turn out greasy or dry.
- Sift the Flour Twice: DESCRIPTION: Skipping this step is how you end up with a cake that’s dense or lumpy. Sift the flour before measuring it into the bowl, then sift it again right before folding it into the wet ingredients. This aerates the flour and keeps the texture light—no extra effort, just a game-changer for crumb.
- Test Doneness Early: DESCRIPTION: After 25 minutes, stick a toothpick in the center. If it comes out clean but the edges are still sinking, that’s your cue to tent foil loosely over the cake. This traps heat without steaming it, letting the middle cook through while the top stays soft. Ignore this, and you’ll either have a dry cake or a gummy center.
- Room Eggs First: DESCRIPTION: Cold eggs from the fridge can curdle the butter mixture, leaving you with a weird, grainy batter. Pop them in a warm (not hot) bowl of water for 10 minutes before cracking them in. The batter will mix smoother, and the cake’s texture will be more uniform—no weird lumps or separation.
Serving suggestions for this dish
Classic Frosting Pairings
This cake shines with vanilla buttercream—whip together 1 cup softened butter, 4 cups powdered sugar, 2 tbsp milk, and 2 tsp vanilla extract until smooth.
For extra decadence, fold in ½ cup crushed vanilla wafers or white chocolate chips. I love using Wilton’s Buttercream Frosting Kit for foolproof results. 🍰
For a tangy contrast, try cream cheese frosting—mix 8 oz cream cheese, ½ cup butter, 3 cups powdered sugar, and 1 tsp vanilla. This balances the cake’s sweetness beautifully. Spread while the cake is still slightly warm for easier application.
Fresh Fruit Toppings
Fresh berries add vibrant color and acidity that cuts through the richness. Arrange sliced strawberries, blueberries, or raspberries in a decorative pattern on top. For a tropical twist, use kiwi slices and mango chunks. Serve immediately to prevent sogginess—this is key! 🍓
Citrus zest—like lemon or orange—brightens every bite. Sprinkle 1 tsp freshly grated zest over the frosting or mix it into the batter for a subtle, aromatic lift. Pair with a drizzle of honey or caramel sauce for a gourmet touch.
Serving Presentation
For elegant layers, slice the cake into 12 equal rectangles and stack with frosting between layers. Use a serrated knife dipped in hot water for clean cuts. Dust with powdered sugar or cocoa powder for a professional finish. 💫
Serve slices on gold-rimmed plates with a side of whipped cream or ice cream. Garnish with a sprig of mint or a candied pecan for a festive touch. This cake is perfect for birthdays, brunch, or even dessert at a picnic!
Make-Ahead Serving
Assemble the cake with frosting up to 24 hours ahead and store in an airtight container at room temperature. Refrigerate for longer storage—up to 3 days
For parties, freeze individual slices wrapped in plastic for up to 1 month. Thaw at room temperature for 30 minutes** before serving. This keeps the cake’s moisture intact and makes prep stress-free.
Nutrition facts
Frequently asked questions
Can I substitute butter with oil in this yellow cake recipe?
Yes, you can replace the butter with ½ cup vegetable oil plus ½ cup melted butter for a moister texture. However, the cake won’t be quite as rich or flavorful. For a completely oil-based version, use 1 cup oil total and reduce the milk by 2 tablespoons to maintain the right batter consistency.
Why did my cake sink in the middle?
This usually happens from overmixing the batter or opening the oven door too early. The creaming method requires gentle folding of dry ingredients—stop mixing as soon as the flour disappears. Also, avoid peeking at the cake while baking, as temperature fluctuations cause collapsing. Let it bake until a toothpick comes out clean.
How do I make this cake gluten-free?
Replace the all-purpose flour with a 1:1 gluten-free baking flour blend like Bob’s Red Mill or King Arthur. Add ½ teaspoon xanthan gum to help bind the texture. You may also need to reduce the milk by 1 tablespoon since gluten-free flours absorb differently. Expect a slightly denser but still moist result.
Can I use this recipe for cupcakes instead?
Divide the batter evenly among 24 lined cupcake tins and bake at 350°F for 18-20 minutes. For extra height, fill cups only ⅔ full with batter. The same creaming method ensures tender cupcakes. Top with buttercream or sprinkles while the cupcakes are still warm for best results.
What’s the best way to store leftovers?
Wrap individual slices tightly in plastic wrap or store the whole cake in an airtight container at room temperature for 3 days. For longer storage, refrigerate for up to 1 week or freeze slices for 3 months. Thaw at room temperature for 30 minutes before serving to restore moisture.

- 3lb Prime Rib Roast Recipe: Juicy Pink Center Guaranteed in 3 Hours - October 31, 2026
- 5 Spice Cake Recipe: Warmly Spiced Layers With Crunchy Top - October 31, 2026
- 1950’s Macaroni and Cheese Recipe: Nostalgic Creamy Cheese Sauce with Buttery Noodles - October 31, 2026