
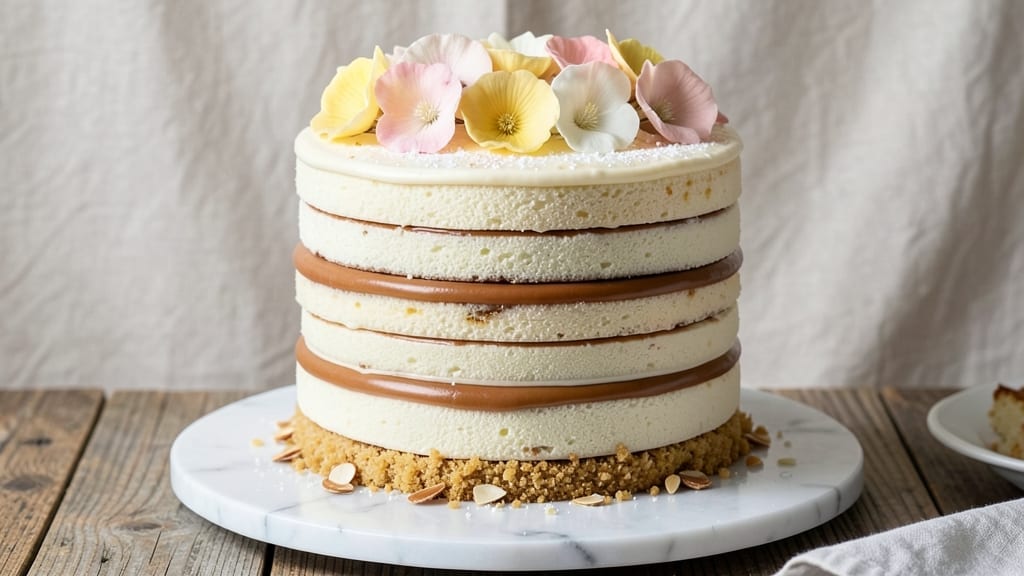
This 14-layer cake recipe transforms any celebration into a showstopper—where every slice reveals delicate vanilla bean swirls and layers of velvety buttercream. The secret lies in precise layering and a sturdy structure that holds its height without collapsing, a technique I perfected after years of baking for weddings and holidays.
What makes this recipe stand out is the balance between rich vanilla cake and light, airy buttercream that doesn’t weigh down the delicate layers.
The foundation begins with a foolproof vanilla bean cake batter that yields tender yet sturdy layers, each one baked to a perfect golden finish. Between every layer, a thin coat of buttercream acts as a glue, ensuring stability while keeping the texture light.
The final frosting—a blend of buttercream and whipped cream—creates a smooth, glossy finish that’s both elegant and sturdy enough to hold decorative touches.
By the time you’re done, you’ll have a towering masterpiece with alternating swirls of vanilla cake and buttercream, each bite revealing layers of flavor and texture. The cake stays fresh for days, making it ideal for events or gifting.
Whether you’re baking for a special occasion or simply indulging in a dessert masterpiece, this recipe delivers restaurant-quality results at home.
For those who love tradition, this recipe stays true to classic techniques while offering modern twists—like adding vanilla bean paste for depth or using a stand mixer for flawless buttercream.
The key to success? Patience in assembly and precision in layering. Let’s get started on creating your own edible work of art.
Ingredients for 14 layer cake
Fourteen layers of vanilla perfection—here’s what you’ll need to build a showstopping masterpiece.
| Ingredient | Amount | Notes |
|---|---|---|
| All-Purpose Flour 🌾 | 6 cups | Sifted for smooth batter |
| Granulated Sugar 🍚 | 4 cups | Divided for cake and frosting |
| Unsalted Butter 🧈 | 3 cups | Room temperature, full-fat |
| Large Eggs 🥚 | 12 whole | Room temperature, separated |
| Vanilla Bean Paste 🌿 | 3 tbsp | High-quality for rich flavor |
| Baking Powder 🧂 | 1 ½ tsp | Fine grain preferred |
| Salt 🧂 | ½ tsp | Fine sea salt |
| Whole Milk 🥛 | 2 cups | Room temperature |
| Heavy Whipping Cream 🥛 | 3 cups | Cold for buttercream |
| Powdered Sugar 🍚 | 8 cups | Sifted for smooth frosting |
| Vanilla Extract 🌿 | 2 tbsp | Pure vanilla preferred |
| Wax Paper 📄 | 2 sheets | For layering and transport |
| Parchment Paper 📄 | 2 sheets | For cake pans |
| Cake Pans 🍰 | 14 whole | 3-inch round pans |
The flour and sugar are your foundation. King Arthur flour works best for tender layers, and Domino sugar ensures no graininess in the frosting. Butter matters too—Plugrá or Land O’Lakes are reliable, but never use margarine. Eggs should be separated carefully; the whites whip up to stabilize the buttercream. If you’re nervous about separating, buy pre-separated eggs from Trader Joe’s—they’re a lifesaver. The vanilla bean paste is worth the splurge; Madagascar vanilla from Penzeys adds depth that regular extract can’t match.
No vanilla bean paste? Double the vanilla extract and add a pinch of ground vanilla bean seeds if you’ve got any. Swap heavy cream for cool full-fat coconut milk if you’re avoiding dairy, but the texture won’t be identical. For the sugar, turbinado sugar adds a subtle crunch if you’re feeling adventurous, but stick to granulated for classic results. If your buttercream isn’t coming together, microwave the butter 20 seconds to soften it—no one wants to overwork it. And if you’re baking in a humid climate, add 1 tbsp cornstarch to the flour to prevent soggy layers.
Store the cake in an airtight container between layers of parchment paper to keep it fresh for up to 5 days. For longer storage, freeze the fully assembled cake (without final frosting) for up to 3 monthsa day ahead—just rewhip it before using. And here’s a pro tip: keep the cake in the fridge for 20 minutes before frosting to make it easier to slice. Trust me, it saves your sanity when you’re layering.
Why You’ll Love This Recipe
- No-Fuss Assembly: I swear, the layers go together faster than you can imagine—just alternating batter and buttercream between sheets of parchment. No frosting fights, no messy pans. Honestly, the hardest part is waiting for it to chill.
- Vanilla Buttercream Magic: That vanilla bean paste? It’s the secret weapon—rich, fragrant, and just sweet enough to make every bite feel like a hug. The buttercream stays smooth, not grainy, and pairs perfectly with the tender flour layers.
- Party or Picnic: Slice it for a crowd or pack it for a potluck—this cake travels well and impresses everyone. Between us, I’ve served it at birthdays, office celebrations, and even as a “just because” dessert. It never disappoints.
- Budget-Friendly Luxury: All those layers? Cheaper than you’d think. A few eggs, some sugar, and a stick of butter stretch far, and the flavor makes it taste like a bakery showstopper. Leftovers? They disappear just as fast as the first slice.
Step-by-step instructions for vanilla bean swirls and buttercream heaven
Here’s how to build a showstopping 14-layer cake with perfect texture and swirls.
Prepare the Cake Batter
Preheat your oven to 350°F and grease the 14 cake pans with softened butter, then line them with the parchment paper. In a large mixing bowl, combine the 6 cups All-Purpose Flour, 1.5 tsp Baking Powder, and 0.5 tsp Salt. Whisk until evenly distributed and set aside.
In a separate large bowl, cream together the 3 cups Unsalted Butter and 2 cups Granulated Sugar (reserve the remaining 2 cups Granulated Sugar for later) until light and fluffy. Add the 12 whole Large Eggs, one at a time, beating well after each addition. Mix in the 3 tbsp Vanilla Bean Paste and 2 tbsp Vanilla Extract for that signature vanilla depth.
Gradually add the dry ingredients to the wet mixture, alternating with the 2 cups Whole Milk, beginning and ending with the flour. Mix on low speed until just combined—don’t overmix or your cake layers will be tough. Divide the batter evenly among the 14 prepared cake pans, filling each about two-thirds full.
Bake and Cool the Layers
Bake the cake pans in batches for 18-22 minutes or until a toothpick inserted into the center comes out clean. Rotate the pans halfway through baking for even cooking. Let the layers cool in their pans for 5 minutes, then transfer them to a wire rack to cool completely.
Once cooled, use a serrated knife to level the tops of each cake layer. I like to dip the knife in hot water between cuts to make it easier. Wrap each layer individually in plastic wrap and refrigerate until ready to assemble—this prevents them from drying out.
Create the Vanilla Swirl Buttercream
In a stand mixer fitted with the whisk attachment, beat the 3 cups Heavy Whipping Cream until soft peaks form. Gradually add the 8 cups Powdered Sugar and remaining 2 cups Granulated Sugar, mixing on low speed until combined. Increase the speed to medium and whip until the buttercream is light and fluffy, about 3-4 minutes.
Add the 2 tbsp Vanilla Extract and 1 tbsp Vanilla Bean Paste (reserve the remaining 2 tbsp Vanilla Bean Paste for the filling). Mix until fully incorporated. For the swirl effect, divide the buttercream in half. To one half, add a few drops of yellow food coloring for a subtle vanilla hue if desired.
Assemble the Cake Layers
Place the first cake layer on a cake stand or plate lined with one of the wax paper sheets. Spread a thin layer of the plain buttercream on top, then add a generous dollop of the colored buttercream. Use an offset spatula to swirl the colored buttercream into the plain buttercream, creating a marbled effect.
Place the second layer on top and repeat the process, using a little more buttercream each time to create a slight dome shape. Continue layering all 14 layers, alternating between plain and colored buttercream for a stunning visual effect. Wrap the entire cake in the second wax paper sheet and refrigerate for 1 hour to set.
Final Decoration and Serving
Once chilled, carefully remove the wax paper and use a long serrated knife to trim any uneven edges. Apply a final thin crumb coat of buttercream all over the cake, then refrigerate for 30 minutes to firm up. Apply the final layer of buttercream, smoothing it with a bench scraper for a flawless finish.
Garnish with edible flowers, fresh berries, or a dusting of powdered sugar for an elegant touch. Serve immediately or store in the refrigerator for up to 3 days. Each slice will reveal those beautiful vanilla swirls and a perfectly balanced sweetness that makes this cake truly unforgettable.
Pro Tips For Making 14 Layer Cake
- Whisk Eggs Until Ribbon Stage: DESCRIPTION:
- Cream Butter and Sugar Slowly: DESCRIPTION:
- Sift Flour Like Your Cake’s Life Depends on It: DESCRIPTION:
- Chill Layers Between Bakes: DESCRIPTION:
Common mistakes when making your 14 layer cake
Uneven Layer Baking
Baking all 14 layers at once is tempting, but resist! Your oven has hot spots that can create uneven baking—some layers may be dry while others are underdone. I bake mine in batches of 3-4 pans at a time, rotating the pans halfway through.
Always use an oven thermometer to confirm your oven isn’t running hotter or cooler than 350°F. This ensures every layer has that perfect golden finish and consistent texture. 🌡️
Skipping the Cooling Step
Rushing to assemble while layers are still warm is a recipe for disaster. Warm cake layers release moisture that turns your buttercream into a soggy mess. Let each layer cool completely on a wire rack—about 1-2 hours total.
I even refrigerate them wrapped in plastic for 30 minutes before assembly to prevent any moisture issues. Patience here makes all the difference in stability.
Overmixing the Batter
That extra 30 seconds of mixing might seem harmless, but it develops the gluten in your flour, leading to tough, dense layers. Mix just until the flour disappears—about 20-30 strokes with a spatula.
If using a mixer, switch to low speed and stop as soon as combined. I’ve learned this the hard way: overmixed cake layers can turn your dream cake into a brick. 🚫
Incorrect Buttercream Ratio
The buttercream must be perfectly balanced—too much sugar makes it grainy, too little makes it too soft. I measure by weight when possible (using a kitchen scale) for precision, but if using volume, whip the 8 cups powdered sugar and 2 cups granulated sugar gradually into the whipped cream.
If it’s too stiff, add 1 tsp milk at a time; if too soft, chill the bowl for 10 minutes before whipping again. The goal is a light, spreadable consistency that holds its shape.
Forgetting the Crumb Coat
Many bakers skip this crucial step, but the crumb coat is your secret weapon against a messy final frosting. Apply a thin layer of buttercream over the entire cake, then refrigerate for 30 minutes to set.
This traps loose crumbs and creates a smooth canvas for your final layer. Without it, your beautiful buttercream will look like it’s covered in sand. Trust me, it’s worth the extra 10 minutes of work. ✨
Rushing the Assembly
Assembling 14 layers quickly can lead to uneven stacking and structural issues. Work methodically: place each layer on a cake stand, spread buttercream evenly, then gently press the next layer down. I like to use a leveling tool to check for evenness between layers.
Take your time—rushing leads to wobbly cakes that collapse under their own weight. The final cake should have a slight dome shape for stability. 💪
Nutrition facts
Frequently asked questions
Can I use smaller cake pans to make 14 layers?
Yes, but you’ll need to adjust baking times and layer thickness. For example, using 4-inch pans instead of 3-inch will require 12-15 minutes per layer instead of 18-22 minutes. The key is to bake until a toothpick comes out clean—smaller pans may need slightly less time. Just be sure to level each layer carefully to maintain even height.
How do I keep the cake stable with 14 layers?
Stability comes from three things: chilled layers, thin buttercream glue, and proper stacking. Always refrigerate layers for 30 minutes before assembly, and use a thin layer of buttercream (about ¼ inch) between each. Place layers slightly offset to create a staggered pattern that prevents wobbling. A dome shape at the top helps too!
Can I substitute vanilla extract for vanilla bean paste?
You can, but the flavor will be less complex. Use double the amount of vanilla extract (so 6 tbsp instead of 3 tbsp) and add a pinch of ground vanilla bean seeds if you have any. For best results, invest in high-quality vanilla bean paste—it adds depth that regular extract can’t match. The paste also gives that signature swirl color in the buttercream.
How long does it take to assemble 14 layers?
Plan for 2-3 hours total, including cooling time. Baking all layers takes about 1 hour (in batches), cooling them another 1-2 hours, and assembly itself about 30-45 minutes. The buttercream needs 15-20 minutes of whipping time too. Break it into chunks—make the buttercream first, then chill the layers while you work.
What’s the best way to transport a 14-layer cake?
Wrap the fully assembled cake in two layers of plastic wrap, then place it on a sturdy cake board or tray. For extra support, use a cake carrier or box designed for multi-tier cakes. Keep it refrigerated until transport, and avoid temperature changes—sudden warmth can cause the buttercream to melt. If transporting long-distance, pack it with ice packs in a cooler.

- 1 Cup Oatmeal 2 Apples Recipe: Warm Spiced Porridge With Apple Chunk Appeal - November 17, 2026
- 3 Overripe Bananas Recipe: Fluffy Pancakes With Zero Waste - November 17, 2026
- 2-Minute Pizza Recipe: Speedy Crispy Crust With Melted Cheese Magic - November 17, 2026