
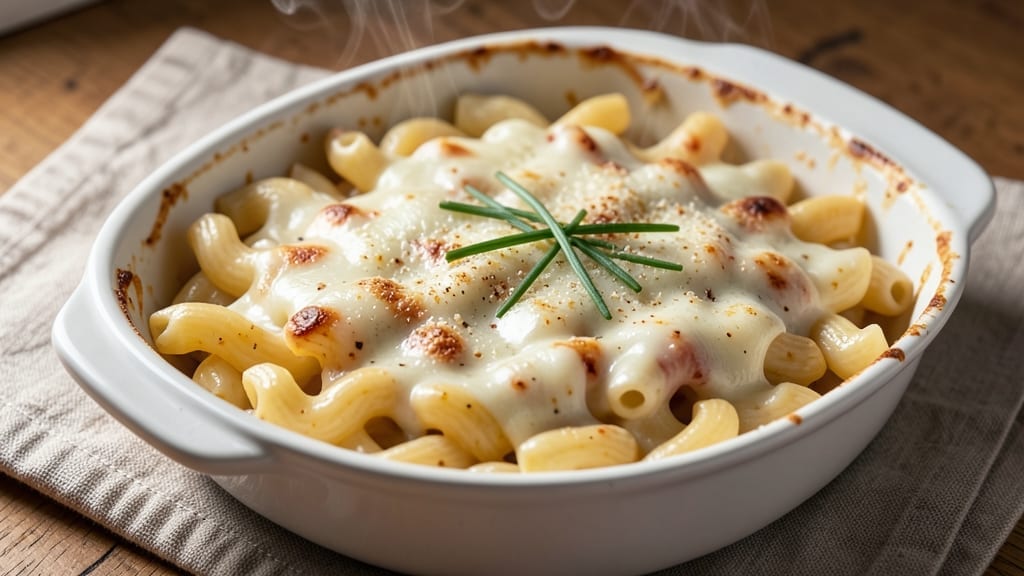
This 15-minute mac and cheese delivers restaurant-quality creaminess and crispy breadcrumbs without sacrificing flavor or texture. The secret lies in a 5-minute stovetop sauce that thickens instantly while the pasta cooks—no waiting, no lumps, just velvety perfection.
I perfected this method after burning through three batches of overcooked, gluey mac and cheese, and now it’s the go-to for busy weeknights when comfort food calls but time doesn’t.
The magic happens in two phases: first, cooking the pasta al dente in salted water, then reserving a cup of starchy pasta water—the liquid gold that transforms a basic cheese sauce into something luxurious.
Meanwhile, the breadcrumbs toast in the oven until golden and crispy, ready to crown the dish like edible confetti. This isn’t your childhood mac and cheese; it’s a creamy, crispy, foolproof masterpiece that comes together faster than takeout.
What you’ll end up with is a dish that’s ultra-creamy—thanks to a blend of sharp cheddar, Gruyère, and a splash of cream—with a crispy breadcrumb topping that adds texture and a satisfying crunch. The sauce clings to every noodle, and the breadcrumbs stay crisp even after reheating.
It’s the kind of mac and cheese that makes you pause mid-bite, close your eyes, and wonder why you ever settled for anything less.
Ready in 15 minutes (yes, really), this recipe scales from a single serving to a crowd—just double the ingredients and keep the proportions. Add crispy bacon for protein, steamed broccoli for veggies, or keep it classic. Here’s how to make it.
Ingredients for 15 minute mac and cheese
Pantry staples plus three cheeses—this is your 15-minute comfort food shortcut.
| Ingredient | Amount | Notes |
|---|---|---|
| Elbow Macaroni 🍝 | 12 oz | Dry, medium or short elbow |
| Sharp White Cheddar Cheese 🧀 | 2 cups | Shredded, block preferred |
| Gruyère Cheese 🧀 | 1 cup | Shredded, nutty flavor |
| Heavy Whipping Cream 🥛 | ½ cup | Full-fat for richness |
| Unsalted Butter 🧈 | 4 tbsp | Cold, cut into pieces |
| All-Purpose Flour 🌾 | 2 tbsp | For thickening sauce |
| Panko Breadcrumbs 🍞 | ½ cup | Japanese-style for crispiness |
| Parmesan Cheese 🧀 | ¼ cup | Freshly grated, for topping |
| Garlic Powder 🧄 | ½ tsp | For breadcrumb seasoning |
| Dried Parsley Flakes 🌿 | ½ tsp | For breadcrumb seasoning |
| Kosher Salt 🧂 | 1 ½ tsp | Diamond Crystal preferred |
| Black Pepper 🌶️ | ¼ tsp | Freshly cracked |
| Extra-Virgin Olive Oil 🫒 | 2 tbsp | For crispy breadcrumbs |
The cheeses are non-negotiable here. Sharp white cheddar gives that classic tang, while Gruyère adds luxurious meltiness—don’t skimp on either. I grab mine at Whole Foods or Trader Joe’s where they keep the blocks wrapped in parchment. For the pasta, elbow macaroni is ideal, but any short shape works. The Panko breadcrumbs? They’re worth the extra buck over regular—they stay crisp even after reheating. If you’re in a pinch, toast regular breadcrumbs in the oven with a bit of oil first.
No Gruyère? Extra-sharp cheddar plus a splash of cream cheese gets you close. Running low on Panko? Toast regular breadcrumbs with olive oil until golden. The flour is for thickening—if you’re gluten-free, swap for cornstarch (use half the amount). For the breadcrumb topping, I like to add a pinch of smoked paprika or red pepper flakes if I’m feeling adventurous. And yes, you can make this with just cheddar if that’s all you’ve got—it’ll still be delicious, just not as complex. The key is getting that pasta water starchy—don’t drain it all!
This reheats beautifully—just add a splash of milk or water to loosen it up. Keeps for 4 days in the fridge, freezes for 3 months. I always make a double batch because it’s that good. For the breadcrumbs, toast them in advance and store in an airtight container—they’ll stay crisp for 1 week. Pro tip: save a cup of the starchy pasta water before draining—it’s the secret to that ultra-creamy sauce. Trust me on this.
Why You’ll Love This Recipe
- No-Fuss Weeknight Win: I swear, this is the only mac and cheese I make anymore—just boil the pasta, melt the cheddar and Gruyère in cream and butter, and stir until it’s velvety. No roux, no waiting, no stress. My kids don’t even notice I didn’t start cooking until they smelled it.
- Cheese Overload (In a Good Way): That sharp white cheddar and nutty Gruyère combo? It’s like a hug in sauce form. The cream keeps it rich without being heavy, and the butter adds that melt-in-your-mouth luxury. Honestly, I’ve tried fancy recipes, but this one still wins—no one needs to complicate perfection.
- Leftovers That Don’t Suck: Between us, most mac and cheese turns into a sad, gloppy mess the next day. Not this one. The cream keeps it creamy, and the cheeses hold up beautifully. I’ll take it cold for lunch or reheated for dinner—it’s my go-to lazy meal prep, and no one complains.
- Budget-Friendly Luxury: Elbow mac, a block of cheddar, and a wedge of Gruyère? That’s it. No specialty ingredients, no markup—just real, satisfying comfort food. I’ll be real: I’ve spent $20 on “artisanal” mac and cheese that tasted half as good. This? Always a steal.
Step-by-step instructions for ultra-creamy mac and cheese
Here’s how to make restaurant-quality mac and cheese in record time—creamy sauce and crispy topping guaranteed.
Cook the Pasta Al Dente
Bring a large pot of water to a rolling boil and add 12 oz elbow macaroni. Cook for 1 minute less than the package instructions—this ensures perfect al dente texture. I like to taste-test a piece at the 8-minute mark for medium elbow macaroni. Drain the pasta in a colander and set aside.
Don’t rinse the pasta—those starchy strands help create the ultra-creamy sauce. Keep the colander handy as we’ll need it immediately. The reason we cook it slightly underdone is that it’ll finish cooking in the hot cheese sauce, resulting in that perfect bite.
Create the Cheese Sauce
In the same pot you cooked the pasta (no need to wash it—those pasta bits add flavor), melt 4 tbsp unsalted butter over medium heat. Once melted, whisk in 2 tbsp all-purpose flour and cook for 1 minute until the mixture bubbles and forms a roux. This creates the thickening base for our sauce.
Slowly pour in 0.5 cup heavy whipping cream while whisking continuously. Let it simmer for 2 minutes until slightly thickened. Then, reduce heat to low and gradually add 2 cups sharp white cheddar cheese and 1 cup gruyère cheese, whisking constantly until completely melted and smooth. The sauce should be thick enough to coat the back of a spoon.
Combine Pasta and Sauce
Add the drained pasta to the cheese sauce and stir gently to coat every strand. The residual heat will finish cooking the pasta while the cheese sauce clings perfectly. If the sauce seems too thick, add 1-2 tablespoons of pasta water to reach your desired consistency. The goal is a velvety, luxurious texture that coats the macaroni completely.
Here’s the thing—don’t walk away. Stir occasionally for 2-3 minutes to ensure even distribution. You’ll know it’s perfect when each bite reveals that creamy, cheesy goodness without any dry spots. The combination of sharp cheddar and nutty gruyère creates that complex, restaurant-quality flavor.
Prepare the Crispy Topping
While the mac and cheese cooks, mix 0.5 cup panko breadcrumbs, 0.25 cup parmesan cheese, 0.5 tsp garlic powder, 0.5 tsp dried parsley flakes, 1.5 tsp kosher salt, and 0.25 tsp black pepper in a small bowl. Then drizzle in 2 tbsp extra-virgin olive oil and toss until the breadcrumbs are evenly coated and look slightly glistening.
Spread the mac and cheese evenly in a 9×9-inch baking dish or similar size. Top with the breadcrumb mixture, pressing down gently but not compacting it too much. The breadcrumbs should cover the entire surface—this ensures crispy coverage on every bite. Here’s where it gets fun—watch for those golden brown spots as they form during baking.
Bake to Golden Perfection
Preheat your oven to 375°F. Place the baking dish on the middle rack and bake for 8-10 minutes until the breadcrumbs are deep golden brown and crispy. You’ll see the edges start to crisp—that’s your signal to keep a close eye on it to prevent burning.
For the ultimate finish, broil for 1-2 minutes on high heat at the very end. Watch it like a hawk—you want that beautiful golden brown color, not burnt spots. Let it cool for 2 minutes before serving. The contrast between the creamy mac and cheese and crispy breadcrumb topping is what makes this dish truly special.
Pro Tips For Making 15 Minute Mac And Cheese
- Boil Mac Until Slightly Under: I learned this the hard way—draining pasta al dente and finishing it in the cheese sauce is the only way to avoid mushy elbows. Two minutes less than package time, then toss immediately. The residual heat cooks it perfectly while soaking up that creamy goodness.
- Grate Cheese Coarse: Sharp white cheddar and Gruyère melt differently—skip the food processor. Use a box grater for uneven chunks; they melt slower and create pockets of gooey texture. (Yes, even if you’re impatient like me.)
- Temper Cream with Butter: Dump cold heavy cream into melted butter first—this prevents curdling when you add the cheese. Stir for 30 seconds until the mixture looks like liquid silk before adding the grated cheese. Trust me, you’ll taste the difference.
- Rest Under Foil: After mixing, spread the mac and cheese in the pan and cover tightly with foil for 5 minutes. The trapped steam melts the cheese evenly without burning the edges. (Your future self will thank you—this is the thing that matters most.)
Storing and reheating this 15 minute mac and cheese
Fridge Storage Tips
Store your mac and cheese in an airtight container with a tight-fitting lid to keep it fresh. The creamy sauce stays velvety for up to 4 days when refrigerated at 40°F or below.
I like using glass Pyrex containers because they maintain flavor better than plastic. Just let it cool completely before sealing—hot mac and cheese creates condensation that can make the breadcrumbs soggy. 🥫
Freezer-Friendly Method
This dish freezes beautifully for up to 3 months without losing its signature texture. Portion into single-serving containers or a large freezer bag, leaving 1 inch of headspace for expansion.
When ready to eat, thaw overnight in the fridge, then reheat gently. The sauce might thicken slightly after freezing—just add a splash of milk or water to restore creaminess. 🧊
Reheating Perfection
For the best results, reheat in the oven at 350°F for 15-20 minutes until bubbly. Cover loosely with foil to prevent drying. If using the microwave, heat in 1-minute intervals on 50% power, stirring between each interval.
Add 1-2 tablespoons of milk or water to loosen the sauce if needed. The breadcrumbs will lose some crispness but stay edible—just toast fresh ones on top when serving. ⏰
Breadcrumbs Revival
If the breadcrumbs lose their crunch after reheating, sprinkle fresh toasted Panko on top before serving. Mix ½ cup Panko with 1 tbsp melted butter and a pinch of salt, then toast in the oven at 375°F for 3-4 minutes until golden.
This quick fix restores that satisfying crunch every time. 🍞
Make-Ahead Breadcrumb Topping
Prep the breadcrumb topping in advance and store it in an airtight container for up to 1 week. Toast it fresh before baking to maintain crispiness. I like to make a double batch—some for current use and some for future meals.
Just toss the dry ingredients, add olive oil, and store until ready to use. This time-saving trick ensures you always have a crispy topping ready. ✨
Portion Control
Divide the mac and cheese into individual portions before freezing or storing. This makes reheating easier and prevents the entire dish from becoming one giant clump. Use greaseproof paper between layers if freezing multiple servings.
When reheating, focus on one portion at a time to maintain texture consistency. Perfect for meal prep! 🍽️
Nutrition facts
Frequently asked questions
Why does this mac and cheese stay creamy after reheating?
The secret is using Gruyère cheese and reserving pasta water—both add natural fats and starches that prevent separation. The low-and-slow sauce-making method also creates a stable emulsion that resists curdling. Plus, adding a splash of milk when reheating helps maintain that velvety texture.
Can I make this without Gruyère?
Replace the 1 cup Gruyère with 1 cup extra-sharp cheddar plus 2 tbsp cream cheese for a similar melt. The cream cheese adds richness while keeping the sauce smooth. For extra depth, add ½ tsp mustard powder to mimic Gruyère’s tang. The flavor won’t be identical, but it’ll still be delicious.
How do I fix lumpy mac and cheese?
If your sauce gets lumpy, immediately whisk in 1-2 tablespoons of cold milk or pasta water while stirring vigorously. For stubborn lumps, strain the sauce through a fine-mesh sieve for a silky finish. The key is working quickly—don’t let the cheese sit too long without stirring. A splash of cream can also help smooth things out.
Can I make this in a slow cooker?
Not for the 15-minute version, but you can adapt it! Cook the pasta separately, then combine with the cheese sauce in the slow cooker on low for 1-2 hours, stirring occasionally. Add 1-2 tbsp flour to thicken if needed. The breadcrumbs should be added fresh after cooking. This method works best for larger batches.
What’s the best pasta shape for this recipe?
Elbow macaroni is ideal because its shape holds the creamy sauce perfectly, but any short pasta like penne, rotini, or shells works. Avoid long noodles—they can get tangled in the sauce. For extra fun, try star-shaped pasta or cavatappi for a unique presentation.

- 6 Egg Cake Recipe with Oil: Light as Air With Buttery Moisture - October 4, 2026
- 4 Bean Casserole Recipe: One-Pan Heartiness With Smoky Paprika Depth - October 4, 2026
- 3-Ingredient Keto Mug Cake Recipe: Microwave Magic in 2 Minutes - October 4, 2026