
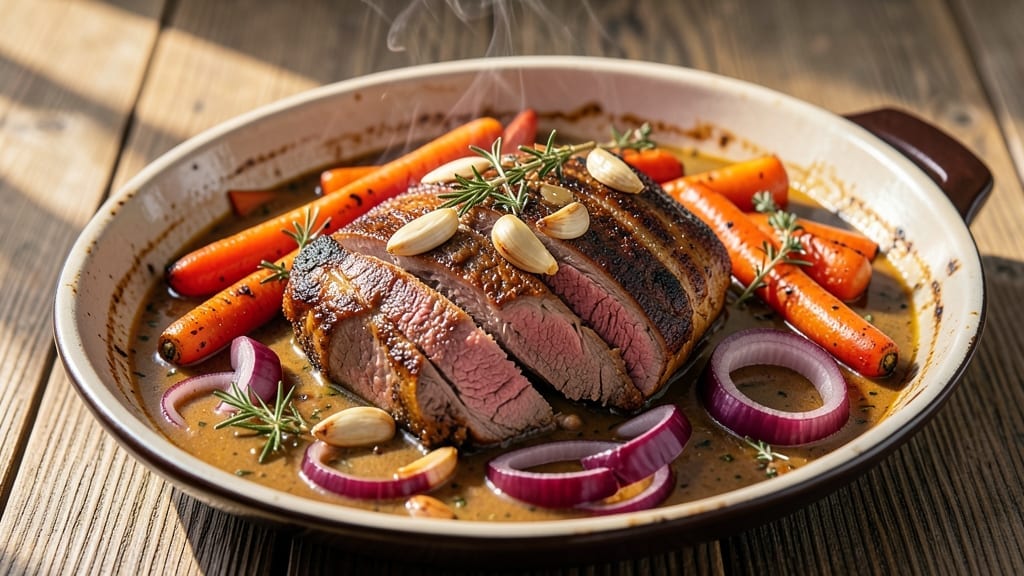
A 1.5-pound pot roast slow-cooked to tender perfection transforms tough cuts into melt-in-your-mouth bites with rich, homemade gravy. This recipe delivers restaurant-quality results using simple techniques—searing for depth, braising for tenderness, and a foolproof method for silky gravy that clings to every bite.
The key lies in patience and layering flavors through herbs, aromatics, and slow cooking. What sets this apart is the balance between simplicity and professional results. You’ll work with just a few core ingredients—quality beef, aromatics, and a splash of liquid—but the technique ensures maximum flavor extraction.
The slow braising process breaks down connective tissue, creating tender, fork-shreddable meat without requiring expensive cuts. Even beginners can achieve this with precise timing and attention to detail.
By the end, you’ll have a golden-brown roast resting in a pan of velvety gravy, ready to be served with classic sides like roasted potatoes or buttery carrots. The gravy, thickened naturally from the cooking juices, adds a luxurious finish that elevates the dish from weeknight dinner to special occasion.
This method works for both oven and stovetop cooking, with adjustments for different heat sources. Let’s get started on creating a dish that’s hearty, comforting, and impossible to resist.
Ingredients for 1.5 pound pot roast
Quality beef and aromatic vegetables form the foundation for this restaurant-style pot roast.
| Ingredient | Amount | Notes |
|---|---|---|
| Chuck Roast 🥩 | 1 ½ lb | Center-cut preferred for tenderness |
| Yellow Onion 🧅 | 1 whole | Medium size, sliced into half-moons |
| Carrots 🥕 | 4 medium | Whole, peeled, cut into 2-inch pieces |
| Garlic Cloves 🧄 | 4 cloves | Peeled, smashed with side of knife |
| Fresh Thyme Sprigs 🌿 | 4 sprigs | Or 1 tsp dried thyme |
| Fresh Rosemary Sprigs 🌿 | 2 sprigs | Or 1 tsp dried rosemary |
| Beef Broth 💧 | 2 cups | Low-sodium preferred |
| Red Wine 🍷 | ½ cup | Dry red like Cabernet Sauvignon |
| All-Purpose Flour 🌾 | 1 tbsp | For gravy thickening |
| Cold Water 💧 | ½ cup | For gravy adjustment |
| Kosher Salt 🧂 | 1 ½ tsp | Diamond Crystal preferred |
| Freshly Ground Black Pepper 🌶️ | 1 tsp | Coarsely ground |
| Unsalted Butter 🧈 | 2 tbsp | For gravy richness |
The chuck roast is the star here—look for center-cut pieces with good marbling at Whole Foods or your butcher shop. Costco often carries excellent pre-cut chuck roasts at a better price. Avoid roasts with excessive fat or grayish edges, as these indicate lower quality. For the aromatics, fresh herbs elevate the dish significantly, but dried will work in a pinch at one-third the amount. The yellow onion should be firm and free of sprouts, while garlic cloves should be plump and free of moisture spots. Store fresh herbs in a sealed container with a damp paper towel to maintain freshness for up to 5 days.
No red wine on hand? Substitute with additional beef broth—just reduce the liquid by half a cup to maintain balance. For the carrots, baby carrots work perfectly if you prefer convenience, though whole carrots add rustic texture. The flour used for gravy thickening should be all-purpose, not cake flour, as it has the proper protein structure for proper thickening. If you’re concerned about gluten, you can use cornstarch instead at half the quantity. The beef broth should be low-sodium to control the final seasoning—most store brands exceed 500mg sodium per cup, which can make the dish overly salty. For a deeper flavor, consider using homemade beef broth or a high-quality brand like Pacific Foods or Imagine.
This roast develops its richest flavors after 24 hours of refrigeration—the cold temperature helps tenderize the meat further. Once cooked, the roast and gravy reheat beautifully, with the gravy actually improving as it sits overnight. Store leftovers in an airtight container for up to 4 days in the refrigerator. For longer storage, freeze portions in individual containers for up to 3 months. The gravy can be reheated separately, and you can adjust its consistency by adding a splash of cold water or beef broth. For serving, consider reheating the roast and gravy together to allow the flavors to meld once more.
Why You’ll Love This Recipe
- One-Pan Magic: I swear by this—just toss the chuck roast, onions, carrots, and thyme into a pot with garlic, add some broth, and walk away. No flipping, no fussing, no tiny chopped bits to lose in the sauce. The onions caramelize right there while the meat tenderizes, and honestly? That’s my kind of cooking.
- Deep Umami Hug: Between us, chuck roast is the unsung hero of flavor. Slow-cooked until it practically falls apart, then kissed with garlic and thyme, it’s got that rich, meaty satisfaction that feels like a warm blanket. The carrots soak up all the juices and get just sweet enough—no one leaves a bite behind.
- Leftover Goldmine: This recipe begs to be made in bulk. The leftovers? Even better the next day. I’ll take that tender roast on toast the morning after, or shred it into tacos for lunch—no extra effort, just pure convenience. (Yes, even on a Tuesday night when you’re already tired.)
- Budget Win: A 1.5-pound chuck roast stretches farther than you’d think, especially with onions and carrots bulking it up. It’s the kind of meal where you’re feeding a crowd without breaking the bank, and the flavors are so robust, no one guesses it’s a budget pick. My wallet thanks me every time.
Step-by-step instructions for slow-cooked pot roast with rich gravy
Here’s how to transform tough chuck roast into melt-in-your-mouth perfection with a velvety homemade gravy.
Sear the Chuck Roast for Deep Flavor
Pat the 1.5 lb chuck roast dry with paper towels—this ensures a proper sear. Season both sides generously with 1.5 tsp kosher salt and 1 tsp freshly ground black pepper, pressing the seasoning into the meat so it adheres. Heat a heavy Dutch oven over medium-high heat and add 2 tbsp unsalted butter—wait until it foams but doesn’t brown.
Place the roast in the pot and sear for 3-4 minutes per side until deep golden brown with crisp edges. Don’t move it around—let it develop that flavorful crust. For even browning, sear the fat cap side last. Remove the roast and set it aside on a plate, leaving all the browned bits in the pot. These bits are the foundation of your gravy.
Build Layers of Flavor with Vegetables and Aromatics
In the same Dutch oven, add 1 whole yellow onion sliced into half-moons and 4 medium carrots cut into 2-inch pieces. Cook for 5 minutes, stirring occasionally, until the onions soften slightly and begin to caramelize. Add the 4 smashed garlic cloves, 4 sprigs fresh thyme, and 2 sprigs fresh rosemary, stirring for 30 seconds until fragrant.
Pour in 0.5 cup red wine, scraping up all the browned bits from the bottom with a wooden spoon. Let it simmer for 2-3 minutes until reduced by half. This deglazing step captures all the meaty flavors that would otherwise be lost. The wine should smell rich and concentrated, not sharp or alcoholic.
Slow-Cook Until Fork-Tender
Return the roast to the pot, fat-side up. Pour in 2 cups beef broth, making sure the liquid comes at least halfway up the roast. Bring to a gentle simmer, then cover and transfer to a 325°F oven. Cook for 2.5-3 hours until the meat is fork-tender—you should be able to easily pierce it with a fork and pull the meat apart with minimal resistance.
Check the roast at the 2-hour mark—it should be close to done but still slightly firm to the touch. If the liquid reduces too quickly, add 0.25 cup cold water to keep the roast moist. The slow cooking breaks down tough fibers, transforming the chuck roast into succulent, shreddable meat.
Create a Velvety Homemade Gravy
Once the roast is tender, remove it from the pot and place it on a cutting board. Strain the cooking liquid through a fine-mesh sieve into a clean saucepan, pressing on the vegetables to extract all the flavor. Return the liquid to medium heat and whisk in 1 tbsp all-purpose flour until smooth. Cook for 1-2 minutes until the flour is fully incorporated and the mixture thickens slightly.
Gradually whisk in 0.5 cup cold water, a little at a time, until the gravy reaches your desired consistency—it should coat the back of a spoon but still be pourable. Taste and adjust seasoning with additional kosher salt or black pepper if needed. The gravy should be rich, slightly tangy from the wine, and deeply flavorful from all the caramelized bits.
Rest and Serve with Perfect Gravy
Let the roast rest for 10-15 minutes before slicing against the grain into ¼-inch thick pieces. This resting period ensures the juices redistribute, keeping every bite moist and flavorful. Serve the roast family-style on a platter, surrounded by the roasted vegetables from the pot, and ladle the warm gravy generously over the top.
For an elevated presentation, garnish with additional fresh thyme sprigs and a sprinkle of freshly ground black pepper. The contrast of tender, juicy meat with the rich, velvety gravy makes this pot roast feel like a restaurant-quality meal. Leftovers reheat beautifully—simply warm the gravy and roast separately before combining.
Pro Tips For Making 1.5 Pound Pot Roast
- SEAR THE ROAST FIRST: Chuck roast is forgiving, but a quick sear in a hot pan (or Dutch oven) before braising builds flavor you won’t get otherwise. I used to skip this, and the dish always tasted like it was missing something—turns out, it was the crust. Two minutes per side with oil and salt, then pop it in the oven or pot. Worth the extra 5 minutes.
- CHOP ONIONS INTO BIG CHUNKS: Tiny onion pieces disappear into the sauce, leaving you wondering where all the flavor went. Cut them into 1-inch chunks instead—they’ll soften beautifully but stay visible, adding texture and depth. Same goes for carrots: leave them thick enough to bite into, not mushy. (Yes, even if you’re impatient like me.)
- DON’T SKIP THE THYME SPRIGS: Fresh thyme isn’t just for garnish—it infuses the meat and sauce with bright, herbal notes that dried thyme can’t match. Tuck 2-3 sprigs into the pot with the roast, then fish them out before serving. I learned this the hard way after serving a pot roast that tasted bland—turns out, I’d used dried and forgotten to add it early.
- BRAISE LOW AND SLOW—NO EXCUSES: Chuck roast needs 3-3.5 hours at 300°F (150°C) to break down into tender perfection. I used to crank the heat higher to speed things up, and the result was tough, dry meat. Set your oven to low, cover the pot, and let it work. The sauce will thicken, the meat will fall apart, and you’ll wonder why you ever rushed it. (Your future self will thank you.)
Pro cooking tips for this dish
Sear Like a Pro
That initial sear isn’t just for looks—it’s the flavor foundation. Use a heavy Dutch oven (I love my Lodge 5.5-quart) to ensure even heat distribution. Pat the roast bone-dry with paper towels before seasoning—this creates a better crust.
For extra depth, add 1 tbsp olive oil alongside the butter when searing. The goal is deep golden brown with crisp edges, which takes 3-4 minutes per side. Don’t rush this step—patience here prevents flavor loss later. 🔥
Deglaze with Precision
The deglazing step transforms those browned bits into gravy magic. After removing the roast, pour in the 0.5 cup red wine and immediately scrape up every last bit with a wooden spoon—metal spoons can scratch your Dutch oven.
Let it simmer until reduced by half (2-3 minutes), then strain out the vegetables. This concentrated liquid becomes the base for your gravy. Pro tip: If you’re nervous about wine, use beef broth instead, but reduce it by 25% longer to compensate for the lack of alcohol. 🍷
Temperature Control Matters
Your oven’s accuracy is critical here. Use an oven thermometer (I recommend Thermoworks Oven Thermometer) to verify your 325°F setting—many ovens run 25°F hotter or colder than indicated. The roast needs to cook at a gentle simmer, not a rolling boil, which would toughen the meat.
If the liquid reduces too quickly, add 2 tbsp cold water every 30 minutes to maintain moisture. The 2-hour mark is your first check—pierce with a fork; if it’s still slightly firm, return it to the oven. 🌡️
Gravy Thickening Secrets
The flour-to-liquid ratio is everything for silky gravy. Whisk the 1 tbsp flour into the strained liquid over medium heat for 1-2 minutes until it thickens slightly—this is called a slurry. Then gradually add the 0.5 cup cold water, whisking constantly.
The cold water helps emulsify the fat for a velvety texture. For extra richness, whisk in 2 tbsp unsalted butter at the end. If it’s too thick, add 1 tbsp beef broth; too thin? Simmer 1 more minute to reduce. 🧈
Resting Prevents Disaster
Skipping the 10-15 minute rest is a rookie mistake. During this time, juices redistribute throughout the meat, preventing dry slices. Place the roast on a wire rack (not directly on the cutting board) to allow air circulation.
For serving, slice against the grain into ¼-inch thick pieces—this shortens the muscle fibers for maximum tenderness. The gravy should be served warm, so keep it in a warm pot on the lowest stove setting while you plate. 💫
Oven vs. Stovetop Adjustments
For stovetop braising, use a heavy pot with a tight-fitting lid and maintain a gentle simmer (small bubbles, not rolling). Reduce cook time to 2-2.5 hours and check the roast every 45 minutes.
If using an electric pressure cooker (like Instant Pot), cook on high pressure for 60 minutes, then natural release for 15 minutes. For slow cookers, use the low setting for 8 hours—add 0.5 cup extra broth to compensate for evaporation. 🏆
Nutrition facts
Frequently asked questions about perfect pot roast
Can I use a different cut of beef instead of chuck roast?
For best results, stick with chuck roast as it’s ideal for slow cooking—its marbling and connective tissue create tender, flavorful meat. You could try bottom round or brisket, but they require slightly longer cooking (up to 4 hours). Avoid lean cuts like sirloin or tenderloin—they’ll dry out during the long cooking process.
How do I know when the pot roast is fully cooked?
The roast is done when it reaches an internal temperature of 203°F and can be easily pierced with a fork. For a 1.5 lb roast, this typically takes 2.5-3 hours at 325°F. The meat should pull apart easily with minimal resistance, and the juices should run clear when pierced.
What’s the best way to reheat leftovers?
Reheat leftovers gently to prevent drying. Place the roast and gravy in an oven-safe dish, cover with foil, and warm at 300°F for 20-30 minutes until heated through. For stovetop reheating, warm the gravy separately over low heat, then add the roast slices to gently absorb the flavors. Never microwave—it makes the meat tough.
Can I make this pot roast in a slow cooker?
Follow the same searing steps, then transfer everything to a slow cooker with 2.5 cups beef broth (add 0.5 cup extra to account for evaporation). Cook on low for 8 hours or high for 5 hours. The slow cooker’s gentle heat works perfectly for tenderizing the meat.
What are the best sides to serve with pot roast?
Classic pairings include creamy mashed potatoes, buttery carrots, or crusty dinner rolls to soak up the gravy. For a lighter option, try roasted Brussels sprouts or a fresh green salad. The rich flavors of the roast complement hearty sides that balance its depth—think of it as a flavor harmony!

- 5 Lb Eye Round Roast Recipe: Slow-Braised to Melt-in-Mouth Tenderness - November 3, 2026
- 3-Hour Ciabatta Bread Recipe: Crusty Chews and Airy Holes Mastered - November 3, 2026
- 5 Fruit Salad Recipe: Vibrant Rainbow Layers With No Brown Spots - November 3, 2026