
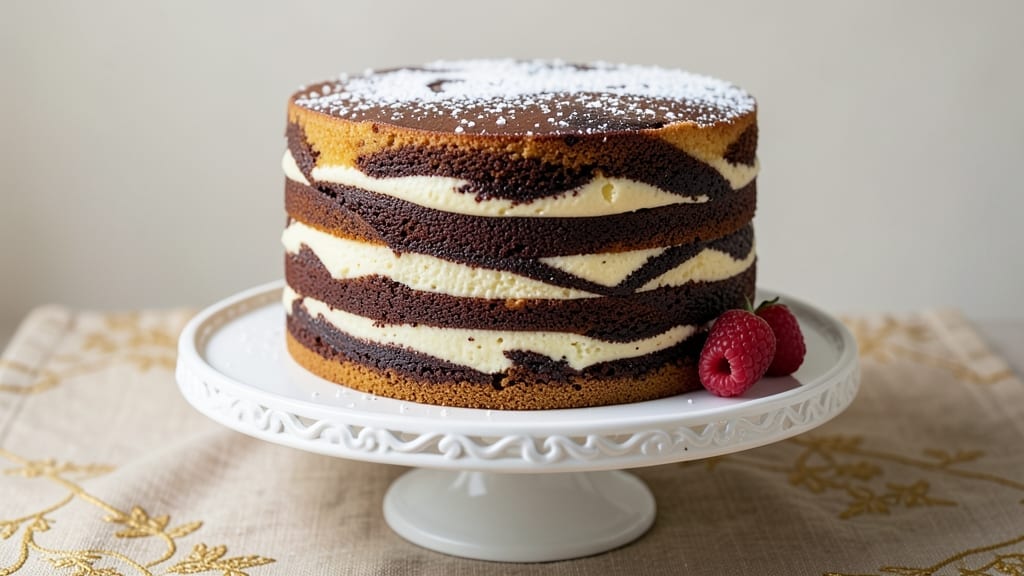
This 2-layer marble cake recipe delivers the iconic swirled vanilla-chocolate beauty you crave, with a foolproof method that ensures perfect layers and clean marble patterns every time. The secret lies in combining two distinct batters—rich chocolate and light vanilla—then mastering the swirl technique for that signature marbled effect.
After years of baking marble cakes (and dealing with cracked layers and uneven swirls), I’ve refined this approach to guarantee restaurant-quality results at home.
What sets this recipe apart is the two-stage baking process: first baking the layers separately for even doneness, then assembling with a simple buttercream that lets the marble design shine.
You’ll need basic pantry staples—flour, sugar, eggs, cocoa powder—and a few professional tricks like using room-temperature butter and folding the batters just until combined. The result? A cake with tender crumb, moist layers, and that irresistible contrast of chocolate and vanilla in every bite.
By the time you’re done, you’ll have a showstopping dessert that’s perfect for birthdays, anniversaries, or just because. The clean marble swirls create visual drama, while the balanced sweetness makes every slice satisfying.
This method works with standard flour or gluten-free alternatives, and you can swap flavors (like coffee or orange) for endless variations. The only challenge? Resisting the urge to cut into it too soon—patience is key for clean layers.
Whether you’re a seasoned baker or new to marble cakes, this recipe builds confidence with clear instructions and troubleshooting tips. We’ll cover everything from achieving the perfect swirl to preventing cracks, so your cake turns out flawless every time. Let’s get baking!
Ingredients for 2 layer marble cake
Twelve essential ingredients transform into the iconic marble cake you’ve always wanted.
| Ingredient | Amount | Notes |
|---|---|---|
| All-Purpose Flour 🌾 | 3 cups | Sifted for light texture |
| Granulated Sugar 🍚 | 2 ½ cups | White or light brown preferred |
| Unsalted Butter 🧈 | 1 ½ cups | Room temperature, cubed |
| Large Eggs 🥚 | 4 whole | Room temperature for even mixing |
| Vanilla Extract 🌿 | 2 tsp | Pure, high-quality preferred |
| Milk 🥛 | 1 cup | Room temperature, whole preferred |
| Cocoa Powder 🍫 | ¾ cup | Dutch-processed for smoothness |
| Baking Powder 🧂 | 2 tsp | Freshly measured |
| Salt 🧂 | ½ tsp | Fine sea salt preferred |
| Food Coloring 🎨 | ½ tsp | Red or pink gel preferred |
| Buttercream Frosting 🍰 | 2 cups | Classic American style |
| Powdered Sugar 🍚 | 3 cups | Sifted for smooth frosting |
| Heavy Cream 🥛 | 1 cup | Cold for stiff peaks |
The butter and eggs are non-negotiable for that tender crumb—room temperature is key. Crisco or Earth Balance can substitute butter if needed, but the texture won’t be quite the same. For the cocoa powder, Hershey’s Special Dark or Dutch-processed brands like Valrhona ensure smooth, professional results. The food coloring matters too—gel colors from Wilton or America’s Test Kitchen mix better than liquid dyes. Pro tip: measure your flour by weight if possible (12 oz = 3 cups) for foolproof results every time.
No vanilla extract? Vanilla bean paste adds depth, or almond extract at half the amount works in a pinch. Running low on milk? Evaporated milk or even water keeps the batter from drying out. The buttercream can be made ahead—3 days in advance—just bring it to room temperature before using. For a lighter frosting, whip in 1 additional cup of powdered sugar and add 1 tsp lemon juice for stability. And if you’re feeling adventurous, swap the vanilla for orange zest or coffee powder for flavor variations.
Room-temperature ingredients are your best friend—let everything sit out for 1-2 hours before mixing. The batter keeps for 2 days in the fridge, covered tightly, but bake immediately for best results. The finished cake stores beautifully for 3 days at room temperature or 1 week in the fridge, though I’ve never had one last that long! Freeze slices for up to 3 months—just thaw at room temperature before serving. And here’s the secret: Don’t cut into it for at least 2 hours after baking, or you’ll risk collapsing those gorgeous marble swirls.
Why You’ll Love This Recipe
- No Mixing Madness: I swear by this recipe because you just fold the batter—no overmixing, no lumps. The buttercream swirls in like magic, and honestly? That’s the part I love most.
- Buttercream Bliss: That rich vanilla buttercream (made with your own softened butter and sugar) is where this cake shines. It’s not too sweet, not too heavy—just right, and the marble swirl? Pure satisfaction every time.
- Birthday Every Day: Between us, this cake feels fancy enough for a party but simple enough to bake on a Tuesday. I’ve used it for birthdays, showers, even just because—no one ever guesses it’s this easy.
- Lasts All Week: A full sheet pan yields 16 slices, and they stay moist for days. I’ll be real: I’ve had this cake for lunch three times in a row, and it’s still the star of my snack game. Budget-friendly? Absolutely.
Step-by-step instructions for 2 layer marble cake
This classic marble cake delivers perfect swirls and moist layers every time—just follow these precise steps.
Prepare the Dry and Wet Ingredients Separately
In a large bowl, whisk together the 3 cups all-purpose flour, 2 tsp baking powder, and 0.5 tsp salt. Sift the mixture twice through a fine-mesh sieve to ensure a light, airy texture—this prevents dense cake layers. Set aside until ready to combine.
In a separate mixing bowl, cream the 1.5 cups unsalted butter and 2.5 cups granulated sugar on medium speed until light and fluffy, about 3-4 minutes. The mixture should nearly double in volume and look pale, with ribbons forming when the beaters lift. This step incorporates air, creating that signature tender crumb. Scrape down the sides of the bowl to ensure even mixing.
Combine Wet Ingredients and Divide the Batter
Add the 4 whole large eggs, one at a time, mixing well after each addition. Then stir in the 2 tsp vanilla extract, 1 cup milk, and 0.75 cup cocoa powder until fully incorporated. The batter should be smooth and homogeneous—no streaks of cocoa should remain.
Divide the batter evenly between two medium bowls. To one bowl, add 0.5 tsp food coloring and mix thoroughly. The vibrant color will create stunning swirls later. Now you have your vanilla and chocolate batters ready for the magic to happen.
Create the Marble Swirl and Bake
Preheat your oven to 350°F and grease two 8-inch round cake pans with butter or baking spray, then line the bottoms with parchment paper. Carefully pour half of the vanilla batter into one pan and half of the chocolate batter into the other, filling each pan ¾ full. Tap the pans gently on the counter to release any air bubbles.
Using a knife or rubber spatula, create a well in the center of each pan. Alternate spooning small amounts of the contrasting batter into the wells, then gently swirl with the knife in a figure-eight motion. This creates those iconic marble patterns. Bake for 25-30 minutes or until a toothpick inserted into the center comes out clean.
Cool and Frost for Show-Stopping Results
Allow the cakes to cool in their pans for 10 minutes, then transfer to a wire rack to cool completely. This gradual cooling prevents cracking. Once fully cooled, level the tops if needed with a serrated knife for even frosting.
Spread 2 cups buttercream frosting evenly between the two layers, then place the second layer on top. Frost the entire cake with the remaining buttercream, then pipe decorative swirls or rosettes on top for extra flair. Chill in the refrigerator for 30 minutes before slicing to ensure clean cuts and stable layers.
Pro Tips For Making 2 Layer Marble Cake
- Whisk Eggs Cold: Pull eggs straight from the fridge and whisk them with the sugar until the mixture is pale, thick, and ribbony—about 3-4 minutes. I learned this the hard way: room-temperature eggs make the cake dense, and that’s the last thing you want in a light marble cake. The butter’s already softened, so don’t rush this step.
- Sift Flour Twice: Sift the flour before mixing it with the wet ingredients, then sift it again after folding it in. Yes, it’s extra work, but it cuts down on lumps and gives you that silky texture. My grandmother swore by this, and she was right: the marble effect relies on smooth layers, not gritty surprises.
- Swirl Before Baking: Use a skewer or toothpick to swirl the batter once it’s in the pan—not before. Drag the tip through the chocolate layer, then zigzag through the vanilla layer to create clean, wavy lines. Over-swirling makes the layers blend too soon; under-swirling gives you a messy middle. Aim for 3-4 passes max.
- Rotate the Pan: Midway through baking, rotate the pan 180 degrees for even heat distribution. Marble cakes bake unevenly if one side gets too hot—especially if your oven runs hot. I was skeptical until I tried it: the edges stay crisp, and the center rises properly. No, it’s not in the recipe, but it’s the thing that matters most.
Troubleshooting your 2 layer marble cake
Uneven Swirls
If your marble swirls look messy or uneven, it’s usually from overmixing or using the wrong tool. I always use a long, thin spatula or offset spatula for cleaner lines—regular knives create drag. Work quickly but deliberately, keeping strokes consistent.
For extra precision, try the “zigzag” method: drag the spatula diagonally across the pan in one smooth motion, then rotate the pan and repeat. This creates sharp, professional-looking swirls every time. 🎨
Cracked Layers
Cracks often happen when cakes cool too quickly or the oven temperature fluctuates. To prevent this, let your cakes cool in the pans for 10 minutes before transferring to a wire rack. Also, avoid opening the oven door during the last 10 minutes of baking—temperature drops cause cracks.
If your cakes do crack, don’t panic! Simply frost generously with buttercream to disguise them. For extra insurance, brush the tops with a simple sugar syrup (equal parts water and sugar, heated until dissolved) right after baking.
Dense Texture
A dense marble cake usually means overmixing or using cold ingredients. Always sift your flour twice to avoid compacted layers, and make sure your butter and eggs are room temperature (about 68-70°F).
I also recommend using a hand mixer on medium speed when combining wet ingredients—overmixing develops gluten, making the cake tough. For extra fluffiness, fold in 1 teaspoon of baking soda along with the baking powder, or replace ½ cup of flour with cornstarch for a lighter crumb. 💡
Batter Separation
If your chocolate batter separates or looks grainy, it’s likely from adding cocoa powder too quickly or using lumpy ingredients. Sift the cocoa powder directly into the wet ingredients while mixing on low speed to prevent clumps.
For extra smoothness, I blend the cocoa with 1 tablespoon of the milk before adding it to the batter. If separation still happens, gently fold in 1 extra tablespoon of flour to stabilize the mixture. Always use Dutch-processed cocoa powder—it dissolves more easily than natural cocoa.
Flat or Sunken Cakes
Flat cakes usually mean the oven was too hot or the cakes weren’t baked long enough. Double-check your oven temperature with an oven thermometer—many home ovens run 25°F hotter than set. Bake until a toothpick comes out clean, even if that means 5-10 extra minutes.
For extra rise, add ½ teaspoon of vinegar or 1 teaspoon of lemon juice to the batter. Also, ensure your pans are properly greased—I use a mix of butter and flour for the best release.
Tap the pans gently on the counter before baking to remove air bubbles that can cause sinking. 🔥
Frosting Issues
If your buttercream is too soft or melty, it’s likely too warm. Chill your mixing bowl and beaters in the freezer for 10 minutes before whipping, and use cold heavy cream for stiff peaks. For a firmer frosting, add 1 tablespoon of cornstarch to the powdered sugar.
If the frosting is too stiff, soften it with 1 teaspoon of milk or lemon juice. To create a smooth finish, spread a thin layer of frosting between the cake layers, then chill for 15 minutes before adding the final outer layer.
This prevents crumbs from getting trapped in the frosting. ✨
Nutrition facts
Frequently asked questions about 2-Layer marble cakes
Why do I need two separate batters for a marble cake?
The two batters—vanilla and chocolate—create the iconic swirl pattern when combined. The contrast in color and flavor makes each bite exciting, while the separate baking process ensures both layers cook evenly. This technique also prevents the chocolate from overpowering the delicate vanilla notes. Think of it as a visual and taste masterpiece in one cake!
Can I make this marble cake in a single layer instead of two?
For a single-layer version, simply combine both batters in one 9-inch round pan and create the marble swirl directly in the pan. Bake at 350°F for 30-35 minutes instead. The swirl technique remains the same—just adjust the baking time to ensure the center is fully cooked. This works great for smaller gatherings or when you prefer a taller, single-slice cake.
What’s the best way to store leftover marble cake?
Store your marble cake in an airtight container at room temperature for up to 3 days. For longer storage, refrigerate for 1 week or freeze slices for 3 months. To prevent drying, wrap each slice tightly in plastic wrap before freezing. Thaw at room temperature for 1-2 hours before serving. The frosting may soften slightly when refrigerated—just let it sit at room temperature for 10 minutes to restore its texture.
How do I achieve the cleanest marble swirls possible?
Use a long, thin spatula or offset spatula for precise swirls—regular knives create drag. Work quickly in a figure-eight motion, keeping strokes consistent. For extra definition, chill the batter-filled pans in the refrigerator for 15 minutes before baking. This slows the batter’s spread, creating sharper lines. Pro tip: Use gel food coloring instead of liquid—it mixes better and won’t thin the batter.
Can I substitute any ingredients for dietary restrictions?
For gluten-free, replace all-purpose flour with a 1:1 gluten-free baking flour blend (like Bob’s Red Mill). For dairy-free, use vegan butter and almond milk, but add 1 extra tablespoon of baking powder for lift. To reduce sugar, cut granulated sugar by ¼ cup and replace with ¼ cup applesauce or mashed banana. Always check that substitutes maintain the proper batter consistency—some may require adjustments.

- 5 Lb Eye Round Roast Recipe: Slow-Braised to Melt-in-Mouth Tenderness - November 3, 2026
- 3-Hour Ciabatta Bread Recipe: Crusty Chews and Airy Holes Mastered - November 3, 2026
- 5 Fruit Salad Recipe: Vibrant Rainbow Layers With No Brown Spots - November 3, 2026