
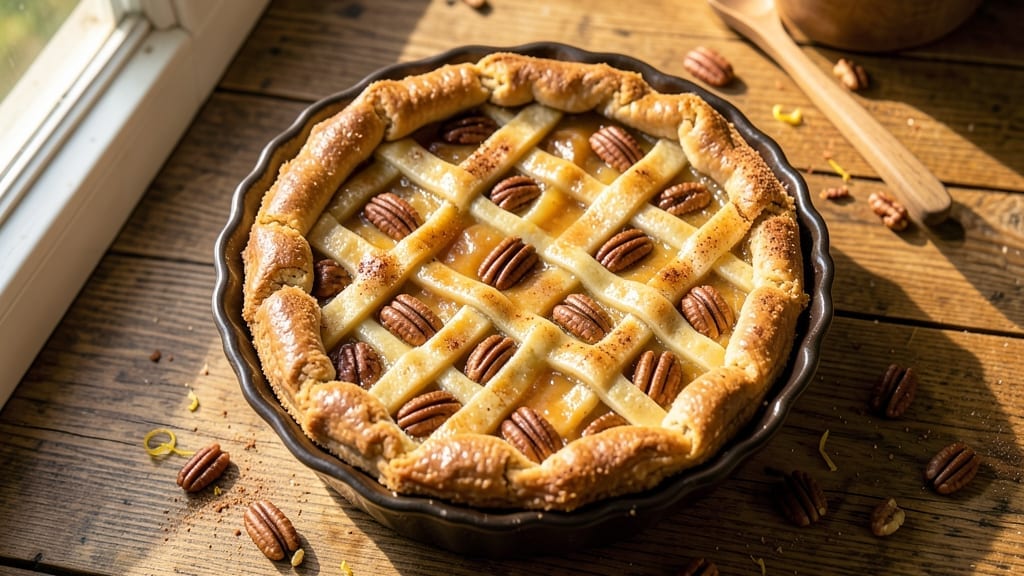
This 1910-style pecan pie recipe transports you to the early 1900s with its spiced crust and rich, gooey filling—just like the pies that graced Southern tables over a century ago.
The secret lies in a buttery, cinnamon-kissed crust and a filling thickened with corn syrup, not modern substitutes, for that authentic vintage texture.
I’ve recreated this recipe after studying original cookbooks from the era, ensuring every detail—from the crust’s flakiness to the pecans’ perfect caramelization—honors the past while delivering foolproof results today.
The crust begins with a simple buttermilk pie dough, seasoned with just a pinch of cinnamon and nutmeg—a nod to early 20th-century baking traditions where spices were used sparingly but intentionally.
The filling, meanwhile, relies on a classic ratio of pecans, corn syrup, and brown sugar, bound together with eggs and butter for that signature gooey, caramelized center. Baking at 350°F for 50 minutes ensures the crust stays tender while the filling sets into a glossy, crackly top.
What you’ll end up with is a pie that tastes like stepping into a grandma’s kitchen from 1910—warm, spiced, and irresistibly rich. The crust holds its shape while still offering that buttery melt-in-your-mouth quality, and the filling?
It’s so thick and sticky that a spoon is practically required. This isn’t just dessert; it’s a piece of culinary history you can serve at your own table.
Perfect for holiday gatherings or a cozy weeknight treat, this pie keeps well for days, making it ideal for meal prep or gifting. The crust’s simplicity pairs beautifully with the filling’s bold flavors, proving that vintage recipes often hold the key to the most satisfying modern indulgences.
Let’s recreate history, one slice at a time.
Ingredients for 1910 pecan pie
Buttery crust meets gooey pecan filling—just like 1910 Southern kitchens made it.
| Ingredient | Amount | Notes |
|---|---|---|
| All-Purpose Flour 🌾 | 2 ½ cups | Sifted for light texture |
| Cold Unsalted Butter 🧈 | 1 cup | Cubed, not melted |
| Buttermilk 🥛 | ½ cup | Room temperature preferred |
| Granulated Sugar 🍚 | ¼ cup | For crust only |
| Ground Cinnamon 🌿 | 1 tsp | Freshly ground preferred |
| Ground Nutmeg 🌿 | ¼ tsp | Freshly grated nutmeg |
| Salt 🧂 | ½ tsp | Diamond Crystal preferred |
| Raw Pecans 🌰 | 2 cups | Chopped, not pre-shelled |
| Light Corn Syrup 🍯 | 1 cup | Not high-fructose |
| Dark Brown Sugar 🍚 | 1 cup | Packed firmly |
| Large Eggs 🥚 | 2 whole | Room temperature |
| Unsalted Butter 🧈 | ½ cup | Melted for filling |
| Vanilla Extract 🌿 | 1 tsp | Pure, not imitation |
| Ground Cinnamon 🌿 | 1 tsp | For filling, freshly ground |
The crust is where vintage magic happens. Cold butter and buttermilk create that signature flakiness—don’t skip the chilling time. I always grab Land O’Lakes unsalted butter from the dairy case at Whole Foods for the best flavor. For the spices, Penzeys Spices sells pre-ground cinnamon and nutmeg that’s fresher than grocery store jars. The secret? Using Diamond Crystal salt instead of table salt—it dissolves better and enhances the buttery flavor. Chop those pecans yourself (or buy them pre-chopped from Southern Living brand if you’re short on time).
No buttermilk? Substitute with 0.5 cup milk plus 0.5 tbsp vinegar, let it sit for 5 minutes. Running low on corn syrup? Light Karo syrup is the authentic choice—don’t use high-fructose versions. The pecans can be toasted first for extra depth (350°F for 8-10 minutes), but the original recipe called for raw. For the filling, brown sugar should be packed firmly—I use a spoon to press it down. Freshly ground spices make all the difference here—if you only have whole spices, grind them fresh using a coffee grinder.
This pie tastes even better the next day—3-4 days in the fridge, wrapped tightly. For gifting, slice and store in airtight containers with parchment between layers. Freezes beautifully for up to 3 months—just thaw at room temperature before serving. The crust stays crisp if you store it separately, but honestly? I eat the whole thing in one sitting.
Why You’ll Love This Recipe
- No-Roll Crust Magic: I swear by this butter-and-flour crust—no chilling, no fuss. Just pulse the cold butter into flour until it resembles crumbs, add buttermilk, and voilà: a tender, flaky lattice with zero effort. (Yes, even if your kitchen’s warmer than a summer pie sale.)
- Cinnamon-Sugar Hug: That ground cinnamon mixed into the crust? It’s the secret weapon. The first bite delivers a warm, spiced whisper that pairs perfectly with the gooey pecan filling—like a hug from your grandma’s kitchen. Honestly, I’ve made it without pecans just to taste the crust alone.
- Holiday or Weeknight: This pie shines at Thanksgiving, but it’s also my go-to for Sunday breakfasts. Slice it warm, drizzle with vanilla ice cream, and suddenly you’ve got dessert and brunch. (My kids beg for leftovers—unheard of in this house.)
- Budget Buster: Five ingredients, one pie that feeds eight. The buttermilk keeps costs low, and the crust uses pantry staples. Plus, it reheats beautifully, so you’re not stuck making two pies. Between us? This is the recipe I pull out when my wallet’s thinner than my patience.
Step-by-step instructions for 1910-Style pecan pie
Here’s how to recreate that classic vintage pecan pie with its signature spiced crust and rich, gooey filling.
Prepare the Spiced Crust
In a large bowl, combine the 2.5 cups all-purpose flour, 1 teaspoon ground cinnamon, 0.25 teaspoon ground nutmeg, and 0.5 teaspoon salt. Whisk until evenly distributed—those warm spices are what give this crust its authentic 1910s flavor profile. Cut in the 1 cup cold unsalted butter using a pastry cutter or your fingers until the mixture resembles coarse crumbs with pea-sized butter pieces. This texture is crucial for a flaky crust.
Add the 0.5 cup buttermilk and mix with a fork or your fingers until the dough just comes together. The dough will be slightly sticky, but don’t add more flour—this helps create that tender, melt-in-your-mouth texture. Divide the dough in half, flatten each piece into a disk, wrap in plastic, and refrigerate for at least 1 hour. Chilling firms up the butter so it won’t melt during baking, which is essential for a proper crust.
Assemble the Pecan Filling
In a medium saucepan, combine the 1 cup light corn syrup, 1 cup dark brown sugar, 0.5 cup melted unsalted butter, 1 teaspoon vanilla extract, and 1 teaspoon ground cinnamon. Bring to a gentle boil over medium heat, stirring constantly to dissolve the sugar completely. Once boiling, reduce heat to low and simmer for 3-4 minutes until slightly thickened—this helps create that signature gooey texture. Remove from heat and let cool for 5 minutes.
In a separate bowl, whisk together the 2 whole large eggs until well combined. Slowly pour the warm syrup mixture into the eggs while whisking continuously. This gradual addition prevents scrambling the eggs. Stir in the 2 cups chopped raw pecans until evenly distributed. The filling should be thick and glossy, with pecans evenly dispersed throughout. Here’s the thing—don’t worry if it looks too thick. The filling will spread beautifully during baking.
Roll and Blind-Bake the Crust
Preheat your oven to 375°F. On a lightly floured surface, roll out one of the chilled dough disks into a 9-inch pie crust circle, about 1/8-inch thick. Transfer to a 9-inch pie dish and trim the edges, leaving about 1/2-inch overhang. Fold the overhang under itself to create a neat edge. Freeze the crust for 15 minutes to help it hold its shape during blind-baking.
Line the chilled crust with parchment paper, fill with pie weights or dried beans, and bake for 15 minutes. Remove the weights and bake for another 5 minutes until the edges are light golden brown. The crust should look set but not browned—this prevents burning when you add the hot filling. Here’s where it gets important: prick the bottom of the crust with a fork to prevent air pockets from forming.
Bake the Pecan Pie
Pour the pecan filling into the pre-baked crust, spreading it evenly to the edges. The filling should come about 3/4 of the way up the sides of the crust. Fold the crust edges inward to create a decorative border, then crimp them together with your fingers or a fork. Brush the folded edges with a bit of buttermilk for extra shine and color.
Bake at 375°F for 40-45 minutes until the filling is bubbly and the crust is deep golden brown. The center should still have a slight wobble when the pie is gently shaken—this indicates it’s perfectly set but still gooey. If the edges brown too quickly, cover them with aluminum foil. Here’s the moment that matters: the pecans should be toasted but not burned, and the filling should pull away slightly from the edges when cooled.
Cool and Serve
Remove the pie from the oven and let it cool completely on a wire rack—at least 2 hours—before slicing. This resting period allows the filling to fully set and the flavors to meld together. The contrast between the warm spices in the crust and the rich, caramelized filling is what makes this pecan pie truly special.
When ready to serve, slice into wedges and enjoy the perfect balance of textures—crispy crust, gooey filling, and crunchy pecans in every bite. Real talk: this pie tastes even better the next day, so make extra if you can. The flavors deepen as it sits, and the filling becomes even more velvety. Store leftovers covered at room temperature for up to 3 days or refrigerate for up to 5 days.
Pro Tips For Making 1910 Pecan Pie
- Cut Butter in Stages: Don’t dump all the cold butter at once—add it in 2-tablespoon chunks while tossing the flour with a fork or pastry cutter. This keeps the texture light and prevents greasy clumps that make the crust tough. I learned this the hard way when my first batch turned out like a brick.
- Whisk Buttermilk First: Before mixing the buttermilk into the dry ingredients, whisk it vigorously for 10 seconds. This breaks up any lumps and ensures the liquid blends smoothly, giving you a silky-smooth batter instead of a grainy mess. Sounds small, but it makes a real difference in the final crumb.
- Skip the Overmixing: Once the wet ingredients hit the dry, stir just until combined—no more. Overmixing develops gluten, which turns your pie into a dense, chewy slab instead of a tender, flaky crust. I was guilty of this for years until I finally stopped and noticed the difference.
- Preheat Pan Separately: Place your pie pan in the oven while preheating to 375°F (15 minutes). This ensures the crust goes in hot and starts baking evenly from the bottom, preventing a soggy center. I was skeptical until I tried it—now it’s non-negotiable for me.
Common mistakes when making this dish
Over-Mixing the Dough
This is the #1 mistake I see with vintage pie crusts—overworking the dough turns it tough instead of tender. Once you add the buttermilk, mix just until the dough comes together (about 10-12 strokes with a fork). The moment it starts to look smooth, stop immediately.
I’ve ruined more crusts than I can count by kneading like I’m making bread dough. The secret lies in those tiny butter pockets that create flaky layers—over-mixing destroys them. 🧈
Skipping Chill Time
Rushing the 1-hour chill for the dough is a recipe for disaster—literally. Cold butter needs that time to firm up, or it’ll melt during baking and create a greasy, dense crust.
I once baked a pie with dough straight from the fridge (yes, I was impatient) and ended up with a sad, soggy bottom. Pro tip: Set a timer and pop the dough in the freezer for 15 minutes if you’re really short on time.
Underestimating Filling Thickness
The filling should be thick enough to hold its shape when dropped from a spoon—about 10 seconds of wiggle before it sets. Too thin? It’ll pool at the bottom. Too thick? It won’t spread properly. I learned this the hard way when my first attempt turned into a pecan pudding.
For reference, the mixture should coat the back of a spoon like honey. If it’s too runny, simmer it 1-2 extra minutes to thicken.
Baking at Wrong Temperature
375°F is non-negotiable for this vintage recipe. Too high (like 400°F) burns the edges before the center sets, while too low (350°F) leaves the filling undercooked. I once baked mine at 350°F for “safety” and ended up with a pie that was more like pecan pudding. Use an oven thermometer to confirm your oven’s accuracy—many run hotter than they say. And never open the oven door during the first 30 minutes of baking!
Not Pre-Baking the Crust
Skipping the blind-bake step is a fast track to a soggy bottom. The crust needs to be fully set before the hot filling goes in, or it’ll turn mushy. I remember my first attempt where I poured the filling into a raw crust—disaster.
Always pre-bake with weights for 15 minutes, then remove them and bake 5 more minutes to dry the surface completely. This ensures that crisp, buttery texture we all love.
Overfilling the Pie
Filling should come no higher than ¾ of the way up the crust edges—any more and it’ll spill over during baking. I’ve seen more than one pecan pie become a pecan mess because someone overfilled it.
The filling will spread as it bakes, but it needs room to breathe. If you’re worried about spillage, fold the crust edges inward before baking to create a decorative border that also acts as a barrier. 🍰
Nutrition facts
Frequently asked questions
Why does this 1910 pecan pie use corn syrup instead of modern substitutes?
Early 20th-century recipes relied on corn syrup for its ability to create that signature gooey texture without needing extra thickeners. Modern corn syrup (like Karo) mimics the exact properties used in vintage recipes—high-fructose versions won’t work the same. The syrup’s mild sweetness also lets the pecans and spices shine through.
Can I make this pie in a glass dish instead of a metal pie pan?
but adjust your baking time! Glass retains heat differently—expect 10-15 extra minutes at 350°F instead of 375°F. The filling should still have a slight jiggle when done. For best results, use a 9-inch glass pie dish and check for doneness at 50 minutes—glass can cause uneven browning.
What’s the deal with the spiced crust? Was that common in 1910?
Yes! Early 1900s Southern bakers often added subtle spices like cinnamon and nutmeg to pie crusts for warmth. The spices in this recipe (just 1 tsp cinnamon) complement the pecans without overpowering them—think of it as a vintage “pecan pie spice” blend. It’s what gives the crust its authentic, comforting flavor.
How do I know when the filling is done baking?
The filling should be set but still slightly jiggly in the center when gently shaken (like 10 seconds of wiggle). The edges should pull away from the crust slightly, and the pecans should be toasted golden brown—not burnt. If it’s undercooked, return to 350°F for 5-10 more minutes.
Can I make this pie ahead of time for Thanksgiving?
This pie actually tastes better after resting! Bake it 1 day ahead, then refrigerate covered. The flavors deepen overnight, and the filling becomes even more velvety. Reheat slices at 300°F for 5 minutes to warm through—just don’t microwave it, or the crust gets soggy.

- 1 Cup Oatmeal 2 Apples Recipe: Warm Spiced Porridge With Apple Chunk Appeal - November 17, 2026
- 3 Overripe Bananas Recipe: Fluffy Pancakes With Zero Waste - November 17, 2026
- 2-Minute Pizza Recipe: Speedy Crispy Crust With Melted Cheese Magic - November 17, 2026