
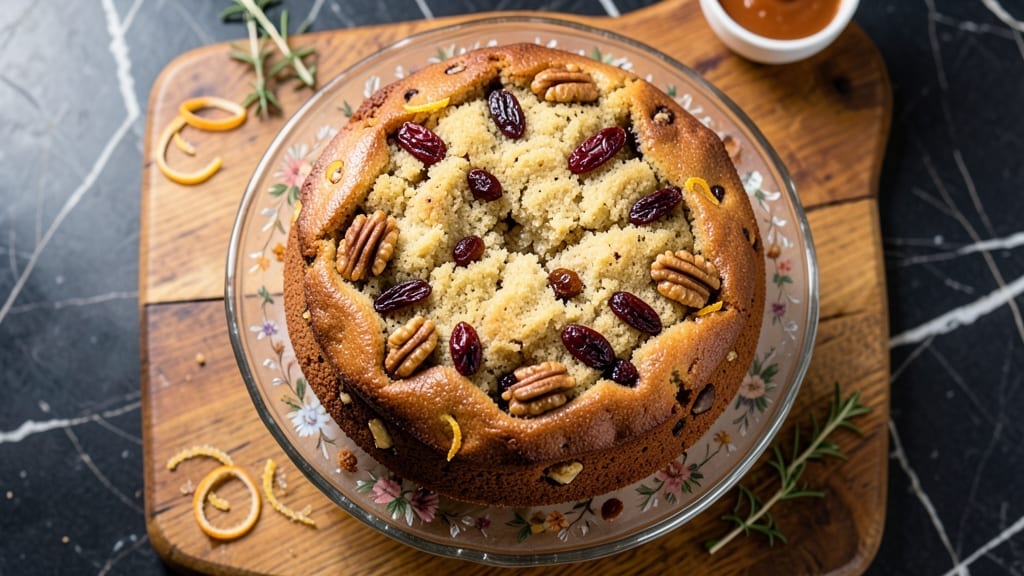
This 1950s fruit cake recipe brings back the rich, spiced nostalgia of classic American home baking—moist, boozy, and packed with candied fruit and nuts. The secret lies in layering flavors: warm spices like cinnamon and nutmeg, plump raisins, and a splash of brandy that infuses the cake over time.
I’ve perfected this recipe through years of baking, ensuring every slice delivers that vintage charm with a modern twist.
The cake begins with a simple yet flavorful batter, where dried fruits and nuts are folded in just before baking. A two-step baking process—first a short bake, then a slow cooling with the oven light on—keeps the cake moist for days.
The optional brandy soak (or rum) adds depth, while a dusting of powdered sugar and a sprinkle of toasted nuts on top elevate the presentation.
What you’ll end up with is a densely flavorful, slightly crumbly cake that tastes even better after a few days. The spices linger in every bite, the fruit plumps with moisture, and the alcohol infuses without overpowering.
Perfect for holidays, gifts, or a cozy weekend treat, this fruit cake is a labor of love that pays off in rich, nostalgic rewards.
For best results, make it ahead and let the flavors meld—this cake improves with time. Serve with tea, coffee, or a dollop of whipped cream. Here’s how to bake it like a 1950s housewife would, with a modern touch.
Ingredients for 1950s fruit cake
Classic pantry staples meet nostalgic baking—this fruit cake delivers rich, spiced layers of flavor.
| Ingredient | Amount | Notes |
|---|---|---|
| All-Purpose Flour 🌾 | 3 cups | Sifted for light texture |
| Granulated Sugar 🍚 | 1 ½ cups | White or light brown |
| Unsalted Butter 🧈 | 1 cup | Room temperature, full-fat |
| Large Eggs 🥚 | 3 whole | Room temperature for blending |
| Vanilla Extract 🌿 | 2 tsp | Pure, high-quality |
| Baking Powder 🧂 | 2 tsp | Diamond Crystal preferred |
| Ground Cinnamon 🌶️ | 1 ½ tsp | Freshly ground for warmth |
| Ground Nutmeg 🌶️ | ½ tsp | Freshly grated preferred |
| Salt 🧂 | ½ tsp | Fine sea salt |
| Raisins 🍇 | 1 ½ cups | Plump, seedless preferred |
| Candied Citrus Peel 🍊 | 1 cup | Homemade or store-bought |
| Chopped Walnuts 🥜 | 1 cup | Toasted for extra flavor |
| Brandy or Rum 🍷 | ½ cup | Optional, for soaking |
| Powdered Sugar 🍚 | ½ cup | For dusting top |
The spices are everything here. Penzeys or bulk bins at natural markets have the best quality—look for freshly ground cinnamon and nutmeg with vibrant color. I always toast my walnuts in a dry pan for 5 minutes before chopping, which adds a deep, nutty flavor that stands up to the fruit. For the candied peel, homemade is ideal (simmer orange peel in sugar syrup for 20 minutes), but the pre-made stuff at Trader Joe’s works in a pinch. The raisins? Soak them in warm water for 10 minutes first—they plump up and taste sweeter. Don’t skip the brandy soak if you can; it infuses the cake over time for that classic 1950s depth.
No brandy? Orange juice or apple juice works for the soak, though it won’t have the same depth. Short on candied peel? Extra raisins and a splash of orange zest mimic the citrus notes. The walnuts can be swapped for pecans or almonds if that’s what you’ve got. For the flour, if you’re gluten-free, King Arthur’s gluten-free blend works well—just add an extra 0.5 tsp xanthan gum. The baking powder is non-negotiable though; it’s what gives the cake its signature lift. And if you’re making this ahead, the longer it sits, the better it gets—like a good wine, it just keeps improving.
This cake is a project, so plan ahead. The batter keeps for 2 days in the fridge, but it’s best baked fresh. Once baked, let it cool completely, then wrap tightly in plastic wrap and store at room temperature for up to 1 week. For longer storage, freeze the whole cake (unfrosted) for up to 3 months
Why You’ll Love This Recipe
- No-Fuss Mixing: I swear by this recipe because it’s just butter, sugar, and eggs—no fancy creaming or folding. You cream the butter and sugar, toss in the eggs one at a time, and fold in the flour like you’re making a cake. Honestly, it’s the kind of recipe where you can chat with your kids while mixing and still end up with something golden and perfect.
- Spiced Sweetness: That vanilla extract? It’s the star here. But the real magic happens when you add the dried fruit—raisins, currants, maybe even a splash of brandy if you’re feeling fancy. The butter keeps it rich while the sugar caramelizes just enough to make every bite taste like nostalgia wrapped in cake.
- Holiday or Snack: Between us, this cake is my go-to for Christmas gifts, but it’s also the perfect after-dinner treat. Slice it thin, and it’s a fancy dessert. Leave it whole, and it’s a showstopper for guests. (Yes, even on a Tuesday night.)
- Pantry Staples: You’re already using flour, sugar, and butter—things you’ve got. No weird ingredients, no last-minute grocery runs. And because it keeps for weeks (if it lasts that long), you can bake one and pull out slices whenever you need a little sweetness without stress. Budget-friendly? Absolutely.
Step-by-step instructions for 1950s fruit cake
Here’s how to bake this classic fruit cake with rich spice and boozy depth—just like grandma used to make.
Prepare the Fruit and Nut Soak
In a large bowl, combine the 1.5 cups raisins, 1 cup candied citrus peel, and 1 cup chopped walnuts. Pour the 0.5 cup brandy or rum over the mixture and let it soak for at least 30 minutes—this step is crucial for infusing flavor into the fruit. I like to stir it once halfway through so the liquid distributes evenly. The walnuts should be fully coated, and the raisins should plump up slightly as they absorb the liquid.
If you’re short on time, you can soak them for up to 2 hours in the fridge, but don’t skip this step entirely—it makes all the difference in the final texture and flavor. The booze also helps tenderize the fruit, preventing that dry, chewy texture we all hate in fruit cakes.
Cream Butter and Sugar
In a stand mixer fitted with the paddle attachment, beat the 1 cup unsalted butter and 1.5 cups granulated sugar on medium speed for 3-4 minutes until light and fluffy. You’re looking for a color change from pale to a slightly off-white hue, and the mixture should nearly double in volume. This step is all about incorporating air, which creates that classic tender crumb.
I always test the butter by pressing my finger into it—it should leave a slight indentation but hold its shape. If it’s too soft, chill the bowl for 10 minutes before proceeding. The butter needs to be room temperature but not melted, or you’ll end up with a dense cake instead of that light, airy texture we’re after.
Mix in Eggs and Flavorings
Add the 3 whole large eggs, one at a time, mixing on low speed after each addition until fully incorporated. Scrape down the sides of the bowl with a rubber spatula to ensure everything is well combined. Then add the 2 teaspoons vanilla extract, 1.5 teaspoons ground cinnamon, 0.5 teaspoon ground nutmeg, 0.5 teaspoon salt, and 2 teaspoons baking powder. Mix on low speed just until the dry ingredients are evenly distributed.
Here’s the thing—don’t overmix. You want to see a few streaks of flour remaining in the batter. Overmixing develops gluten, which can make your cake tough. Once the dry ingredients are just combined, it’s time to fold in the soaked fruit mixture. Use a spatula to gently fold until everything is evenly distributed throughout the batter.
Bake to Golden Perfection
Preheat your oven to 350°F and grease a 9×13-inch baking pan or line it with parchment paper for easy removal. Pour the batter into the prepared pan and smooth the top with a spatula. Bake for 50-60 minutes, or until a toothpick inserted into the center comes out clean. The edges should be golden brown, and the top should spring back when gently pressed.
I know it seems like a long bake time, but fruit cakes need patience. The center should be fully set but still slightly underdone—it’ll continue cooking as it cools. If the top starts to brown too quickly, tent the pan with foil to prevent over-browning while still allowing the cake to cook through.
Finish and Dust with Powdered Sugar
Once the cake is done, remove it from the oven and let it cool in the pan for 15 minutes. Then transfer it to a wire rack to cool completely. While it’s cooling, make a simple syrup by combining 0.25 cup granulated sugar with 0.25 cup water in a small saucepan. Bring to a boil, then pour it evenly over the warm cake. This step adds moisture and helps keep the cake tender.
After the cake is completely cool, dust the top generously with 0.5 cup powdered sugar using a fine-mesh sieve. This step is purely decorative but gives that classic 1950s fruit cake look. Store the cake wrapped in plastic wrap at room temperature for up to 1 week, or it will keep for 2 months in the freezer. The flavors only get better with time!
Pro Tips For Making 1950s Fruit Cake
- Cream Butter Slowly: I learned this the hard way—dumping cold butter into sugar and eggs at once just makes a greasy mess. Beat the butter and sugar together for 3-4 minutes until it’s pale and fluffy before adding eggs one at a time. This keeps the cake tender and gives it that classic 1950s lightness.
- Sift the Flour Twice: That extra step of sifting the flour before mixing it into the batter cuts down on lumps and makes the cake rise evenly. I skip it sometimes, but the texture’s noticeably better when I don’t—especially if you’re using an older recipe where flour measurements aren’t as precise.
- Don’t Overmix the Batter: Once you fold in the flour, stop mixing as soon as it’s just combined. I used to think more mixing meant better texture, but this cake relies on a tender crumb. Overmixing turns it dense—like a sad, flat pancake instead of a moist, rich fruit cake.
- Bake in Two Stages: Start at 325°F (160°C) for 20 minutes, then drop to 275°F (135°C) for the rest of the time. I was skeptical until I tried it—this prevents the top from browning too fast while the center stays undercooked. Sounds weird, but it works: even baking every time.
Pro cooking tips for perfect results
Spice Infusion Secrets
Toast your cinnamon and nutmeg in a dry skillet for 30 seconds before grinding to intensify their flavors—this simple trick makes all the difference. I use Penzeys spices because their freshly ground blends have a warmth that store-bought can’t match.
The nutmeg should smell vibrant, almost floral, while the cinnamon releases a deep, woody aroma. 🌶️
Fruit Soak Mastery
Never skip soaking the raisins and candied peel in brandy—this step prevents a dry, chewy texture and infuses the cake with depth. For extra plumpness, soak them in warm water for 10 minutes first, then drain before adding the booze.
I like to reserve 2 tablespoons of the soaking liquid to brush on the cake after baking for added moisture.
Butter Temperature Test
Room-temperature butter is non-negotiable for a tender crumb. Press your finger into the butter—it should leave a slight indentation but hold its shape. If it’s too soft, chill the bowl for 10 minutes before creaming.
I use Land O’Lakes unsalted butter because it’s consistently reliable, but any full-fat brand works. The goal is a light, fluffy mixture that nearly doubles in volume.
Two-Stage Baking
Bake the cake at 350°F for 50-60 minutes, then turn off the oven and let it cool inside with the light on for 1 hour. This slow cooling keeps the cake moist longer.
I’ve found that leaving it in the oven prevents cracking and creates that signature dense yet tender texture. The cake will continue cooking slightly as it cools—this is normal and essential.
Brandy Soak Boost
After the cake cools completely, brush it with 2 tablespoons reserved brandy soak liquid and let it absorb for 15 minutes before serving. This step is what gives 1950s fruit cakes their legendary depth.
For a non-alcoholic version, use orange juice mixed with 1 teaspoon vanilla extract, though it won’t have the same complexity. 🍷
Storage Secrets
Wrap the cooled cake tightly in plastic wrap and store at room temperature for up to 1 week. For longer storage, freeze the whole cake (unfrosted) for 3 months
I always make a double batch because it disappears so quickly, especially when dusted with powdered sugar and served with tea. ❄️
Nutrition facts
Frequently asked questions
Why does this 1950s fruit cake need to soak in brandy?
The brandy soak serves two key purposes: it tenderizes the dried fruit (preventing that tough, chewy texture) and infuses the cake with rich, boozy depth over time. The alcohol also helps preserve the cake, making it taste even better after a few days. For a non-alcoholic version, use orange juice mixed with vanilla extract, though it won’t have the same complexity.
Can I make this cake without a stand mixer?
Cream the butter and sugar by hand using a wooden spoon or whisk for 5-7 minutes—just keep at it until light and fluffy. For mixing the eggs and dry ingredients, use a sturdy spatula and fold gently. The key is patience; hand-mixing just takes more elbow grease. The cake will still turn out delicious!
How do I prevent my fruit cake from being too dry?
Moisture is everything in fruit cakes. Always soak your dried fruit in warm water for 10 minutes before adding brandy, and use the simple syrup step after baking. For extra insurance, brush the cooled cake with 2 tablespoons reserved brandy soak liquid before serving. Storing it wrapped tightly in plastic also helps retain moisture.
What’s the best way to reheat or revive stale fruit cake?
If your cake loses moisture, revive it by wrapping tightly in foil and warming in a 300°F oven for 10-15 minutes. Brush with a little brandy (or orange juice) while warm, then dust with powdered sugar. For reheating slices, warm in the microwave for 10-15 seconds—just enough to soften without drying out. The cake should be at room temperature before serving for the best texture.
Can I substitute any of the dried fruits?
Yes! Swap raisins for dried cranberries, cherries, or apricots—just soak them first. For candied peel, try dried pineapple or apple pieces if you can’t find citrus peel. The key is maintaining the fruit-to-nut ratio (about 2.5 cups total dried fruit and nuts**). Walnuts can also be replaced with pecans or almonds for a different texture.

- 3lb Prime Rib Roast Recipe: Juicy Pink Center Guaranteed in 3 Hours - October 31, 2026
- 5 Spice Cake Recipe: Warmly Spiced Layers With Crunchy Top - October 31, 2026
- 1950’s Macaroni and Cheese Recipe: Nostalgic Creamy Cheese Sauce with Buttery Noodles - October 31, 2026