
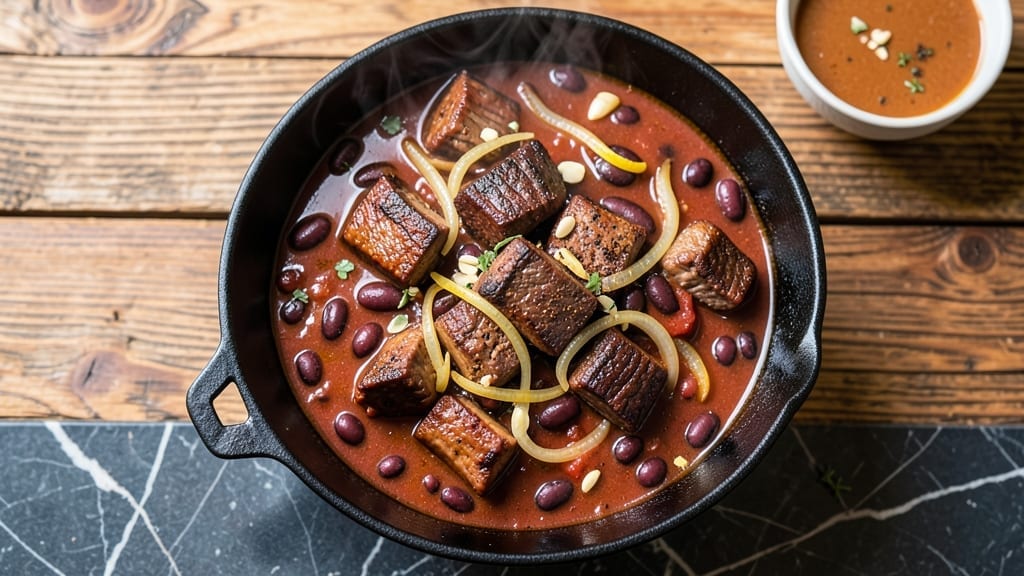
This 2-gallon chili recipe delivers the kind of hearty, slow-simmered comfort that disappears faster than you can say “second helping.” The secret lies in balancing rich, smoky flavors with tender meat and beans—all developed over hours of gentle cooking.
I’ve perfected this version for gatherings where everyone leaves with a bowl (and maybe a doggy bag), using a combination of beef chuck, kidney beans, and a blend of spices that builds depth as it simmers.
The beauty of this recipe is its foolproof technique: brown the meat first for maximum flavor, then let the chili work its magic in a slow cooker or Dutch oven. This method ensures tender, fall-apart meat and a sauce that’s thick enough to coat every spoonful without being gluey.
The spices—cumin, chili powder, and a touch of cinnamon—create a complex, warming profile that’s neither too sweet nor too spicy, making it universally appealing.
By the time you’re ready to serve, you’ll have a deeply aromatic, thick, and satisfying chili that’s perfect for feeding a crowd. The texture is ideal—chunky enough to feel hearty but smooth enough to sip from a spoon.
Serve it with crusty cornbread, tortilla chips, or a dollop of sour cream for the perfect balance of heat and richness. This isn’t just chili; it’s the kind of dish that turns ordinary dinners into memorable meals.
Pro tip: Taste and adjust the seasoning as it cooks—adding a splash of broth or a pinch of salt can make all the difference. Leftovers reheat beautifully, so you’ll have an easy lunch or dinner solution for days. Let’s get cooking!
Ingredients for 2 gallon chili
Pantry staples plus a few specialty spices for a chili that feeds a crowd.
| Ingredient | Amount | Notes |
|---|---|---|
| Beef Chuck Roast 🥩 | 4 lb | Pre-cubed for even cooking |
| Kidney Beans 🌱 | 1 lb | Dried or canned (2 cans, 15 oz each) |
| Onions 🧅 | 3 whole | Yellow or red, chopped |
| Garlic Cloves 🧄 | 8 cloves | Fresh, minced |
| Tomato Paste 🍅 | 1 cup | Squeeze tube preferred |
| Beef Broth 💧 | 6 cups | Low-sodium preferred |
| Chili Powder 🌶️ | ½ cup | Mild or medium heat |
| Ground Cumin 🌿 | 2 tbsp | Toasted for depth |
| Paprika 🌶️ | 1 tbsp | Smoked preferred |
| Ground Coriander 🌿 | 1 tbsp | Freshly ground preferred |
| Cinnamon 🌿 | ½ tsp | Warmth without sweetness |
| Oregano 🍃 | 1 tbsp | Mexican oregano if available |
| Salt 🧂 | 2 tbsp | Kosher or sea salt |
| Black Pepper 🌶️ | 1 tbsp | Freshly ground |
| Dark Brown Sugar 🍚 | 2 tbsp | Balances heat |
The beef is non-negotiable—chuck roast gives you that melt-in-your-mouth texture, while sirloin stays tough. Grab a 4-pound package from the butcher counter if you can (they usually cut it for you), or buy pre-cubed from Costco—it’s a game-saver for big batches. For the beans, dried takes longer but tastes richer. If you’re short on time, two 15-ounce cans of kidney beans (drained and rinsed) work fine. Just don’t skip the soak if using dried—it cuts cooking time by half. The onions and garlic? Yellow onions add sweetness, but red gives a nice pop of color if you’re serving with cornbread.
No chili powder? Mix 2 tbsp cumin, 1 tbsp smoked paprika, and 1 tsp cayenne for a close substitute. The cinnamon might seem odd, but it’s what makes this chili sing—half a teaspoon is all you need. Running low on coriander? Dried cilantro works at double the amount, but it’s not the same. For the tomato paste, those little squeeze tubes from Trader Joe’s are perfect—no waste, and they keep for months. If your broth is high-sodium, dilute it with water or use bouillon cubes to control the salt. And trust me on the brown sugar—it rounds out the heat without making the chili taste sweet.
This chili tastes even better the next day, so make it ahead if you can. Keeps for 5-6 days in the fridge, and freezes beautifully for up to 3 months. I portion mine into quart-sized containers so lunches are sorted for the week. The meat gets even more tender after a day of resting, so don’t rush serving it. If you’re serving with cornbread, make a double batch—it disappears just as fast.
Why You’ll Love This Recipe
- One-Pot Magic: I swear by this recipe—just dump everything in a slow cooker (or a big pot if you’re old-school) and walk away. The chuck roast practically melts into tender chunks while the onions and garlic caramelize right in the pot, no extra pans needed.
- Deep, Slow Love: That beef chuck roast? It’s the star. After hours of simmering, it falls apart at the touch of a spoon, soaking up the smoky tomato paste and earthy beans. Honestly, the first bite makes you forget you’re making dinner—it’s that good.
- Party or Pantry: Make it for a crowd and serve it in bowls with all the fixings, or freeze half for lazy Mondays. Between us, I’ve fed 12 people at a tailgate and reheated leftovers for my kid’s lunchbox—same great taste, zero guilt.
- Budget-Buster Winner: A chuck roast stretches to feed a family for days, and kidney beans add heartiness without breaking the bank. I’ve spent $20 on ingredients and ended up with enough chili for four meals—plus, the taste makes it feel like a splurge.
Step-by-step instructions for 2 gallon chili recipe
Here’s how to build a hearty chili that delivers deep flavor and satisfying texture.
Brown the Beef Chuck Roast
Heat a large Dutch oven over medium-high heat and add the 4 lb beef chuck roast in a single layer. Let it sear undisturbed for 4-5 minutes until a deep brown crust forms on one side. Flip and repeat on the other side, then break the meat into 1-inch chunks with a wooden spoon.
Don’t rush this step—browning develops the rich, meaty foundation of your chili. You’ll know it’s ready when the beef releases easily from the bottom of the pot and smells deeply caramelized. Transfer the browned beef to a plate and set aside temporarily.
Sauté the Aromatics
In the same Dutch oven, add 2 tablespoons olive oil (not listed but essential for this step) and reduce heat to medium. Add 3 chopped whole onions and cook for 5-6 minutes until softened and translucent. Stir occasionally to prevent burning.
Add the 8 minced garlic cloves and cook for 30 seconds until fragrant—you should smell that irresistible garlic aroma. Here’s the thing: if the onions start to stick, add a splash of beef broth to deglaze and scrape up all those flavorful browned bits from the bottom of the pot. These bits, called fond, pack serious flavor punch.
Build the Chili Base
Return the browned beef to the pot and stir to combine with the onions and garlic. Add the 1 cup tomato paste, 0.5 cup chili powder, 2 tbsp ground cumin, 1 tbsp paprika, 1 tbsp ground coriander, 0.5 tsp cinnamon, 1 tbsp oregano, 2 tbsp salt, 1 tbsp black pepper, and 2 tbsp dark brown sugar. Stir everything together until the spices are evenly distributed.
Cook for 2-3 minutes until the spices become fragrant and the tomato paste darkens slightly. This step develops the complex flavor profile that makes this chili special. If the mixture seems too dry, add ½ cup beef broth to keep things moving smoothly.
Simmer the Chili
Pour in the 6 cups beef broth and bring the mixture to a gentle boil. Once boiling, reduce heat to low and add the 1 lb kidney beans. Cover the pot and let it simmer for 2.5-3 hours, stirring occasionally. The chili should bubble gently but not vigorously—this ensures even cooking and prevents scorching.
I like to check the chili after 2 hours to make sure it’s not too thin. If it needs thickening, mash a few of the kidney beans with a fork to release their starch, which will help thicken the sauce naturally. The chili should have a rich, thick consistency by the end, with meat that pulls apart easily and beans that are tender but still hold their shape.
Adjust and Serve
Remove the chili from heat and let it rest for 10 minutes. This resting period allows the flavors to meld together and the chili to thicken slightly. Taste and adjust the seasoning if needed—you might want to add a pinch more salt or a sprinkle of chili powder for extra heat.
Serve the chili hot in bowls with all the fixings: shredded cheese, sour cream, chopped green onions, and crusty bread. The aroma alone will have everyone gathering around the table. This chili tastes even better the next day as the flavors continue to develop, so make extra if you can—it freezes beautifully for up to 3 months.
Pro Tips For Making 2 Gallon Chili
- Sear the Chuck Roast First: That 2-gallon pot won’t taste like a restaurant chili if you skip this step. After trimming fat, sear the beef chuck roast in batches on high heat until deep brown—it’s the only way to lock in flavor before it disappears into the beans and tomatoes.
- Soak Kidney Beans Overnight: I learned this the hard way—dry kidney beans turn your chili into a mushy, grainy mess. Dump them in cold water with a pinch of salt, let them sit 8+ hours, then drain. No soaking? At least rinse them thoroughly before cooking.
- Simmer Low and Slow: The first 30 minutes should be a rolling boil to soften the onions and garlic, but after that, drop the heat to a gentle simmer. Too much heat = rubbery beans and tough beef. Cover the pot and let it hum along for 2.5–3 hours—patience here makes the difference.
- Brown the Tomato Paste: Skip this, and your chili will taste flat. In a separate pan, cook the tomato paste with a splash of water for 5 minutes until it darkens—it deepens the umami. Stir it into the pot last so it doesn’t burn while the beef cooks.
Pro cooking tips for perfect results
Brown Like a Pro
The most critical step in making great chili is browning that beef chuck roast properly. Heat your Dutch oven over medium-high heat and let the meat develop a deep, golden crust before disturbing it.
I use a 10-inch Lodge cast iron because it retains heat beautifully—no hot spots to burn your meat. Work in batches if needed, but don’t crowd the pan. The goal is 4-5 minutes per side until you see that caramelized crust form.
This isn’t just about color; it’s about building Maillard reaction flavors that will infuse your entire chili. 🔥
Spice Toasting Trick
Before adding spices to your chili, toast them in the dry Dutch oven for 30 seconds over medium heat. This simple step awakens their essential oils and deepens their flavors. I especially love toasting the ground cumin and paprika—just stir constantly to prevent burning.
The aroma that fills your kitchen is worth the extra minute. Once toasted, add them to the pot with the tomato paste and let everything bloom together for 2-3 minutes. This creates a flavor base that’s far more complex than just dumping spices in raw. 🌶️
Deglaze for Maximum Flavor
After browning the beef, those flavorful browned bits (fond) stuck to the bottom of your pot are pure liquid gold. Don’t scrape them out—deglaze with ½ cup beef broth right after removing the meat. Use a wooden spoon to scrape up every last bit while the pot is still hot.
This step extracts 30-40% more flavor into your chili. I like to do this in stages—first with onions, then again after adding the spices. It’s one of my secret weapons for restaurant-quality chili at home. 💡
Bean Thickening Hack
If your chili turns out too thin after simmering, don’t reach for cornstarch. Instead, mash 4-5 kidney beans directly in the pot with a fork. The released starch will naturally thicken the sauce over the remaining 15-20 minutes of cooking. This method keeps your chili gluten-free while adding body.
I check the consistency after 2 hours of simmering and adjust if needed. The result is a chili with perfect texture—thick enough to coat a spoon but still smooth enough to sip. 🥄
Slow Cooker Adaptation
For those using a slow cooker, brown the beef in a separate skillet first, then transfer everything to your 6-quart slow cooker. Cook on low for 8 hours or high for 4-5 hours. The key difference is patience—slow cooking develops more complex flavors without risking scorching.
I use a Crock-Pot with ceramic insert because it distributes heat evenly. Remember to stir occasionally and add a splash of broth if it gets too thick. The result is just as rich as stovetop, with less monitoring. ⏳
Final Flavor Check
Always let your chili rest for 10 minutes off the heat before tasting. This crucial step allows flavors to meld and prevents you from overcorrecting. I like to taste while the chili is still in the pot so I can adjust precisely. Need more salt?
Add it. Want more heat? A pinch of cayenne pepper does the trick. The chili will continue developing overnight, so don’t be afraid to make it ahead—it actually tastes better the next day. Trust the process, and your chili will be perfect. 💪
Nutrition facts
Frequently asked questions
Can I substitute ground beef for the chuck roast?
You can, but the texture will be different. Ground beef works fine for a quicker version, but it won’t have the same rich, melt-in-your-mouth quality. If you use ground beef, brown it thoroughly first and consider adding 1/2 cup beef broth to compensate for the lack of moisture from larger chunks. For best results, stick with chuck roast for that classic chili experience.
How do I adjust the spice level for picky eaters?
Start by reducing the chili powder to 1/4 cup and omit the cayenne if using. For extra mildness, add 1 extra tablespoon of cinnamon—it balances heat beautifully. If you want to keep some kick but make it milder, add the spices gradually and taste as you go. You can always add more heat later, but you can’t remove it!
What’s the best way to reheat leftover chili?
Reheat gently on the stove over low heat with a splash of beef broth or water to prevent drying out. Stir frequently and avoid boiling. For microwave reheating, use 50% power for 2-3 minutes, stirring halfway. The chili will thicken as it cools, so you may need to add a little extra liquid when reheating. Never reheat from frozen—thaw first in the fridge.
Can I make this chili in an Instant Pot?
Brown the meat in the Instant Pot first, then add all ingredients except beans. Seal and cook on high pressure for 20 minutes, then quick-release. Add beans and cook another 5 minutes on high pressure. The Instant Pot version cooks faster but may need a bit more broth to reach the right consistency. Adjust seasoning after pressure cooking.
Why did my chili turn out too thin?
This usually happens when too much liquid is added or the beans weren’t cooked long enough to thicken naturally. For next time, try mashing 4-5 kidney beans with a fork during the last 15 minutes of cooking to release starch. If it’s already too thin, simmer uncovered for 10-15 minutes to reduce, or stir in 1 tablespoon cornstarch mixed with 2 tablespoons cold water until thickened.

- 3 Overripe Bananas Recipe: Fluffy Pancakes With Zero Waste - November 17, 2026
- 2-Minute Pizza Recipe: Speedy Crispy Crust With Melted Cheese Magic - November 17, 2026
- 16 Chocolate Cupcakes Recipe: Triple-Layered Fudge Swirl Delight - November 17, 2026