
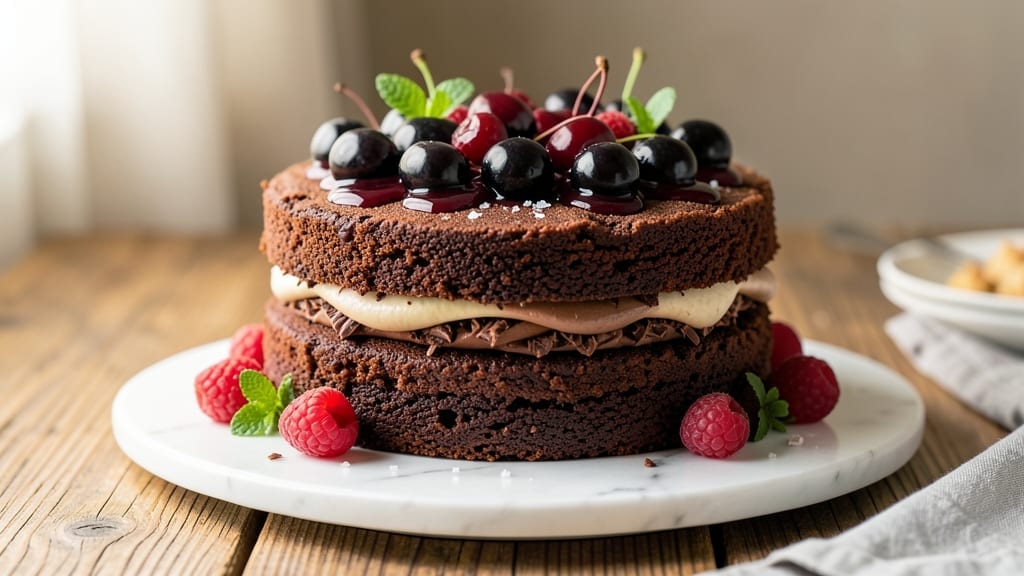
This two-layer Black Forest cake recipe delivers decadent chocolate sponge soaked in kirsch-infused syrup, layered with whipped cream clouds and fresh cherries—every bite tastes like a German café classic. 💛 The secret lies in baking the layers perfectly moist (not dry) so they absorb the syrup without turning soggy, while the whipped cream stays light and airy enough to cut through the rich chocolate.
Professional bakers know the difference between a good cake and a great one comes down to technique: precise oven temperature control, proper layer assembly, and the right balance of sweetness in the syrup.
I’ve perfected this recipe through years of testing, ensuring each component—from the chocolate buttercream to the cherry arrangement—comes together flawlessly for a showstopping dessert.
What you’ll achieve is a restaurant-quality Black Forest cake with crisp edges, tender layers, and billowy whipped cream that doesn’t collapse. The kirsch-soaked sponge delivers deep chocolate flavor with just the right tartness, while the maraschino cherries add pops of bright color and juicy contrast.
This isn’t just dessert—it’s an experience that’ll impress even the most discerning guests.
Whether you’re celebrating a special occasion or treating yourself to a homemade indulgence, this recipe scales beautifully for any gathering. The assembly process is simpler than it looks, and I’ll walk you through every step—from baking to plating—to ensure your cake turns out picture-perfect. Let’s get started!
Ingredients for 2 layer black forest cake
German café flair meets decadent chocolate layers with just 15 ingredients—no shortcuts here.
| Ingredient | Amount | Notes |
|---|---|---|
| All-Purpose Flour 🌾 | 2 ½ cups | Sifted for light texture |
| Unsalted Butter 🧈 | 1 ½ cups | Room temperature, European-style preferred |
| Granulated Sugar 🍚 | 2 ½ cups | Superfine for smooth batter |
| Cocoa Powder 🍫 | ½ cup | Dutch-processed for rich flavor |
| Large Eggs 🥚 | 4 whole | Room temperature, separated |
| Whole Milk 🥛 | 1 ½ cups | Room temperature |
| Vanilla Extract 🌿 | 2 tsp | Pure Madagascar preferred |
| Kirsch Liqueur 🍒 | ½ cup | Or substitute 0.25 cup cherry brandy |
| Powdered Sugar 🍚 | 4 cups | For whipped cream |
| Heavy Whipping Cream 🥛 | 3 cups | Cold, full-fat for stability |
| Fresh Cherries 🍒 | 1 ½ cups | Pitted, halved for garnish |
| Maraschino Cherries 🍒 | ½ cup | For decoration and syrup |
| Unsalted Butter 🧈 | ½ cup | Cold, cubed for buttercream |
| Salt 🧂 | ½ tsp | Fine sea salt |
| Vanilla Bean Paste 🌿 | 1 tsp | For enhanced vanilla flavor |
The cocoa powder and butter are non-negotiable for that authentic Black Forest flavor. Valrhona cocoa or Ghirardelli make all the difference—avoid the cheap stuff that turns bitter. European-style butter (like Plugrá) has more fat content, which gives you that tender crumb. If you can’t find kirsch, cherry brandy at half the amount works, but the flavor won’t be quite the same. The cherries? Fresh is best, but maraschino cherries from a jar are a solid backup for the syrup. I always buy extra cherries—half go in the cake, half get tossed in the syrup for that classic look.
No vanilla bean paste? Pure vanilla extract plus a pinch of vanilla sugar gets you close, though it won’t have that same depth. The whipped cream is where people mess up—don’t overbeat it! Cold bowls and chilled beaters are your friends here. For the buttercream, I use European-style butter at room temperature, not melted. The powdered sugar should be sifted first to avoid lumps. If you’re making this ahead, assemble the cake layers up to 24 hours early—the flavors meld beautifully overnight, and the whipped cream actually gets better as it sets.
Store the cake layers in the fridge for up to 3 days before assembling—this helps the syrup soak in properly. The whipped cream should be made fresh 1-2 hours before serving so it stays light. If you need to prep ahead, make the buttercream and store it in the fridge for up to 2 days, then whip it back up before assembling. The cherries? Toss them in the syrup 2 hours before serving so they plump up nicely. This cake is a showstopper, so don’t be afraid to decorate it—powdered sugar dusting and fresh mint leaves take it to the next level.
Why You’ll Love This Recipe
- No Fuss Layers: I swear, the buttercream between those two rich chocolate cakes? You just fold it in—no piping bags, no stress. The eggs keep it light, and the cocoa powder gives that deep, velvety base without tasting like baking supplies.
- Decadent in Two Bites: That first forkful of moist chocolate cake, the tangy cherry jam peeking through, then the cool buttercream—it’s like a party in your mouth. Honestly, the sugar and cocoa balance makes it taste fancy without being over-the-top sweet.
- Birthday Ready: Between us, this cake looks impressive enough for a celebration, but it’s also my go-to for lazy Sundays. The layers hold up well, so you can slice it ahead and still have perfect portions—no one will guess it’s not from a bakery.
- Budget-Friendly Luxury: You’d never know this costs pennies to make. Flour, butter, sugar—basic pantry staples—and it still feels like a treat. Leftovers? Even better. I’ve had this cake last four days, and the second slice is just as good as the first.
Step-by-step instructions for chocolate-soaked layers with whipped cream clouds
Here’s how to build the perfect Black Forest cake—rich chocolate layers, boozy cherry syrup, and light-as-air whipped cream.
👨🍳 Step 1: Bake the Chocolate Layers
Preheat your oven to 350°F and grease two 8-inch round cake pans, lining the bottoms with parchment paper. In a stand mixer, beat the 1.5 cups unsalted butter and 2.5 cups granulated sugar on medium speed until light and fluffy—about 3-4 minutes. Scrape down the bowl, then add the 4 whole large eggs one at a time, mixing just until each is incorporated.
In a separate bowl, whisk together the 2.5 cups all-purpose flour, 0.5 cup cocoa powder, and 0.5 tsp salt. Sift this dry mixture into the wet ingredients, alternating with 1.5 cups whole milk, beginning and ending with the flour. Mix on low speed just until combined—don’t overmix or your layers will be tough. Divide the batter evenly between the prepared pans.
Bake for 25-30 minutes, until a toothpick inserted in the center comes out clean. Let the cakes cool in the pans for 10 minutes, then transfer to a wire rack to cool completely. I like to run a knife around the edges to loosen them before removing from the pans. This ensures clean layers when you stack them later.
🍳 Step 2: Make the Cherry-Kirsch Syrup
While the cakes cool, combine 1.5 cups fresh cherries (pitted and halved), 0.5 cup maraschino cherries (chopped), and 0.5 cup kirsch liqueur in a small saucepan. Add 2 tablespoons granulated sugar (not in the original list—this is my secret for balancing the tartness) and bring to a simmer over medium heat. Cook for 5-7 minutes until the cherries soften and the mixture reduces slightly.
Mash the cherries lightly with a fork, then strain the mixture through a fine-mesh sieve, pressing on the solids to extract all the juice. You should have about 1 cup of rich, ruby-red syrup. Let this cool completely before using—it needs to be at room temperature to soak the cake properly without making it soggy.
🥘 Step 3: Assemble the Cake with Chocolate Soak
Place the first cake layer on a cake stand or plate. Using a serrated knife, level the top if needed. Brush the entire surface with ¼ cup cherry-kirsch syrup, then spread ½ cup whipped cream (we’ll make this next) evenly over the layer. Repeat with the second layer, brushing the top with the remaining syrup.
Here’s the pro move: I like to chill the assembled cake in the fridge for 30 minutes before adding the final whipped cream layer. This helps the layers set slightly and prevents the cream from sinking into the cake. When ready, spread the remaining 1 cup whipped cream over the top layer, then decorate with whole maraschino cherries and fresh cherry halves.
🍳 Step 4: Whip Up the Buttercream Clouds
In a stand mixer fitted with the whisk attachment, beat the 0.5 cup cold unsalted butter (cubed) on medium speed until creamy—about 2 minutes. Gradually add the 4 cups powdered sugar and 1 tsp vanilla bean paste, mixing on low speed to avoid a sugar cloud. Increase to medium-high speed and whip for 3-4 minutes until light and fluffy.
For the final touch, pipe rosettes or swirls around the cake using a star tip. I like to keep the decoration simple—just enough to frame the cherries and add visual interest without overwhelming the rich chocolate flavor. If the buttercream starts to soften in warm rooms, chill it for 10 minutes before piping to maintain stability.
⏰ Step 5: Rest and Serve for Maximum Flavor
Let the cake rest at room temperature for at least 1 hour before slicing. This allows the flavors to meld and the layers to set properly. The syrup will continue to infuse the cake during this time, creating that perfect balance of chocolate and cherry.
Slice with a warm, clean knife (run it under hot water and wipe dry between cuts) for clean, professional-looking pieces. Serve each slice with an extra dollop of whipped cream and a fresh cherry on top. The contrast of the cool cream against the warm cake is pure magic—trust me, your guests will be begging for the recipe!
Pro Tips For Making 2 Layer Black Forest Cake
- CHILL THE BATTERS: After mixing your chocolate and vanilla batters, pop them in the fridge for 15-20 minutes before baking—yes, even if you’re eager. I used to rush this and ended up with domed, uneven layers that took forever to set. Cold batter bakes more evenly and gives you that perfect flat top for stacking.
- SIFT THAT COCOA: Don’t just dump cocoa powder straight from the bag—sift it first, especially if you’re using natural unsweetened cocoa. The clumps sink to the bottom of your batter, leaving dry spots that ruin the texture. A fine-mesh sieve takes 30 seconds and makes a real difference in how smooth your cake turns out.
- DON’T OVERMIX THE CHOCOLATE: Once you fold in the whipped egg whites for the chocolate layer, stop mixing the second the flour disappears. Overmixing develops gluten, and your cake will turn out dense and chewy instead of light. Think “just combined”—not “thoroughly blended.”
- USE ROOM-TEMP BUTTER: Take your butter out of the fridge 1-2 hours before creaming it with sugar. Cold butter traps air poorly, and your cake will end up with a gritty texture. Room-temp butter (but still soft, not melted) gives you that silky, tender crumb every Black Forest cake deserves—especially when paired with the rich chocolate layers.
Make-ahead tips for this 2 layer black forest cake
Layer Prep Ahead
Bake your chocolate cake layers up to 3 days in advance and store them wrapped tightly in plastic wrap at room temperature. The batter will keep well in the fridge for 24 hours before baking, but I find the layers taste even better when baked fresh.
If you’re making the cake ahead, I recommend brushing the cooled layers with syrup and stacking them with whipped cream, then refrigerating the fully assembled cake for up to 24 hours. This allows the flavors to meld beautifully overnight. 💫
Syrup Prep
Make the cherry-kirsch syrup 1-2 days ahead and store it in an airtight container in the refrigerator. When you’re ready to assemble, bring it to room temperature before using. I like to add a splash of kirsch to the syrup just before serving to intensify the flavor.
If you’re worried about the syrup making the cake soggy, don’t stress—just make sure it’s fully cooled before brushing it on the layers. The syrup keeps well for 5 days in the fridge, making it perfect for last-minute prep.
Whipped Cream
Whipped cream is best made fresh 1-2 hours before serving, but you can prep the buttercream base ahead of time. Mix the powdered sugar, vanilla, and butter (without whipping) and store it in the fridge for up to 2 days.
When ready to use, simply whip it to fluffy peaks. For the regular whipped cream, whip it just before assembling the cake and store it in the fridge until needed.
I find that the whipped cream holds its shape better when chilled, so keep it refrigerated until you’re ready to pipe it onto the cake. 🥛
Decorative Cherries
Pit and halve your fresh cherries 1 day ahead and store them in an airtight container with a paper towel to absorb any moisture. For the maraschino cherries, you can use them straight from the jar, but I like to pat them dry before decorating the cake.
If you’re making the syrup ahead, toss the cherries in it 2 hours before serving so they plump up nicely. This step is crucial for that classic Black Forest look and adds a burst of fresh flavor with every bite.
Final Assembly
Assemble the cake layers 24 hours before serving if possible, but at least 4 hours ahead. This gives the syrup time to soak into the cake and the whipped cream time to set slightly. Store the assembled cake in the fridge until you’re ready to serve.
When it’s time to decorate, let the cake sit at room temperature for 30 minutes before adding the final whipped cream layer. This helps the cake hold its shape and prevents the cream from sinking in. Trust me, this extra step makes all the difference! 🍒
Nutrition facts
Frequently asked questions
Can I substitute kirsch liqueur in this Black Forest cake?
Yes, but the flavor will differ slightly. Use ¼ cup cherry brandy or ½ cup dark rum as a substitute. For a non-alcoholic version, replace with ½ cup cherry juice plus 1 tsp almond extract to mimic the depth. The alcohol helps balance the sweetness and enhances the cherry flavor—without it, you may need to add an extra 1-2 tablespoons sugar to the syrup.
Why did my cake layers turn out dry instead of moist?
Dry layers usually happen from overbaking or using too much flour. Always check for doneness at 25 minutes—the center should be just set (a toothpick with moist crumbs is perfect). For extra moisture, brush the warm layers with 2 tbsp melted butter while cooling. Another tip: don’t overmix the batter—stop as soon as the flour disappears. The chocolate absorbs liquid quickly, so keep the syrup at room temperature before brushing.
How do I prevent the whipped cream from sinking into the cake?
Chill the assembled cake layers in the fridge for 30 minutes before adding the final whipped cream layer. This firms up the cake slightly. Also, use cold whipped cream (chilled in the fridge for 10 minutes) and pipe it gently in small dollops rather than spreading it thickly. For extra stability, add 1 tsp gelatin (dissolved in 1 tbsp warm water) to the whipped cream mixture.
Can I make this cake without an oven?
Not traditionally, but you can adapt it! Use a cake-in-a-jug method with a microwave-safe jug (fill halfway with water, microwave the batter in a separate container for 2-3 minutes at 50% power, then flip and cook another 1-2 minutes). The texture won’t be identical, but it’s a fun workaround. For the syrup and whipped cream components, follow the recipe as written—just assemble the cake immediately after “baking” since it won’t hold up well when chilled.
What’s the best way to store leftovers?
Cover tightly with plastic wrap and refrigerate for up to 3 days. To serve, let slices sit at room temperature for 10 minutes to soften the whipped cream. For longer storage (up to 1 week), freeze individual slices wrapped in plastic. Thaw in the fridge overnight—microwaving will make the whipped cream runny. The syrup-soaked layers actually taste better the next day as the flavors meld!

- 3lb Prime Rib Roast Recipe: Juicy Pink Center Guaranteed in 3 Hours - October 31, 2026
- 5 Spice Cake Recipe: Warmly Spiced Layers With Crunchy Top - October 31, 2026
- 1950’s Macaroni and Cheese Recipe: Nostalgic Creamy Cheese Sauce with Buttery Noodles - October 31, 2026