
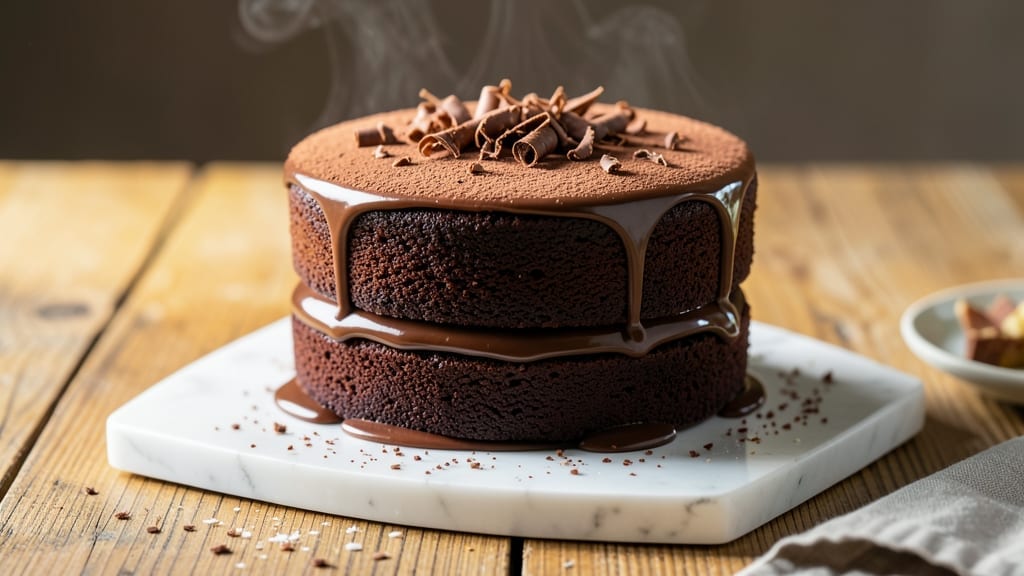
This 2-layer moist chocolate cake delivers the perfect balance of a fudgy base and velvety top layer that crumbles just enough to hold rich buttercream.
The secret lies in precise mixing techniques and the right ratio of cake flour to all-purpose flour, which creates that signature tender crumb without drying out. I’ve perfected this recipe over years of baking—it’s the one people always ask for seconds on.
What sets this cake apart is the two-stage baking process: the first layer gets a head start to set properly before adding the second batter, ensuring even rise and a clean slice.
Traditional methods like creaming butter and sugar properly and folding in eggs gently keep the texture light yet dense. For extra insurance against dryness, I incorporate a touch of sour cream into the batter, which adds moisture without altering the chocolate flavor.
The result is a cake that’s moist for days, with each layer holding its shape beautifully while still feeling indulgent. The buttercream—whether classic American or lighter Swiss meringue—stays luscious without making the cake soggy.
This recipe also adapts easily to dietary needs: swap butter for coconut oil for a vegan version, or use gluten-free flour blends for a lighter texture.
Perfect for birthdays, anniversaries, or just because, this cake builds confidence with every slice. The layers hold together perfectly when stacked, and the frosting stays smooth even in warm kitchens. Let’s get baking—your taste buds will thank you.
Ingredients for 2 layer moist chocolate cake
The perfect blend of tender crumb and rich chocolate flavor—no dry crumbs here.
| Ingredient | Amount | Notes |
|---|---|---|
| Unsalted Butter 🧈 | 1 ½ cups | Room temperature for creaming |
| Granulated Sugar 🍚 | 2 ½ cups | Superfine preferred for smoothness |
| Cake Flour 🌾 | 2 ½ cups | Lightly spooned, not sifted |
| All-Purpose Flour 🌾 | ½ cup | For structural balance |
| Unsweetened Cocoa Powder 🍫 | ¾ cup | Natural, not Dutch-processed |
| Baking Powder 🧂 | 1 ½ tsp | Freshly measured |
| Salt 🧂 | ½ tsp | Fine sea salt preferred |
| Large Eggs 🥚 | 4 whole | Room temperature |
| Sour Cream 🥛 | ½ cup | Full-fat for moisture |
| Vanilla Extract 🌿 | 2 tsp | Pure Madagascar preferred |
| Hot Water 💧 | ½ cup | For blooming cocoa |
| Buttercream Frosting 🍰 | 3 cups | Classic American style |
| Dark Chocolate Chips 🍫 | 1 cup | 70% cocoa for fudgy base |
The butter and sugar are where the magic starts. European-style butter like Plugrá or Land O’Lakes has higher fat content, which gives that signature tender crumb. Grab the superfine sugar if you can—it dissolves faster for smoother batter. Cake flour is non-negotiable for that signature tender texture, but if you’re in a pinch, mix 2.5 cups all-purpose flour with 2 tbsp cornstarch. The cocoa powder should be natural, not Dutch-processed—it reacts better with the baking soda. For the sour cream, full-fat works best—it keeps the cake moist without making it dense. I always buy mine from Whole Foods or the bakery section at Kroger.
No cake flour? Mix 2.5 cups all-purpose flour with 2 tbsp cornstarch—it mimics the texture perfectly. Dutch-processed cocoa? Add 1/2 tsp baking soda to the batter to reactivate it. Short on eggs? Flax eggs work at 1:3 ratio (1 tbsp ground flax + 3 tbsp water = 1 egg), though the texture won’t be identical. The buttercream can be swapped for Swiss meringue buttercream if you prefer a lighter option—just reduce the butter slightly. For extra richness, fold in 1/2 cup melted dark chocolate into the frosting. The chocolate chips are optional but add that classic fudgy texture to the base layer.
This cake stays moist for 5-6 days when stored properly. Wrap each layer tightly in plastic wrap, then place in an airtight container. The frosting? Keep it chilled until ready to use—it softens in warm kitchens. For make-ahead prep, bake the layers 1 day ahead, frost 4 hours before serving. Freeze unfrosted layers for up to 3 months—thaw at room temperature before frosting. The secret to clean slices? Let the cake cool completely before stacking—patience prevents crumbs.
Why You’ll Love This Recipe
- No Mixer Needed: I swear by this recipe when my stand mixer’s on vacation. Cream the butter and sugar by hand—it’s just a few minutes of elbow grease, and the result? That signature velvety texture from the cake flour and cocoa blend. Honestly, the only tool you’ll miss is a whisk.
- Rich Without Bitterness: Here’s what sold me—the cocoa powder’s not overpowering, thanks to the sugar balancing it out. The butter keeps it moist, but the cake flour gives that light, airy crumb you’d never guess came from a simple bowl. (Yes, even on a Tuesday night.)
- Party or Pajamas: This cake’s my go-to for birthdays and lazy Sundays. The layers stay fresh for days, so I can bake it ahead for gatherings or grab a slice straight from the fridge when I’m craving something indulgent. Between us, the leftovers disappear faster than I can say “second helping.”
- Budget Baking Wins: I use this recipe when I’m pinching pennies—just butter, sugar, and flour stretch far, and the cocoa powder adds luxury without breaking the bank. Plus, the two-layer method means fewer ingredients wasted, and the leftovers? They’re my secret weapon for office potlucks.
Step-by-step instructions for 2-Layer moist chocolate cake
Here’s the method for a cake that stays moist for days—no dry crumbs in sight.
Cream Butter and Sugar Until Light and Fluffy
In a stand mixer fitted with the paddle attachment, beat the 1.5 cups unsalted butter and 2.5 cups granulated sugar on medium speed for 3-4 minutes. You’re looking for a pale, thick mixture that nearly doubles in volume and leaves a trail when the beaters lift. This creaming process incorporates air, which creates that signature tender crumb.
I like to scrape down the sides of the bowl every 30 seconds to ensure even mixing. The butter should be completely smooth with no graininess, and the mixture should feel cool to the touch. If it feels warm, let it sit for 5 minutes before proceeding—this prevents the eggs from scrambling later.
Add Eggs and Sour Cream for Rich Moisture
Add the 4 whole large eggs, one at a time, mixing on low speed after each addition until fully incorporated. Then add the 0.5 cup sour cream and mix for 30 seconds until smooth. The sour cream adds moisture and prevents cracking, while the eggs provide structure.
Here’s the thing—don’t overmix. The batter should be thick but pourable. If it looks curdled after adding the eggs, don’t worry. Once you add the dry ingredients, everything will come together beautifully. The batter should be smooth with a ribbon consistency when you lift the beaters.
Combine Dry Ingredients and Fold Gently
In a separate bowl, sift together the 2.5 cups cake flour, 0.5 cup all-purpose flour, 0.75 cup unsweetened cocoa powder, 1.5 teaspoons baking powder, and 0.5 teaspoon salt. Gradually add this dry mixture to the wet ingredients on low speed, mixing just until combined—about 20-30 seconds. Overmixing develops gluten, which can make the cake dense.
Remove the bowl from the mixer and gently fold in the 1 cup dark chocolate chips using a silicone spatula. The chocolate chips add pockets of fudgy goodness throughout each layer. Then, stir in the 2 teaspoons vanilla extract and 0.5 cup hot water—this activates the cocoa powder for maximum flavor development.
Bake in Two Layers for Even Cooking
Divide the batter evenly between two 8-inch round cake pans lined with parchment paper. I use a kitchen scale for precision—each pan should get about 1 pound 8 ounces of batter. Tap the pans gently on the counter to remove any air bubbles, then smooth the tops with a spatula.
Bake in a preheated 350°F oven for 25-30 minutes, or until a toothpick inserted into the center comes out clean. The cakes should be springy to the touch and pull away from the sides of the pan easily. If the tops brown too quickly, tent loosely with foil after 20 minutes to prevent overbrowning while ensuring doneness.
Cool and Frost for Perfect Layers
Let the cakes cool in their pans for 10 minutes, then transfer to a wire rack to cool completely. This gradual cooling prevents cracking. Once fully cooled, level the tops if needed with a serrated knife. Spread 1.5 cups buttercream frosting between the layers, then cover the entire cake with the remaining 1.5 cups buttercream frosting, smoothing with an offset spatula.
The result should be a cake with a velvety texture, rich chocolate flavor, and a moist crumb that lasts for days. Serve at room temperature for the best experience—this cake tastes even better the next day as the flavors meld together.
Pro Tips For Making 2 Layer Moist Chocolate Cake
- Melt Butter Slowly: I learned this the hard way—dumping cold butter into hot liquid makes greasy lumps that ruin texture. Warm the butter in the microwave for 20-30 seconds first, then add it to the sugar while mixing. The butter will emulsify smoothly, giving you that silky batter you actually want.
- Sift That Cocoa: Unsweetened cocoa powder is a powder for a reason. Sift it with the cake and all-purpose flour before adding liquids—this prevents clumps that turn into dry pockets in your cake. I skip this sometimes, and the difference in moisture is noticeable, especially in the top layer.
- Test Doneness Early: Chocolate cake looks done before it is. Start checking for doneness with a toothpick at 25-30 minutes (depending on your oven). If it comes out clean but the edges are still slightly underbaked, tent with foil for 5 more minutes—this guarantees a moist center without a gummy mess.
- Chill the Batter: Sounds weird, but it works: let the batter rest for 10-15 minutes after mixing. This gives the flour time to hydrate fully, which means less cracking when baking and a denser, more uniform crumb. (Yes, even if you’re impatient like me—your future self will thank you.)
Make-ahead tips for leftovers
Bake Layers Ahead
Bake both cake layers 1 day ahead and store them wrapped tightly in plastic wrap at room temperature. The flavors deepen overnight, and the texture becomes even more tender.
I like to place them in an airtight container with a slice of bread to absorb any excess moisture—this keeps them perfectly fresh. 💫
Frosting Timeline
Frost the cake 4 hours before serving to allow the buttercream to set properly. If you’re short on time, assemble it 2 hours ahead and store it uncovered in the fridge.
Bring it to room temperature before serving—this prevents the frosting from melting or becoming grainy. For extra insurance, chill the frosting separately for 30 minutes before spreading.
Freezing Unfrosted Layers
Unfrosted cake layers freeze beautifully for up to 3 months. Wrap each layer individually in plastic wrap, then place them in a freezer bag with all the air squeezed out. Thaw at room temperature for 2-3 hours before frosting.
The texture remains moist, but you may need to add a touch more buttercream if the cake absorbs some of it during thawing.
Make-Ahead Frosting
Prepare your buttercream 2 days ahead and store it in an airtight container in the fridge. The flavors meld beautifully, and the texture becomes even smoother. Give it a quick beat with a hand mixer before using to restore its fluffy consistency.
For extra richness, add 1 tablespoon heavy cream when re-beating to compensate for any drying that may occur.
Transporting the Cake
If you need to transport the cake, assemble it completely 2 hours before departure and keep it in a cool car. Place it in a sturdy cake box with a layer of crumpled paper towels on the bottom to prevent shifting.
Avoid placing it near the heater or air conditioning vents—temperature fluctuations can cause the frosting to melt or sweat. For long trips, consider transporting it unfrosted and assembling it at your destination.
Reviving Stale Cake
If your cake starts to dry out, don’t toss it! Brush the top and sides with 2 tablespoons warm water or simple syrup (equal parts water and sugar heated until dissolved), then cover with plastic wrap. Let it sit for 1 hour before slicing.
The moisture will revive the crumb, and the cake will taste almost as good as new. This trick works especially well for cakes that have been stored for 3-4 days. 💡
Nutrition facts
Frequently asked questions
Why does this cake stay moist longer than others?
The secret lies in the sour cream and the right flour blend. Cake flour creates a tender crumb, while sour cream adds moisture without making the cake dense. The two-stage baking process also helps lock in moisture—each layer sets properly before adding the second batter. Plus, the buttercream stays luscious without sogginess when applied to fully cooled layers.
Can I make this cake in a 9-inch pan instead of 8-inch?
Yes, but adjust the baking time and batter quantity. For a 9-inch pan, reduce batter by about 20% and bake for 20-25 minutes at 350°F. The layers will be slightly thinner but still moist. If you want the same height, bake for 30-35 minutes instead. Always check with a toothpick for doneness.
What if I don’t have cake flour?
No problem! Replace 2.5 cups cake flour with 2.5 cups all-purpose flour minus 2 tablespoons (so 2.25 cups total). Add the missing 2 tablespoons cornstarch to mimic cake flour’s protein content. This keeps the texture tender without over-developing gluten. Sift the flour well to avoid lumps.
How do I fix cracked cake layers?
Cracks usually happen from overmixing or cooling too quickly. To fix them: spread a thin layer of frosting over the cracks, then add a second layer of frosting on top. For prevention, let the cake cool in the pan for 10 minutes before transferring to a rack. Also, ensure your oven is fully preheated and avoid opening the oven door during baking.
Can I use this recipe for a sheet cake?
Spread the batter evenly in a 9×13-inch pan lined with parchment paper. Bake for 30-35 minutes at 350°F until a toothpick comes out clean. For a two-layer effect, bake one batch, cool completely, then spread frosting and add a second thin layer of batter on top before baking again. Use a serrated knife to trim edges for clean sides.

- 5 Lb Eye Round Roast Recipe: Slow-Braised to Melt-in-Mouth Tenderness - November 3, 2026
- 3-Hour Ciabatta Bread Recipe: Crusty Chews and Airy Holes Mastered - November 3, 2026
- 5 Fruit Salad Recipe: Vibrant Rainbow Layers With No Brown Spots - November 3, 2026