
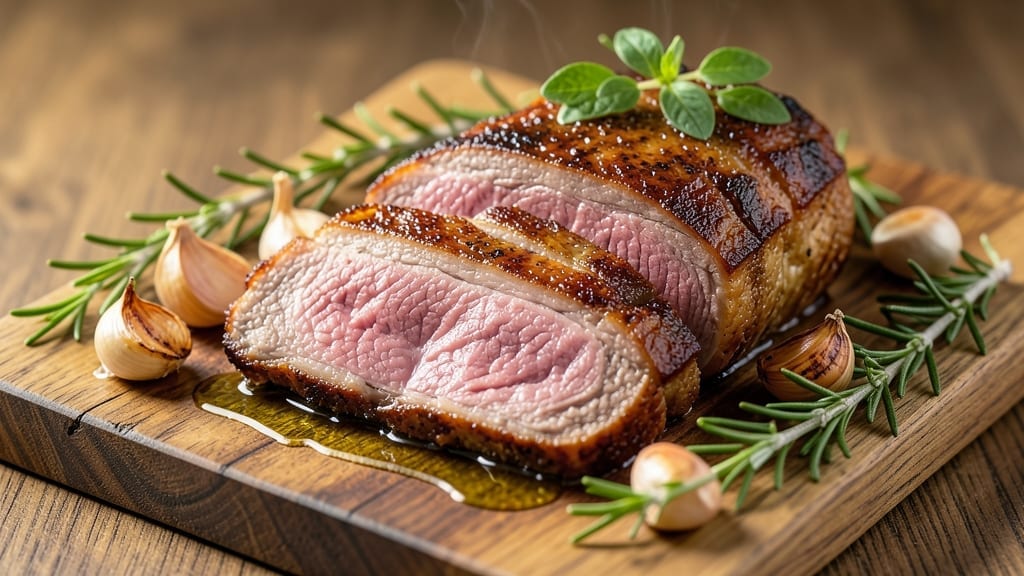
A 2 lb bottom round roast cooked perfectly in the oven transforms tough, lean beef into a juicy, tender centerpiece that steals every meal. The secret lies in slow cooking at the right temperature while keeping moisture locked in—no more dry, chewy roasts.
I’ve tested countless methods, and this approach delivers restaurant-quality results without special equipment or hours of prep.
This method relies on low-and-slow roasting at 325°F, which breaks down the tough muscle fibers while rendering fat for self-basting. A simple salt-and-pepper crust forms as the roast cooks, sealing in juices and adding flavor without overpowering the beef.
The key? A resting period that redistributes juices, ensuring every slice stays moist.
By the time you carve into this roast, you’ll find perfectly tender meat with a slight pink center—no gray, no dry spots. The exterior stays flavorful but not burnt, and the texture is so satisfying it’ll have everyone asking for seconds.
Pair it with roasted potatoes or a fresh salad for a complete meal that feels special without the fuss.
Whether you’re feeding a family or treating yourself to a weekend dinner, this recipe delivers foolproof results every time. The technique is straightforward, but the outcome is impressive—proof that great beef doesn’t require complicated methods. Let’s get started with the exact steps to make it happen.
Ingredients for 2 lb bottom round roast in oven
This short list transforms tough beef into melt-in-your-mouth perfection—no fancy ingredients, just smart technique.
| Ingredient | Amount | Notes |
|---|---|---|
| Bottom Round Roast 🥩 | 2 lb | Center-cut preferred for tenderness |
| Kosher Salt 🧂 | 1 ½ tsp | Diamond Crystal preferred for balance |
| Freshly Ground Black Pepper 🌶️ | 1 tsp | Cracked peppercorns preferred |
| Olive Oil 🫒 | 1 tbsp | Extra-virgin, for crust development |
| Garlic Cloves 🧄 | 4 cloves | Smash lightly for flavor infusion |
| Fresh Rosemary 🌿 | 2 sprigs | Fresh sprigs for aromatic depth |
| Yellow Onion 🧅 | 1 whole | Sliced into wedges for aromatics |
| Beef Broth 🍲 | ½ cup | Low-sodium preferred for balance |
| Fresh Thyme 🌿 | 2 sprigs | Or 1 tsp dried thyme |
| Butter 🧈 | 2 tbsp | Unsalted, for basting |
| Red Wine 🍷 | ¼ cup | Dry red like Cabernet preferred |
| Vegetable Oil 🫒 | 1 tbsp | For pan searing |
The bottom round roast is your star—center-cut is key for tenderness, but don’t stress if you grab a regular cut. Most grocery stores carry it in the beef case, often pre-trimmed for convenience. Look for good marbling (little white flecks) to ensure flavor. I usually grab mine from Costco when I’m doing a big batch, but the regular supermarket stuff works fine for weeknight dinners. If you’re buying a whole round, ask your butcher to cut it into a 2-pound roast for even cooking. The olive oil isn’t just for flavor—it helps create that flavorful crust we’re aiming for.
No red wine? Beef broth with a splash of balsamic works just as well. Fresh rosemary and thyme are ideal, but dried herbs at half the amount get you close in a pinch. The garlic cloves can be roasted whole with the onion for extra flavor—just smash them lightly before adding. For the onion, any yellow or red will do, but avoid sweet onions like Vidalia. The butter is crucial for basting—don’t skip the unsalted kind, or you’ll over-salt the roast. If you’re short on time, pre-slice the onion and smash the garlic ahead of time to save steps during cooking.
This roast reheats beautifully—honestly tastes better the next day once all the flavors meld. Store leftovers in an airtight container for up to 4 days in the fridge, or freeze for 3 months by wrapping tightly in plastic. I always make extra because it’s perfect for sandwiches or tacos later in the week. For best results, let the roast sit at room temperature for 30 minutes before cooking, and rest for 15 minutes after—this keeps all those juices locked in where they belong.
Why You’ll Love This Recipe
- Foolproof Timing: I swear by this method—just season, sear, and let the oven do the work. No fancy thermometers or guesswork; the garlic and salt infuse perfectly while you prep sides or wait for guests.
- Crispy-Creamy Magic: That seared crust with tender inside? It’s all in the olive oil and salt. The garlic cloves roast into sweet, fragrant bursts—like a steakhouse bite without the fuss.
- Leftover Goldmine: Slice it thin for sandwiches or toss chunks into salads. Honestly, I make this twice a month just for the leftovers—it’s my go-to for lunch prep.
- Budget Beef Boost: Bottom round’s lean but mighty, and this roast stretches to feed four for under $10. (Yes, even on a Tuesday night.) The pepper and garlic make it feel fancy without breaking the bank.
Step-by-step instructions for juicy, tender bottom round roast
Here’s how to transform tough bottom round into melt-in-your-mouth perfection with simple oven techniques.
Prep the Roast for Maximum Tenderness
Remove the 2 lb bottom round roast from the refrigerator at least 1 hour before cooking to bring it to room temperature. This ensures even cooking throughout. Pat the roast dry with paper towels—this step is crucial for developing a flavorful crust later.
Position the roast on a cutting board with the fat cap facing up. Using a sharp boning knife, trim any excess fat to about ¼-inch thickness. This leaves enough fat to baste the meat while preventing it from interfering with heat penetration. Rub the entire surface with 1 tbsp olive oil, then season generously with 1.5 tsp kosher salt and 1 tsp freshly ground black pepper, pressing the seasoning into the meat so it adheres well.
Create the Flavor Base for Braising
Heat 1 tbsp vegetable oil in a large oven-safe skillet over medium-high heat. Once shimmering, add the roast and sear for 2-3 minutes per side until golden brown. Remove the roast and set aside. In the same skillet, add the sliced yellow onion wedges and cook for 3-4 minutes until softened.
Add the 4 lightly smashed garlic cloves, 2 sprigs rosemary, and 2 sprigs thyme to the skillet. Cook for 30 seconds until fragrant. Pour in the 0.25 cup red wine and scrape up any browned bits from the bottom with a wooden spoon. Let it simmer for 2 minutes until reduced by half. This creates a flavorful base that will infuse the roast during cooking.
Braise to Juicy Perfection
Return the seared roast to the skillet along with the 0.5 cup beef broth. Place the skillet in a preheated 325°F oven and cook for 2 hours. The low temperature and liquid braising method work together to break down the tough muscle fibers, transforming the roast into tender, juicy slices.
After 1 hour, carefully flip the roast and spoon the braising liquid over it. This basting step ensures moisture and flavor penetration. The roast is done when it reaches an internal temperature of 195°F (use a meat thermometer inserted into the thickest part) and is fork-tender. The cooking time may vary slightly depending on your oven, so check periodically after the initial 2 hours.
Finish with Rich Butter and Rest
Remove the roast from the oven and transfer it to a cutting board. Tent loosely with aluminum foil and let it rest for 15-20 minutes. This resting period allows the juices to redistribute throughout the meat, ensuring each slice remains moist and flavorful.
While the roast rests, place the skillet with the braising liquid over medium heat. Add the 2 tbsp butter and whisk until melted and incorporated. Taste and adjust seasoning with additional salt and pepper if needed. The finished sauce should coat the back of a spoon and complement the rich flavor of the roast.
Slice and Serve with Confidence
After resting, slice the roast against the grain into ¼-inch thick slices. The grain direction will be visible as lines running through the meat. Serve immediately with the rich butter sauce spooned over each portion. Each slice should be fork-tender with a beautiful pink center and a flavorful, caramelized crust.
This method guarantees a bottom round roast that’s impossibly tender and juicy—no dry spots in sight. The combination of searing, braising, and proper resting transforms what could be a tough cut into a showstopping centerpiece for your meal.
Pro Tips For Making 2 Lb Bottom Round Roast In Oven
- SEAR FIRST, THEN SALT: After you sear the roast in olive oil, let it cool for 5 minutes before adding kosher salt—this keeps the crust intact instead of dissolving it into a salty paste. Trust me, that crispy exterior won’t survive if you salt it hot.
- USE WHOLE GARLIC CLOVES: Smash 4-5 garlic cloves flat with the side of your knife instead of mincing them—this releases more flavor without burning. Tuck them under the roast in the last 20 minutes of cooking for a fragrant, caramelized punch.
- DON’T CUT INTO IT: I learned this the hard way—bottom round is lean, and checking doneness with a knife releases juices that turn it dry. Use a meat thermometer (130°F for medium-rare) and let it rest 10 minutes before slicing.
- HIGH HEAT, THEN LOW: Start the roast at 425°F for 15 minutes to build a crust, then drop to 325°F—this two-stage approach guarantees a juicy center without drying out the edges. Sounds weird, but it works every time.
Wine and beer pairings for these flavors
Red Wine Pairings
A bold Cabernet Sauvignon from Napa Valley or a Malbec from Argentina is my go-to choice for this roast. The medium tannins and dark fruit notes in these wines complement the rich, savory flavors of the beef while standing up to the rosemary and thyme.
Look for a bottle with 12-14% alcohol—this range balances the wine’s structure with enough fruit to harmonize without overwhelming the dish. 🍷
Medium-Bodied Reds
If you prefer something slightly lighter, a Chianti Classico from Italy or a Syrah from the Rhône Valley works beautifully. These wines offer bright acidity and earthy undertones that cut through the beef’s richness while enhancing the herbaceous notes.
I recommend decanting for 30 minutes to let the wine breathe and open up its flavors before serving.
Beer Pairings
A Belgian Dubbel like Westmalle or a dark ale from New Belgium Brewing adds a malty, slightly sweet contrast to the roast. The caramel and chocolate notes in these beers pair wonderfully with the beef’s savory depth.
For a lighter option, a German Dunkel provides just enough body without overpowering the dish. 🍺
Non-Alcoholic Options
Don’t drink? No problem. A sparkling cranberry juice with a splash of lime mimics the acidity of wine and cleanses the palate between bites. For a more robust option, try a hibiscus iced tea—its tartness balances the richness of the roast beautifully.
Both options are refreshing and enhance the meal without alcohol.
Sauce Enhancements
If you’re serving the roast with the rich butter sauce, consider drizzling a few drops of balsamic glaze over the top for a sweet-tart contrast. This not only adds visual appeal but also harmonizes with the wine or beer pairings.
I like to serve it alongside roasted root vegetables or a simple arugula salad to round out the meal.
Nutrition facts
Frequently asked questions
Why does the recipe call for a 2-hour cook time at 325°F?
The low-and-slow method at 325°F is essential for breaking down the tough muscle fibers in bottom round while keeping it moist. Cooking for 2 hours ensures even tenderness throughout, especially since this cut has minimal marbling. The slow heat allows the natural collagen to render into gelatin, creating that melt-in-your-mouth texture.
Can I use a different cut of beef instead of bottom round?
This method works best with lean, tough cuts like chuck roast or top round, but avoid overly fatty cuts like ribeye. If substituting, increase the cooking time by 15-20 minutes since leaner meats cook faster. The key is maintaining the 325°F temperature and braising liquid for tenderness.
What if my roast is still tough after cooking?
Overcooking is the most common mistake—check the internal temperature with a meat thermometer. It should reach 195°F (not 145°F for medium). If it’s still firm, return it to the oven for 30 minutes more with an additional ¼ cup broth. The extra moisture and time will finish tenderizing it.
How do I know when the roast is done without a thermometer?
Use the fork test: Insert a fork into the thickest part—if it slides in easily with no resistance, it’s done. The juices should run clear, not pink. For extra safety, aim for 2 hours 15 minutes total cooking time at 325°F. The crust should be golden brown, not burnt.
Can I make this roast ahead of time?
Yes! This roast tastes even better reheated. Cook it as directed, then refrigerate in an airtight container for up to 4 days. Reheat by placing slices in a skillet with 1 tbsp beef broth over medium heat for 3-4 minutes per side. The flavors deepen overnight, making it perfect for meal prep.

- 6 Egg Cake Recipe with Oil: Light as Air With Buttery Moisture - October 4, 2026
- 4 Bean Casserole Recipe: One-Pan Heartiness With Smoky Paprika Depth - October 4, 2026
- 3-Ingredient Keto Mug Cake Recipe: Microwave Magic in 2 Minutes - October 4, 2026