
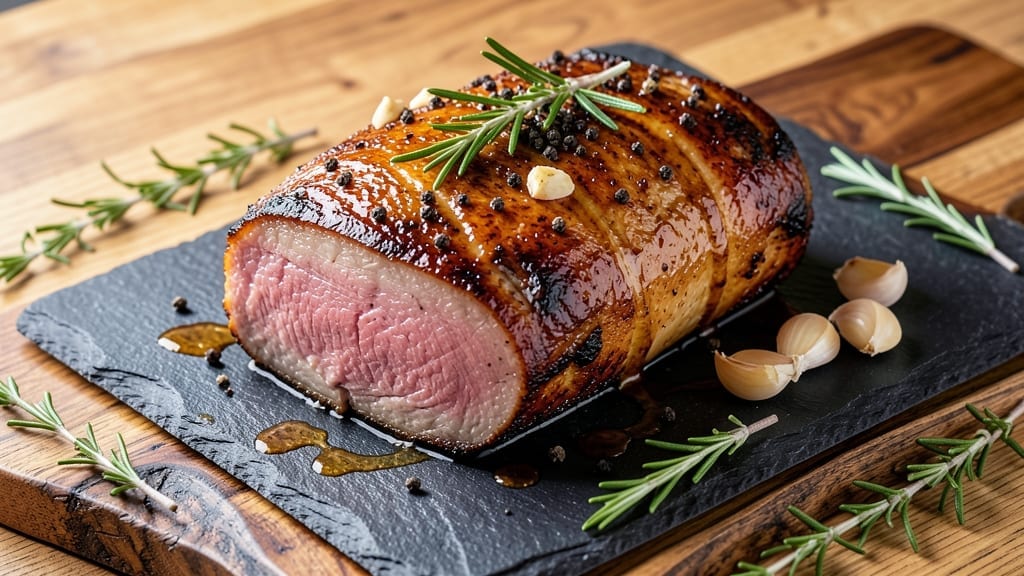
A 2 lb bottom round roast transformed into juicy pink perfection is the game-changer you need for weeknight dinners or special occasions. This lean cut deserves special treatment—reverse-searing unlocks its full potential by balancing tenderness and flavor without drying it out.
The secret lies in low-and-slow cooking followed by a high-heat sear, creating a crust that seals in moisture while keeping the interior tender and pink.
What sets this method apart is the precision: we’ll use a 300°F oven for even cooking, then finish with a 450°F sear for that coveted crust. A simple brine enhances moisture retention, while garlic and herbs infuse flavor without overpowering the beef’s natural taste.
This approach delivers restaurant-quality results at home, turning a budget cut into a standout main course.
The result is a roast with a caramelized exterior and a juicy pink center—tender enough to slice easily but firm enough to hold its shape. The reverse-sear method ensures even cooking throughout, eliminating the risk of dryness that often plagues lean cuts.
Serve with roasted vegetables or a fresh salad to complete the meal.
Perfect for feeding four, this recipe scales easily for larger gatherings while maintaining consistency. The technique is foolproof, making it ideal for both beginners and experienced cooks. Let’s get started on a roast that will impress everyone at the table.
Ingredients for 2 lb bottom round roast
Precision ingredients transform a budget cut into restaurant-quality reverse-seared beef perfection.
| Ingredient | Amount | Notes |
|---|---|---|
| Bottom Round Roast 🥩 | 2 lb | Center-cut preferred for tenderness |
| Kosher Salt 🧂 | 1 tbsp | Diamond Crystal preferred for purity |
| Black Peppercorns 🌶️ | 1 tbsp | Freshly cracked for robust flavor |
| Garlic Cloves 🧄 | 6 cloves | Smashed for even infusion |
| Fresh Rosemary 🌿 | 1 sprig | Woody stems removed |
| Fresh Thyme 🌿 | 1 sprig | Leaves only, stems removed |
| Extra-Virgin Olive Oil 🫒 | 2 tbsp | High-quality for crust development |
| Yellow Onion 🧅 | 1 whole | Thinly sliced for garnish |
| Unsalted Butter 🧈 | 2 tbsp | Cold for final sear |
| Red Wine Vinegar 🍷 | 2 tbsp | For pan deglazing |
| Beef Tallow or Duck Fat 🥄 | 1 tbsp | For extra crust development |
| Fresh Parsley 🌿 | ¼ cup | Chopped for garnish |
The bottom round roast is the star—center-cut pieces deliver superior tenderness. Most butchers will trim excess fat for you, but request it if your store doesn’t. For the absolute best quality, source from a reputable specialty butcher like D’Artagnan or your local high-end grocer’s meat department. The roast should have good marbling and a vibrant red color—anything grayish indicates age. If using frozen, thaw in the fridge overnight for even cooking. The herbs should be fresh and aromatic—Whole Foods or Trader Joe’s carry excellent quality, or grow your own if you’re feeling ambitious. Rosemary and thyme should smell piney and earthy, respectively, with no musty notes.
No fresh rosemary? Dried works at half the amount, but the flavor will be more subdued. Substituting garlic? Garlic powder at one-third the amount suffices, though fresh is ideal. For the sear, butter alone works, but adding tallow or duck fat creates a deeper, more complex crust—Costco sells duck fat in bulk for this purpose. The red wine vinegar can be swapped for balsamic vinegar if unavailable, though it’ll have a slightly sweeter profile. The onion is purely decorative, so use whatever’s on hand—yellow, red, or even shallots work. For a vegetarian-friendly garnish, roasted mushrooms add an elegant touch without compromising the beef’s star status.
Store any unused herbs in damp paper towels wrapped in plastic for up to 5 days in the fridge. The roast itself should be used immediately after purchase for peak tenderness, but can be refrigerated for 3-4 days if wrapped tightly in butcher paper. For longer storage, vacuum-seal and freeze for up to 6 months. The rendered fat from the searing can be saved in a jar and reused for future cooking—just strain it through a fine-mesh sieve after cooling. Portion leftovers into single-serving containers for easy reheating; they keep well for 3-4 days in the fridge or 3 months frozen. Reheat gently in a 350°F oven with a splash of water to prevent drying.
Why You’ll Love This Recipe
- Rosemary Magic: That sprig of fresh rosemary tucked into the roast? It infuses the meat with a woodsy, herby depth that turns simple beef into something special. (Yes, even my picky husband notices.)
- Leftover Hero: This roast practically begs to be sliced thin for sandwiches or chopped into tacos the next day. Honestly, I make it on Sundays just so I can enjoy it twice.
- Budget Powerhouse: Bottom round is lean, affordable, and still delivers big flavor—no fancy cuts needed. Between us, this is how I feed my family well without breaking the bank.
Step-by-step instructions for reverse-seared bottom round roast
This method guarantees a perfectly juicy pink center with a flavorful crust every time.
Prep and Season the Roast
Remove the bottom round roast from its packaging and pat it dry thoroughly with paper towels. This step is critical—any moisture on the surface will prevent proper browning. Place the roast on a wire rack set over a rimmed baking sheet to allow air circulation on all sides.
In a small bowl, combine the 1 tablespoon kosher salt and 1 tablespoon black peppercorns. Crush the peppercorns lightly with the flat side of a knife to release their oils. Rub this mixture evenly over the entire surface of the roast, pressing firmly so the seasoning adheres. Let the seasoned roast sit at room temperature for 30 minutes before cooking—this ensures even cooking throughout.
Low-Temperature Oven Roast to Medium Doneness
Preheat your oven to 275°F. Place the seasoned roast on the wire rack and insert a meat thermometer into the thickest part of the roast. Roast for 2 to 2.5 hours, rotating the roast halfway through cooking, until the internal temperature reaches 135°F. This slow cook ensures the roast develops even tenderness without drying out.
During this time, prepare the aromatics. In a small skillet over medium heat, warm the 2 tablespoons extra-virgin olive oil. Add the 6 smashed garlic cloves, 1 sprig fresh rosemary (woody stems removed), and 1 sprig fresh thyme (leaves only). Cook for 2 minutes until fragrant but not browned. Remove from heat and set aside.
Rest and Prepare for Final Sear
Remove the roast from the oven and transfer it to a cutting board. Tent loosely with aluminum foil and let it rest for 15 minutes. This resting period allows the juices to redistribute throughout the meat, ensuring maximum tenderness when sliced. While it rests, thinly slice the 1 whole yellow onion using a mandoline or sharp knife for even slices.
In a separate small bowl, combine the 2 tablespoons red wine vinegar and the 1 tablespoon beef tallow or duck fat. Whisk to emulsify—this mixture will create a glossy finish on the roast during the final sear. Keep the roast and all prepared components at room temperature for the next step.
High-Temperature Sear for Crust and Color
Increase your oven temperature to 450°F. Place the rested roast on a clean wire rack set over a rimmed baking sheet. Brush the roast evenly with the red wine vinegar and beef tallow mixture. This step creates a flavorful crust while keeping the interior juicy.
Roast the beef for 15 to 20 minutes, rotating the roast every 5 minutes, until the internal temperature reaches 140°F and the surface develops a deep golden-brown crust. During the last 2 minutes of searing, add the 2 tablespoons cold unsalted butter to the baking sheet. The butter will melt and baste the roast, adding richness and shine.
Garnish and Serve Immediately
Remove the roast from the oven and let it rest for an additional 10 minutes on a cutting board. This final rest ensures the juices remain inside the meat. Slice the roast against the grain into ¼-inch thick slices for maximum tenderness.
Garnish each serving with the thinly sliced yellow onion and the garlic-herb mixture prepared earlier. Finish with the 0.25 cup chopped fresh parsley for a pop of color and freshness. Serve immediately while the crust is still crisp and the interior remains juicy pink.
Pro Tips For Making 2 Lb Bottom Round Roast
- SEAR HARD FIRST: Get that roast screaming hot in a dry pan—no oil needed—until deep brown crust forms on all sides. I learned the hard way that skipping this step means bland, gray meat, even with rosemary and garlic. Two minutes per side, no rush.
- SALT THE GARLIC: Crush those garlic cloves with a pinch of kosher salt before smashing them into the meat. The salt breaks down the garlic’s cell walls, releasing more flavor directly into the roast. (Yes, it sounds weird, but it works—trust me.)
- REST IT WRAPPED: After pulling the roast from the oven, wrap it in a clean kitchen towel and foil for 10 minutes. The towel catches moisture while the foil keeps it warm—no sad, dry slices when you cut into it. (Your future self will curse you if you skip this.)
- STEAM THE ROSEMARY: Tuck the rosemary sprigs under the roast, not on top—let the heat steam the needles instead of burning them. Overcooked rosemary tastes like hay, and nobody wants that. A few sprigs, buried, make all the difference.
Regional styles of 2 lb bottom round roast
Texas-Style Smoked Roast
In Texas, the bottom round roast becomes a showstopper when smoked low-and-slow with a mix of hickory and oak chips.
Start by applying a dry rub of 2 tbsp coarse kosher salt, 1 tbsp black pepper, 1 tbsp smoked paprika, and 1 tbsp brown sugar—this creates that signature bark. Smoke at 225°F until internal temp hits 140°F (about 3-4 hours).
Finish with a 450°F oven sear for 10 minutes to lock in those smoky flavors. Serve with pickled red onions and creamy coleslaw for the full Texas BBQ experience. 🌶️
Italian-Inspired Osso Buco
For an Italian twist, transform your bottom round into a tender osso buco-style roast. After the initial 275°F oven roast to 135°F, sear in a Dutch oven with 2 tbsp olive oil, 4 garlic cloves, 1 sprig rosemary, and 1 sprig thyme.
Deglaze with ½ cup dry white wine and add 1 cup beef broth to create a rich sauce. Finish with 1 tbsp tomato paste and 1 bay leaf, then simmer until the roast reaches 140°F. Garnish with lemon zest and fresh basil for an elegant touch. 🍷
Korean-Inspired Bulgogi Roast
Marinate your bottom round roast overnight in a blend of 3 tbsp soy sauce, 2 tbsp brown sugar, 1 tbsp sesame oil, 1 tbsp grated ginger, 4 garlic cloves, and 1 tbsp gochujang for a Korean-inspired bulgogi flavor.
After the 275°F oven roast to 135°F, sear in a cast-iron skillet with 1 tbsp sesame seeds and thinly sliced green onions. Serve with steamed jasmine rice and quick-pickled cucumbers for a bold, umami-packed meal. 🌟
French Classic Entrecôte
For a French bistro-style approach, after the initial oven roast, sear the beef in 2 tbsp butter and 1 tbsp duck fat until a deep golden crust forms. Deglaze the pan with 2 tbsp brandy and reduce by half.
Finish with 1 tbsp Dijon mustard and 1 tbsp chopped shallots. Serve with buttery mashed potatoes and sautéed green beans for a classic French dinner. 🥖
Mexican Carnitas-Style Roast
After the 275°F oven roast, shred the beef slightly and return it to the oven with 1 tbsp lard, 1 tbsp cumin, 1 tbsp oregano, and ½ cup chicken broth.
Cook until the liquid reduces and the beef becomes tender and shreddable. Serve in warm tortillas with avocado slices, pickled jalapeños, and sour cream for a delicious carnitas-style roast. 🌮
Nutrition facts
Frequently asked questions
Why does this recipe use reverse-searing for bottom round?
Bottom round is a lean cut that can dry out easily with traditional methods. The reverse-sear technique—low-and-slow cooking followed by a high-heat sear—creates a perfect balance. The initial 275°F oven phase gently tenderizes the meat while the final 450°F sear builds a flavorful crust without overcooking the interior. This ensures a juicy pink center with maximum tenderness.
Can I cook this roast in a slow cooker instead?
Yes! For a slow cooker version, season the roast as directed, then cook on LOW for 6-8 hours until the internal temperature reaches 135°F. Finish with a quick sear in a hot skillet with butter and garlic for that restaurant-quality crust. Just be sure to use a meat thermometer for accuracy.
What if my roast doesn’t reach 135°F after 2.5 hours?
If your roast isn’t hitting 135°F after 2.5 hours, check your oven temperature with an oven thermometer—many ovens run 25°F hotter or cooler than set. If your oven is accurate, extend cooking time in 15-minute increments until it reaches 135°F. For extra tenderness, you can also add 1-2 tablespoons of beef broth to the baking sheet during the final sear.
How do I know when the roast is done without a meat thermometer?
While a meat thermometer is ideal, you can use the “touch test” for a rough estimate. Press the roast gently with your finger: if it feels very firm (like pressing a tennis ball), it’s likely 140°F and ready. For 135°F, it should feel slightly less firm but still firm to the touch. Remember, bottom round benefits from being cooked to a lower internal temperature than more tender cuts.
Can I make this recipe ahead of time?
Yes! Cook the roast as directed, then let it cool completely before slicing. Store in an airtight container in the refrigerator for up to 3 days. For serving, reheat slices in a skillet with a splash of beef broth until warmed through (2-3 minutes per side). The texture will be slightly firmer but still delicious. For best results, reheat only what you plan to serve immediately.

- 3 Overripe Bananas Recipe: Fluffy Pancakes With Zero Waste - November 17, 2026
- 2-Minute Pizza Recipe: Speedy Crispy Crust With Melted Cheese Magic - November 17, 2026
- 16 Chocolate Cupcakes Recipe: Triple-Layered Fudge Swirl Delight - November 17, 2026