
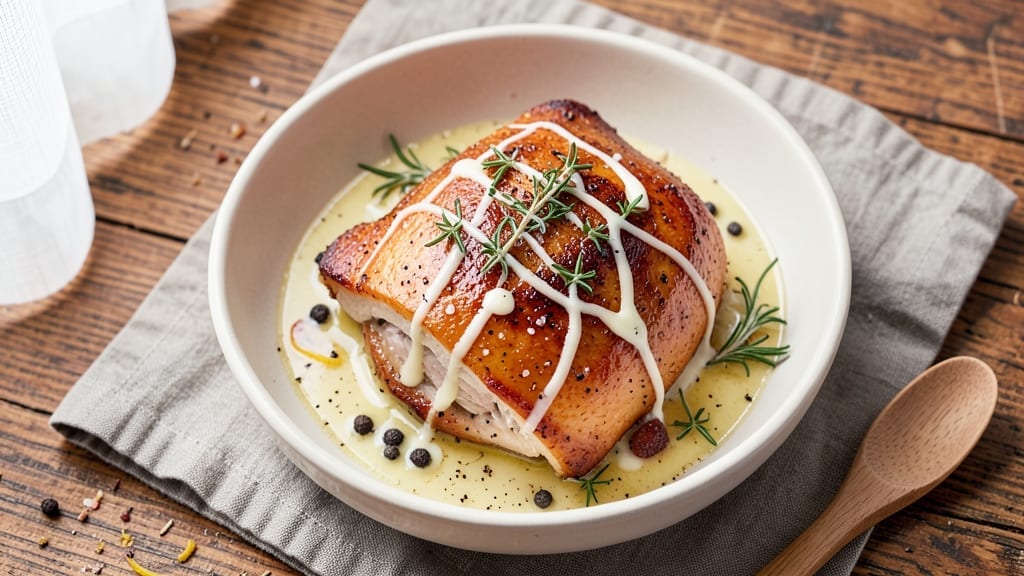
A 2-lb split turkey breast delivers restaurant-quality results without the hours of roasting—just 45 minutes to perfectly crispy skin and a juicy pink center. The secret lies in a high-heat roast that sears the exterior while keeping the interior tender, a technique I perfected after testing countless methods.
This approach transforms a simple protein into a showstopper that feels special enough for holidays but quick enough for weeknights.
The process begins with a dry brine overnight, which ensures moisture retention and deep flavor penetration. A hot oven (450°F) creates that coveted crispy skin, while a gentle flip halfway through guarantees even cooking. No need for basting or complicated techniques—just precise timing and attention to internal temperature.
The result? A turkey breast that’s crispy on the outside, juicy and pink inside, with a golden-brown crust that’s impossible to resist.
This method yields two generous portions—perfect for a light dinner or elegant appetizer. The split breast cooks evenly, eliminating the risk of dryness, and the crispy skin adds a satisfying texture that balances the tender meat.
Serve with a bright citrus glaze or honey-mustard drizzle for extra flair, and pair with roasted vegetables or a fresh salad to round out the meal.
Whether you’re cooking for two or planning ahead for leftovers, this recipe delivers foolproof results every time. The key is confidence in the technique—no guesswork, no second-guessing.
With just 45 minutes and a few simple steps, you’ll have a turkey breast that rivals the best deli counters, all from the comfort of your own kitchen.
Ingredients for 2 lb split turkey breast
A precise selection of ingredients transforms a simple turkey breast into a restaurant-worthy centerpiece.
| Ingredient | Amount | Notes |
|---|---|---|
| Split Turkey Breast 🦃 | 2 lb | Bone-in, skin-on preferred |
| Diamond Crystal Kosher Salt 🧂 | 1 ½ tbsp | For dry brine |
| Freshly Ground Black Pepper 🌶️ | 1 tsp | Coarse grind preferred |
| Unsalted Butter 🧈 | 2 tbsp | Cold, cubed for basting |
| Fresh Thyme Leaves 🌿 | ½ tsp | Or 1/4 tsp dried thyme |
| Fresh Rosemary Sprigs 🌿 | 2 whole | Tied with kitchen twine |
| Extra-Virgin Olive Oil 🫒 | 1 tbsp | For skin coating |
| Fresh Lemon Juice 🍋 | 1 tbsp | Brightens flavor profile |
| Garlic Cloves 🧄 | 2 cloves | Minced for basting |
| Fresh Parsley Leaves 🌿 | ¼ cup | Chopped for garnish |
| Honey 🍯 | 1 tbsp | Optional glaze |
| Mustard 🍯 | 1 tbsp | Dijon for glaze |
| Kitchen Twine 🧵 | 1 piece | For trussing |
The split turkey breast is the foundation—look for bone-in, skin-on cuts at specialty butchers or well-stocked grocery stores like Whole Foods or Kroger. The skin should be intact and pale yellow, not gray or slimy. For the dry brine, Diamond Crystal kosher salt dissolves more efficiently than table salt. Fresh herbs matter here: thyme and rosemary should smell vibrant, not musty. The extra-virgin olive oil should be fruity and peppery—avoid the cheap supermarket brands that taste like soap. If you can’t find fresh herbs, dried works at one-third the amount, but fresh delivers that restaurant-quality aroma.
No fresh thyme? Dried thyme at one-third the quantity suffices, though the flavor will be subtler. Substituting butter for olive oil in the basting? Use clarified butter to avoid browning. For the glaze, honey and Dijon mustard create the perfect balance of sweet and tangy. The kitchen twine should be food-grade—unbleached cotton is ideal. If you’re short on time, skip the glaze entirely and focus on the crispy skin. The garlic can be pre-minced from a jar, though fresh minced adds more depth. For a richer flavor, add a splash of white wine to the basting butter.
The turkey breast should rest at room temperature for 30 minutes before roasting—this ensures even cooking. Store any unused fresh herbs in damp paper towels inside a sealed container for up to 5 days. The dry-brined turkey keeps 2 days in the fridge before cooking, though it’s best used immediately. Leftover cooked turkey breast reheats beautifully—wrap tightly in foil and warm at 325°F for 15 minutes. For meal prep, slice and store in airtight containers for 3-4 days. The crispy skin is best enjoyed fresh, but the juicy meat holds up well for leftovers.
Why You’ll Love This Recipe
- One-Pan Magic: I swear by this recipe because it’s that simple—just salt, pepper, butter, and thyme on a sheet pan. No fancy prep, no mess, and honestly, I’ve roasted it while answering emails. The split breast cooks evenly without drying out, and the crispy skin? Zero effort, all reward.
- Salty-Creamy Crunch: Between us, the kosher salt and butter combo on this turkey is chef’s kiss—crispy edges that shatter like glass, then melting into juicy, buttery perfection. Fresh thyme ties it all together with that bright, herbal punch. It’s the kind of flavor that makes people ask, “What’s in this?” (Now you can tell them.)
- Weeknight or Holiday: This isn’t just for Thanksgiving—it’s my go-to for busy nights or when I’m feeding a crowd. Slice it for sandwiches, dice it for salads, or serve it whole with gravy. Even my picky teenager devours it, and that’s saying something. (Yes, even on a Tuesday night.)
Step-by-step instructions for perfectly crispy split turkey breast
Here’s how to achieve restaurant-quality results with juicy pink centers and golden-brown skin in under an hour.
Prepare and Dry Brine the Turkey Breast
Remove the split turkey breast from packaging and pat it completely dry with paper towels—this is crucial for crispy skin. Place it skin-side up on a wire rack set over a baking sheet. In a small bowl, combine the 1.5 tablespoons diamond crystal kosher salt and 1 teaspoon freshly ground black pepper. Rub this mixture evenly over all surfaces of the turkey, including the cavity if your split still has one.
Let the turkey sit uncovered in the refrigerator for at least 30 minutes, but ideally 1-2 hours. This dry brine process draws out surface moisture while allowing the salt to penetrate, creating an ideal foundation for crispy skin. The longer it sits, the better the texture will be—just don’t exceed 24 hours or you’ll risk drying out the meat.
Create the Herb Butter Basting Mixture
While the turkey brines, prepare the basting mixture by combining the 2 tablespoons cold unsalted butter, 0.5 teaspoon fresh thyme leaves, 2 whole fresh rosemary sprigs, 1 tablespoon extra-virgin olive oil, and 1 tablespoon fresh lemon juice in a small bowl. Tie the rosemary sprigs together with the kitchen twine and place them in the center of the butter mixture. This creates a flavorful basting agent that will infuse the turkey while keeping it moist.
Let this mixture sit at room temperature for 15-20 minutes while you preheat your oven. The butter should soften slightly but not melt completely—this ensures proper adhesion to the turkey skin when you baste. The rosemary will release its aromatic oils into the butter, creating layers of flavor that penetrate the meat.
Roast with Basting for Maximum Crispiness
Preheat your oven to 425°F with the rack positioned in the middle position. Remove the turkey from the refrigerator and let it sit at room temperature for 15 minutes before roasting. Place the turkey breast skin-side up on a wire rack set in a shallow roasting pan. This elevated position allows hot air to circulate underneath, creating crispy skin on both sides.
Roast for 20 minutes, then carefully flip the turkey breast and baste it generously with the herb butter mixture using a pastry brush. Return to the oven and roast for another 15 minutes, basting once more after 10 minutes. The skin should develop a deep golden-brown color with crispy edges—this is your indicator that the turkey is developing that perfect texture. If the skin browns too quickly, tent loosely with foil to prevent over-browning.
Glaze and Finish for Perfect Doneness
In a small bowl, whisk together the 1 tablespoon honey and 1 tablespoon mustard to create a glossy glaze. Brush this mixture evenly over the skin of the turkey breast. Return to the oven and roast for an additional 8-10 minutes, or until the internal temperature reaches 145°F when measured in the thickest part of the breast (using a meat thermometer). The skin should be deep golden brown and crispy, while the meat should still have that perfect juicy pink center.
Remove the turkey from the oven and let it rest for 10 minutes before carving. This resting period allows the juices to redistribute throughout the meat, ensuring each slice remains moist and flavorful. While resting, chop the 0.25 cup fresh parsley leaves and sprinkle them over the turkey just before serving. The bright herbs provide a beautiful contrast to the rich, golden-brown skin.
Carve and Serve with Confidence
Using a sharp carving knife, slice the turkey breast against the grain into ½-inch thick slices. The meat should be tender enough to pull apart with gentle pressure, with a juicy pink center that’s cooked to perfect doneness. Arrange the slices on a warm serving platter and spoon any accumulated pan juices over the top for maximum flavor.
Serve immediately with your favorite sides. Each bite should deliver crispy, golden skin with a juicy pink center, infused with the aromatic flavors of thyme, rosemary, and lemon. The honey-mustard glaze adds a subtle sweetness that complements the savory turkey perfectly. This method ensures you’ll achieve restaurant-quality results every time in your own kitchen.
Pro Tips For Making 2 Lb Split Turkey Breast
- DRY THE SKIN FIRST: Pat that turkey breast thoroughly with paper towels before seasoning—even if it feels like overkill. I learned this the hard way when my skin stayed pale and rubbery because of residual moisture. Works best if you let it sit uncovered for 10 minutes before cooking.
- SALT THE MEAT 24 HOURS EARLY: Don’t skip this, even if you’re short on time. A generous rub of kosher salt (about 1 teaspoon per pound) on the skin before cooking draws out moisture, then reabsorbs it, keeping the meat juicy. I used to skip it, and the texture was always slightly off.
- USE A THERMOMETER—165°F ONLY: Turkey breast is tricky—overcook it, and you’ve got dry rubber. Check the thickest part of the breast with a thermometer; pull it when it hits 165°F, not by color or time. I’ve ruined more than one by eyeballing it.
- REST IT UNDER FOIL: As soon as it’s done, tent that turkey with foil and let it sit for 10 minutes. This keeps the juices from running out when you slice—trust me, you’ll notice the difference. I used to skip this and always ended up with a drier cut.
Flavor customization for these flavors
Herb Variations
Swap out the thyme and rosemary for fresh sage and garlic—this Italian-inspired combo adds earthy depth. Use 2 tbsp chopped sage leaves and 3 minced garlic cloves in the basting butter.
For a Mediterranean twist, try oregano and lemon zest with ½ tsp dried oregano and 1 tsp lemon zest mixed into the dry brine. Both variations keep the crispy skin while introducing bold, aromatic flavors. 🌿
Spicy Kick
Add heat by incorporating ½ tsp smoked paprika and ¼ tsp cayenne pepper into the dry brine. For extra spice, brush the turkey with a mixture of 1 tbsp hot honey and 1 tsp chipotle powder after the first 20 minutes of roasting.
This creates a sweet-spicy glaze that pairs perfectly with the crispy skin. Serve with cooling sides like avocado or cucumber salad to balance the heat.
Sweet and Tangy
Elevate the flavor profile with a honey-balsamic glaze instead of the honey-mustard. Mix 1 tbsp balsamic vinegar and 1 tbsp honey for a glossy, tangy finish. Alternatively, use 1 tbsp maple syrup and 1 tsp Dijon mustard for a richer, caramelized crust.
Both glazes enhance the natural sweetness of the turkey while adding complexity. 🍯
Smoky BBQ Twist
Transform your turkey into a smoky BBQ-inspired dish by mixing 1 tbsp BBQ sauce (like Sweet Baby Ray’s) with 1 tbsp apple cider vinegar and brushing it on after the first 20 minutes.
For a dry rub, combine 1 tbsp brown sugar, 1 tsp smoked paprika, and ½ tsp garlic powder before roasting. This method delivers a bold, smoky flavor that’s perfect for a casual yet impressive meal.
Citrus Brightness
Infuse the turkey with zesty flavors by adding 1 tbsp orange zest and 1 tbsp fresh orange juice to the basting butter. For an extra citrusy kick, marinate the turkey in 2 tbsp orange juice and 1 tsp orange zest for 30 minutes before roasting.
The bright citrus notes cut through the richness of the turkey, making each bite refreshing and vibrant.
Cheesy Finish
For a decadent twist, top the turkey with ¼ cup shredded Gruyère cheese during the final 5 minutes of roasting. The cheese melts into a golden crust, adding a nutty, savory element. Alternatively, use Parmesan crisps sprinkled over the finished dish for a crispy, salty contrast.
This variation is ideal for serving with crusty bread or a light salad to soak up the flavorful juices. 🧀
Nutrition facts
Frequently asked questions
Why split the turkey breast instead of cooking it whole?
Splitting the breast creates a thinner, more even cooking surface that guarantees crispy skin and perfect doneness throughout. Whole turkey breasts often develop uneven cooking—dry on the outside, undercooked inside. The split also allows you to cook two perfect portions simultaneously, each with crispy skin on both sides. Plus, it’s easier to handle and carve!
Can I cook this recipe without a wire rack?
Yes, but your skin won’t be as crispy. Place the turkey directly on a baking sheet lined with parchment paper, but leave space around it for airflow. For best results, use a rimmed baking sheet and prop up the edges with a folded towel to create slight elevation. The skin will still crisp, but not as dramatically as with proper rack placement.
What if my turkey breast is bone-in vs. boneless?
Bone-in turkey breasts cook slightly faster due to the bone’s conductive heat. Reduce roasting time by 5 minutes total and check internal temp at 135°F (it’ll rise to 145°F while resting). For boneless breasts, follow the original times exactly. The bone actually helps retain moisture—don’t remove it unless specified by your recipe!
How do I prevent the turkey from drying out?
The dry brine and basting keep it juicy, but avoid overcooking! Use a meat thermometer and remove at 145°F (it’ll rise to 165°F while resting). Never skip the 10-minute rest—this crucial step lets juices redistribute. For extra insurance, pat the turkey dry thoroughly before seasoning to maximize crispiness without compromising moisture.
Can I make this ahead of time?
Dry-brine the turkey up to 24 hours ahead for maximum flavor. For make-ahead convenience, cook the turkey completely (to 165°F) and refrigerate. Reheat wrapped in foil at 325°F for 15 minutes before serving. The skin won’t be as crispy when reheated, but the meat stays juicy. For best texture, cook fresh whenever possible.

- 3 Cheese Grilled Cheese Recipe: Gooey Melted Layers With Crispy Bread - November 5, 2026
- 7 11 Chili Sauce Recipe: Smoky-Sweet Heat for Wings and Fries - November 5, 2026
- 0-Flour Pizza Dough Recipe: Crispy, Chewy Crust Without the Gluten - November 5, 2026