
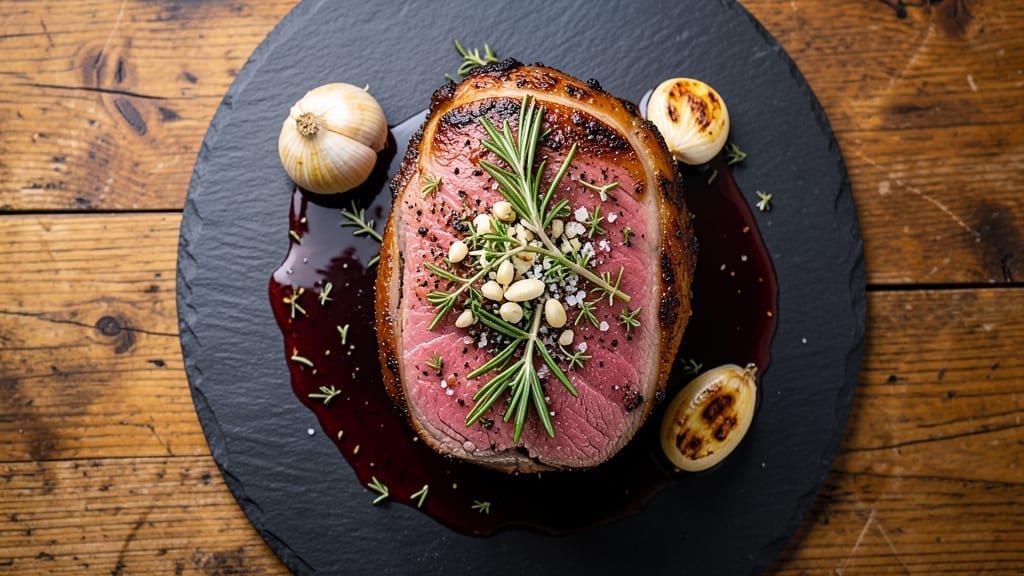
A 2 lb tenderloin roast cooked to a perfect juicy pink core with a flavorful herbed crust is the centerpiece of any special dinner. The secret lies in precise temperature control and a resting period that locks in every drop of moisture—no dry, overcooked steak here.
This method delivers restaurant-quality results at home, where the crust seals in the natural richness of the beef while keeping the interior tender and succulent.
The process begins with a dry-brined herb crust that forms a flavorful barrier, protecting the meat as it roasts. Using a meat thermometer ensures accuracy, with a target internal temperature of 125°F for medium-rare—just enough time to finish searing for that perfect crust.
The resting period is non-negotiable; it allows the juices to redistribute, ensuring each bite is moist and flavorful. This isn’t guesswork—it’s a foolproof technique that transforms a simple cut into an unforgettable main course.
What you’ll end up with is a tender, juicy roast with a golden, herbed crust that crackles with every bite. The pink center remains perfectly cooked, while the exterior delivers layers of savory, aromatic flavor.
This is the kind of dish that makes guests ask for seconds and leaves them raving about your cooking skills. Pair it with garlic mashed potatoes or a rich red wine reduction for a complete, showstopping meal.
Ready in about 1 hour and 15 minutes—including prep and resting time—this recipe is ideal for weekend dinners or holiday feasts. The method is straightforward, but the results are anything but ordinary. Let’s get cooking!
Ingredients for 2 lb tenderloin roast
Twelve ingredients for a restaurant-worthy roast with a golden herbed crust and juicy pink center.
| Ingredient | Amount | Notes |
|---|---|---|
| Beef Tenderloin Roast 🥩 | 2 lb | Center-cut, trimmed of silver skin |
| Fresh Rosemary 🌿 | ¼ cup | Finely chopped, fresh preferred |
| Fresh Thyme 🌿 | ¼ cup | Leaves only, stems removed |
| Fresh Garlic 🧄 | 6 cloves | Minced, for crust |
| Diamond Crystal Kosher Salt 🧂 | 1 ½ tbsp | Coarse grain preferred |
| Freshly Ground Black Pepper 🌶️ | 1 tsp | Coarsely cracked |
| Extra-Virgin Olive Oil 🫒 | 2 tbsp | High-quality, fruity |
| Unsalted Butter 🧈 | 2 tbsp | Cold, cubed |
| Yellow Onion 🧅 | 1 whole | Thinly sliced, for garnish |
| Red Wine Vinegar 🍷 | 1 tbsp | For finishing drizzle |
| Fresh Parsley 🌿 | ⅛ cup | Chopped, for garnish |
| Meat Thermometer 🌡️ | 1 whole | Instant-read preferred |
The beef tenderloin is the star, and center-cut, silver-skin-trimmed is non-negotiable for tenderness. Whole Foods or high-end butchers carry the best cuts—look for vibrant color and good marbling. If you’re buying whole, trim the silver skin yourself for a cleaner finish. The herbs should be freshly chopped (dried won’t give the same aromatic punch), and Penzeys or local markets often have the best quality. Prep the crust ingredients ahead: finely chop the rosemary and thyme, mince the garlic, and measure your salt and pepper precisely—this dry-brine method is what creates that perfect flavorful crust.
No fresh rosemary? Dried rosemary at half the amount works, but the texture won’t be as luxurious. Swap the thyme for oregano or marjoram if needed, though thyme’s piney notes are ideal here. The olive oil and butter form the crust’s fat base—don’t substitute with vegetable oil, as it lacks the richness. For the finishing drizzle, red wine vinegar cuts through the richness beautifully, but balsamic glaze is a great alternative. The meat thermometer is critical; an instant-read model ensures you hit that 125°F internal temp without overcooking. If you don’t have one, err on the side of undercooking slightly—it’ll rise 5-10°F while resting.
The roast should rest 15-20 minutes after cooking—this is where the magic happens as juices redistribute. Tent loosely with foil to keep it warm but allow airflow. Store leftovers in an airtight container for up to 3 days in the fridge, or freeze for 3 months by wrapping tightly in butcher paper. For presentation, slice against the grain and garnish with the onion slices and parsley just before serving. The crust will crisp up again slightly when reheated, so reheat gently in the oven rather than the microwave.
Why You’ll Love This Recipe
- Zero-Chop Prep: I swear by this—just slather the tenderloin with softened butter, crushed garlic, and a sprinkle of rosemary and thyme. No dicing, no mincing, just a quick rub that takes less time than waiting for the oven to preheat. Honestly, the hardest part is deciding whether to roast it or sear it first.
- Herb-Crusted Magic: That crispy, golden crust from the kosher salt and fresh herbs? It’s the secret weapon. The rosemary adds piney brightness, the thyme brings warmth, and the garlic—oh, the garlic—makes every bite taste like you spent hours in the kitchen. (Between us, it’s foolproof.)
- Weeknight or Weekend Star: This roast works for everything. Toss it on the table for a fancy dinner with minimal fuss, or slice it into sandwiches the next day. My kids even ask for it on Sundays when I’m too tired to grill—yes, even on a Tuesday night.
- Leftovers That Don’t Suck: Most roasts turn into sad, dry scraps, but not this one. The tenderloin stays juicy, and the flavor only gets better after resting. I’ll prep extra just to have it for quick lunches or toss it into pasta—no one misses the “fresh” roast. Solid move.
Step-by-step instructions for 2 lb tenderloin roast
Mastering this cut requires precision timing and technique to achieve the signature pink center.
Prepare the Herb Crust and Season the Roast
In a small bowl, combine the 0.25 cup fresh rosemary, 0.25 cup fresh thyme, 6 cloves minced garlic, 1.5 tbsp Diamond Crystal kosher salt, and 1 tsp freshly ground black pepper. This aromatic blend will create the signature herbed crust that seals in moisture.
Pat the 2 lb beef tenderloin roast completely dry with paper towels—this critical step ensures maximum browning. Rub the herb mixture evenly over all surfaces, pressing firmly so the seasoning adheres. Let the roast sit at room temperature for 30 minutes before cooking to promote even heat distribution throughout the meat.
Sear the Roast for Maximum Flavor Development
Preheat your oven to 425°F. Heat a heavy oven-safe skillet over medium-high heat and add 2 tbsp extra-virgin olive oil. Once shimmering, add the 2 tbsp cold cubed butter and let it foam for 30 seconds before removing from heat.
Carefully place the seasoned roast in the skillet and sear for 2 minutes per side until golden brown. The butter will baste the meat as it cooks, creating a flavorful crust. Transfer the skillet to the preheated oven and roast for 10 minutes to establish an initial crust before adjusting to 375°F for the remainder of cooking.
Cook to Perfect Medium-Rare Doneness
Return the oven to 375°F and continue roasting, using the meat thermometer to monitor internal temperature. For a juicy pink center, remove the roast when it reaches 120°F—this is the critical temperature for medium-rare tenderness. Total cooking time should be approximately 25-30 minutes from the initial sear.
Here’s the key: the roast will continue rising 5-10°F after removal from heat. If you prefer slightly more done meat, aim for 125°F internal temperature. Never exceed 130°F or you risk drying out this delicate cut. The internal temperature should read 120-125°F when you remove it from the oven.
Rest and Prepare for Serving
Transfer the roast to a cutting board and tent loosely with aluminum foil. Let it rest for 15 minutes at room temperature—this crucial step allows juices to redistribute throughout the meat. During this time, thinly slice the 1 whole yellow onion and set aside for garnish.
After resting, slice the roast ¼-inch thick against the grain for maximum tenderness. Drizzle with 1 tbsp red wine vinegar and sprinkle with 0.125 cup chopped fresh parsley just before serving. The acidity of the vinegar brightens the rich beef flavors while the parsley adds fresh contrast.
Pro Tips For Making 2 Lb Tenderloin Roast
- Sear First, Then Roast: After burning three batches of tenderloin, I learned to sear the roast hard in a screaming-hot pan for 3-4 minutes per side before moving it to the oven. That crust locks in juices—no more dry, sad meat. (Yes, even if you’re impatient like me, wait for the pan to smoke.)
- Trim the Fat, Not the Flavor: Tenderloin’s fat is minimal, but leave a thin layer on the edges—it renders into flavor. Skip the aggressive trimming unless you’re going for a leaner cut, and save yourself cleanup. (I used to over-trim and wondered why my roast tasted bland.)
- Salt the Night Before: Tenderloin absorbs salt like a sponge. Sprinkle it generously (about 1.5 tsp Diamond Crystal per pound) and let it sit uncovered in the fridge for 12-24 hours. The meat stays juicier, and the crust forms better. (Your future self will thank you.)
- Use a Meat Thermometer: Guessing medium-rare on a 2 lb roast is a recipe for disaster—it’s small enough that overcooking happens fast. Pull it at 125°F internal temp (130°F for medium), then let it rest. (I learned this after slicing a gray, rubbery roast. Never again.)
Common mistakes when making your 2 lb tenderloin roast
Overcooking the Roast
I cannot stress enough how easy it is to overcook tenderloin—this lean cut dries out quickly if you push past 130°F internal temperature. Many home cooks remove the meat too late, thinking it needs more time.
Trust your instant-read thermometer and pull it at 120-125°F for medium-rare. The roast will continue rising 5-10°F while resting, so don’t wait for it to reach your desired temperature in the oven. 🌡️
Skipping the Resting Period
The 15-20 minute rest is non-negotiable—this is when juices redistribute from the center to the edges. I’ve seen cooks slice into roast immediately after cooking, only to find it dry and disappointing.
Tent loosely with foil and let it rest completely before cutting. Patience here makes all the difference in texture and flavor.
Uneven Seasoning Application
When you rub the herb mixture over the roast, make sure every surface gets even coverage. I’ve seen roasts where one side was heavily seasoned while others were nearly bare, leading to inconsistent flavor.
Press the seasoning firmly into the meat and don’t skip any areas. The crust should be uniform all around for balanced flavor in every bite.
Using the Wrong Pan
A thin, flimsy skillet won’t handle the heat needed for proper searing. Use a heavy, oven-safe skillet like All-Clad Stainless or Lodge Cast Iron to conduct heat evenly. Thin pans can cause uneven cooking and make it difficult to establish that crucial initial crust.
The pan should be hot enough to sizzle when you add the roast.
Ignoring Room Temperature Prep
Letting the roast sit at room temperature for 30 minutes before cooking ensures even heat distribution throughout the meat. I’ve seen cooks skip this step, thinking it’s not important, only to end up with uneven doneness.
The center may remain cold while the exterior cooks too quickly. This prep step is especially critical for larger cuts.
Cutting Against the Grain Incorrectly
Tenderloin has muscle fibers that run in one direction, and cutting against the grain is essential for tenderness. I’ve seen people slice perpendicular to the fibers, resulting in chewy, stringy meat.
Look for the natural grain pattern when you slice the roast, then cut at a 45-degree angle against it. This simple technique transforms the texture completely. 💡
Nutrition facts
Frequently asked questions
What’s the best temperature for cooking a 2 lb tenderloin?
Start with a 425°F oven for searing, then reduce to 375°F for the remainder. The key is removing it at 120-125°F internal for medium-rare—this lean cut rises 5-10°F while resting. Never exceed 130°F or you’ll dry it out!
Can I cook this roast without a meat thermometer?
You can try, but it’s risky! For a 2 lb roast, aim for 25-30 minutes total at 375°F after searing. The crust should be golden and internal color should show slight pinkness. If unsure, err on the underdone side—it’s better than overcooking this delicate cut.
How do I know when the roast is fully rested?
The 15-20 minute rest is complete when the internal temperature has stabilized (check with your thermometer). You’ll know it’s ready when the juices run clear when you pierce the thickest part with a knife. The crust should also firm up slightly during resting—this is your visual cue!
What if I don’t have fresh herbs?
Use ½ tsp dried rosemary and ½ tsp dried thyme instead of fresh, but increase the garlic to 8 cloves for extra flavor. The crust will be less aromatic but still delicious. For best results, toast the dried herbs in a dry pan for 30 seconds before mixing with salt and pepper.
How should I store leftovers?
Slice the roast completely and store in an airtight container for up to 3 days in the fridge. For longer storage, wrap individual slices in plastic wrap, then place in a freezer bag for up to 3 months. Reheat gently in a 325°F oven for 10-15 minutes to maintain moisture—never microwave!

- 6 Egg Cake Recipe with Oil: Light as Air With Buttery Moisture - October 4, 2026
- 4 Bean Casserole Recipe: One-Pan Heartiness With Smoky Paprika Depth - October 4, 2026
- 3-Ingredient Keto Mug Cake Recipe: Microwave Magic in 2 Minutes - October 4, 2026