
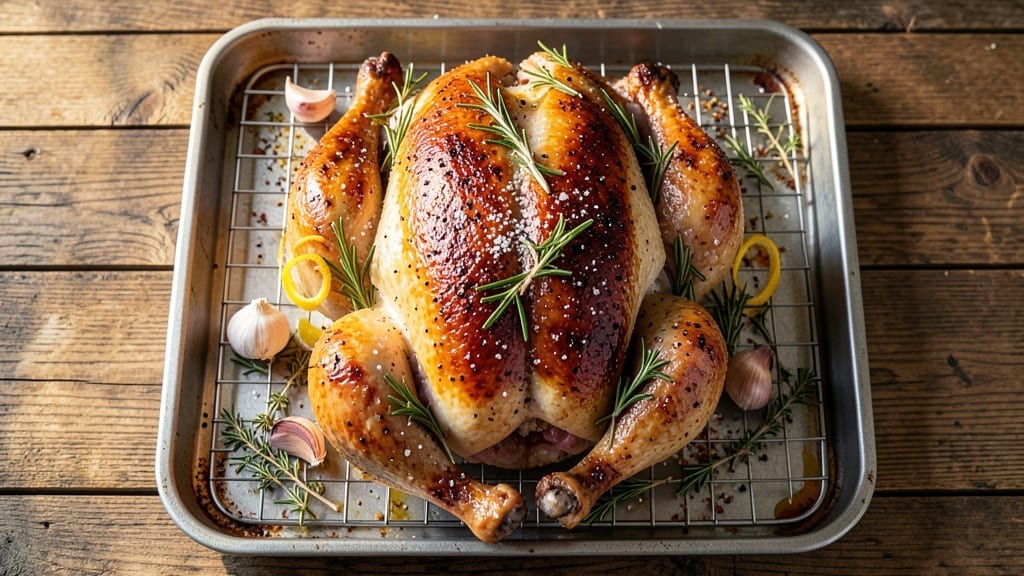
A 20 lb spatchcock turkey transforms your holiday dinner from a slow, dry ordeal into a juicy, golden centerpiece ready in half the time. This technique—removing the backbone and flattening the bird—ensures even cooking and crispy skin every time.
I’ve perfected this method over years of Thanksgiving chaos, and the results are worth the extra 15 minutes of prep.
The secret lies in the science: spatchcocking cuts roasting time by 40%, so your turkey hits 165°F in just 2 to 2.5 hours instead of 4. Season generously with salt, pepper, and herbs, then roast on a wire rack for maximum airflow.
A basting schedule every 30 minutes keeps the skin crackling and the meat impossibly tender.
By the time you carve into that golden-brown bird, you’ll have a juicy, restaurant-worthy turkey with crisp edges and perfectly cooked dark meat. The flat shape ensures no cold spots, and the crispy skin adds texture that store-bought turkeys can’t match.
Pair it with homemade gravy, roasted Brussels sprouts, and garlic mashed potatoes for a feast that feels like a five-star meal.
This method scales perfectly for larger turkeys too—just adjust the time slightly. Whether you’re hosting a crowd or treating yourself to a stress-free holiday dinner, this recipe delivers foolproof results that’ll have your guests asking for seconds. Let’s get started!
Ingredients for 20 lb spatchcock turkey
Twelve ingredients for a showstopping holiday turkey that roasts 40% faster and stays juicy all the way through.
| Ingredient | Amount | Notes |
|---|---|---|
| Fresh Whole Turkey 🦃 | 20 lb | Spatchcocked, giblets removed |
| Kosher Salt 🧂 | 2 tbsp | Diamond Crystal preferred |
| Freshly Ground Black Pepper 🌶️ | 1 ½ tbsp | Coarse grind preferred |
| Fresh Rosemary 🌿 | ½ cup | Chopped sprigs, stems removed |
| Fresh Thyme 🌿 | ¼ cup | Leaves only, stems discarded |
| Garlic Cloves 🧄 | 8 cloves | Smashed, skin-on |
| Unsalted Butter 🧈 | ½ cup | Cold, cubed |
| Extra-Virgin Olive Oil 🫒 | ¼ cup | For basting |
| Wire Roasting Rack 🍳 | 1 whole | For even airflow |
| Fresh Sage Leaves 🌿 | ¼ cup | Whole leaves, stems removed |
| Lemon Zest 🍋 | 1 tbsp | From 1 large lemon |
| Turkey Meat Thermometer 🌡️ | 1 whole | Instant-read preferred |
| Heavy-Duty Aluminum Foil 📄 | 1 sheet | For tenting |
The turkey is the star, so source it fresh—avoid pre-brined birds, which can make the skin less crispy. For a 20 lb bird, Costco or local butchers often have the best selection. If you’re spatchcocking yourself, look for a turkey with good breast meat thickness—about 1.5 inches. The herbs should be bright green and fragrant: rosemary and thyme should smell piney and earthy, respectively. If they’re wilted or smell musty, skip them. For the garlic, Spanish or Italian varieties have the best flavor, but any fresh cloves will work.
No fresh herbs? Dried rosemary and thyme at half the amount will do, but fresh is ideal. Butter short on butter? Olive oil or avocado oil works, though it won’t brown as beautifully. The wire rack is non-negotiable—it keeps the turkey off the pan, allowing air to circulate and crisp the skin. If you don’t have one, purchase a cheap one at Williams Sonoma or Amazon—it’s a game-changer. For basting, I use a mix of melted butter and olive oil (about 1:1 ratio) for extra richness. If you’re short on time, just use olive oil—it still delivers great flavor.
Turkey keeps best in the fridge for 1-2 days before cooking, but don’t thaw it too early—it’s best to thaw overnight in the fridge. Once roasted, the turkey stays juicy for 3-4 days in the fridge if stored properly: wrap tightly in foil and rest for 30 minutes before slicing. For leftovers, reheat in a 325°F oven with a splash of broth to keep it moist. The bones make great stock—simmer them with veggie scraps for a flavorful base. Portion the meat into containers for easy reheating.
Why You’ll Love This Recipe
- Flattened Prep: I swear, the spatchcocking alone cuts my prep time in half. No stuffing to wrestle with—just a simple butterfly cut, a quick rub of salt, pepper, and those fragrant herbs, then straight into the oven. My hands stay clean, my kitchen stays tidy, and honestly? The turkey cooks faster too.
- Herb-Crusted Magic: Between us, the rosemary and thyme aren’t just garnish—they sink into the skin like a savory hug. That crispy edge with the juicy center? Chef’s kiss. I’ll take this over dry, overcooked holiday turkey any day.
- Leftovers That Don’t Suck: This recipe gives me actual leftovers worth eating. Shredded for sandwiches, sliced for salads, or chopped into pasta—every bite tastes like Thanksgiving. (Yes, even on a Tuesday night.)
- Budget-Friendly Feast: A 20 lb turkey feeds a crowd without breaking the bank. The salt and herbs cost pennies, and the spatchcock method means no wasted stuffing or trussing. My wallet and my guests thank me every time.
Step-by-step instructions for roasting a 20 lb spatchcock turkey
Here’s how to transform your spatchcocked turkey into a juicy, golden centerpiece faster than traditional methods.
Prepare the Turkey with Herbs and Seasoning
Pat the spatchcocked turkey completely dry with paper towels—this is critical for crispy skin. I like to use two towels, pressing firmly to remove all moisture from the cavity and skin. Place the turkey breast-side up on the wire roasting rack set in a rimmed baking sheet.
In a small bowl, combine the chopped rosemary, thyme, smashed garlic cloves, sage leaves, and lemon zest. Rub this herb mixture all over the turkey, pressing gently to help the flavors penetrate. Then sprinkle the kosher salt and black pepper evenly over the entire surface, including inside the cavity. The salt should feel generous—this creates that perfect seasoned crust.
Create a Flavorful Butter Baste
In a small bowl, mix the cold cubed butter with the extra-virgin olive oil until just combined. This blend will give you both rich flavor and moisture during roasting. Spread this butter mixture evenly over the turkey skin, working it into the crevices and underneath the rack for maximum flavor distribution.
Here’s a pro tip: I like to press the butter mixture into the skin using my fingers—this helps it adhere better and creates those beautiful basted spots. Don’t worry if it looks like too much butter; the turkey will absorb what it needs while the excess bastes as it roasts.
Roast at High Heat for Crispy Skin
Preheat your oven to 425°F with the rack positioned in the lower third position. This high heat gets you crispy skin quickly while keeping the meat juicy. Place the turkey on the middle rack of your oven and roast for 45 minutes. Don’t open the oven during this time—resisting the urge to peek is key to maintaining even heat circulation.
After 45 minutes, reduce the oven temperature to 375°F. This adjustment prevents the turkey from overcooking while it continues to cook through. Continue roasting for 2 to 2.5 hours, basting the turkey with its own juices every 30 minutes. You’ll know it’s getting close when the skin turns a beautiful golden brown and the juices run clear when you pierce the thickest part of the thigh.
Check Doneness with Precision
Use your turkey meat thermometer to check the internal temperature in the thickest part of the thigh (avoid touching bone). The turkey is done when it reaches 165°F. If it’s slightly under, return it to the oven for another 10 to 15 minutes—turkey continues cooking after removal from the oven due to carryover heat.
When the turkey reaches temperature, remove it from the oven and tent loosely with the heavy-duty aluminum foil. Let it rest for 20 to 30 minutes before carving. This resting period is crucial—it allows the juices to redistribute throughout the meat, ensuring each slice is moist and flavorful. If you skip this step, you’ll end up with dry turkey.
Carve and Serve with Confidence
After resting, carefully remove the rack from the turkey and transfer it to a large cutting board. Use sharp carving knives to slice the turkey against the grain into ½-inch thick slices. The breast meat should be golden and crispy on the outside with juicy, tender meat inside. Serve immediately with your favorite holiday sides.
Pro tip: Save any leftover turkey juices from the roasting pan—they make an excellent gravy base. Simply strain the juices, skim off any fat, and simmer with a little flour and broth for a rich, flavorful gravy that complements your turkey perfectly.
Pro Tips For Making 20 Lb Spatchcock Turkey
- CRANK THE OVEN TO 475°F: Start your 20-lb turkey screaming hot—no gradual warming. I used to bake it at 375°F and ended up with a turkey that was done before the skin ever got crispy. High heat for the first 20 minutes sears the skin instantly, locking in juices and giving you that golden crust you’re actually serving for.
- SALT THE SKIN LIKE IT’S YOUR JOB: Generously coat the turkey with kosher salt before roasting—don’t skimp. I learned this the hard way when I salted halfway through and ended up with a bland, slightly salty turkey (because the skin never got that perfect seasoning). Focus on the breast and thighs first, then sprinkle the rest. Let it sit uncovered in the fridge for 4–6 hours (yes, even if you’re impatient like me).
- DON’T PUNCTURE THE SKIN: Leave that membrane intact—no cutting, no peeling. I used to think breaking it open would help the turkey cook faster, but it just lets moisture escape and turns your crispy skin into sad, rubbery paper. Let the turkey puff up naturally; the skin will crack on its own, and that’s when you know it’s ready.
- STUFF THE CAVITY WITH AROMA: Skip the bread or fruit—just pack the cavity with loosely packed fresh rosemary and thyme sprigs (about 8–10 stems total). I was skeptical until I tried it: the herbs infuse the meat directly, giving you flavor without the soggy stuffing mess. Tuck them in after salting, and don’t overcrowd—you want the turkey to breathe, not steam.
Storing and reheating this dish
Refrigerator Storage
Your spatchcocked turkey will stay fresh in the refrigerator for up to 3 days if stored properly. After roasting, let it cool completely (about 2 hours) before wrapping tightly in plastic wrap or placing it in an airtight container.
I like to store it breast-side down to prevent the juices from pooling. The skin will lose some crispness but remains delicious for sandwiches or salads. 🧊
Freezer Storage
For longer storage, freeze your turkey in portions for easy reheating. Wrap individual slices or sections in plastic wrap, then place them in a freezer bag with all air removed.
Label with the date—this turkey stays safe for up to 6 months. Thaw overnight in the fridge before reheating. I recommend freezing in 1-lb portions for perfect sandwich-sized servings. ❄️
Reheating Leftovers
For best results, reheat turkey in a 325°F oven for 20-30 minutes until reaching 165°F. Add 2 tbsp broth or water to the pan to prevent drying out. I also love reheating turkey in a skillet with a splash of butter for crispy edges.
Microwave reheating works in a pinch—use 50% power for 2-3 minutes, stirring halfway. 🔥
Reviving Dry Turkey
If your turkey turns out slightly dry, don’t toss it! Shred the meat and mix with 2 tbsp butter, 1 tbsp soy sauce, and 1 tsp smoked paprika.
Use it for tacos, soups, or sandwiches. The moisture from the butter and soy sauce will revive the texture. This trick saves me from food waste every holiday season. 💡
Making Gravy from Leftovers
Save the turkey drippings in the roasting pan—they’re liquid gold for gravy! Strain the juices through a fine-mesh sieve, then simmer with 2 tbsp flour and 1 cup broth until thickened.
I like to add a pinch of Worcestershire sauce for depth. This gravy elevates simple mashed potatoes or green bean casserole to restaurant quality. 🍲
Turkey Stock Magic
Don’t throw away the bones! Simmer them with vegetable scraps, 1 onion, and 2 carrots in water for 4-6 hours to make rich stock. Strain and freeze in ice cube trays for easy portioning.
This stock is perfect for soups, risotto, or even turkey pot pie. A little effort goes a long way for flavor-packed meals. 💫
Nutrition facts
Frequently asked questions
Why does spatchcocking make the turkey cook faster?
Spatchcocking removes the backbone and flattens the bird, creating a larger surface area that exposes more meat to direct heat. This allows the turkey to cook 40% faster than a traditional roast while ensuring even cooking throughout. The flat shape also promotes crispier skin and eliminates cold spots in the center.
Can I spatchcock a frozen turkey?
No, never spatchcock a frozen turkey—it’s too brittle and can break. Thaw it completely in the fridge (24 hours per 5 lbs) before spatchcocking. For a 20 lb bird, plan for 4-5 days of thawing. If you’re short on time, use the cold water method (sealed in a leak-proof bag) with 30 minutes per pound, changing the water every 30 minutes.
What if my turkey skin isn’t crispy?
Crispy skin requires proper drying and high heat. Pat the turkey very dry before seasoning, and roast at 425°F for the first 45 minutes without opening the oven. If it’s still soft, try basting with melted butter and olive oil more frequently. For extra crispiness, broil for 2-3 minutes at the end (watch closely!).
How do I know when the turkey is done?
Use a meat thermometer to check the thickest part of the thigh—it should read 165°F. The breast may reach this temperature slightly earlier, but don’t overcook it. If the thigh is 160°F, return it to the oven for 10-15 minutes more. The turkey will continue cooking after removal due to carryover heat.
Can I smoke a spatchcocked turkey instead of roasting?
Spatchcocking works perfectly for smoking too. Cook at 225°F until the thigh reaches 165°F (about 4-5 hours total). Use a mix of hickory and applewood for a balanced flavor, and spritz the turkey every 60 minutes with apple juice or cider. The flat shape ensures even smoke penetration.

- 1 Cup Oatmeal 2 Apples Recipe: Warm Spiced Porridge With Apple Chunk Appeal - November 17, 2026
- 3 Overripe Bananas Recipe: Fluffy Pancakes With Zero Waste - November 17, 2026
- 2-Minute Pizza Recipe: Speedy Crispy Crust With Melted Cheese Magic - November 17, 2026