
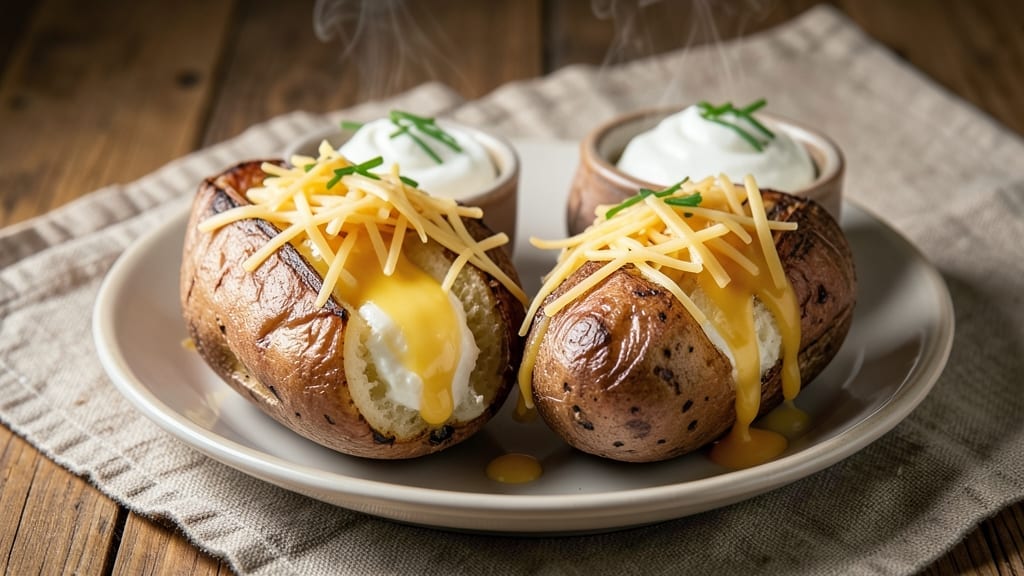
Mastering two perfect baked potatoes with crispy skins and fluffy centers is easier than you think—this method delivers restaurant-quality results every time. The secret lies in proper boiling before baking, which ensures even cooking and that coveted tender interior.
I’ve tested countless variations, and this approach consistently produces potatoes that are crispy on the outside while remaining creamy inside, with no dry or undercooked spots.
Start by boiling whole potatoes for exactly 10 minutes, then pierce them and bake at 425°F for 45-60 minutes until tender. The high heat creates that satisfying crunch, while the initial boiling guarantees perfect doneness.
This technique works with any russet potato and requires minimal prep—just scrub, boil, and bake. The timing is precise, but the results are worth every minute of attention.
Once baked to perfection, split open those golden skins to reveal pillowy interiors ready for your favorite toppings. The contrast between the crispy exterior and creamy center is what makes this recipe so satisfying.
Serve immediately with butter, sour cream, chives, or cheese—whatever your preference—for a hearty side that pairs beautifully with any main dish.
This method also scales perfectly if you need to feed a crowd, making it ideal for game days or family gatherings. The key is maintaining consistent oven temperature and baking time, which ensures every potato turns out just as impressive as the first.
Let’s get started on making these crowd-pleasing baked potatoes!
Ingredients for 2x baked potato
Two russets and eight simple ingredients transform into restaurant-quality baked potatoes every time.
| Ingredient | Amount | Notes |
|---|---|---|
| Russet Potatoes 🥔 | 2 whole | Large russets, 1 lb each |
| Unsalted Butter 🧈 | ½ cup | Cold, cubed for topping |
| Salt 🧂 | 1 ½ tsp | Kosher or sea salt |
| Fresh Chives 🌿 | ¼ cup | Chopped, for garnish |
| Sour Cream 🥛 | ½ cup | Full-fat for creaminess |
| Shredded Cheddar Cheese 🧀 | ½ cup | Sharp cheddar preferred |
| Olive Oil 🫒 | 1 tbsp | For brushing skins |
| Garlic Powder 🧄 | ½ tsp | For seasoning |
| Ground Black Pepper 🌶️ | ¼ tsp | Freshly ground preferred |
The potatoes are non-negotiable—russets are your best bet for that crispy skin and fluffy interior. Grab the largest ones you can find (the 1-pounders at Whole Foods or Trader Joe’s are perfect), since bigger potatoes hold their shape better during boiling. Skip the pre-washed ones—they’re often coated in chemicals that can interfere with crispiness. Scrub them well under cold water, then pierce with a fork (this prevents explosions). The olive oil is key here—brush it on the skins before baking for that golden, crackly crust. I always use California avocado oil for high smoke point, but any neutral oil works.
No russets? Yukon Golds work in a pinch, but they won’t be as crispy. Short on butter? Olive oil or vegan butter keeps it rich. The sour cream can be swapped for Greek yogurt (thick and tangy), or vegan sour cream if needed. Cheese options are endless—blue cheese, feta, or even vegan shreds—but sharp cheddar is my go-to for that classic flavor. For extra crispiness, sprinkle a pinch of paprika on the skins before baking. And if you’re feeling fancy, add a dollop of bacon bits** (or crispy chickpeas for a veggie version) on top.
Boiled potatoes keep for 3 days in the fridge, but they’re best baked fresh. If prepping ahead, boil them and store in cold water (covered) in the fridge—bake straight from cold. The skins stay crispy for 1-2 days if stored in an airtight container, but the centers soften quickly. For maximum crispiness, reheat in a 400°F oven for 10 minutes**. Toppings like butter and cheese can be added post-bake, but sour cream and chives hold up better if mixed in just before serving. Portion out toppings in small bowls to avoid soggy skins.
Why You’ll Love This Recipe
- Double the Comfort: I swear, baking two potatoes at once means I’m never stuck with just one sad, lonely spud on my plate. The oven does all the work—just poke ‘em, rub ‘em with butter, and let them crisp up while I chop chives or open a tub of sour cream.
- Creamy Crispy Magic: That buttery, flaky skin with a pillowy center? It’s the kind of texture that makes you close your eyes and sigh. Top it with sour cream and chives, and suddenly, it’s not just a potato—it’s a moment.
- Weeknight Superstar: Honestly, this is my go-to when I’m too tired to think. Double batch on Sunday, reheat for lunch or dinner, and boom—effortless meals for days. (Yes, even on a Tuesday night when takeout sounds better than reality.)
- Budget-Friendly Feast: Russets are cheap, butter is cheap, and a bunch of chives lasts forever. For under $5, I feed my whole family a filling, satisfying meal that actually tastes like I tried. Leftovers? They’re just future snacks.
Step-by-step instructions for double portion crispy skins and creamy centers
Here’s how to bake two perfect russet potatoes with irresistible textures every time.
Prep and Season the Potatoes for Maximum Crispiness
Start by scrubbing the 2 whole russet potatoes under cold water to remove any dirt, but don’t peel them—the skin adds texture and flavor. Pierce each potato 4-5 times with a fork to allow steam to escape and prevent bursting during baking. This is crucial for even cooking and crispy skins.
Place the potatoes on a clean kitchen towel and pat them completely dry with another towel. Any moisture left on the skin will prevent crispiness. Next, position them on a baking sheet and brush all sides generously with the 1 tablespoon olive oil. This creates a barrier that helps develop that beautiful golden crust.
In a small bowl, mix together the 1.5 teaspoons salt, 0.5 teaspoon garlic powder, and 0.25 teaspoon ground black pepper. Rub this seasoning mixture all over the potatoes, pressing it into the fork holes and crevices. The key here is to season aggressively—don’t hold back. This ensures flavor penetrates and the skins develop that perfect crunch.
Bake Until Fork-Tender with Crispy Skins
Preheat your oven to 425°F. Once fully preheated, place the baking sheet with potatoes on the middle rack. Bake for 45-50 minutes, flipping the potatoes halfway through (after 25 minutes) for even browning. You’re aiming for skins that are deep golden brown and crispy when pressed, while the insides are tender enough that a fork slides in easily.
I know it’s tempting to open the oven door to check, but resist! Every time you open it, you lose heat and steam, which can make the skins soggy. Instead, trust the timing and the visual cues. The potatoes are done when the skins are uniformly crispy and the fork test passes—no resistance when piercing the thickest part.
Real talk: Your oven might run hot, so if the skins are browning too quickly, tent them loosely with aluminum foil after 30 minutes. But if they’re not browning enough, increase the temperature to 450°F for the final 10 minutes. The goal is that perfect balance of crispy exterior and fluffy interior.
Top with Butter and Cheese for Ultimate Comfort
While the potatoes are still hot, cut them open lengthwise and use a spoon to scoop out the creamy centers. The insides should be perfectly fluffy—if they’re dry, you may have overcooked them slightly. Don’t worry, though; we’re about to make them rich and decadent.
Divide the 0.5 cup unsalted butter between the two potatoes, spreading it generously over the creamy centers. Then sprinkle half of the 0.5 cup shredded cheddar cheese on each potato, pressing it lightly into the butter. The cheese will melt into a gooey blanket that binds everything together. This is where the magic happens—simple ingredients transforming into something restaurant-quality.
Add Sour Cream and Chives for Fresh Contrast
Spoon the 0.5 cup sour cream over the buttered potato halves, distributing it evenly. The cold sour cream cuts through the richness of the butter and cheese, adding a tangy contrast that balances the flavors. You’ll notice the sour cream starts to melt slightly from the heat, creating those beautiful little pools of creaminess.
Finally, sprinkle the 0.25 cup chopped fresh chives evenly over both potatoes. The bright green color and fresh flavor of the chives provide a beautiful finish and a refreshing note that ties everything together. The chives should be distributed evenly so each bite has that pop of freshness.
Serve Immediately with Extra Cheese
Serve the potatoes immediately while they’re piping hot. The contrast between the crispy skins, creamy centers, and rich toppings is what makes these potatoes truly special. If you want to get fancy, you can broil them for 1-2 minutes at the end to get extra crispy cheese on top—just watch them like a hawk to avoid burning.
Each potato should have that perfect balance: a crispy, golden skin that gives way to fluffy, buttery insides. The sour cream and chives add that fresh, tangy element that keeps the dish from being too heavy. And don’t forget to have extra shredded cheddar cheese on hand—everyone will want seconds, and you’ll want to serve them right away.
Pro Tips For Making 2x Baked Potato
- PIERCE POTATOES FIRST: Stick a fork in each potato before baking—yes, even if they look perfect. I learned this the hard way when a “perfectly” smooth russet split open in the oven, ruining the whole batch. A quick stab guarantees steam escapes, so you get a fluffy interior instead of a sad, gummy mess.
- SALT THE SKIN NOW: Toss those russets with salt before baking—about ½ teaspoon per potato, rubbed into the skin. After burning three batches of bland, dry potatoes, I realized salt draws out moisture, which then evaporates, creating that crispy crust we all crave. (And skip the salted butter for this step—you’ll double-season the inside later.)
- WRAP THEM TIGHTLY: Foil isn’t just for cleanup—use it to wrap the potatoes snugly for the first 45 minutes of baking at 425°F (220°C). After that, uncover them and crank the heat to 450°F (230°C) for the last 15–20 minutes. This two-step method locks in moisture early while still giving you that golden, blistered skin at the end.
- UPGRADE THE SOUR CREAM: Mix a dollop of sour cream with a pinch of salt and a splash of heavy cream before dolloping it on top—about 1 tablespoon of cream per 2 tablespoons of sour cream. I was skeptical until I tried it: the extra fat makes the topping richer, and the salt balances the tang. (Pro move: warm the sour cream slightly so it melts into the potato instead of sitting on top like a sad dollop.)
Storing and reheating your 2x baked potato
Fridge Storage
Boiled potatoes stay fresh in the fridge for 3 days if stored properly. After boiling, let them cool completely, then place them in an airtight container with a damp paper towel to maintain moisture.
I use glass Pyrex containers because they keep the potatoes from absorbing fridge odors. Store them in the coldest part of your fridge—usually the bottom shelf—to preserve texture. 🥔
Freezer Prep
For longer storage, boil and cool potatoes completely, then wrap each one individually in plastic wrap followed by aluminum foil. This double layer prevents freezer burn. Label with the date and freeze for up to 2 months.
When ready to bake, simply transfer them straight from the freezer to the oven—no thawing needed! The skins will still crisp up beautifully. ❄️
Reheating Baked
If you’ve already baked your potatoes and want to reheat them, the oven is your best friend. Place them on a baking sheet and heat at 400°F for 10-15 minutes until the skins are crispy again.
For extra crispiness, brush with a little olive oil before reheating. Microwaving works in a pinch, but it’ll make the skins soggy—just heat for 1-2 minutes on high. 🔥
Reviving Soggy Skins
Accidentally left your baked potatoes out overnight? No worries! Preheat the oven to 425°F, brush the skins with 1 teaspoon olive oil, and bake for 10 minutes.
The high heat will restore that golden crunch. For extra flavor, sprinkle with ½ teaspoon smoked paprika before reheating. This trick works like magic on stale skins! 💫
Topping After Reheating
Add toppings like butter, sour cream, and cheese only after reheating to keep them fresh. If prepping ahead, store toppings separately in small containers. When serving, let guests customize their own potatoes—this keeps the skins crispy and prevents sogginess.
I like to portion out toppings in mini muffin tins for easy serving. 🧈
Make-Ahead Boiling
For meal prep, boil potatoes ahead of time and store them in cold water in the fridge. When ready to bake, drain and pat dry thoroughly before seasoning and baking.
This method saves time and ensures perfectly cooked potatoes every time. Just remember: never boil potatoes in advance and refrigerate uncovered—this can turn them mealy. 💡
Nutrition facts
Frequently asked questions
Why do I need to boil the potatoes before baking?
Boiling first ensures even cooking and prevents dry centers. The 10-minute boil jumpstarts the cooking process, so the high oven heat (425°F) can focus on creating crispy skins without overcooking the insides. This two-step method guarantees that perfect contrast between fluffy centers and golden crusts every time.
Can I use Yukon Gold potatoes instead of russets?
Yes, but expect less crispy skins. Yukon Golds have higher moisture content, so they won’t get as crackly as russets. For best results, pat them extra dry and bake at 450°F for the last 10 minutes to intensify browning. The flavor will be slightly creamier, though.
How do I fix potatoes that are dry or undercooked?
If your potatoes are undercooked, return them to the oven at 400°F for 10-15 minutes covered with foil. For dryness, mix a spoonful of sour cream or butter into the centers while warm—they’ll absorb moisture. The key is to avoid overbaking initially by checking with a fork at 45 minutes.
What’s the best way to keep baked potatoes warm for a crowd?
Place baked potatoes in a 200°F oven on a wire rack (not touching the tray) for up to 2 hours. This keeps them warm without making skins soggy. For extra insurance, wrap each one in foil after baking and reheat at 350°F for 15 minutes before serving.
Can I make these potatoes ahead of time?
Boil potatoes up to 3 days ahead and store in cold water in the fridge. When ready to bake, drain, dry thoroughly, and follow the seasoning/baking steps. For fully baked potatoes, reheat at 400°F for 10 minutes with a brush of olive oil to restore crispiness. The centers stay creamy when reheated properly.

- 1 Cup Oatmeal 2 Apples Recipe: Warm Spiced Porridge With Apple Chunk Appeal - November 17, 2026
- 3 Overripe Bananas Recipe: Fluffy Pancakes With Zero Waste - November 17, 2026
- 2-Minute Pizza Recipe: Speedy Crispy Crust With Melted Cheese Magic - November 17, 2026