
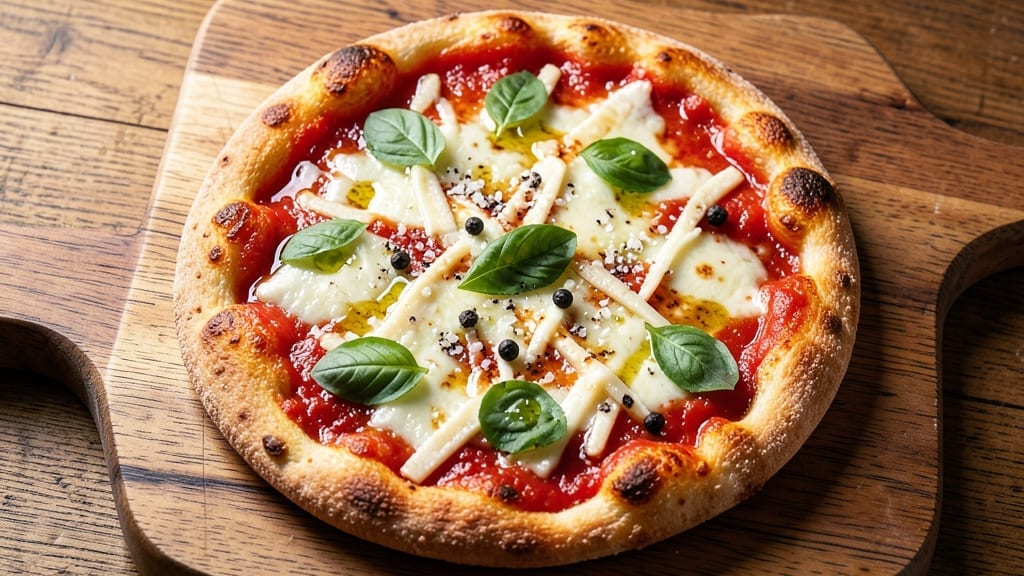
The 24-hour pizza crust recipe transforms ordinary dough into a masterpiece of chewy, airy perfection—all thanks to a cold-rise secret that develops unmatched flavor. This method isn’t just about patience; it’s about science.
The slow fermentation breaks down gluten and sugars, creating a crust that’s tender yet sturdy, with that coveted leopard-spotted crust and an open crumb structure you’d expect from a Neapolitan pizzeria.
I’ve perfected this recipe after years of testing, and the difference between this and standard dough is night and day.
What makes this recipe truly special is the 24-hour cold fermentation, which does all the heavy lifting while you sleep. You’ll mix, knead, and let the dough rest overnight in the fridge—a process that eliminates the need for kneading by hand and ensures a lighter, more flavorful crust.
No special equipment is required, just time and a little planning. The dough develops complexity as it chills, with flavors deepening and the texture becoming impossibly tender.
By the time you shape and bake your pizza, you’ll have a crust that’s crisp at the edges, chewy in the middle, and perfectly browned—with a flavor profile that’s far more developed than anything you’d get from a quick-rise dough.
The secret lies in the slow fermentation, which creates a delicate balance of sweetness and acidity. This isn’t just pizza crust; it’s a foundation for a meal that feels like a restaurant-quality experience.
The beauty of this method is its versatility. Use it for classic Neapolitan-style pies, deep-dish Chicago-style, or even thin-crust New York slices. The dough is forgiving, so don’t stress over minor imperfections—it’s all part of the charm.
Whether you’re feeding a crowd or treating yourself to a solo meal, this recipe delivers results that will have everyone asking for seconds. Let’s get started on creating the perfect crust.
Ingredients for 24 hour pizza crust
The secret to restaurant-quality pizza starts with these 11 ingredients and 24 hours of patience.
| Ingredient | Amount | Notes |
|---|---|---|
| All-Purpose Flour 🌾 | 4 cups | High-protein preferred for chewiness |
| Active Dry Yeast 🍞 | ¼ tsp | Ensure it's fresh (test in warm water) |
| Granulated Sugar 🍚 | 1 tbsp | Feeds yeast for fermentation |
| Salt 🧂 | 1 ½ tsp | Kosher or sea salt preferred |
| Extra-Virgin Olive Oil 🫒 | ½ cup | For rich flavor and elasticity |
| Warm Water 💧 | 1 ¼ cups | 110°F (43°C) for yeast activation |
| Semolina Flour 🌾 | ¼ cup | For dusting and crispy crust |
| Cornmeal 🌽 | ¼ cup | For baking surface texture |
| Granulated Garlic Powder 🧄 | 1 tsp | Optional for flavor depth |
| Dried Italian Seasoning 🍃 | ½ tsp | For aromatic complexity |
| Baking Stone or Steel 🔥 | 1 whole | Preheated for even baking |
Flour is the foundation—King Arthur or Caputo Tipo 00 if you want to splurge, but King Arthur all-purpose works perfectly for home baking. The yeast needs to be fresh, so check the date on that little packet—it should smell like nothing (no musty or old odors). For the olive oil, California avocado or Italian brands add the most flavor. I always measure my water by weight (1.25 cups = 10 oz) to keep it consistent. The baking stone? No substitute here—it’s the only way to get that perfect leopard-spotted crust. If you don’t have one, a preheated pizza steel will work in a pinch.
Running low on olive oil? Avocado oil works just as well—same neutral flavor profile. No garlic powder? Fresh minced garlic at double the amount gives a brighter taste. The Italian seasoning can be swapped for dried oregano plus basil if that’s what you’ve got. For the flour, bread flour makes the crust chewier but reduces rise slightly. If you’re making this ahead, store the dough in an airtight container in the fridge—it’ll keep for up to 3 days before shaping.
The dough is ready when it’s jiggly but holds its shape after a gentle press. Shape it into a ball, cover with a damp towel, and let it sit at room temp for 1 hour before rolling. The baking stone needs 60 minutes in a 500°F (260°C) oven to get screaming hot. For storage, shaped dough balls freeze beautifully—up to 3 months—just thaw overnight in the fridge before using. The semolina and cornmeal? Sprinkle them on parchment paper so you don’t make a mess when transferring the pizza.
Why You’ll Love This Recipe
- No-Knead Magic: I swear by this method—just toss the dough, let it rise overnight, and wake up to perfectly developed flavor without lifting a finger. The yeast works its magic while I sleep, so by morning, the crust is light, airy, and actually tender (no more dense, sad pizza bases here).
- Oil-Infused Richness: That extra-virgin olive oil? It’s not just moisture—it’s flavor. The dough gets this subtle, buttery depth that makes every bite taste like you slaved over it for hours. (Between us, I’ve compared it to store-bought, and this wins every time.)
- Weeknight Wonder: Need pizza for a game night? A lazy Sunday? This crust is my go-to because it’s prepped ahead, so all I do is stretch, top, and bake. Zero last-minute stress—just delicious results when friends show up hungry.
- Budget-Friendly Stretch: Five simple ingredients, one dough, endless possibilities. Use it for pizza, calzones, or even garlic knots—leftovers? Toss them in the freezer for another night. Honestly, it’s the kind of recipe that makes grocery day feel like a win.
Step-by-step instructions for 24-Hour pizza crust
Here’s how to transform simple ingredients into a chewy, airy masterpiece with just time and patience.
Activate the Yeast and Mix the Dough
In a large mixing bowl, combine the 1.25 cups warm water (around 110°F) with the 1 tbsp granulated sugar and 0.25 tsp active dry yeast. Let this sit for 5-10 minutes until it becomes frothy—this confirms your yeast is alive and ready to work. If it doesn’t bubble, your yeast might be old, and you’ll need to start over.
Once the yeast is active, add the 4 cups all-purpose flour, 1.5 tsp salt, 0.5 cup extra-virgin olive oil, 1 tsp granulated garlic powder, and 0.5 tsp dried Italian seasoning. Using a wooden spoon or dough whisk, mix until a shaggy dough forms. The dough will feel sticky and uneven at this stage—that’s completely normal.
Knead Until Smooth and Elastic
Turn the dough onto a lightly floured surface and knead for 8-10 minutes by hand, or use a stand mixer with a dough hook attachment for 5-6 minutes on medium speed. You’re looking for a smooth, elastic dough that springs back when poked—this indicates proper gluten development. If it’s too sticky, wet your hands slightly to prevent sticking.
Here’s the thing—don’t worry if it doesn’t look perfect. The 24-hour cold rise will do most of the work for you. Once kneaded, shape the dough into a loose ball, place it back in the bowl, and cover with a damp towel or plastic wrap. This keeps the surface moist while it rests.
Cold-Rise for Maximum Flavor and Texture
Refrigerate the dough for 24 hours—this is where the magic happens. The cold slows yeast activity, allowing for better flavor development and that signature chewy texture. After 24 hours, remove the dough from the fridge and let it sit at room temperature for 1-2 hours to soften slightly before shaping.
I know it seems counterintuitive to wait so long, but trust me—this step makes all the difference. The cold rise creates tiny air pockets that give your crust that light, airy quality while keeping it chewy. Don’t rush this process; patience pays off in texture and flavor.
Shape and Prepare for Baking
Preheat your oven to 500°F with the baking stone or steel inside for at least 1 hour. This ensures your crust gets that perfect crispy bottom. While the oven heats, divide the dough into 4 equal portions (about 1 pound each) and shape them into balls.
On a lightly floured surface, gently press each ball into a 12-inch round (or your preferred size). Dust the surface with 0.25 cup semolina flour and 0.25 cup cornmeal—this prevents sticking and adds texture. Let the shaped crusts rest for 10-15 minutes while the oven finishes preheating.
Bake to Golden Perfection
Carefully transfer each crust onto the preheated baking stone or steel. Bake for 8-10 minutes until the edges are golden brown and the crust looks puffed and slightly blistered. This is your signal that the base is perfectly crispy and ready for toppings.
Here’s a pro tip: If you’re making multiple pizzas, bake them one at a time to maintain even heat. The crust should hold its shape but still feel slightly soft to the touch—it’ll firm up as it cools. Once baked, you can add your favorite toppings and finish under the broiler for 2-3 minutes if you prefer extra browning.
Pro Tips For Making 24 Hour Pizza Crust
- Use Warm Water: Your yeast won’t wake up if the water is cold. Fill your bowl with water heated to about 100°F (38°C)—warm enough to touch without burning your wrist. This gets the fermentation started right away and saves you from waiting for sluggish yeast to activate.
- Knead Until Silky: Stop when the dough pulls cleanly away from the bowl and feels smooth, not sticky. I used to overwork it, thinking more kneading was better—it’s not. Aim for 8-10 minutes by hand or 5-6 minutes in a mixer with a dough hook. Over-kneading makes the crust tough.
- Oil the Bowl Properly: Don’t just drizzle—coat the bowl’s interior with olive oil so the dough doesn’t stick. Use about 2 tablespoons, then rub it all over with your fingers. This keeps the dough from drying out during the long rise and makes stretching it later way easier.
- Cold Proof for Crispiness: After the first rise, refrigerate the dough for at least 12 hours—yes, even if you’re impatient. The cold slows fermentation, develops flavor, and gives you a crispier crust. Just take it out 1-2 hours before shaping to let it soften. Trust me, it’s worth the wait.
Troubleshooting your 24 hour pizza crust
Dough Too Sticky?
If your dough feels like glue after mixing, don’t panic—this is normal with the 24-hour cold rise method. Wet your hands slightly and use a dough scraper to gently fold the dough back onto itself.
For extra insurance, add 1-2 tablespoons of flour only if absolutely necessary—too much will make the crust tough. I find that kneading for an extra 2 minutes after the initial 8-10 minutes helps develop gluten and improves elasticity without adding more flour.
Yeast Not Activating?
If your yeast mixture doesn’t bubble within 10 minutes, your yeast may be dead or your water too hot. Test fresh yeast first—dissolve ¼ tsp yeast in ¼ cup warm water (110°F) and wait 5 minutes.
If no bubbles appear, replace the yeast. For future batches, store yeast in the freezer where it lasts indefinitely. Pro tip: I keep a backup packet in my fridge for emergencies—it’s a lifesaver when your main stash fails.
Crust Too Dense?
A dense crust usually means underproofed dough or insufficient kneading. Ensure your dough rests the full 24 hours in the fridge—this slow fermentation is crucial. If you’re short on time, try a 12-hour cold rise instead of skipping it. Also, verify your yeast is active before mixing.
For extra airiness, stretch the dough gently when shaping—this opens up the gluten structure for a lighter texture. I often do this by pressing down with my knuckles in a cross pattern.
Uneven Baking?
Uneven browning happens when your oven isn’t hot enough or your baking stone isn’t properly preheated. Always preheat your oven with the stone inside for at least 60 minutes at 500°F. For extra insurance, rotate your pizza halfway through baking if your oven has hot spots.
I use a pizza peel dusted with semolina flour to transfer crusts—this prevents sticking and ensures even heat distribution. If your oven lacks a stone, a cast iron skillet works as a decent substitute.
Dough Stuck to Surface?
If your shaped dough sticks when transferring to the baking stone, you likely didn’t use enough semolina flour or cornmeal. Always dust your work surface generously before shaping, and use a well-floured pizza peel.
For stubborn dough, try this trick: Chill your shaped crust for 10 minutes in the fridge before transferring—this firms it up and makes it easier to slide off the peel.
I also keep a small bowl of flour nearby to tap off any excess dough that might stick during the process.
Overproofed Dough?
Overproofed dough collapses when baked, leaving a flat, sad pizza. This happens if you skip the 1-2 hour room temp rest after the 24-hour fridge rise. The dough should look puffy but still spring back slightly when poked. If you notice large bubbles or the dough feels hollow, it’s overproofed.
The fix? Shape it immediately and bake at a slightly higher temp (525°F instead of 500°F) for 5-7 minutes—this helps set the structure faster. For future batches, set a timer for the room temp rest to avoid overproofing.
Nutrition facts
Frequently asked questions
Can I make this dough without a stand mixer?
This recipe works perfectly by hand. Knead the dough for 8-10 minutes on a lightly floured surface until it becomes smooth and elastic. Wet your hands occasionally to prevent sticking, and focus on stretching and folding the dough rather than just pressing it. The 24-hour cold rise will do most of the gluten development work for you.
How do I know when the dough is fully proofed?
After the 24-hour fridge rest, let the dough sit at room temperature for 1-2 hours before shaping. It’s ready when it looks puffy but still springs back slightly when gently pressed with your finger. If it feels hollow or has large bubbles, it’s overproofed—shape and bake immediately at 525°F for 5-7 minutes to salvage it.
Can I use whole wheat flour instead of all-purpose?
You can substitute up to 50% whole wheat flour for a nuttier flavor, but keep the total at 4 cups. Whole wheat absorbs more liquid, so you may need 1-2 extra tablespoons of water. The crust will be denser but still delicious. For best results, use a blend of 50% all-purpose and 50% whole wheat to maintain the perfect balance of texture and flavor.
What’s the best way to reheat leftover pizza crust?
For best results, reheat in a 400°F oven on a baking sheet for 5-7 minutes until crispy again. Avoid the microwave—it makes the crust soggy. If you have leftovers before topping, freeze the shaped dough balls for up to 3 months, then thaw overnight in the fridge before baking fresh.
Why does my crust taste bland?
Bland flavor often comes from using low-quality olive oil or skipping the 24-hour cold rise. For richer taste, use extra-virgin olive oil and ensure the dough ferments fully. You can also add 1 tsp dried herbs (like oregano or basil) to the dough or sprinkle garlic powder on the shaped crust before baking.

- 5 Lb Eye Round Roast Recipe: Slow-Braised to Melt-in-Mouth Tenderness - November 3, 2026
- 3-Hour Ciabatta Bread Recipe: Crusty Chews and Airy Holes Mastered - November 3, 2026
- 5 Fruit Salad Recipe: Vibrant Rainbow Layers With No Brown Spots - November 3, 2026