
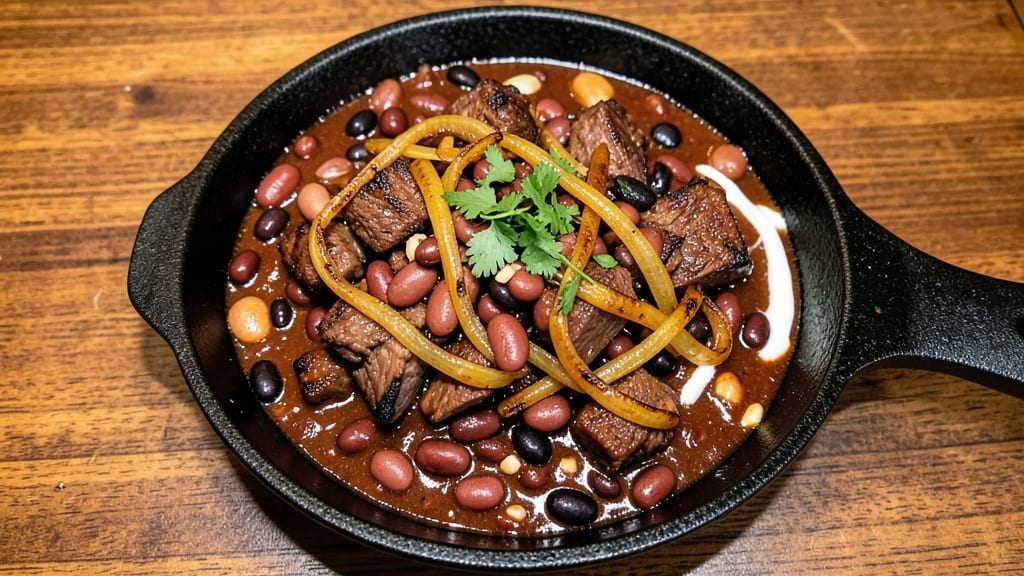
Recreating the legendary 24th Street Cafe chili at home delivers that signature deep, meaty richness you crave in every spoonful. The secret lies in slow-cooked beef chuck, caramelized onions, and a blend of beans that simmer together until the flavors meld into perfect harmony.
This isn’t just chili—it’s a one-pot masterpiece that builds layers of smoky, savory depth over hours of gentle cooking.
The recipe begins with browning the beef in batches to develop that signature caramelized crust, then simmers everything together until the meat practically falls apart. 30 minutes of prep transforms into hours of flavor development, resulting in a chili so rich it needs no garnish—though the cafe’s classic toppings of shredded cheddar and sour cream only enhance it further.
The key is patience; rushing this dish means missing out on its full potential.
What you’ll end up with is a steaming pot of chili where every bite delivers tender beef, hearty beans, and a broth so flavorful it coats your spoon. The texture is perfect—tender meat, creamy beans, and a sauce thick enough to stand up to toppings.
This is the kind of chili that disappears faster than you can say “second helping,” leaving everyone asking for the recipe.
Serve it with cornbread, crusty rolls, or just a spoon in hand—either way, you’re bringing the soul of 24th Street Cafe straight to your kitchen. The instructions ahead will guide you through every step to ensure that home-cooked version tastes just as legendary as the original.
Let’s get started on this chili tradition.
Ingredients for 24th street cafe chili
Six servings of legendary chili—rich beef, hearty beans, and deep smoky flavors in one pot.
| Ingredient | Amount | Notes |
|---|---|---|
| Beef Chuck Roast 🥩 | 3 lb | Cut into 1-inch cubes, trimmed of fat |
| Yellow Onions 🧅 | 2 whole | Medium size, thinly sliced |
| Garlic Cloves 🧄 | 6 cloves | Peeled, roughly chopped |
| Kidney Beans 🌱 | 15 oz | Drained, rinsed, canned or cooked |
| Black Beans 🌱 | 15 oz | Drained, rinsed, canned or cooked |
| Pinto Beans 🌱 | 15 oz | Drained, rinsed, canned or cooked |
| Tomato Paste 🍅 | ½ cup | Smooth, not chunky |
| Dried Chili Powder 🌶️ | 2 tbsp | Medium heat preferred |
| Ground Cumin 🌿 | 1 tbsp | Toasted for deeper flavor |
| Smoked Paprika 🌶️ | 1 tbsp | For that cafe smoky touch |
| Beef Broth 💧 | 4 cups | Low-sodium preferred |
| Dark Brown Sugar 🍚 | 2 tbsp | Enhances depth of flavor |
| Salt 🧂 | 1 ½ tsp | Kosher or sea salt |
| Black Pepper 🌶️ | ½ tsp | Freshly ground preferred |
| Extra-Virgin Olive Oil 🫒 | 2 tbsp | For browning beef |
The beef is everything here. Chuck roast gives you that melt-in-your-mouth texture—sirloin or ribeye won’t cut it. Grab a 3-pound roast and cube it yourself, or pick up pre-cubed from the meat counter. Costco or Whole Foods usually have it ready to go, but any grocery store with a butcher section works. Look for good marbling—those little fat streaks are flavor gold. If you’re feeling fancy, ask for it to be cut into 1-inch pieces. For the beans, no-soak varieties save time, but regular dried beans work if you’ve got them. The onions? Yellow onions are classic, but red or white add a nice color contrast if you’re serving this with cornbread.
No chili powder? Mix 1 tbsp smoked paprika with 1 tsp cayenne for a close substitute. Short on beef broth? Water plus 1 beef bouillon cube gets you there. The tomato paste can be the squeeze-tube kind from Trader Joe’s—it’s perfect for this. No need to peel the garlic, just smash the cloves with the flat side of your knife. The beans? Any combination of kidney, black, and pinto works. If you’re using dried beans, soak them overnight and drain well. The brown sugar might seem odd, but it’s what gives that cafe chili its signature depth—don’t skip it. For extra smokiness, add a quartered chipotle pepper in adobo (remove before serving).
This chili tastes even better the next day—plan ahead. Store in the fridge for up to 5 days, or freeze portions for 3 months. I like to portion it into ziplock bags with a little extra broth so it reheats beautifully. When reheating, stir in a splash of water or broth if it gets too thick. The beans will soften further, and the flavors just get more complex. Leftovers make killer chili cheese toast or loaded baked potatoes—worth making extra. The spices lose potency after a month, so if you’re not using all the chili powder or paprika, transfer them to a small jar and store in a cool, dark place.
Why You’ll Love This Recipe
- One-Pot Magic: I swear by this recipe because it’s literally one pot—no chopping chaos, no extra dishes. Just toss in the beef chuck roast, onions, and garlic, let it slow-simmer, and boom. The beans soften right in the pot, so you’re not stuck with a separate can to drain or rinse. Honestly, my lazy Sundays just got a whole lot easier.
- Deep, Smoky Richness: That beef chuck roast? It melts into tender, flavor-packed shreds, while the onions caramelize into sweet, jammy pockets. Between the us the garlic cloves and the slow-cooked spices, every spoonful has this layered depth—like a hug in a bowl. (Yes, even on a Tuesday night.)
- Meal Prep MVP: This chili begs to be made in bulk. Double the batch, freeze half, and you’ve got a weeknight lifesaver. I keep a jar in my freezer for those “I don’t wanna cook” days, and it reheats like a dream—no dry edges, no sad texture. My roommates call it my “emergency chef” recipe.
- Budget-Friendly Powerhouse: Beef chuck roast stretches far when you slow-cook it, and the beans? They’re cheap but pack serious protein. Between us, this recipe feeds four for under $15, and the leftovers? Even better the next day. It’s the kind of dish that makes me feel like I’m feeding a crowd without breaking the bank.
Step-by-step instructions for 24th Street cafe-style chili
Here’s how to create that signature deep, smoky, bean-rich chili that’s become a cult favorite.
Brown the Beef for Maximum Flavor
Heat the 2 tablespoons extra-virgin olive oil in a large Dutch oven over medium-high heat. Working in batches if needed, add the 3 lb beef chuck roast cut into 1-inch cubes (trimmed of fat). Let the beef brown undisturbed for 3-4 minutes until deeply golden on all sides—this creates the rich foundation for your chili.
I press down gently on the beef cubes during the first minute to prevent curling, which ensures even contact with the pan. Once browned, transfer the beef to a plate and set aside. Don’t drain the rendered fat—this precious liquid carries all the beef’s flavor and will form the base of your chili.
Sauté the Aromatics Until Fragrant
In the same Dutch oven, add the 2 whole yellow onions (thinly sliced) and cook over medium heat for 5-6 minutes until softened and just beginning to caramelize. Add the 6 cloves garlic cloves (roughly chopped) and cook for another 30 seconds until fragrant—this is when your kitchen should smell like a warm autumn day.
Here’s the thing—don’t let the garlic burn. It should smell sweet and inviting, not bitter. If it starts to darken too quickly, reduce the heat slightly. The onions should be translucent with just a hint of golden color at the edges by the time you add the garlic.
Build the Chili Base with Spices and Beans
Stir in the 2 tablespoons dried chili powder, 1 tablespoon ground cumin, and 1 tablespoon smoked paprika, letting them toast in the onion-garlic mixture for 30 seconds until fragrant. Add the 0.5 cup tomato paste and stir vigorously to create a smooth paste that coats all the spices.
Return the browned beef to the pot along with the 15 oz kidney beans, 15 oz black beans, and 15 oz pinto beans (all drained and rinsed). Pour in the 4 cups beef broth and stir well. The mixture should look rich and thick—this is where all the deep flavors start to meld together.
Simmer and Develop the Complex Flavors
Bring the chili to a boil, then reduce heat to low and let it simmer uncovered for 2.5 to 3 hours. I know this seems like a long time, but patience is key here—this slow cooking allows all the flavors to develop and the beef to become fork-tender. Stir occasionally to prevent sticking, especially during the first 30 minutes.
After about 2 hours, taste the chili and adjust seasoning if needed. Add the 2 tablespoons dark brown sugar, 1.5 teaspoons salt, and 0.5 teaspoon black pepper, stirring well. The sugar enhances the depth of flavor while balancing the spices. The chili should be thick but still spoonable—if it’s too thick, add a splash of water or broth.
Finish and Serve with Perfect Texture
Once the beef is fork-tender (it should pull apart easily with minimal resistance), remove the chili from heat. Let it rest for 10 minutes—this resting period allows the flavors to fully meld and the chili to thicken slightly. The texture should be rich and hearty, with the beans holding their shape but still tender.
Serve the chili hot in bowls, garnished with additional black pepper if desired. Each spoonful should deliver layers of smoky, spicy, sweet, and savory flavors that make this chili truly unforgettable. The perfect bowl of chili should be thick enough to coat the back of a spoon but still have a slight brothiness to it.
Pro Tips For Making 24th Street Cafe Chili
- SEAR THE BEEF FIRST: Walk away after that initial sear—it’s not about speed, it’s about color. A deep brown crust on the chuck roast means flavor, not just char. I used to rush this, and the chili always tasted like it needed more seasoning. Let it sit 5 minutes after browning, even if you’re staring at it like it’s a crime scene.
- CHAR THE ONIONS: No one likes sad, translucent onions. Cook them low and slow until they’re almost black at the edges—this caramelizes their sugars and cuts through the richness of the beef. I learned this the hard way when I skipped it; the chili tasted flat. (Yes, even if you’re impatient like me.)
- SALT THE BEANS: Dump those kidney and black beans straight into the pot with a pinch of salt before adding broth. It’s the only way to guarantee they absorb flavor, not just water. I was skeptical until I tried it—now I can’t imagine making chili any other way.
- SKIP THE PRE-SOAK: Drain and rinse the beans, but don’t soak them. The 24th Street version relies on their natural texture, not mushiness. I used to soak them for “tenderizing,” but the chili turned gloppy. Trust the recipe: the long simmer does the work.
Storing and reheating this dish
Refrigerator Storage
Let your chili cool to room temperature for no more than 2 hours before transferring to airtight containers—I love using glass Pyrex bowls with tight-fitting lids. Store in the fridge at 40°F or below for up to 5 days.
The flavors actually deepen overnight as the spices meld further, making leftovers even more delicious. 🥣
Freezer Prep Tips
For long-term storage, portion chili into ziplock freezer bags or glass containers, leaving 1 inch of headspace to prevent expansion cracks. I like to add a small splash of broth to each portion—this prevents drying out when reheated.
Label with the date and freeze for up to 3 months for maximum freshness. ❄️
Stovetop Reheating
My preferred method is stovetop reheating because it preserves that perfect texture. Transfer chili to a pot and heat over medium-low heat for 10-15 minutes, stirring occasionally. If it thickens too much, add 1-2 tablespoons of water or beef broth.
Taste and adjust seasoning—chili often needs a pinch of salt after reheating. The result should be just as rich and flavorful as day one. 🔥
Microwave Safety
For quick reheating, use the microwave on 50% power in 2-minute intervals, stirring between each interval. Cover with a damp paper towel to prevent drying. The chili should reach 165°F internal temperature—use a thermometer if unsure. Avoid reheating in the microwave more than once to maintain quality. 💫
Reheating from Frozen
Frozen chili takes a little more patience. Thaw overnight in the fridge, then reheat using the stovetop method above. If you’re short on time, transfer frozen chili to a pot with ½ cup extra broth and simmer on low heat for 30-45 minutes, stirring occasionally.
The extra liquid prevents scorching and ensures even heating. 🍲
Garnish Refresh
After reheating, brighten up your chili with fresh toppings. A dollop of sour cream, sprinkle of shredded cheddar, or chopped green onions add freshness. I also like a pinch of smoked paprika or a squeeze of lime for extra zing.
These toppings elevate the dish and make it feel like a restaurant-quality meal. 🌿
Nutrition facts
Frequently asked questions
Can I substitute ground beef for the chuck roast?
While you can use ground beef, it won’t deliver the same rich, melt-in-your-mouth texture. The chuck roast’s fat content and connective tissue create that signature depth and tenderness. If you must substitute, use 80/20 ground chuck and increase the cooking time by 30 minutes to render the fat properly.
How do I make this chili less spicy?
Reduce the chili powder to 1 tablespoon and omit the cayenne if using a substitute. For extra mildness, stir in 1 cup tomato sauce during the final 30 minutes of simmering. The acidity helps balance the heat while keeping the chili’s signature depth.
Can I make this chili in a slow cooker?
Brown the beef and sauté onions/garlic as directed, then transfer everything to a 6-quart slow cooker. Add all remaining ingredients and cook on low for 8 hours or high for 5 hours. The slow cooker method actually enhances the tenderness of the beef and deepens the flavors.
What’s the best way to reheat chili without drying it out?
Use the stovetop method: heat over medium-low heat for 10-15 minutes, stirring occasionally. Add 1-2 tablespoons of beef broth if it thickens too much. For microwave reheating, use 50% power in 2-minute intervals and cover with a damp paper towel. Never reheat past 165°F for food safety.
Is this chili kid-friendly?
With minor adjustments, yes! Reduce the chili powder to 1 teaspoon and omit the smoked paprika. For extra mildness, blend ½ cup of the chili with ½ cup tomato sauce and stir it back in. Serve with shredded cheddar and sour cream for a kid-approved version. The rich beef and beans provide great protein for growing bodies.

- 6 Egg Cake Recipe with Oil: Light as Air With Buttery Moisture - October 4, 2026
- 4 Bean Casserole Recipe: One-Pan Heartiness With Smoky Paprika Depth - October 4, 2026
- 3-Ingredient Keto Mug Cake Recipe: Microwave Magic in 2 Minutes - October 4, 2026