
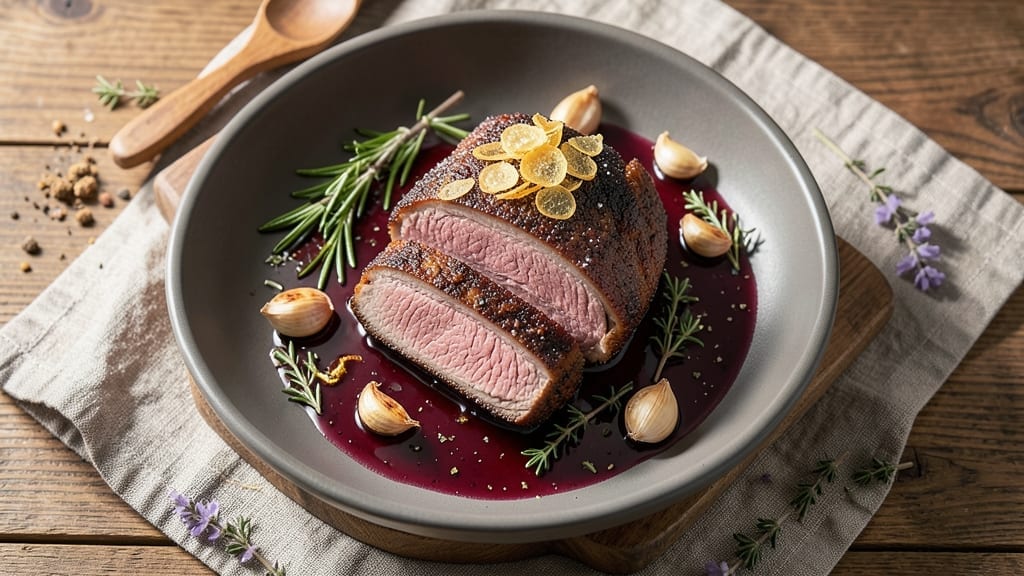
A 2.5 lb boneless chuck roast cooked using the reverse-sear method guarantees perfectly tender, juicy beef with a caramelized crust every time—no guesswork involved. This technique transforms tough cuts into melt-in-your-mouth perfection by controlling temperature and timing precisely.
The key lies in slow cooking to an ideal internal temperature before finishing with a high-heat sear for that coveted crust.
The reverse-sear approach eliminates the risk of overcooking while maximizing flavor development. You’ll start with a low-and-slow cook, allowing connective tissues to break down naturally, then finish with a quick sear in a hot pan or broiler.
This method delivers restaurant-quality results at home with minimal effort—ideal for weeknight dinners or meal prep.
What you’ll achieve is beef that’s fork-tender throughout with a beautifully browned exterior, ready to slice against the grain for perfect bite-sized pieces. The reverse-sear technique works particularly well with chuck roast due to its natural fat content, which renders during cooking to keep the meat moist and flavorful.
Serve this versatile roast with classic sides like roasted potatoes, caramelized onions, or a fresh green salad. The rich, beefy flavor pairs beautifully with bold seasonings and complementary vegetables. Let’s get started with this foolproof method that transforms a simple cut of beef into an impressive centerpiece for any meal.
Ingredients for 2.5 lb boneless chuck roast
Master these ingredients for a chuck roast so tender it falls apart with a touch.
| Ingredient | Amount | Notes |
|---|---|---|
| Boneless Chuck Roast 🥩 | 2 ½ lb | High-quality, well-marbled cut preferred |
| Kosher Salt 🧂 | 1 ½ tbsp | Diamond Crystal preferred for even distribution |
| Freshly Ground Black Pepper 🌶️ | 1 ½ tsp | Freshly cracked for optimal flavor |
| Garlic Cloves 🧄 | 6 whole | Smashed for maximum aromatic release |
| Fresh Rosemary 🌿 | ½ tsp | Chopped, stems removed for purity |
| Fresh Thyme 🌿 | ½ tsp | Leaves only, finely chopped |
| Extra-Virgin Olive Oil 🫒 | 2 tbsp | High-quality, fruity variety |
| Yellow Onion 🧅 | 1 whole | Cut into 1-inch chunks for even cooking |
| Carrots 🥕 | 4 whole | Cut into 2-inch pieces for texture |
| Beef Broth 💧 | 1 ½ cups | Low-sodium preferred for seasoning control |
| Tomato Paste 🍅 | 2 tbsp | High-quality, no added salt |
| Red Wine 🍷 | ½ cup | Bold variety like Cabernet Sauvignon |
| Balsamic Vinegar 🍶 | 1 tbsp | Aged variety for depth of flavor |
| Fresh Parsley 🌿 | ¼ cup | Chopped, for garnish and freshness |
The chuck roast is non-negotiable here—look for well-marbled cuts with visible fat distribution, which ensures moisture during cooking. Costco or Whole Foods typically carry high-quality boneless chuck roasts, but your local butcher shop may offer even better quality if you’re willing to pay a premium. If you’re buying a whole chuck roast, trim off excess fat and ask the butcher to remove the bone for you. Freshly ground black pepper and Diamond Crystal kosher salt are essential for seasoning, as they dissolve evenly and enhance flavor without overpowering. For the herbs, fresh rosemary and thyme provide aromatic depth that dried versions simply can’t match—trust me on this.
No red wine? Beef broth with a splash of balsamic vinegar delivers similar depth, though the acidity will be slightly less pronounced. Dried herbs work in a pinch, but use half the amount of fresh—so if the recipe calls for 0.5 tsp fresh thyme, use 0.25 tsp dried. Tomato paste can be substituted with 1 tbsp of crushed tomatoes if you’re in a bind, though the texture will differ slightly. The garlic and onion can be swapped for 2 cloves of garlic powder and 1 tbsp of onion powder, though fresh is always preferred. If you’re short on time, pre-chopped vegetables from the store are fine, but whole carrots and onions caramelize better during the slow cook.
This roast reheats beautifully—actually tastes better the next day as the flavors meld. Store leftovers in an airtight container in the fridge for up to 5 days, or freeze for 3 months by wrapping tightly in plastic wrap and aluminum foil. For meal prep, portion into individual servings before freezing to simplify reheating. The reverse-sear method means the roast is already cooked through, so you can safely refrigerate and reheat without worrying about overcooking. Garnish with fresh parsley just before serving to brighten the dish.
Why You’ll Love This Recipe
- Here’s what sold me: the crust. Searing the chuck roast first locks in juices while building a caramelized crust that’s dangerously good. The rosemary and garlic infuse into every bite, but it’s the smoky-sweet edge that makes this feel like a restaurant dish—not just another weeknight meal.
- One-Pan Magic: I swear by this recipe because it’s literally hands-off after the initial seasoning. Toss the roast with salt, pepper, smashed garlic, and rosemary—no fancy marinade, no extra pots—just sear it in a skillet, then finish in the oven. That’s it. My lazy Sundays just got an upgrade.
- Deep, Savory Crunch: Here’s what sold me: the crust. Searing the chuck roast first locks in juices while building a caramelized crust that’s dangerously good. The rosemary and garlic infuse into every bite, but it’s the smoky-sweet edge that makes this feel like a restaurant dish—not just another weeknight meal.
- Leftovers That Don’t Suck: Between us, most roast recipes leave you with dry, sad leftovers. Not this one. The chuck stays tender for days, so I make it on Sunday and repurpose it all week—sandwiches, tacos, or even a quick pasta toss. Honestly, the second day is when it really shines.
Step-by-step instructions for reverse-seared boneless chuck roast
This method guarantees perfectly tender meat with a crisp exterior every time.
Season and Sear the Roast
Pat the 2.5 lb boneless chuck roast dry with paper towels—this ensures maximum browning. In a small bowl, combine 1.5 tbsp kosher salt and 1.5 tsp freshly ground black pepper, then rub this mixture evenly over all sides of the roast. Let it sit at room temperature for 30 minutes while you prepare the aromatics.
Heat 2 tbsp extra-virgin olive oil in a large oven-safe skillet over medium-high heat. Once the oil shimmers, add the roast and sear for 4-5 minutes per side until deeply browned. The goal is to develop flavor and create a crust before the slow cook. Remove the roast and set it aside on a plate.
Build the Flavor Base
In the same skillet, add the 1 whole yellow onion cut into 1-inch chunks and the 4 whole carrots cut into 2-inch pieces. Cook for 5 minutes until the vegetables begin to soften. Add the 6 whole garlic cloves (smashed with the side of a knife), 0.5 tsp fresh rosemary, and 0.5 tsp fresh thyme. Stir for 1 minute until fragrant.
Pour in the 0.5 cup red wine and scrape up any browned bits from the bottom of the pan. Let it simmer for 2 minutes until reduced by half. Stir in the 2 tbsp tomato paste and 1 tbsp balsamic vinegar, cooking for another 1 minute to meld the flavors. This aromatic base will infuse the roast during the slow cook.
Slow Cook to Perfect Doneness
Return the roast to the skillet and pour in the 1.5 cups beef broth, ensuring the roast is partially submerged. Bring to a gentle simmer, then transfer the skillet to a 325°F oven. Cover loosely with aluminum foil and cook for 2.5-3 hours, or until the internal temperature reaches 195-200°F and the meat is fork-tender. This low-and-slow approach breaks down the connective tissue for maximum tenderness.
Check the roast after 2 hours—if the liquid reduces too quickly, add 1-2 tablespoons of water to maintain moisture. The key is patience; rushing this step will result in tough meat. The roast should pull apart easily when tested with a fork.
Finish with a Crisp Sear
Remove the roast from the oven and increase the oven temperature to 425°F. Let the roast rest for 5 minutes while you preheat the oven. Place the skillet back on the stovetop over high heat and sear the roast for 2-3 minutes per side until the exterior is deeply browned and crisp. This final sear locks in juices and creates the perfect contrast between the tender interior and crisp exterior.
Transfer the roast to a cutting board and tent loosely with foil. Let it rest for 10-15 minutes before slicing—this allows the juices to redistribute, ensuring each bite is moist and flavorful. Serve with the pan sauce (strain and reduce if needed) and garnish with 0.25 cup fresh parsley for a touch of brightness.
Pro Tips For Making 2.5 Lb Boneless Chuck Roast
- Sear First, Then Salt: The chuck roast needs that deep crust, so hit it with high heat for 3-4 minutes per side in a screaming-hot pan before you even think about seasoning. I used to salt early, but now I sear first—more flavor sticks, and the crust locks in moisture better.
- Crush Those Garlic Cloves: Whole garlic cloves on the surface? That’s just decoration. Smash them flat with the side of your knife or a garlic press before adding them to the pan—this way, they actually infuse the meat instead of just sitting there like garnish. (Yes, it’s a little messy, but it works.)
- Don’t Crowd the Pan: If you’re browning the roast in a skillet, resist the urge to add all the garlic and rosemary at once. Cook the meat first, then pull it out, add the aromatics, and let them sizzle for 30 seconds before returning the roast. This keeps the garlic from burning and the rosemary from turning to sawdust.
- Let It Rest—Seriously: That 2.5 lb roast is still working after you pull it from the heat. Tent it with foil and give it a solid 10 minutes before slicing, or you’ll end up with a pile of dry, sad meat. I know, I know—you’re hungry—but trust the process.
Best sauces and condiments for this recipe
Classic Red Wine Reduction
Use the 0.5 cup red wine and 1.5 cups beef broth from your cooking liquid to create a rich reduction. After removing the roast, simmer the pan sauce uncovered on the stovetop over medium-high heat for 8-10 minutes until reduced by half.
The wine’s bold Cabernet Sauvignon notes complement the beef beautifully. Finish with 1 tbsp balsamic vinegar for depth and a pinch of kosher salt to balance flavors. 🍷
Creamy Horseradish Sauce
For a tangy kick, blend ½ cup sour cream, 2 tbsp prepared horseradish, 1 tbsp Dijon mustard, and 1 tsp Worcestershire sauce until smooth. Adjust the horseradish to taste—start with 1 tbsp if you prefer milder heat.
This sauce adds a refreshing contrast to the rich beef and pairs perfectly with roasted potatoes or crusty bread. 🌶️
Mustard-Herb Pan Sauce
After searing the roast, deglaze the pan with 0.25 cup dry white wine (or apple cider vinegar) and scrape up all the browned bits. Stir in 1 tbsp whole-grain mustard, 1 tsp fresh thyme leaves, and 1 tbsp butter.
Simmer for 3-4 minutes until slightly thickened. This sauce adds a bright, herby note that cuts through the richness of the chuck roast.
Garlic-Butter Pan Sauce
For a simpler option, melt 2 tbsp butter in the pan after removing the roast. Add 2 minced garlic cloves and 1 tbsp minced shallot, cooking for 1 minute until fragrant.
Deglaze with 0.25 cup beef broth and simmer until slightly reduced. Finish with a squeeze of lemon juice for brightness. This sauce is quick, foolproof, and always impressive. 💛
Spicy Chipotle Sauce
Blend ½ cup sour cream, 1 tbsp chipotle paste, 1 tsp cumin, and 1 tsp lime juice until smooth. Adjust the chipotle to taste—start with ½ tbsp for mild heat.
This smoky, spicy sauce adds a bold contrast to the tender beef. Serve with sliced avocado or pickled red onions for extra texture. 🌶️
Nutrition facts
Frequently asked questions
Why does this recipe use the reverse-sear method instead of traditional cooking?
The reverse-sear method guarantees perfectly tender beef by cooking the roast slowly to 195-200°F first, which breaks down connective tissues. The final high-heat sear creates a flavorful crust without overcooking the interior. This approach works especially well with chuck roast, which benefits from slow cooking to become fork-tender.
Can I substitute red wine with another liquid?
Yes! Use 0.5 cup beef broth + 1 tbsp balsamic vinegar for similar depth, or 0.5 cup apple cider for a sweeter note. Avoid non-alcoholic wine substitutes—they lack the acidity and flavor complexity. The key is maintaining the same liquid volume and acid balance.
How do I know when the roast is fully cooked?
The roast is done when it reaches 195-200°F internally and pulls apart easily with a fork. Use a meat thermometer for accuracy—chuck roast should never be cooked to 165°F as it needs the higher temperature to become tender. The slow cook time varies by oven, so check after 2 hours.
What’s the best way to slice the roast for serving?
Slice against the grain (perpendicular to the muscle fibers) for the most tender pieces. Look for the direction of the grain when you remove the roast from the pan. Cut into ½-inch thick slices for easy serving. This technique prevents tough, chewy bites and makes each portion more manageable.
Can I make this recipe in a slow cooker instead of the oven?
Sear the roast first, then transfer it to a slow cooker with all ingredients (except red wine—use extra broth). Cook on low for 6-8 hours or high for 4-5 hours until tender. Finish with a quick pan sear to develop crust. The slow cooker method is perfect for hands-off prep!

- 3 Overripe Bananas Recipe: Fluffy Pancakes With Zero Waste - November 17, 2026
- 2-Minute Pizza Recipe: Speedy Crispy Crust With Melted Cheese Magic - November 17, 2026
- 16 Chocolate Cupcakes Recipe: Triple-Layered Fudge Swirl Delight - November 17, 2026