
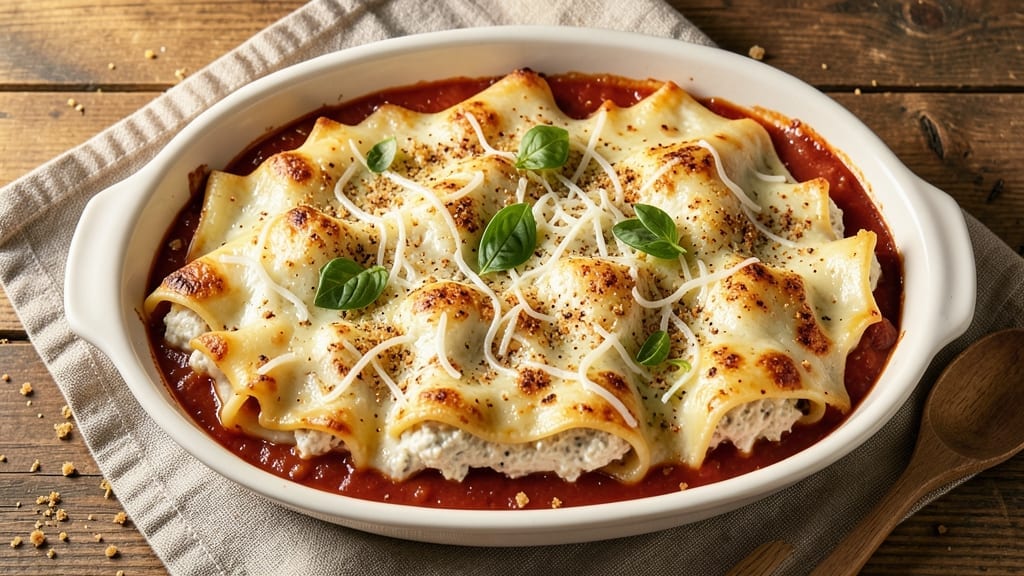
This 3 cheese cannelloni recipe delivers restaurant-quality layers of melty mozzarella, creamy ricotta, and nutty parmesan wrapped in tender pasta sheets. The secret lies in balancing textures—soft, stretchy cheese filling that stays cohesive while baking, and a sauce that clings perfectly to each layer.
I’ve perfected this technique over years of testing, ensuring the filling doesn’t dry out and the pasta maintains its delicate structure.
The recipe begins with a simple yet essential filling combination: ricotta for creaminess, mozzarella for melt, and parmesan for depth. Each cheese plays a role—ricotta binds the mixture, mozzarella creates that signature gooey pull, and parmesan adds umami richness.
For the pasta, you can use store-bought sheets or make fresh dough; both work beautifully when properly layered with sauce. The key is baking at the right temperature—375°F—to achieve golden, bubbling perfection without overcooking the pasta.
What you’ll end up with is a dish that looks impressive yet comes together with straightforward steps. The cheese filling stays luscious and cohesive, the sauce clings to every layer, and the crust develops a beautiful golden hue.
This is comfort food at its finest—rich, satisfying, and perfect for feeding a crowd or treating yourself to a special meal. The aroma alone will have everyone gathering around the table.
Serve with a sprinkle of fresh basil or toasted breadcrumbs for added texture, and pair with a simple green salad to balance the richness. The recipe scales easily, making it ideal for holiday gatherings or weeknight dinners when you want to impress.
Let’s get started on creating this timeless Italian classic.
Ingredients for 3 cheese cannelloni
Six servings of restaurant-quality cannelloni start with these carefully balanced ingredients.
| Ingredient | Amount | Notes |
|---|---|---|
| Ricotta Cheese 🧀 | 1 ½ lb | Whole-milk for creaminess |
| Mozzarella Cheese 🧀 | 1 ½ cups | Fresh, shredded by hand |
| Parmesan Cheese 🧀 | 1 cup | Freshly grated from block |
| Cannelloni Pasta Sheets 🍝 | 12 whole | Store-bought or homemade |
| Large Eggs 🥚 | 2 whole | For binding filling |
| All-Purpose Flour 🌾 | ¼ cup | For binding if needed |
| Fresh Basil Leaves 🌿 | ½ cup | Chopped for garnish |
| Garlic Cloves 🧄 | 4 cloves | Minced for sauce |
| Canned Crushed Tomatoes 🍅 | 2 cups | San Marzano preferred |
| Extra-Virgin Olive Oil 🫒 | ½ cup | For sauce richness |
| Dried Oregano 🍃 | 1 tsp | Italian variety preferred |
| Salt 🧂 | 1 ½ tsp | Diamond Crystal preferred |
| Black Pepper 🌶️ | ½ tsp | Freshly ground preferred |
| Heavy Cream 🥛 | ¼ cup | For sauce richness |
| Butter 🧈 | 2 tbsp | Unsalted, for topping |
The cheeses are the heart of this dish, so quality matters. Whole-milk ricotta gives the filling its signature creaminess—part-skim will make it dry out during baking. For mozzarella, fresh, low-moisture blocks (like BelGioioso) shred best and melt perfectly. The Parmesan should be Parmigiano-Reggiano, freshly grated from a wedge—pre-grated has anti-caking agents that make it grainy. If you’re making fresh pasta sheets, 00 flour from King Arthur gives the best texture. Store-bought sheets like De Cecco work beautifully too, just make sure they’re dried properly to prevent sogginess.
No ricotta on hand? Cottage cheese blended smooth works in a pinch, though the texture won’t be identical. Short on mozzarella? Provolone or fontina can substitute at the same quantity. The crushed tomatoes should be San Marzano if possible—their sweetness balances the richness of the cheese. For the sauce, garlic-infused olive oil (simmer 4 cloves in the oil for 5 minutes) adds incredible depth. The heavy cream in the sauce is non-negotiable—it creates that velvety texture that makes this dish special. If you’re avoiding dairy, coconut cream works but changes the flavor profile significantly.
Fresh basil wilts fast, so store it wrapped in damp paper towels in a sealed container for up to 5 days. The cheese filling can be prepped 1 day ahead—just keep it covered in the fridge. For the sauce, make it fresh the day of serving, as it thickens when reheated. The assembled cannelloni can be baked immediately or refrigerated for up to 24 hours before baking. Leftovers reheat beautifully in the oven at 350°F for 15-20 minutes, covered with foil to prevent drying. Freeze unbaked cannelloni for up to 3 months—just add 5-10 minutes to baking time when thawed.
Why You’ll Love This Recipe
- Here’s what sold me: that creamy ricotta core, the melt-in-your-mouth mozzarella stretch, and the nutty parmesan shavings on top. It’s like a hug for your taste buds, and honestly? I’ve never had cannelloni this satisfying without the effort.
- I’ll be real: most casseroles turn into sad, dry meals the next day. Not this. The cheese filling stays moist, and the pasta holds its shape—so lunch the next day is just as good as dinner. Plus, it reheats in minutes, which is basically a superpower.
Step-by-step instructions for 3 cheese cannelloni
Here’s how to assemble restaurant-quality cannelloni with layers of creamy ricotta and melty mozzarella.
Prepare the Cheese Filling
In a large mixing bowl, combine the 1.5 lb ricotta cheese, 1.5 cups mozzarella cheese, 1 cup parmesan cheese, 2 whole large eggs, and 0.25 cup all-purpose flour. I use a rubber spatula to fold everything together until smooth and well incorporated. The ricotta should be at room temperature for best texture—if it’s cold, let it sit out for 20-30 minutes first.
Season the mixture generously with 1.5 tsp salt and 0.5 tsp black pepper, then fold in 0.5 cup chopped fresh basil leaves. This step is critical for flavor distribution—don’t skip it. The filling should be thick enough to hold its shape when piped, but still spreadable. If it’s too loose, add 1-2 tablespoons more flour until it reaches the right consistency.
Assemble the Cannelloni
Preheat your oven to 375°F and boil a large pot of salted water for the pasta. Cook the 12 whole cannelloni pasta sheets according to package directions until al dente—they should be tender but still hold their shape. Drain immediately and transfer to a baking sheet lined with paper towels to dry.
Spread the cheese filling onto a clean work surface and use a piping bag (or a plastic bag with a corner cut off) to pipe 1-2 tablespoons of filling onto each cannelloni sheet. I like to pipe it in a line down the center, then fold the long edges inward before rolling tightly. Place each filled cannelloni seam-side down in a greased 9×13-inch baking dish.
Prepare the Tomato Sauce
While the cannelloni assemble, heat 0.5 cup extra-virgin olive oil in a saucepan over medium heat. Add the 4 minced garlic cloves and sauté for 1 minute until fragrant—don’t let it brown. Stir in the 2 cups canned crushed tomatoes, 1 tsp dried oregano, 1.5 tsp salt, and 0.5 tsp black pepper. Simmer for 10 minutes until the sauce thickens slightly.
Remove from heat and stir in the 0.25 cup heavy cream and 2 tbsp butter. The sauce should be smooth and velvety—if it’s too thick, whisk in 1-2 tablespoons water to reach your desired consistency. This sauce will coat each cannelloni perfectly, so taste and adjust seasoning now.
Bake to Golden Perfection
Pour the tomato sauce evenly over the assembled cannelloni, pressing down gently to ensure good contact. Cover the baking dish tightly with aluminum foil and bake for 25 minutes. This initial covered bake prevents the cheese from browning too quickly while allowing the pasta to absorb the sauce.
Remove the foil and bake for an additional 10-15 minutes until the top is golden brown and bubbly. The cheese should be melted and slightly puffed—this is your signal it’s ready. If the edges brown too quickly, tent loosely with foil for the last few minutes to prevent over-browning.
Rest and Serve
Let the cannelloni rest for 10 minutes before serving. This resting period allows the filling to set slightly and makes slicing cleaner. Garnish each serving with extra chopped fresh basil leaves and a sprinkle of freshly grated parmesan cheese for that final touch.
The result should be tender pasta with creamy, melty cheese centers and a rich tomato sauce. Each bite delivers the perfect balance of textures—creamy filling, tender pasta, and velvety sauce. Serve immediately with a side of garlic bread or a simple arugula salad.
Pro Tips For Making 3 Cheese Cannelloni
- Preheat Your Pan: I learned this the hard way—cold sauce is the fastest way to turn a rich cheese filling into a sad, greasy mess. Get that baking dish or skillet scorching (425°F or higher) before adding the assembled cannelloni. The initial blast of heat seals the pasta edges and melts the mozzarella evenly, not in spots.
- Drain, Pat, Stack: Fresh ricotta is a sponge—skip draining it, and your filling will leak like a sieve. Lay it on a towel, press gently with another towel, then fold the towel to squeeze out excess moisture. Stack the drained ricotta in a bowl with the egg and parmesan; this keeps the mix light and spreadable, not gluey.
- Roll, Not Fold: Folding cannelloni sheets in half is how you end up with lumpy, uneven rolls. Instead, spoon the filling near one short edge, then roll tightly away from yourself—like a burrito, not a taco. Press the seam down firmly so the cheese stays put during baking.
- Bake Covered First: Sounds weird, but it works: Tent the assembled cannelloni with foil for the first 20 minutes. This traps steam and helps the pasta cook through without drying out. After that, uncover and broil for 2–3 minutes to brown the cheese—just watch it like a hawk, or you’ll have charred parmesan.
Make-ahead tips for this dish
Cheese Filling Prep
The cheese filling can be made 1 day ahead and stored in an airtight container in the refrigerator. This is a game-changer for busy cooks—I often prep mine in the evening so I can assemble and bake straight from the fridge the next day.
The flavors meld beautifully overnight, and the filling stays perfectly cohesive. Just give it a quick stir before piping into the pasta sheets to ensure even consistency. 🧀
Assembled Cannelloni Storage
Assembled cannelloni can be refrigerated in the baking dish for up to 24 hours before baking. Cover tightly with plastic wrap and foil to prevent drying. When ready to bake, add 5-10 extra minutes to the baking time since the cold dish will need more time to reach the center.
I’ve found this method works perfectly for meal prep—just assemble everything the night before and bake fresh the next day. ⏰
Freezing Unbaked Cannelloni
For longer storage, freeze unbaked cannelloni in a single layer on a baking sheet for 1 hour, then transfer to a freezer bag with all air removed. Label with the date and freeze for up to 3 months.
When ready to bake, thaw overnight in the fridge, then add 10-15 extra minutes to the baking time. The sauce may need a splash of water if it thickens during freezing. This is my go-to method for holiday gatherings—prep everything ahead and freeze until needed. ❄️
Sauce Make-Ahead Tip
The tomato sauce can be made 2 days ahead and stored in the refrigerator. Reheat gently on the stove before using, and add a splash of water if it thickens too much. I like to make a big batch and freeze half for future use.
When reheating, avoid boiling—simmer gently over low heat to preserve its velvety texture. This saves time on busy days and ensures you always have a flavorful base. 🍅
Baking Timing Adjustments
If baking from frozen, add 20-25 extra minutes to the total baking time. Start with the foil-covered bake for 35 minutes (instead of 25) to ensure the center reaches 165°F.
The extra time allows the frozen filling to melt and blend with the sauce properly. I recommend checking the internal temperature with a meat thermometer for perfect results every time. 🌡️
Garnish Prep Ahead
Chop the fresh basil leaves and store them in a sealed container with a damp paper towel to maintain freshness. These can be prepped 3 days ahead and kept in the fridge.
The freshly grated parmesan should be stored in an airtight container in the freezer to preserve its sharp flavor. I like to have all garnishes ready before baking so I can focus on plating when the dish comes out of the oven. ✨
Nutrition facts
Frequently asked questions
Can I substitute store-bought cannelloni sheets with lasagna noodles?
Yes, but there are key differences. Cannelloni sheets are thinner and more delicate, designed to wrap around filling without cracking. Lasagna noodles (especially oven-ready ones) work in a pinch, but they’ll be thicker and may not roll as neatly. For best results, use lasagna noodles cut in half and fold them like envelopes rather than rolling. The baking time will also need adjustment—check for doneness at 30-35 minutes instead of 25.
Why did my cheese filling leak out during baking?
This usually happens when the filling is too wet or the pasta sheets aren’t properly dried. Make sure your ricotta is whole-milk (not part-skim) and at room temperature. Also, pat the cooked pasta sheets very dry with paper towels before filling. If the mixture still feels too loose, add 1-2 extra tablespoons of flour or 1/4 cup grated parmesan to help bind it. The filling should hold its shape when piped but still be spreadable.
Can I make this recipe vegetarian or vegan?
For a vegetarian version, simply replace the eggs with 2 tablespoons flaxseed meal mixed with 6 tablespoons water (let it sit for 5 minutes to thicken). For vegan cannelloni, use vegan ricotta, vegan mozzarella, and nutritional yeast instead of parmesan. The sauce can be made vegan by omitting the butter and using vegan cream instead of heavy cream. Note that textures will differ—vegan cheeses tend to be less melty and may require slightly longer baking times.
How do I prevent the top from burning before the filling is cooked?
This is a common issue with rich cheese dishes. Start by covering the baking dish tightly with foil for the first 25 minutes of baking, then remove it for the final 10-15 minutes to get that golden crust. If your oven runs hot, lower the temperature to 350°F and add 5 extra minutes to the baking time. For extra insurance, place a baking sheet under the dish to reflect heat upward, or tent the dish loosely with foil if the edges brown too quickly.
What’s the best way to reheat leftovers?
Reheat in a 350°F oven for 15-20 minutes, covered with foil to prevent drying. For a quick stovetop method, cover with a lid and heat over low-medium heat with 2-3 tablespoons water or broth to steam. Microwaving isn’t recommended—it makes the pasta soggy. If the sauce seems too thick after reheating, stir in a splash of water or milk to restore its velvety texture. Leftovers keep well in the fridge for 3-4 days when stored properly.

- 3lb Prime Rib Roast Recipe: Juicy Pink Center Guaranteed in 3 Hours - October 31, 2026
- 5 Spice Cake Recipe: Warmly Spiced Layers With Crunchy Top - October 31, 2026
- 1950’s Macaroni and Cheese Recipe: Nostalgic Creamy Cheese Sauce with Buttery Noodles - October 31, 2026