
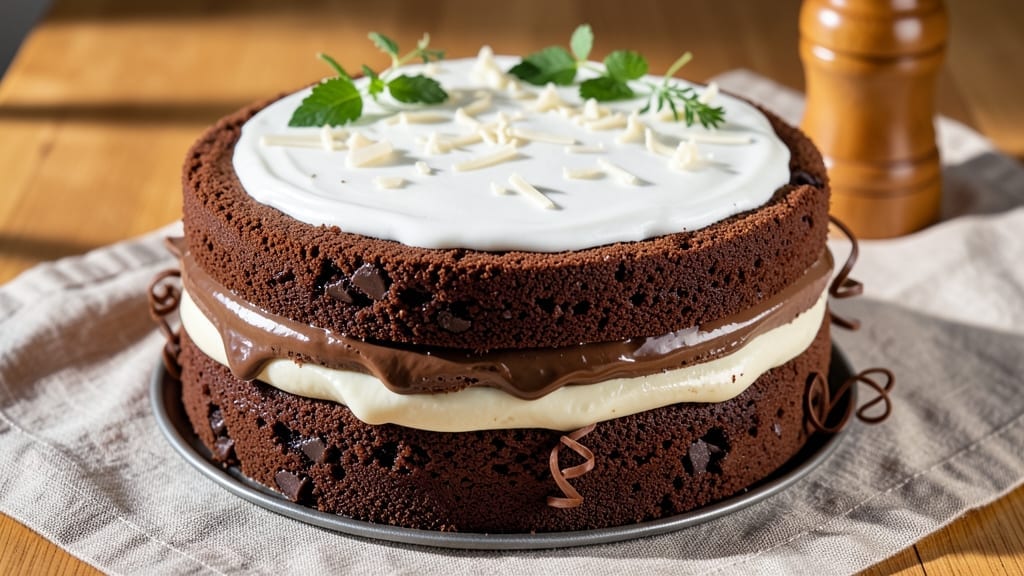
A 3-chocolate cake delivers decadence in every bite—moist, fudgy layers sandwiched between velvety frosting that melts at the touch. This recipe combines dark, milk, and white chocolate for a complex flavor profile that satisfies even the most discerning chocolate lovers.
The secret lies in precise baking techniques that prevent cracking and ensure a tender crumb, while the frosting achieves that signature glossy finish.
What sets this cake apart is the balance of textures: a dense, almost brownie-like base contrasts beautifully with a lighter, airier middle layer, all bound together by a rich chocolate buttercream.
Professional results come from simple ingredients—high-quality cocoa powder, melted butter, and a touch of espresso powder to deepen the chocolate flavor without bitterness. The recipe includes foolproof steps for layering and chilling, ensuring clean slices every time.
By the time you’re done, you’ll have a showstopping dessert that’s perfect for celebrations or indulgent weeknight treats. The combination of dark chocolate’s intensity, milk chocolate’s smoothness, and white chocolate’s sweetness creates a symphony of flavors that pairs beautifully with coffee or a glass of wine.
Each forkful delivers that perfect harmony of texture and taste.
For added elegance, consider piping swirls of ganache between layers or dusting with cocoa powder before serving. The cake keeps well for up to 5 days when stored properly, making it ideal for meal prep or gifting.
Ready to create a dessert that rivals bakery-quality? Let’s get started with this foolproof 3-chocolate cake recipe.
Ingredients for 3 chocolate cake
Twelve ingredients create a decadent triple-layered masterpiece with fudgy depth and velvety frosting.
| Ingredient | Amount | Notes |
|---|---|---|
| Unsalted Butter 🧈 | 2 cups | Room temperature, high-quality preferred |
| Granulated Sugar 🍚 | 3 ½ cups | Superfine preferred for smoother texture |
| Dark Chocolate Bars 🍫 | 8 oz | 70% cocoa, chopped finely |
| Milk Chocolate Bars 🍫 | 8 oz | High-quality, chopped finely |
| White Chocolate Bars 🍫 | 8 oz | Chopped finely for even distribution |
| All-Purpose Flour 🌾 | 3 cups | Sifted for light layers |
| Cocoa Powder 🍫 | 1 cup | Dutch-processed for smoothness |
| Espresso Powder ☕ | 1 tbsp | Enhances chocolate depth |
| Baking Powder 🧂 | 2 tsp | Freshly measured |
| Salt 🧂 | ½ tsp | Fine sea salt preferred |
| Large Eggs 🥚 | 6 whole | Room temperature, separated |
| Vanilla Extract 🌿 | 2 tsp | Pure Madagascar preferred |
| Heavy Whipping Cream 🥛 | 3 cups | Cold for stiff peaks |
| Powdered Sugar 🍚 | 4 cups | Sifted for smooth frosting |
The chocolate selection is non-negotiable—Ghirardelli or Valrhona bars elevate this recipe. For the cocoa powder, Dutch-processed brands like Callebaut ensure smoothness without bitterness. The espresso powder (I use Lavazza) deepens the chocolate flavor without adding bitterness, a professional baker’s trick. Room-temperature butter is critical—microwave in 20-second bursts until just soft. Sift the flour and cocoa powder together to prevent dense layers. The vanilla extract should be pure Madagascar—McCormick brand is reliable for consistent results.
No dark chocolate bars? Substitute with 1 cup extra cocoa powder plus 1/2 cup melted butter, but texture may vary. Milk chocolate can be swapped for white chocolate plus 1/4 cup cocoa powder, though flavor balance shifts. Running short on eggs? Flax eggs (1 tbsp ground flaxseed + 3 tbsp water per egg) work in a pinch, though texture will be slightly denser. For the frosting, whipped cream from a can (like Reddi-wip) cuts prep time but lacks richness—worth the extra effort for professional results. The powdered sugar should be sifted to avoid graininess in the final frosting.
Store the cake layers in an airtight container between parchment paper at room temperature for 2 days or refrigerated for 5 days. The frosting keeps separately for 3 days in the fridge. For longer storage, freeze fully assembled layers (unfrosted) for 3 months
Why You’ll Love This Recipe
- Here’s what sold me: the leftovers. This cake doesn’t dry out fast, so I can bake it ahead and still have moist slices days later. And because it’s made with bars instead of expensive baking chocolate, it’s a splurge that doesn’t break the bank. Win-win.
- Pantry-Friendly Magic: I swear by this recipe because it uses what I already have—no special trips to the store. Butter, sugar, and three kinds of chocolate bars? That’s it. The white chocolate adds a velvety contrast, the milk chocolate brings that classic richness, and the dark? Oh, it’s the star that keeps me coming back.
- Three-Layer Bliss: Honestly, the layers are where this cake shines. The dark chocolate base is deep and fudgy, the milk chocolate middle is creamy without being cloying, and the white chocolate top? It’s like biting into a cloud. Each forkful is a different story, and I love that.
- Birthday to Brunch: Between us, this cake works everywhere. Too fancy for a weekday? The layers feel special without being pretentious. Need a dessert for a crowd? It’s easy to double the batter. Even my coffee mornings get an upgrade when I slice a piece—trust me, it’s that good.
Step-by-step instructions for triple-layered chocolate cake
Mastering this decadent cake requires precision in layering and baking techniques.
Prepare the Chocolate Layers
Preheat your oven to 350°F and grease three 8-inch round cake pans thoroughly, then line the bottoms with parchment paper. In a stand mixer fitted with the paddle attachment, cream together the 2 cups unsalted butter and 3.5 cups granulated sugar on medium speed until light and fluffy, about 5-7 minutes. This step incorporates air, creating a tender crumb.
In a separate bowl, whisk together the 3 cups all-purpose flour, 1 cup cocoa powder, 2 tsp baking powder, 0.5 tsp salt, and 1 tbsp espresso powder. With the mixer running on low speed, add the dry ingredients to the butter mixture in three additions, alternating with the 6 whole large eggs beginning and ending with the flour mixture. Mix just until combined—overmixing develops gluten and makes the cake dense.
Fold in the 8 oz finely chopped dark chocolate bars, 8 oz milk chocolate bars, and 8 oz white chocolate bars by hand using a spatula. Add the 2 tsp vanilla extract and mix until just incorporated. Divide the batter evenly among the prepared pans, spreading it smoothly. Bake for 25-30 minutes or until a toothpick inserted into the center comes out clean. Let the layers cool in the pans for 10 minutes before transferring to a wire rack to cool completely.
Create the Chocolate Ganache
While the layers cool, prepare the ganache by combining the 8 oz dark chocolate bars, 8 oz milk chocolate bars, and 8 oz white chocolate bars (the remaining amounts) with 1 cup heavy whipping cream in a heatproof bowl. Place the bowl over a pot of simmering water, ensuring the bottom of the bowl doesn’t touch the water. Stir gently until the chocolate and cream melt completely and the mixture is smooth. Remove from heat and let it cool slightly to room temperature but still pourable.
Once cooled, whisk in the remaining 2 cups heavy whipping cream until the ganache reaches a thick, spreadable consistency. This ganache will serve as both a filling and a frosting, binding the layers together and adding luxurious richness. If the ganache thickens too much, gently reheat it and stir in a few drops of cream to restore its smooth texture.
Assemble the Cake Layers
Place the first cake layer on a serving plate or cake stand. Spread a thin layer of the ganache over the top, ensuring it reaches the edges. This creates a moisture barrier that prevents the layers from drying out. Place the second layer on top of the ganache, repeating the process with another layer of ganache. Finally, place the third layer on top.
Once all layers are stacked, pour the remaining ganache over the top and sides of the cake, allowing it to drip slightly for a decadent finish. Use an offset spatula to smooth the ganache evenly over the cake, creating a seamless, glossy surface. Chill the cake in the refrigerator for at least 2 hours to allow the ganache to set and the layers to meld together.
Prepare the Whipped Cream Frosting
In a chilled bowl, whip the remaining 1 cup heavy whipping cream with the 4 cups powdered sugar until soft peaks form. This light, airy frosting contrasts beautifully with the dense, fudgy layers. For added flavor, you can fold in a few tablespoons of the reserved ganache or a sprinkle of cocoa powder for a marbled effect.
Once the cake has chilled, spread the whipped cream frosting evenly over the top and sides of the cake, using the offset spatula to create smooth, even strokes. The contrast between the rich ganache and the delicate whipped cream adds visual appeal and balances the cake’s texture. Serve the cake at room temperature for the best experience, allowing the flavors to meld and the frosting to soften slightly.
Pro Tips For Making 3 Chocolate Cake
- CHOP CHOCOLATE SMALL: Chop the chocolate bars into ¼-inch pieces—not too fine, not too chunky. I learned this the hard way after a batch where the white chocolate clumped into gooey lumps instead of melting smoothly. A sharp knife or food processor set to pulse works best.
- MELT BUTTER SLOWLY: Don’t rush the butter—melt it over low heat or even microwave it in 20-second bursts. I used to dump it in boiling water like a fool, and it’d scorch before the chocolate had a chance to soften. Warm butter blends better with the sugar and chocolate.
- WEIGH THE CHOCOLATE: Skip the eyeballing—weigh the chocolate bars before chopping. Dark, milk, and white chocolate have wildly different densities, and using volume measurements (like “a handful”) leads to uneven layers. A kitchen scale takes 10 seconds and saves you from a cake that’s too bitter or too sweet in one spot.
- ROOM-TEMP BUTTER MATTERS: Take the butter out of the fridge 30 minutes before mixing. Cold butter traps air, which makes the cake dense and dry. I was skeptical until I tried it—I now keep a bowl of butter on the counter while I prep everything else. (Yes, even if you’re impatient like me.)
Perfect pairings for these flavors
Coffee Pairings
This triple-chocolate masterpiece and a bold espresso create a match made in heaven. The bitterness of dark roast cuts through the cake’s richness, cleansing your palate between bites. I recommend a double shot of freshly brewed espresso (about 2 oz) served alongside each slice.
For a lighter option, try a cortado—equal parts espresso and steamed milk—to balance the cake’s intensity without overwhelming it. ☕
Wine Complements
A glass of Portuguese Ruby Port (like Graham’s 20-Year-Old) enhances the cake’s chocolate complexity with its caramel and dried fruit notes. The wine’s sweetness mirrors the white chocolate layers while its depth complements the dark chocolate’s intensity.
For a non-alcoholic option, chocolate milk (made with whole milk and a splash of vanilla extract) mirrors the cake’s flavor profile perfectly. 🍷
Creamy Contrasts
Serve warm vanilla bean ice cream alongside for a creamy contrast that melts beautifully against the cake’s fudgy texture. I love using Häagen-Dazs Vanilla Bean for its rich, creamy consistency.
For a lighter option, whipped mascarpone with a drizzle of honey adds elegance without heaviness. The acidity of the honey brightens the chocolate flavors. 🥄
Spiced Enhancements
Add a sprinkle of cinnamon or orange zest to the cake’s presentation for a warm, aromatic touch. The citrus notes in orange zest elevate the white chocolate layers, while cinnamon adds subtle warmth.
For an extra indulgence, serve with chocolate-covered espresso beans—the coffee notes tie back to the cake’s espresso powder. 🍊
Seasonal Adaptations
In summer, pair the cake with chilled mint tea to refresh your palate between bites. The mint’s brightness contrasts perfectly with the chocolate’s richness. For winter gatherings, a spiced rum (like Captain Morgan Original) heated with a cinnamon stick adds cozy warmth.
The rum’s caramel notes enhance the cake’s depth. ❄️
Nutrition facts
Frequently asked questions
Can I substitute white chocolate in this recipe?
You can replace white chocolate with 8 oz milk chocolate plus 1/4 cup cocoa powder, but the flavor balance will shift toward milk chocolate dominance. For a true triple-chocolate experience, stick to the original recipe—white chocolate’s sweetness and smooth texture are irreplaceable for that signature melt-in-your-mouth quality.
Why did my cake crack on top?
Cracking usually happens from overmixing the batter or opening the oven door too soon. Mix just until combined (no streaks of flour) and avoid peeking! Let the cake cool completely in the pan for 10 minutes before transferring. For extra insurance, bake at 325°F instead of 350°F—this gives the center more time to set.
Can I make this cake in a single layer?
Reduce the batter to fit one 9-inch pan and bake for 35-40 minutes. The ganache will still work as a frosting, but you’ll lose the dramatic triple-layer effect. For a single-layer version, use 2 cups batter and adjust baking time accordingly. The flavor will be just as rich!
How do I store leftover cake?
Keep the fully assembled cake in an airtight container at room temperature for 2 days or refrigerate for up to 5 days. For longer storage, freeze the unfrosted layers (wrapped individually) for 3 months. Thaw overnight in the fridge before reassembling. The ganache will soften slightly when chilled—bring it to room temperature before serving for the best texture.
What’s the best way to make this cake gluten-free?
Replace the all-purpose flour with a 1:1 gluten-free baking flour blend (like Bob’s Red Mill) and add 1 tsp xanthan gum. Reduce the baking powder to 1.5 tsp to prevent over-rising. Test the cake immediately after baking—gluten-free versions often need slightly longer baking times (35-40 minutes). The texture will be slightly denser but still delicious!

- 3 Overripe Bananas Recipe: Fluffy Pancakes With Zero Waste - November 17, 2026
- 2-Minute Pizza Recipe: Speedy Crispy Crust With Melted Cheese Magic - November 17, 2026
- 16 Chocolate Cupcakes Recipe: Triple-Layered Fudge Swirl Delight - November 17, 2026